In the ever-evolving landscape of IT, virtualization has established itself as an irreplaceable cornerstone. While various platforms offer virtualization services, Microsoft’s Hyper-V stands out as a robust, scalable, and user-friendly option. If you’re an IT professional, chances are you’ve come across Hyper-V at some point in your career. With its intricate features and multi-faceted architecture, Hyper-V serves as the backbone for many virtualized environments.
However, just like any piece of complex software, Hyper-V is not immune to errors and glitches. These can disrupt the virtual environment, impact productivity, and ultimately cost both time and resources to fix.
Understanding Hyper-V Architecture
Components
At the heart of Hyper-V lies its architecture—a complex system of interlocking components designed to deliver virtualization services seamlessly. Understanding these parts can be crucial when you’re trying to solve any glitches. The main components are:
Hypervisor: This is the core of Hyper-V. It manages the distribution of system resources to each virtual machine (VM).
Virtual Machines: These are the simulated systems running on your host machine.
Virtual Hard Drives (VHDs): These files act like physical hard drives but are flexible and can be easily moved and resized.
Virtual Network: This includes all networking components, such as switches, adapters, and configurations that tie your virtual world together.
Workflow
Hyper-V operates using a straightforward but effective workflow. It begins with the Hypervisor that sits directly on the hardware and oversees all system resources. Above the Hypervisor, there’s a parent partition running a version of Windows, Linux, or other compatible OS, which in turn hosts multiple child partitions where the VMs reside.
Understanding this architecture is not just academic curiosity; it’s practical knowledge that can help you pinpoint the root cause of issues more effectively. For instance, knowing the difference between Gen 1 and Gen 2 VMs could be crucial in troubleshooting. To dig deeper into the intricacies of Hyper-V architecture, check out this comprehensive guide.
Common Errors and Their Symptoms
Understanding common errors and their symptoms is the first line of defense in effective troubleshooting. By recognizing the signs early, you can nip issues in the bud before they escalate into full-blown problems.
Configuration Errors
These types of errors often occur during the initial setup or during major changes in the Hyper-V environment. They can involve network settings, storage configurations, and even Hyper-V Manager settings. If you notice connectivity issues or unexpected VM behavior, it might be worth taking a closer look at your configuration settings.
Performance Issues
Performance problems can manifest in various ways, such as slow VM boot-up, laggy applications, or even complete system hang-ups. Several factors could be at play here, from CPU overload to memory deficits. These issues may require in-depth analysis to solve but identifying them early can save you a lot of trouble down the line.
Network Errors
Network-related errors can be among the most frustrating to troubleshoot. Symptoms can range from disconnected VMs, latency issues, to DNS resolution failures. The root cause is often elusive but could include everything from misconfigured Virtual NICs to VLAN tagging errors.
Virtual Machine Failures
When a VM fails to start, or experiences data corruption, it’s usually a sign of a deeper problem within your Hyper-V environment. Boot failures and data corruption are telltale signs of virtual machine problems. It’s crucial to identify the cause quickly to minimize downtime.
Recognizing common errors and their symptoms is the cornerstone of effective troubleshooting. A detailed understanding can not only help in solving current issues but can also assist in the prevention of future problems. For more tips on Hyper-V best practices that can help prevent common issues, check out this article.
Identifying Errors: Where to Look
Finding the root of a problem is half the battle won. Knowing where to look can drastically reduce your troubleshooting time. Here are some quick pointers on where you can spot these common errors:
Event Viewer
This built-in Windows tool is often the first stop for any IT professional. For Hyper-V related issues, the Hyper-V-VMMS and Hyper-V-Worker admin logs can be particularly useful. Here you’ll find error codes and descriptions that can guide you to the problem’s origin.
Hyper-V Manager
Hyper-V Manager not only allows you to configure and manage your virtual machines but also provides feedback in the form of statuses and error messages. For example, if a VM fails to start, Hyper-V Manager will display an error message that can clue you in on what went wrong.
Performance Monitor
For performance-related issues, the Performance Monitor tool can be invaluable. You can set up specific counters for CPU, Disk I/O, and network usage to monitor the performance of your Hyper-V host and the VMs running on it.
PowerShell Scripts
PowerShell is a powerful tool for automating tasks and retrieving information. Numerous Hyper-V related PowerShell cmdlets can be used to gather detailed information about your virtual machines and their current state, offering another route to identify issues.
Third-Party Tools
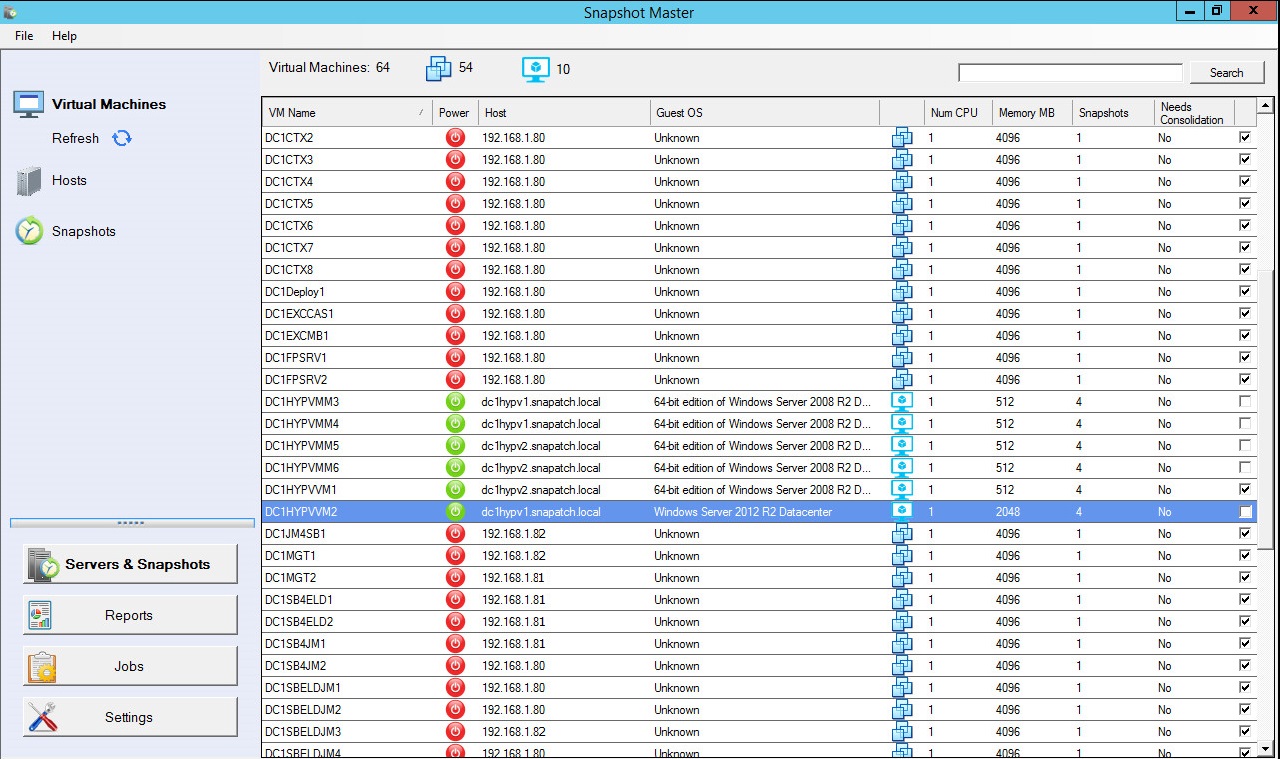
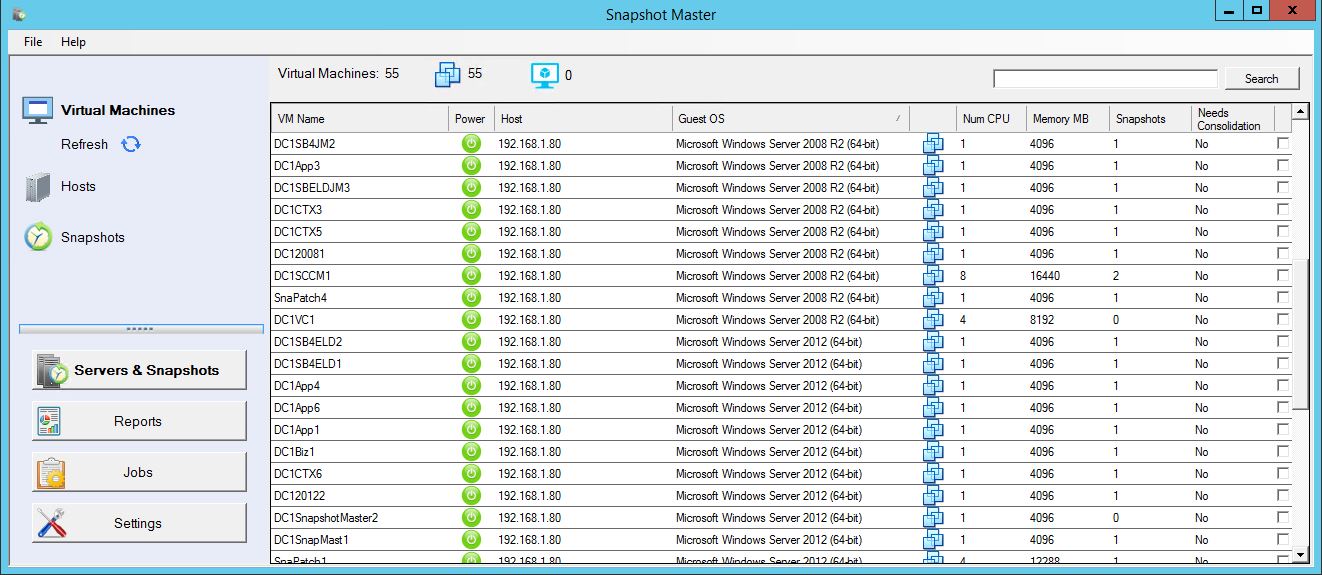
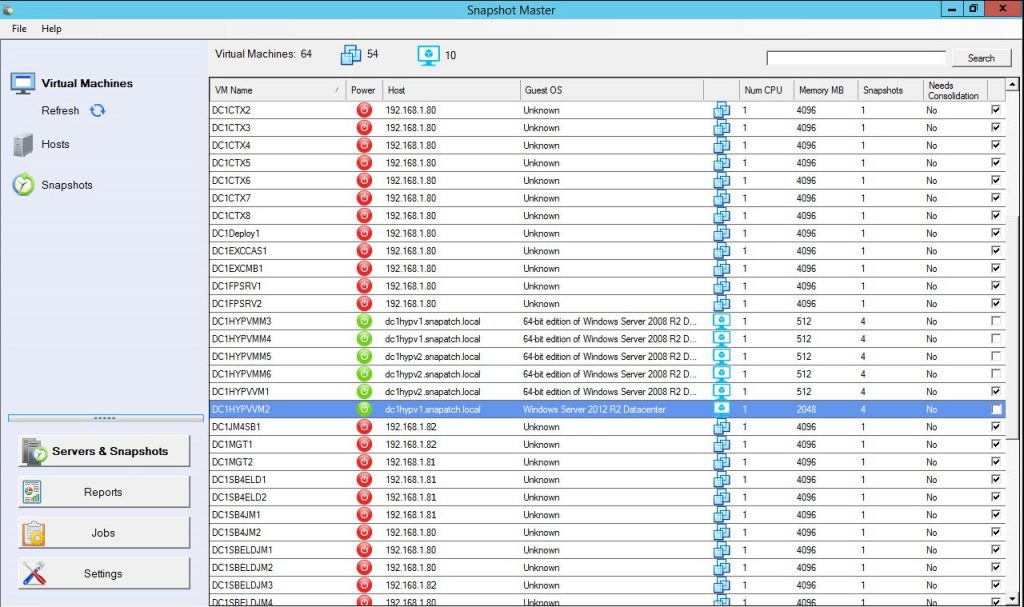
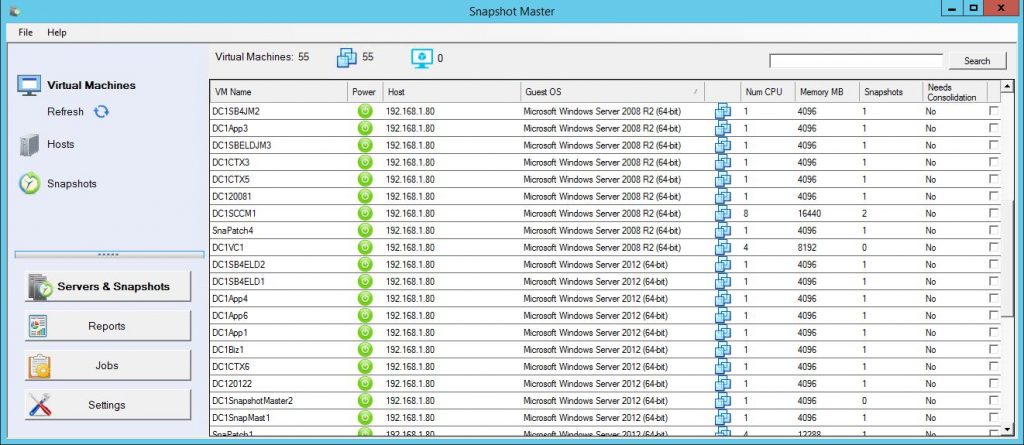
There are specialized third-party tools designed to manage and monitor Hyper-V environments. For instance, Snapshot Master offers comprehensive reports on all your VM snapshots, allowing you to spot issues that may not be immediately apparent through native tools.
By knowing where to look, you’re well-equipped to start the troubleshooting process effectively. Armed with this information, diagnosing issues can become a less daunting task.
Diagnosing and Fixing Common Errors
Now that you know the types of errors you might encounter and where to look for them, let’s dive into the nitty-gritty of diagnosing and fixing these common glitches.
How to Diagnose Configuration Errors
Check Network Settings: In the Hyper-V Manager, ensure that your virtual switches are correctly set up. Verify IP addresses and subnet masks to ensure they’re in the correct range.
Verify Storage Paths: Make sure that the paths to your VHDs are correct. Inaccessible or incorrect paths can lead to VM start-up failures.
User Permissions: Ensure that the users have the necessary permissions to access the resources they need.
Fixing Performance Issues
Optimize Resource Allocation: Use Performance Monitor to check if the system resources are being overutilized. If so, consider redistributing resources or adding more to the Hyper-V host.
Update Drivers and Software: Outdated software can often be the culprit. Make sure you’re running the latest versions of all drivers and software.
Check for Malware: Performance issues can also be caused by malware affecting your system. Run a complete malware scan to rule out this possibility.
Resolving Network Errors
Examine Virtual Network Configuration: Incorrect settings here can lead to various network issues. Make sure VLAN IDs and subnet configurations are accurate.
Reset Winsock Configuration: Sometimes, resetting the Winsock catalogue can resolve network issues. Use the command netsh int ip reset in the Command Prompt.
Check Firewall Rules: Sometimes, firewall configurations can interfere with Hyper-V’s network communication. Make sure the necessary ports are open.
Rectifying Virtual Machine Failures
Check Event Logs: As mentioned earlier, the Event Viewer can offer valuable insights into what went wrong. Look for any Critical or Error events that might point to the issue.
Repair VHDs: Corrupt VHD files can cause a VM to fail. Use Hyper-V’s native tools or third-party software to repair these files.
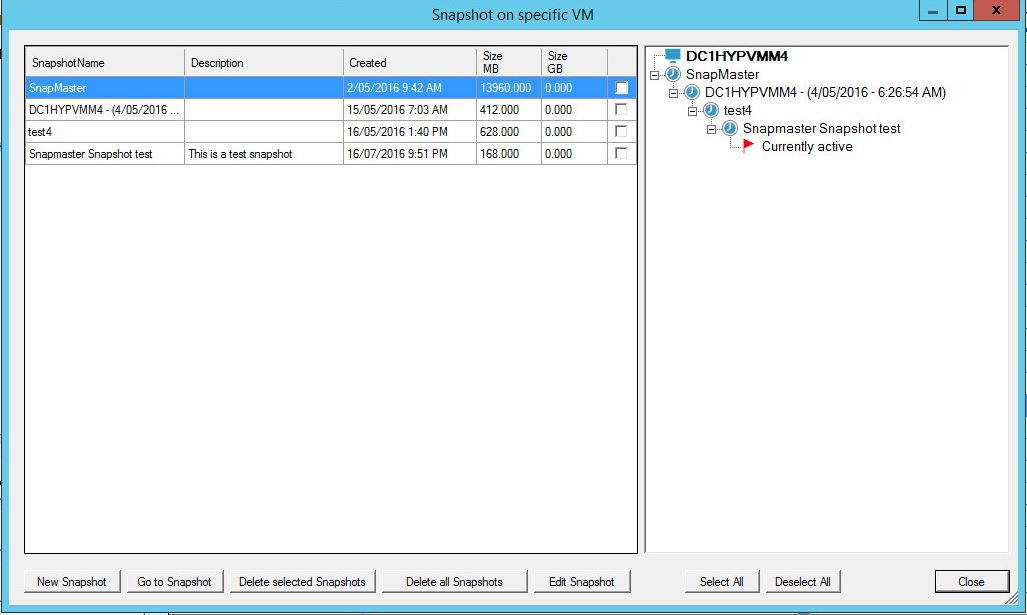
Snapshot Management: Sometimes, lingering snapshots can cause VM failures. Managing these effectively can often resolve the issue. For detailed insights into how to manage VM snapshots, here is a complete guide.
Now that we’ve covered some of the most frequent Hyper-V errors and how to fix them, you’re better equipped to manage your virtual environment efficiently.
Enhancing Your Troubleshooting Game
While native Hyper-V tools are robust and offer a plethora of features for troubleshooting, sometimes, a third-party tool can offer that extra edge in managing your virtual environment. These tools often come with specialized functionalities that can make your life a lot easier.
Snapshot Master: An All-in-One Solution
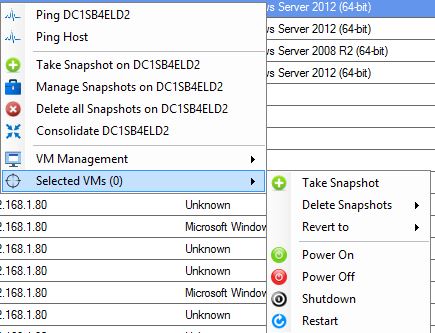
You’ve probably been through the painstaking process of manually managing snapshots or scripting out automated jobs. What if you could simplify this into a few clicks? Meet Snapshot Master by SmiKar, an all-encompassing tool designed to make snapshot management a breeze.
Features of Snapshot Master
Automated Snapshot Creation: No more late nights or weekends spent creating snapshots. Automate the process and sleep easy.
Comprehensive Management Dashboard: Keep track of all your snapshots across VMware, Hyper-V, and Azure platforms from a single pane.
Scheduled Snapshot Deletion: Keep your storage optimized by setting up rules for snapshot deletion.
Benefits
Saves Time and Resources: Automation means you can allocate your precious IT resources elsewhere.
Enhanced Reliability: With set-and-forget automation, human error is significantly reduced, thereby improving your system’s reliability.
Not only does it offer a robust snapshot management solution, but Snapshot Master also serves as a reliable tool for backup and disaster recovery. Here is how to use Snapshot Master effectively.
Preventive Measures: Best Practices for Hyper-V
An ounce of prevention is worth a pound of cure. While it’s crucial to know how to troubleshoot issues, implementing some best practices can help avoid many problems from arising in the first place.
Regular Updates and Patches
Ensure that your Hyper-V environment is always updated with the latest patches and updates. This can improve performance and fix known bugs, reducing the likelihood of encountering issues.
Resource Allocation
Ensure that your Hyper-V host has enough resources to manage all the VMs adequately. Overloading your host can lead to performance issues for all the VMs it hosts.
Keep an eye on CPU, memory, disk, and network metrics. Use Performance Monitor or third-party tools to set up alerts for abnormal behavior.
Network Configuration
Ensure that your network configurations, including VLAN settings and virtual switches, are set up correctly. This will reduce the risk of network-related issues.
Even if there’s no immediate issue, regularly checking the Event Viewer can help you spot potential problems before they turn into actual issues.
Limit Administrative Access
The fewer people who have admin access to your Hyper-V setup, the lower the risk of human errors that could lead to problems. Only grant access to trusted and trained personnel.
Compliance Checks
Regularly check your system for compliance with internal policies and regulatory standards. This can often prevent issues that may arise due to non-compliance.
Implementing these best practices can make your Hyper-V management experience much smoother and reduce the frequency and impact of issues.
Conclusion
Troubleshooting in Hyper-V doesn’t have to be a daunting task. Armed with the right knowledge, tools, and best practices, you can efficiently manage your virtual environment. From understanding common errors and their symptoms to using third-party tools like Snapshot Master, there’s a lot you can do to simplify this process. So, are you ready to take control of your Hyper-V setup? Why not give Snapshot Master a try and simplify your Hyper-V management today!
Frequently Asked Questions
Q1: Where can I find Hyper-V logs for troubleshooting?
Answer: The Event Viewer under Hyper-V-VMMS and Hyper-V-Worker admin logs is a good place to start.
Q2: What are some common Hyper-V performance issues?
Answer: CPU overutilization, disk I/O bottlenecks, and network latency are some common performance issues.
Q3: Can third-party tools integrate with Hyper-V?
Answer: Yes, many third-party tools like Snapshot Master are designed to integrate seamlessly with Hyper-V.
Q4: Are snapshots a good backup strategy for Hyper-V?
Answer: Snapshots are useful but should not replace a comprehensive backup strategy. Learn more about it here.
Q5: How can I update Hyper-V?
Answer: You can update Hyper-V through Windows Update or download specific patches from Microsoft’s website.
I hope this article serves as a comprehensive guide for all your Hyper-V troubleshooting needs. Feel free to try out Snapshot Master to see how it can make your life easier!
Hyper-V has rapidly become an indispensable tool in the system administrator’s toolkit. Not only does it provide a robust, feature-rich platform for virtualization, but it also seamlessly integrates with Windows Server, making it a must-have for any Windows-based enterprise environment. As a system administrator, you’ve probably realized that managing Hyper-V manually through its GUI can be time-consuming. That’s where PowerShell steps in, offering automation capabilities and more nuanced control of your Hyper-V environment.
Why Use PowerShell for Hyper-V Management
PowerShell and Hyper-V together are like Batman and Robin for system administrators. PowerShell brings with it an extensive range of commands specifically tailored for Hyper-V management. This means you can manage virtual machines, set configurations, and even perform monitoring tasks without having to click through countless windows. Plus, PowerShell allows you to automate repetitive tasks, so you can set it and forget it, freeing up more time for you to deal with those pressing tickets piling up in your inbox.
What to Expect in this Article
This article will serve as your comprehensive guide to understanding Hyper-V PowerShell commands. Whether you’re new to Hyper-V or you’ve been a sysadmin for years, we’ll walk you through the essential commands, how to automate tasks, and best practices for optimizing your virtual environment.
Understanding Hyper-V PowerShell Module
What Is Hyper-V PowerShell Module
The Hyper-V PowerShell module is a set of cmdlets for managing Hyper-V that are available in the Hyper-V role on Windows Server. These cmdlets enable the automation of the Hyper-V platform, allowing you to orchestrate and automate virtual machine deployments, configurations, and even the underlying storage and networking components. Think of it as the control panel of your virtualized environment, but with the ability to script every knob and button.
Installing the Hyper-V PowerShell Module
The Hyper-V PowerShell module is typically installed by default when you install the Hyper-V role on Windows Server. However, if for some reason it isn’t installed, you have two methods for installing it:
Using Install-WindowsFeature
The Install-WindowsFeature cmdlet enables you to install specified roles, role services, and features on a computer that is running Windows Server. It’s as simple as running Install-WindowsFeature -Name Hyper-V -IncludeAllSubFeature.
Using Enable-WindowsOptionalFeature
If you prefer a more granular approach, the Enable-WindowsOptionalFeature cmdlet allows you to enable or disable optional features in Windows. Here, you’d simply run Enable-WindowsOptionalFeature -Online -FeatureName Microsoft-Hyper-V-All.
Importing the Hyper-V Module into Your Session
Once you’ve confirmed the Hyper-V PowerShell module is installed, you can import it into your PowerShell session by using the Import-Module Hyper-V command. This will give you access to all the Hyper-V cmdlets, effectively turning your PowerShell session into a control center for managing Hyper-V.
Essential Hyper-V PowerShell Commands
Basic Commands
Now that you’re equipped with the background knowledge and have the Hyper-V PowerShell module at your fingertips, let’s delve into the essential commands. When you’re starting out, these are your bread and butter.
Get-VM
The Get-VM command allows you to retrieve the state, status, and other important details of virtual machines. It’s the first thing you’d typically run when you log in, giving you an overview of what’s running, what’s stopped, and what’s in a critical state.
New-VM
Creating a new VM is as easy as pie with the New-VM command. By specifying parameters like name, the path where the VM files will be stored, and initial configurations, you can spin up a new VM in no time.
Start-VM and Stop-VM
Starting and stopping VMs are basic tasks that you’ll often need to do. The Start-VM and Stop-VM commands let you do this efficiently, without having to navigate through the GUI. If you need to force stop a VM, the -Force switch is your go-to option.
Advanced Commands
As you gain more experience, you’ll find yourself wanting to do more than just the basics. That’s where advanced commands like Set-VMProcessor, Convert-VHD, Add-VMHardDiskDrive, and Remove-VMHardDiskDrive come in. These allow you to modify VM configurations, convert VHD files to different formats, add or remove hard disk drives, and more.
Monitoring Commands
Keeping an eye on resource usage is a crucial part of system administration. Hyper-V PowerShell offers a range of monitoring commands like Get-VMHost, Measure-VM, and Get-VMResourceMetering that allow you to keep tabs on VM performance, the Hyper-V host’s capabilities, and even measure the resources consumed by individual VMs.
Troubleshooting Commands
When things go south, and they inevitably will at some point, you have a toolbox of troubleshooting commands at your disposal. Test-VMReplicationConnection can test the connection between two Hyper-V hosts, while Repair-VM can be used to fix a malfunctioning VM.
Command Reference Table
Command
Switch
Description
Get-VM
-Name
Retrieves the state of a specified VM
New-VM
-Name, -Path
Creates a new VM with specified parameters
Start-VM
-Name
Starts a specified VM
Stop-VM
-Name, -Force
Stops a specified VM, with the option to force shutdown
Tests the replication connection between two hosts
Repair-VM
-Name
Repairs a malfunctioning VM
Automation with Hyper-V PowerShell Scripts
Automation is not just a buzzword; it’s a lifesaver for system administrators. Hyper-V PowerShell scripts allow you to automate routine tasks, thereby freeing you up to focus on more pressing issues. While the basics are great for day-to-day management, mastering automation scripts can
transform you from a regular sysadmin to a Hyper-V wizard. The idea is simple: you write a PowerShell script using the commands you’ve learned, specify triggers or schedules, and let the system do the work for you. It’s like setting up a bunch of dominos, then just tapping the first one and watching them all fall down in perfect order.
For instance, let’s say you need to run backups for all your VMs. Instead of going through each one, you could write a script that uses Checkpoint-VM to create snapshots, then stores them in a designated location. Once written, you can schedule this script to run at a specific time, say 2:00 a.m., when server traffic is at its lowest.
Another powerful use-case for automation is in scaling operations. Suppose you monitor your virtual machines and notice they’re consistently hitting high CPU usage. Instead of manually allocating more resources, a well-crafted PowerShell script could automatically add extra CPUs to VMs reaching a certain threshold, without any downtime or manual intervention.
Best Practices for Using Hyper-V PowerShell Commands
While PowerShell offers incredible utility, it also demands responsibility. A wrongly executed command can have significant consequences, so it’s vital to follow best practices.
Test Commands in a Sandbox Environment: Before running any new commands or scripts on your production environment, test them in a sandbox. It’s like the rehearsal before the grand play; if something goes wrong, it’s far better for it to happen here.
Document Your Scripts and Commands: Good documentation serves as a roadmap for anyone who follows, ensuring that they understand the what, why, and how behind each command or script.
Use Commenting Liberally: When writing scripts, always add comments to explain what each part does. A few months down the line, even you might not remember why you wrote a particular line of code.
Limit the Scope of Administrative Privileges: Not every script or task needs full admin rights. Limit the scope to what’s absolutely necessary for that specific task to minimize security risks.
Regularly Update and Review Scripts: As your infrastructure evolves, so should your scripts. Regular updates and reviews ensure they remain effective and secure.
Conclusion
PowerShell’s integration with Hyper-V provides system administrators with a powerful set of tools to manage and automate tasks in virtual environments. By understanding and utilizing the available commands and following best practices, you can streamline operations, enhance efficiency, and bolster the security of your virtual machines. So why click when you can script? Elevate your sysadmin game and make PowerShell your go-to tool for managing Hyper-V.
FAQs
Is the Hyper-V PowerShell module automatically installed with Hyper-V?
Typically, yes. The module is usually installed by default when you add the Hyper-V role. However, it’s always good to double-check and manually install if necessary.
Can I manage multiple Hyper-V hosts using PowerShell?
Absolutely. PowerShell enables you to manage multiple Hyper-V hosts through remote sessions. Commands like Enter-PSSession or Invoke-Command can help you administer multiple hosts efficiently.
How do I find a list of all available Hyper-V PowerShell commands?
You can list all the Hyper-V cmdlets available to you by running Get-Command -Module Hyper-V. This will provide a complete list, and you can dive into each command’s specifics with Get-Help <CommandName>.
Is it safe to run PowerShell scripts for critical operations?
Provided you have thoroughly tested and documented your scripts, using PowerShell for critical operations is generally considered safe and efficient. Always make sure to run new scripts in a sandbox environment first.
Can I revert actions taken through PowerShell on Hyper-V?
The reversibility of actions depends on what you’ve done. While some actions, like creating or deleting VMs, are irreversible, changes to configurable settings like memory or CPU allocation can usually be undone.
What are the benefits of automating tasks in Hyper-V with PowerShell?
Automation saves time, reduces the chances of human error, and allows you to focus on more critical tasks. It’s an efficient way to manage resources and can be particularly helpful in scaling operations.
How can I schedule PowerShell scripts to run at specific times?
You can use the Task Scheduler in Windows to run PowerShell scripts at specified times. Just set up a new task that triggers the script and define your preferred timing.
Do I need administrative rights to run Hyper-V PowerShell commands?
Many Hyper-V PowerShell commands do require administrative rights to execute, especially those that make changes to VM configurations. However, you should always apply the principle of least privilege and use only the permissions necessary for the task at hand.
Is there a way to log the output of PowerShell commands for auditing?
Yes, you can redirect the output of PowerShell commands to a text or log file for auditing purposes. Simply append > Output.txt or >> Output.txt to save the output to a file.
Can I use PowerShell to manage Hyper-V on remote servers?
Yes, PowerShell remoting allows you to manage Hyper-V instances on remote servers. You’ll need to set up remoting with commands like Enable-PSRemoting and use Enter-PSSession or Invoke-Command to execute commands on the remote server.
Command Line Interface (CLI) for VMware is not just a feature but a cornerstone for effective virtualization management. Think of it as the hidden trapdoor that takes you straight to the control room of a spaceship. It’s less fancy than the graphical user interface (GUI), but it gets you direct access to the nuts and bolts of your VMware environment.
Importance of CLI over GUI
While GUIs are visually appealing and easier for beginners, they can be restrictive. The CLI allows for a level of granularity and automation that you simply can’t achieve with a GUI. It’s like comparing a multi-tool Swiss knife (CLI) with a regular knife (GUI); both have their uses, but one clearly offers more functionality.
Carbon Hypervisor Screen
Prerequisites
Setting Up the VMware Environment
Before you start commanding your virtual empire, you’ll need to install VMware and set up your virtual environment. This is the equivalent of setting up your chess board before starting the game. You’ll need to ensure you have the proper hardware requirements, software dependencies, and sufficient storage space.
Gaining CLI Access
Once your environment is set up, gaining access to the CLI is your next step. This usually involves opening a terminal window within your VMware environment or connecting remotely via SSH (Secure Shell). It’s like unlocking the door to your control room with a special key.
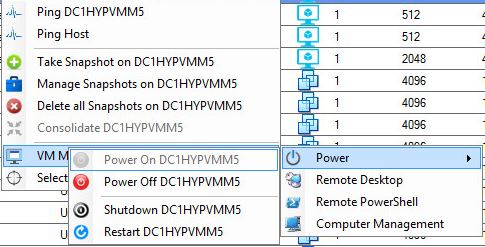
SnapShot Master Power On
Virtual Machine Management
Creating a New VM
A virtual machine (VM) in VMware is like a simulated computer running within your physical computer. Creating a new VM via the CLI is akin to setting up a new office in an empty room. You need to define its size (disk space), capacity (RAM and CPU), and connections (networking). The primary tool for this is a configuration file with a .vmx extension, which acts as your blueprint. Here, you define parameters like memsize, numvcpus, and ethernet0.connectionType.
Starting, Stopping, and Suspending VMs
Just as you wouldn’t leave all the devices in your house running when you’re not using them, you also need to manage the state of your VMs effectively. VMware CLI provides simple yet powerful commands for these operations. For instance, the vmware-cmd /path/to/vm.vmx start command fires up your VM, while vmware-cmd /path/to/vm.vmx stop will shut it down. To pause it, you’d use vmware-cmd /path/to/vm.vmx suspend, effectively freezing the VM’s state for later use.
CLI Commands: The Core Syntax
Essential Commands for Beginners
As a beginner, you don’t have to know all the commands; you just need to master a few to get started. Here are some essentials:
vmware -v: Displays the installed VMware version.
vmrun list: Lists all running VMs.
vmware-cmd: The Swiss Army knife of VMware CLI, used for various operations such as creating, modifying, and controlling VMs.
Advanced Commands for Seasoned Users
For those who are more comfortable, diving deeper into VMware CLI’s command set can unlock powerful functionalities. Commands like vicfg-vswitch for intricate network configurations or esxtop for real-time system monitoring are tools that offer granular control over your environment.
Network Management
Configuring Virtual Networks
Networks are the highways that data travels on, and managing them efficiently is paramount. VMware CLI allows you to configure virtual switches, port groups, and more. For example, to create a new virtual switch, you can use the vicfg-vswitch command:
vicfg-vswitch --add vSwitch1
This command is akin to laying down a new highway for your data to travel. You’re essentially giving your virtual machines more lanes to move data around.
Understanding NAT and Bridged Modes
In VMware, the NAT (Network Address Translation) and Bridged modes define how your VM interacts with your network. Bridged mode allows the VM to appear as its own entity on the network, whereas NAT places the VM behind a private network. It’s like deciding whether you want your kid to have their own room (Bridged) or share it with a sibling (NAT). The CLI lets you toggle these settings, tailoring each VM’s network access according to your needs.
SnapShot Master Home Screen
Storage and Disk Management
Creating Virtual Disks
The primary command for creating a new virtual disk is vmkfstools. For instance, to create a 10GB disk, you would run:
vmkfstools -c 10G NewVirtualDisk.vmdk
This would allocate a 10GB disk with the label “NewVirtualDisk.”
Managing Disk Space
Over time, as data accumulates, you might need to expand your disk. The CLI makes this straightforward:
vmkfstools -X 15G NewVirtualDisk.vmdk
This resizes the disk to 15GB. This action is similar to extending a partition on a physical drive. But remember, you’ll also need to resize the partition inside the VM to make use of the new space.
Resource Allocation and Monitoring
Allocating CPU and Memory
Let’s say you have a VM that’s sluggish and needs a power boost. You can reallocate resources like CPU and RAM using various CLI commands or by directly editing the VM’s .vmx configuration file.
vi /path/to/your/vm.vmx
Inside this file, you can modify the numvcpus and memsize parameters to adjust the number of CPUs and RAM size, respectively.
Monitoring Tools in VMware CLI
Awareness is key to maintaining a healthy virtual environment. VMware CLI has commands like esxtop for real-time monitoring. It shows you an ocean of metrics like CPU usage, memory usage, and network stats—think of it as your personal weather report for the virtual environment.
Automation and Scripting
Basics of Scripting in VMware
Automation is the art of teaching your systems to do tasks without your manual intervention. In VMware CLI, this often involves writing scripts that use a series of CLI commands. Simple scripts can automate tasks like backups, while more complex ones can handle failover procedures and more.
Real-World Scripting Examples
One practical example might be a script that takes snapshots of all running VMs. Such a script would loop through all active VMs, using the vmware-cmd command to create snapshots. This is a time-saving tool that could be invaluable in a production environment.
Security Aspects
Secure Login and SSH
Secure Shell (SSH) allows for secure remote access to your VMware host. SSH is like a secure tunnel in a mountain; it ensures that no unauthorized users can snoop on your data as it travels.
Encryption and Data Protection
VMware CLI also offers options to encrypt your virtual disks, making unauthorized access to data almost impossible. It’s like installing a high-tech security system in your home, making it impenetrable to burglars.
Table of VMware CLI Commands and Their Explanations
Command
Parameters
Description
Example Usage
vmware -v
N/A
Displays the installed VMware version.
vmware -v
vmrun list
N/A
Lists all currently running VMs.
vmrun list
vmware-cmd
Multiple
A multipurpose command for VM operations like creating, modifying, and controlling VMs.
vmware-cmd /path/to/vm.vmx start
vicfg-vswitch
--add, --delete
Manages virtual switches.
vicfg-vswitch --add vSwitch1
vmkfstools
-c, -X
Used for disk operations like creating and resizing virtual disks.
vmkfstools -c 10G NewVirtualDisk.vmdk
esxtop
N/A
Provides real-time monitoring for ESXi and associated VMs.
Another multipurpose command for managing VMs and ESXi hosts.
vim-cmd vmsvc/power.on VM-ID
vicfg-route
--add, --delete
Adds or removes routes in the VMkernel.
vicfg-route --add 192.168.1.0/24 192.168.1.1
vicfg-dns
--dns
Configures the DNS servers used by ESXi.
vicfg-dns --dns 192.168.1.1
vicfg-user
--adduser
Adds a new user to the ESXi host.
vicfg-user --adduser new_user --password password
vicfg-advcfg
Multiple
Allows for advanced configuration options for ESXi.
vicfg-advcfg -g /Net/FollowHardwareMac
vicfg-syslog
--server
Specifies a syslog server for logging.
vicfg-syslog --server syslog.example.com
This table provides a quick reference for the most commonly used CLI commands in VMware. Each of these commands plays a vital role in configuring, managing, and optimizing your virtual environments. Feel free to bookmark this section for easy future reference.
This wraps up our in-depth exploration of managing VMware through its CLI. The CLI offers an unparalleled level of control and customization, making it an essential tool for VMware users of all levels. From managing VMs and networks to automating complex tasks, CLI offers a robust set of features designed to make your life easier.
Carbon Hypervisor Screen
Conclusion
So, what’s the verdict? Is CLI a rudimentary, old-fashioned tool? Far from it! In the context of VMware, CLI is a powerful, intricate system that can streamline complex tasks, optimize resource allocation, and even bolster security measures. Whether you’re a beginner or a seasoned expert, there’s always more to learn and explore in VMware’s CLI.
FAQs
Is VMware CLI difficult to learn?
While it has a learning curve, the VMware CLI is highly rewarding to master, offering capabilities that the GUI often can’t match.
Can I manage multiple VMs at once with CLI?
Absolutely, automation and scripting capabilities allow you to manage multiple VMs simultaneously.
Is CLI secure for remote management?
Yes, with SSH and various encryption options, CLI is designed with security in mind.
Can I use CLI to monitor real-time system performance?
Yes, tools like esxtop provide comprehensive real-time statistics.
Where can I find more resources to learn VMware CLI?
VMware’s own documentation is an excellent start. Online forums, webinars, and courses are also available for deeper understanding.
I hope you found this guide both informative and engaging! Feel free to explore the expansive world of VMware CLI.
The Azure Files update in 2023 introduced Azure Active Directory support for REST API, enabling SMB file share access with OAuth authentication. This advancement improved the scalability of Azure Virtual Desktop by increasing the root directory handle limit from 2,000 to 10,000. Additionally, the public preview of geo-redundant storage for large file shares enhanced capacity and performance, while the Premium Tier now guarantees a 99.99% uptime SLA for all premium shares.
In 2022, Azure AD Kerberos authentication for hybrid identities was a highlight, as it built upon FSLogix profile container support. Also, SUSE Linux gained compatibility with SAP HANA System Replication and Pacemaker.
In 2021, premium Azure file shares received heightened baseline and burst IOPS, catering to POSIX-compliant, distributed file shares. NFSv4.1 protocol was enabled for premium file shares, enhancing flexibility and alignment with standard shares. SMB Multichannel was introduced, offering parallel connections for network optimization, along with SMB 3.1.1 with additional encryption modes. Azure Files started supporting storage reservations for premium, hot, and cool tiers, optimizing cost efficiency. The portal experience for domain joining was simplified, and Azure Files management became accessible through the control plane, streamlining management actions through various tools.
These updates represent a continual effort by Microsoft to improve the functionality, performance, and security of Azure Files, reflecting their commitment to providing a robust and efficient file-sharing service.
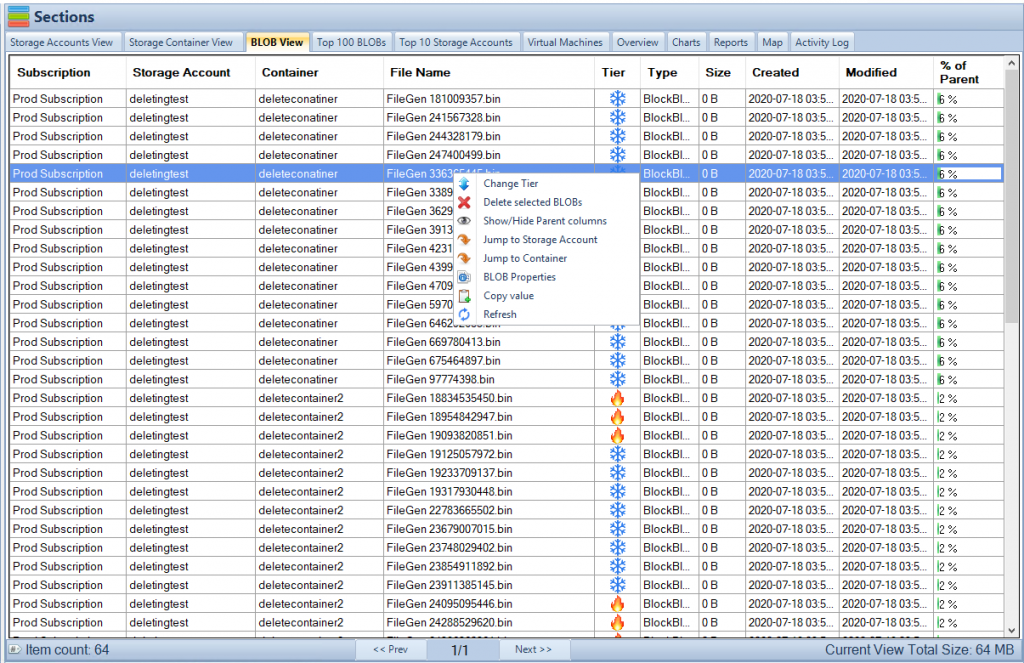
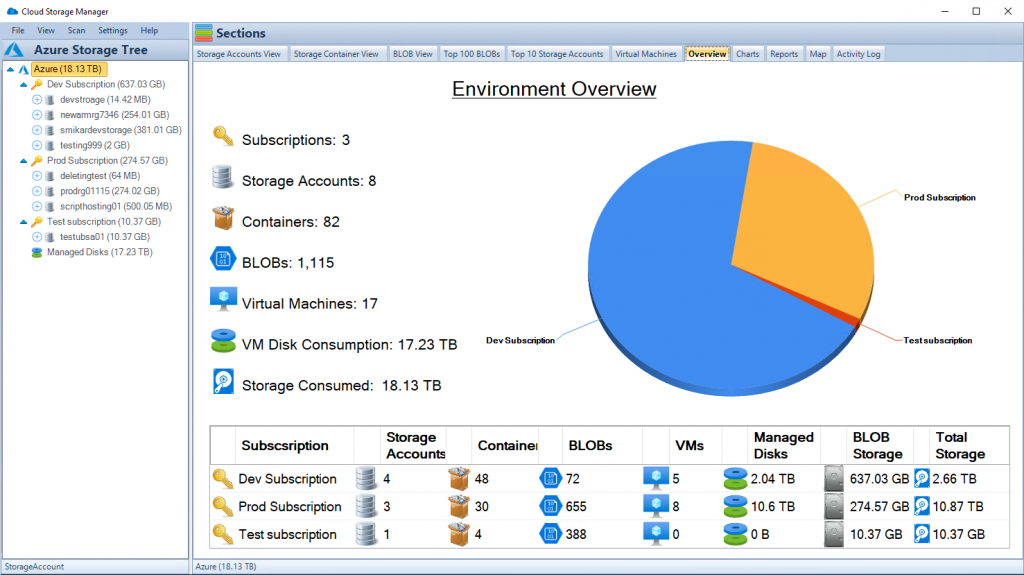
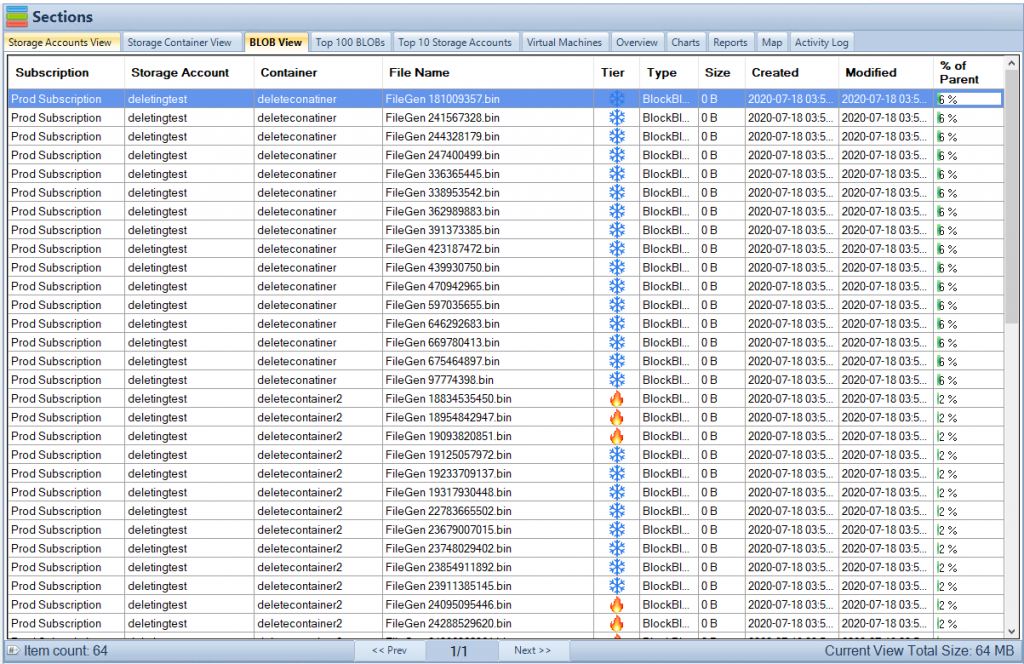
Cloud Storage Manager Blobs Tab
Enhanced Features of Azure Files
Azure Active Directory Support for REST API
Azure Active Directory (Azure AD) support for REST API is a significant enhancement as it enables Server Message Block (SMB) file share access using OAuth authentication. This feature enhances security by allowing only authenticated users to access file shares. It is particularly beneficial for organizations that have already integrated Azure AD and want to leverage it for secure file access.
Increased Root Directory Handle Limit
The scalability of Azure Virtual Desktop was improved by increasing the root directory handle limit from 2,000 to 10,000. This enhancement allows for more simultaneous connections to the root directory, enabling larger organizations to use Azure Virtual Desktop more effectively.
Geo-Redundant Storage for Large File Shares
The introduction of geo-redundant storage for large file shares in public preview is another noteworthy update. This feature boosts both the capacity and performance of file shares, making it easier for organizations to manage large amounts of data across different geographical locations.
99.99% Uptime SLA for Premium Shares
The Premium Tier of Azure Files now guarantees a 99.99% uptime Service Level Agreement (SLA) for all premium shares. This improvement ensures higher availability and reliability of premium file shares, which is crucial for businesses that require continuous access to their data.
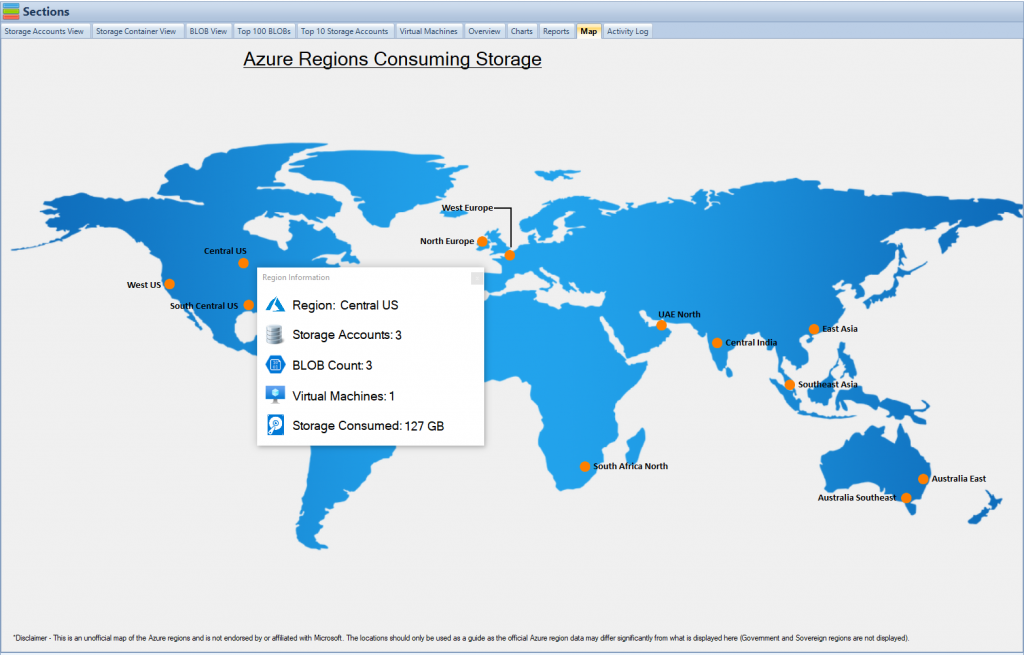
Cloud Storage Manager Map View
Highlighted Updates from Previous Years
Azure AD Kerberos Authentication for Hybrid Identities (2022)
In 2022, Azure AD Kerberos authentication for hybrid identities was a significant update. This feature further built upon FSLogix profile container support, enhancing the security and ease of use for organizations with hybrid identities.
Compatibility of SUSE Linux with SAP HANA System Replication and Pacemaker (2022)
Also in 2022, SUSE Linux gained compatibility with SAP HANA System Replication and Pacemaker. This update is essential for organizations that use SAP HANA for their database needs and want to ensure high availability and disaster recovery.
Heightened Baseline and Burst IOPS for Premium Azure File Shares (2021)
In 2021, premium Azure file shares received heightened baseline and burst Input/Output Operations Per Second (IOPS), which caters to POSIX-compliant, distributed file shares. This improvement enhances the performance of file shares, making it easier for organizations to manage large amounts of data.
Enablement of NFSv4.1 Protocol for Premium File Shares (2021)
Also in 2021, the NFSv4.1 protocol was enabled for premium file shares, enhancing flexibility and alignment with standard shares. This update allows organizations to use the NFSv4.1 protocol, which is essential for applications that require POSIX compliance.
Introduction of SMB Multichannel (2021)
SMB Multichannel was introduced in 2021, offering parallel connections for network optimization. This feature enhances the performance of file shares by allowing multiple simultaneous connections, improving data transfer rates and network utilization.
Additional Encryption Modes with SMB 3.1.1 (2021)
Also in 2021, SMB 3.1.1 was introduced with additional encryption modes, enhancing the security of file shares. This update provides more options for organizations to encrypt their data, ensuring that it is protected from unauthorized access.
Support for Storage Reservations (2021)
In 2021, Azure Files began supporting storage reservations for premium, hot, and cool tiers, optimizing cost efficiency. This feature allows organizations to reserve storage capacity in advance, ensuring that they have enough space for their data and reducing costs by avoiding over-provisioning.
Simplified Portal Experience for Domain Joining (2021)
The portal experience for domain joining was simplified in 2021, making it easier for organizations to integrate their Azure Files with their existing Active Directory domain. This update streamlines the process of domain joining, reducing the administrative effort required.
Accessible Azure Files Management through Control Plane (2021)
Azure Files management became accessible through the control plane in 2021, streamlining management actions through various tools. This update makes it easier for administrators to manage their file shares, reducing the time and effort required.
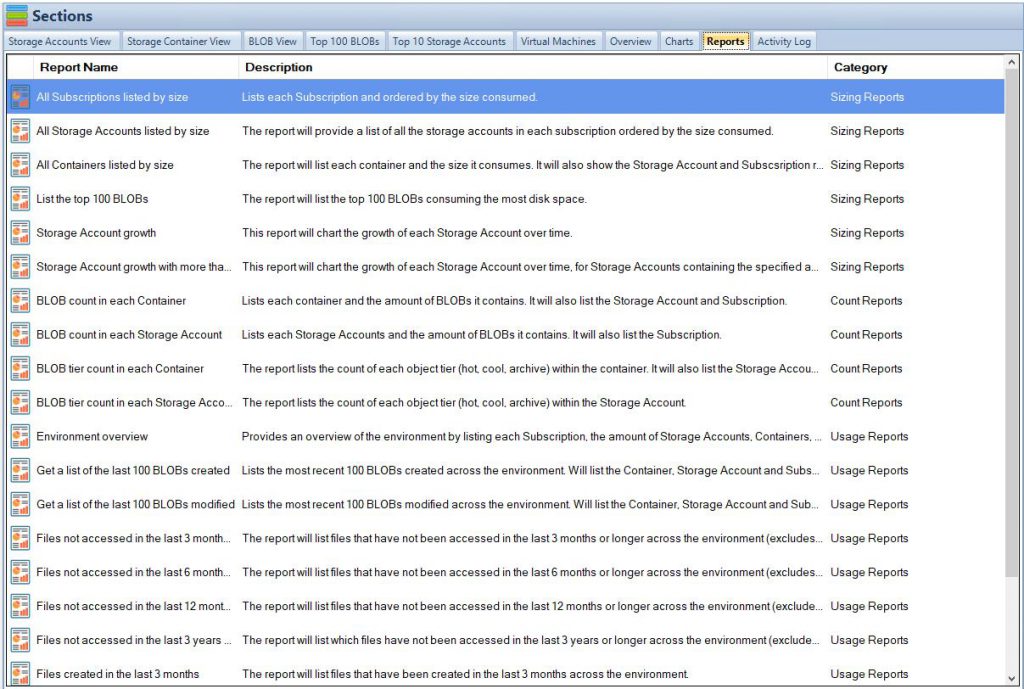
Cloud Storage Manager Reports Tab
Reducing your Azure Files Costs
Saving money with Azure Files using Cloud Storage Manager is a strategic and efficient solution for businesses looking to optimize their cloud storage costs. This robust software offers a comprehensive set of tools that enable users to effectively manage, monitor, and optimize their Azure Files storage resources. By leveraging features such as automated tiering, data compression, and deduplication, Cloud Storage Manager empowers organizations to make the most of their storage budget. Its intuitive interface and advanced analytics provide valuable insights into usage patterns, allowing businesses to identify opportunities for cost reduction and resource allocation refinement. With Cloud Storage Manager, companies can achieve a higher level of control over their Azure Files storage, ultimately leading to minimized expenses and maximized return on investment in the cloud infrastructure.
Conclusion
The Azure Files update in 2023 brought several significant enhancements, including Azure AD support for REST API, increased root directory handle limit, geo-redundant storage for large file shares in public preview, and a 99.99% uptime SLA for premium shares. These updates, along with the highlighted updates from previous years, reflect Microsoft’s commitment to continuously improving the functionality, performance, and security of Azure Files. Organizations can leverage these enhancements to optimize their file-sharing operations, ensuring secure, reliable, and efficient access to their data.
AzCopy is a command-line utility designed for copying data to and from Microsoft Azure Blob and File storage. It is a very powerful tool provided by Microsoft that helps users to copy and transfer data efficiently and securely. One of the key features of AzCopy is the ability to schedule transfers. Scheduled transfers can be extremely useful in managing data and ensuring that data is moved or backed up at the most appropriate times. AzCopy is particularly useful for businesses and individuals who handle large volumes of data and need a reliable and efficient way to manage data transfers. The ability to schedule transfers allows users to plan ahead and ensure that important data is transferred at the right times, without having to manually initiate the transfer each time.
Why Schedule Transfers?
Scheduling transfers can be incredibly beneficial for a number of reasons.
Importance of Scheduling
Firstly, scheduling transfers can help manage the load on your network. Transferring large amounts of data can be very resource-intensive and can impact the performance of other applications and services. By scheduling transfers for off-peak times, you can reduce the impact on your network and ensure that other services continue to run smoothly. This is particularly important for businesses that rely on their network for critical operations and cannot afford any downtime or reduced performance. Additionally, scheduling transfers can also help in managing costs. Many cloud providers charge based on the amount of data transferred and the time at which the transfer occurs. By scheduling transfers for off-peak times, you may be able to take advantage of lower rates and save on costs.
Use Cases
Another use case for scheduling transfers is for regular backups or data synchronizations. For example, if you have a database that needs to be backed up daily, you can schedule a transfer to occur every night at a specific time. This ensures that your data is always backed up and protected. Regular backups are essential for protecting against data loss due to hardware failure, data corruption, or other unforeseen events. By scheduling transfers, you can automate the backup process and ensure that it is always completed on time. Another common use case is for data synchronization between different systems or locations. For example, you may have a production environment and a backup environment that need to be kept in sync. By scheduling transfers, you can ensure that any changes made in the production environment are automatically replicated to the backup environment.
Cloud Storage Manager Main Window
How to Schedule Transfers
Scheduling transfers in AzCopy involves a few steps.
Installation and Setup
Before you can schedule transfers, you need to ensure that AzCopy is installed on your machine. The installation process is straightforward and involves downloading the AzCopy executable file from the Microsoft website and configuring it on your machine. It is important to ensure that you have the appropriate permissions to install software on your machine and to access the source and destination locations for the transfer. Additionally, you may need to configure your firewall or network settings to allow AzCopy to access the internet or other network resources.
Using the Command Line
AzCopy is a command-line tool, so you will need to use the command line to schedule transfers. The basic syntax for scheduling a transfer with AzCopy is as follows:
In this example, C:\source is the source directory, and https://destination.blob.core.windows.net/container is the destination URL. The --schedule parameter specifies the schedule for the transfer using a cron expression. The cron expression 0 2 * * * specifies that the transfer should occur at 2 AM every day.
Cloud Storage Manager Reports Tab
Tips and Best Practices
It’s important to consider a few things when scheduling transfers with AzCopy.
Handling Errors
Errors can occur during the transfer process, and it’s important to handle them appropriately. AzCopy provides several options for handling errors, such as retrying the transfer, logging the error, or stopping the transfer completely. It is recommended to review the documentation for AzCopy and configure the appropriate error handling options for your use case. For example, you may want to configure AzCopy to retry the transfer a certain number of times before logging an error and stopping the transfer. Additionally, you may want to configure AzCopy to generate a log file that you can review after the transfer is completed to identify any issues or errors that occurred during the transfer.
Monitoring Transfers
Monitoring transfers is also important to ensure that they are completed successfully. AzCopy provides several options for monitoring transfers, such as generating a log file or displaying the status of the transfer in the command line. It is recommended to review the documentation for AzCopy and configure the appropriate monitoring options for your use case. For example, you may want to configure AzCopy to generate a log file that you can review after the transfer is completed to confirm that all files were transferred successfully. Additionally, you may want to monitor the status of the transfer in the command line to identify any issues or errors that occur during the transfer.
Automating Transfer Schedules
Automating transfer schedules can help streamline the process and ensure that transfers occur as planned.
Using Scripting
Scripting can be a powerful way to automate transfer schedules. You can create a script that contains the AzCopy command with the appropriate parameters for your transfer and then schedule the script to run at the desired times. There are several scripting languages available, such as PowerShell or Bash, that you can use to create your script. It is recommended to review the documentation for your preferred scripting language and the AzCopy command-line reference to create your script.
Using Task Scheduler
Another way to automate transfer schedules is by using the Task Scheduler on Windows. You can create a task that runs the AzCopy command at the desired times. The Task Scheduler provides a user-friendly interface for configuring tasks and allows you to specify various options, such as the start time, recurrence, and actions to take if the task fails. It is recommended to review the documentation for the Task Scheduler and the AzCopy command-line reference to create your task.
Conclusion
Scheduling transfers with AzCopy can be incredibly useful for managing data and ensuring that data is moved or backed up at the most appropriate times. By using the command line, scripting, or the Task Scheduler, you can automate transfer schedules and streamline the process. Remember to handle errors appropriately and monitor transfers to ensure they are completed successfully. Additionally, it is important to test your scheduled transfers thoroughly before relying on them in a production environment. By following these best practices, you can take full advantage of the scheduling capabilities of AzCopy and ensure that your data is always transferred on time and securely.
Cloud Storage Manager Blobs Tab
Frequently Asked Questions
Can I schedule transfers to occur at multiple times throughout the day? Yes, you can schedule transfers to occur at multiple times throughout the day by specifying multiple cron expressions in the --schedule parameter. For example, if you want to schedule a transfer to occur at 2 AM and 2 PM every day, you would use the following command: azcopy copy "C:\source" "https://destination.blob.core.windows.net/container" --schedule="0 2 * * *,0 14 * * * In this example, the cron expression 0 2 * * * specifies that the transfer should occur at 2 AM every day, and the cron expression 0 14 * * * specifies that the transfer should occur at 2 PM every day.
Can I schedule transfers from multiple sources to a single destination? Yes, you can schedule transfers from multiple sources to a single destination by running multiple AzCopy commands with different source and destination parameters. Each command will create a separate transfer, and you can schedule them to occur at the same time or at different times. For example, you may have two directories that you want to back up to the same destination, but at different times. You can create two separate AzCopy commands with the appropriate source and destination parameters and schedule them to occur at the desired times.
Can I cancel a scheduled transfer? Yes, you can cancel a scheduled transfer by stopping the AzCopy process or by deleting the scheduled task in the Task Scheduler. If you are using a script to automate your transfer schedule, you can stop the script or remove the scheduled task that runs the script. It is important to cancel a scheduled transfer carefully to avoid any data loss or corruption. For example, if you stop the AzCopy process while a transfer is in progress, some files may be partially transferred or not transferred at all.
Can I schedule transfers to occur on specific days of the week? Yes, you can schedule transfers to occur on specific days of the week by specifying the appropriate days in the cron expression. For example, if you want to schedule a transfer to occur on Mondays and Fridays at 2 AM, you would use the following command: azcopy copy "C:\source" "https://destination.blob.core.windows.net/container" --schedule="0 2 * * 1,5" In this example, the cron expression 0 2 * * 1,5 specifies that the transfer should occur at 2 AM on Mondays and Fridays.
Can I schedule transfers between different Azure accounts? Yes, you can schedule transfers between different Azure accounts by specifying the appropriate source and destination parameters in the AzCopy command. For example, you may have an Azure Blob Storage account in one Azure subscription and an Azure File Storage account in another Azure subscription. You can create an AzCopy command with the appropriate source and destination parameters and schedule it to occur at the desired times.