With the surge in digitization, the concept of cloud migration has become a fundamental reality for many organizations. VMware, a widely accepted leader in server virtualization, has enabled many businesses to take advantage of virtual machines’ benefits. However, as businesses evolve, so do their requirements. This often leads to the need for moving these VMware-based virtual machines to more flexible and scalable platforms like Microsoft Azure. This article will serve as a guide to the intricate process of migrating VMware VMs to Microsoft Azure, aiming to simplify and illuminate the process for organizations considering this important digital shift.
Firstly, what prompts businesses to migrate from VMware to Microsoft Azure? VMware has been instrumental in helping businesses consolidate their servers and maximize resources. Still, with growing demands for agility, scalability, and cost-effectiveness, many organizations are turning their eyes toward cloud platforms. Microsoft Azure, with its extensive suite of cloud services and robust security measures, has proven to be an attractive destination for such migration. From enhanced scalability that adapts to your business’s ebb and flow to potential cost reductions due to its pay-as-you-go model, Azure offers compelling advantages. Moreover, Azure provides businesses with the ability to harness the power of advanced analytics, machine learning, and artificial intelligence capabilities that are increasingly crucial in today’s data-driven world.
The process of migrating VMware VMs to Azure might initially seem daunting. However, with the correct tools, planning, and execution, it can be a smooth and rewarding process. It involves conducting a thorough assessment of your current VMware environment, designing the target Azure environment, choosing the right migration tools, and executing the migration while mitigating any potential issues. This guide will provide an in-depth understanding of each stage, ensuring that you are well-equipped to navigate this complex journey.
In essence, the transition from a VMware-based infrastructure to Azure is a strategic move that can set your organization on a path to improved operational efficiency and innovation. However, success depends on a clear understanding of the process, careful planning, and strategic execution. This article serves to provide that understanding and be your companion through this transformative journey. So, whether you’re a decision-maker looking to understand the migration benefits or an IT professional seeking step-by-step guidance, continue reading as we delve into the intricacies of migrating VMware VMs to Microsoft Azure.
Carbon Azure VM Details
Understanding VMware and Microsoft Azure
VMware, an industry leader in server virtualization, has been a critical part of IT infrastructures for many businesses. At its core, VMware offers a platform for creating, managing, and executing virtual machines (VMs). These VMs emulate a computer system, providing the functionality of a physical computer. They simplify resource management by enabling multiple virtual machines to share the resources of a single physical machine, such as memory, processor cycles, network bandwidth, and so on. This results in optimal resource utilization and reduced costs. VMware’s solutions extend beyond server virtualization, including network virtualization, cloud management, and digital workspace technology, among others.
VMware’s VMs are renowned for their robustness and reliability. Their ability to isolate applications and services in individual VMs adds a layer of security, making it an appealing choice for businesses of all sizes. Furthermore, VMware VMs provide businesses with the flexibility to run their applications on any device without modifying the application or the underlying operating system. This seamless interoperability is one of the main reasons businesses have come to rely heavily on VMware over the years.
However, the digital landscape is rapidly evolving, and the need for more scalable, agile, and cost-effective solutions is more pressing than ever. This is where Microsoft Azure comes into the picture. As one of the leading cloud service providers, Azure offers a comprehensive suite of services that extend far beyond simply hosting VMs. It offers a wide range of platform-as-a-service (PaaS), software-as-a-service (SaaS), and infrastructure-as-a-service (IaaS) solutions, among others.
One of Azure’s most compelling features is its scalability. It allows businesses to scale their services up or down based on their current needs, ensuring they only pay for what they use. This contrasts with traditional infrastructure setups, where organizations often had to overprovision resources to avoid potential capacity issues. In Azure, these resources can be allocated or de-allocated dynamically, offering incredible flexibility and cost savings.
Furthermore, Azure is known for its robust security features. It employs a multilayered security model, ensuring every layer of your cloud environment is protected. This includes physical data centers, infrastructure, networking, and applications. In addition, Azure’s built-in security center provides visibility and control over the security of your resources, making it easier to maintain compliance and protect against threats.
While VMware has served businesses well over the years, the shift towards cloud services like Microsoft Azure offers several advantages. From scalability and cost-effectiveness to advanced analytics and robust security, Azure provides a platform that can handle the needs of today’s businesses. In the next sections, we’ll delve deeper into how to make this transition from VMware to Azure a successful one.
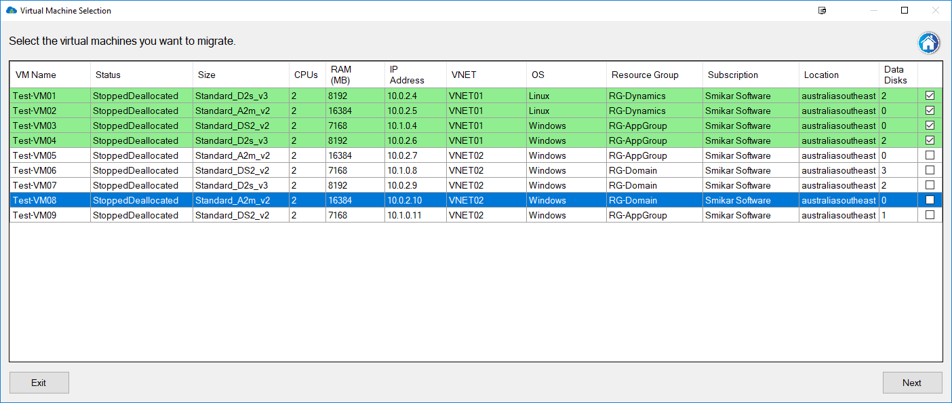
Carbon Azure VM Selection Screen
Preparing for Azure VM Migration
Before beginning the journey of migrating VMware VMs to Microsoft Azure, a significant amount of groundwork needs to be carried out. The success of the migration hinges upon how well you’ve prepared and evaluated your existing VMware environment. It’s like laying the foundation for a building – a strong foundation ensures that the structure can withstand the trials of time and natural elements.
The first step in preparation is performing a comprehensive assessment of your existing VMware environment. This includes understanding the current workload of your VMs, their interdependencies, performance metrics, and any potential bottlenecks. A well-rounded understanding of your present environment will not only help identify any challenges that might occur during the migration but also provide insights into optimizing your environment in Azure. Utilize tools like Azure Migrate to help perform this assessment, which can provide a detailed inventory of your on-premise servers, performance metrics, and visualizations of interdependencies. Remember, this phase is crucial for a successful migration, as it will shape your strategy moving forward. It’s like a reconnaissance mission, identifying potential roadblocks before they can impede your journey.
Designing the target Azure environment is the next crucial step. In this stage, you’ll be planning how to map your existing workloads to Azure resources. It involves considering the scalability, reliability, and cost-effectiveness of your future environment. Think about your organization’s needs and how Azure can meet them. This might mean deciding between Azure’s various VM types, storage options, networking capabilities, and other services. Consider using the Azure Pricing Calculator to estimate the cost of your future environment and optimize it accordingly. It’s like creating a blueprint of your future building, defining where each component should be placed to achieve maximum efficiency and effectiveness.
Choosing the right tools for migration is the third step in preparation. Microsoft provides several tools designed to aid in the migration from VMware to Azure, including Azure Migrate, Azure Site Recovery, and Azure Database Migration Service. Each tool has its strengths and serves different purposes during the migration process. Azure Migrate is your primary tool for assessing and migrating servers, Azure Site Recovery helps in large-scale migration and disaster recovery, and Azure Database Migration Service simplifies the process of migrating databases. If your environment has specific needs not addressed by these tools, third-party options can be explored. Choosing the right tool is like selecting the right equipment to construct your building – it must be suited to the task at hand to ensure a smooth and efficient construction process.
Preparation is key to a successful migration. By understanding your current VMware environment, designing your future Azure environment, and selecting the right tools, you lay a strong foundation for the migration. The next section will build upon this foundation, guiding you through the migration process step-by-step.
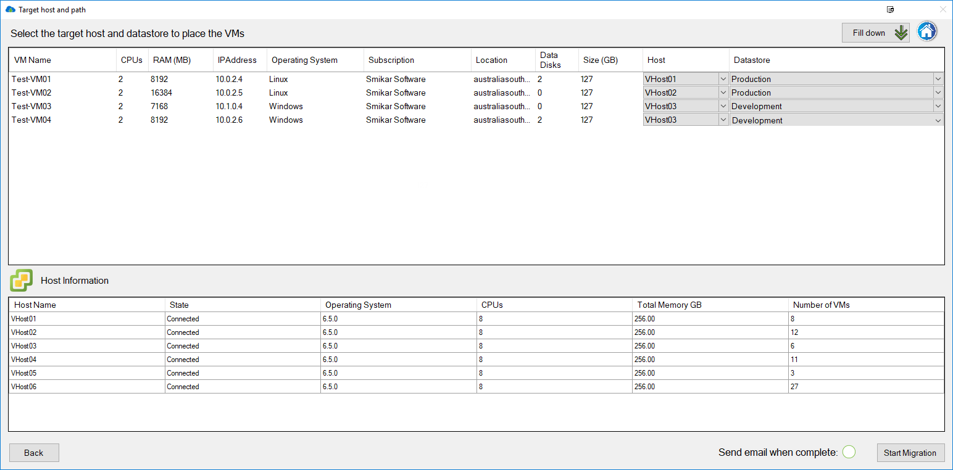
Carbon Hypervisor Screen
The Migration Process
With the preparation phase completed, it’s time to embark on the actual migration process. This stage is where the insights, plans, and tools from the preparation stage get put into action. It’s the equivalent of the construction phase in a building project – carefully assembling the different components to shape the final structure.
The migration process begins with the replication of your VMware VMs to Azure. This is carried out using the Azure Migrate: Server Migration tool or Azure Site Recovery, depending on your specific needs and the scale of migration. During replication, each VM’s data is copied and sent to a storage account in Azure without affecting the operation of the source VM. It’s like creating a mirror image of your existing VMs in the cloud. The Azure Migrate: Server Migration tool simplifies this process by providing a single location to start, monitor, and manage the replication of your VMs.
Once the replication is successful, it’s time to test the migrated VMs. Testing is an essential step to ensure the migration has been successful and that the Azure VMs can run the workloads without any issues. Azure allows you to test the migrated VMs without impacting your live environment. It’s like running a safety check on the building before anyone moves in. Conduct thorough tests, simulate real-world scenarios as much as possible, and validate the applications’ performance and functionality. Don’t rush this process; ensure that everything works as expected before moving on to the next step.
After testing, the next step is the actual cutover, marking the point of no return in your migration journey. During cutover, you’ll be switching your live traffic from the on-premise VMware VMs to the Azure VMs. It’s like opening the doors of your new building for business. Plan your cutover during a period of low activity, if possible, to minimize disruption. Azure provides flexibility here, allowing you to choose when you want to perform the cutover for each VM.
The migration process is a complex journey that requires careful execution. By replicating, testing, and performing a cutover, you’ll be transforming your plans into reality. But remember, the journey doesn’t end here. The final destination is a state where your migrated environment is optimized, monitored, and managed effectively. The next section will guide you through the post-migration activities to achieve this state.
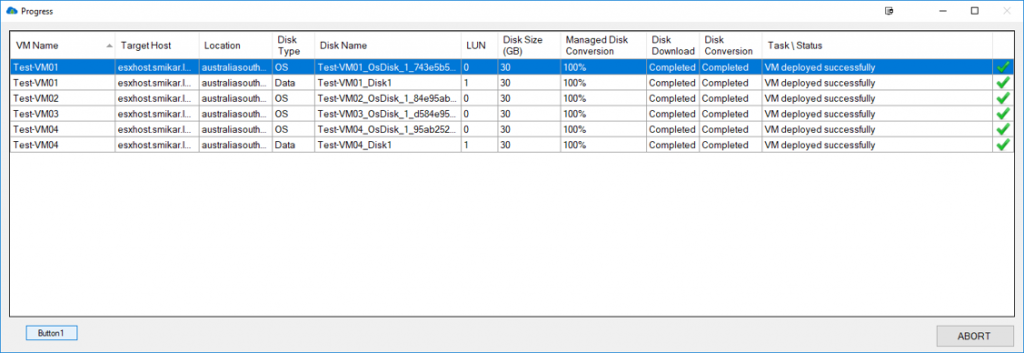
Carbon Azure Migration Progress Screen
Azure VM Post-Migration Activities
Just like a successful building project doesn’t end with the construction of the building, successful migration doesn’t conclude with the cutover. There are numerous post-migration activities that ensure the ongoing success of the migration project. This stage is like the maintenance and management phase of a building project – keeping the building in top shape and ensuring it continues to serve its purpose effectively.
Firstly, verifying the success of the migration is crucial. Although you would have tested the Azure VMs before the cutover, it’s important to continue monitoring them post-migration to ensure they’re functioning as expected in their live state. Use Azure Monitor and Azure Log Analytics to gain insights into the performance and health of your Azure VMs. Look for any anomalies or unexpected behavior and address them promptly. It’s akin to conducting routine inspections in a building to catch and fix any issues early.
Next, optimizing the Azure environment is an ongoing task. The great thing about Azure is its flexibility and the variety of options it provides. However, this also means there’s always room for improvement. Regularly review your usage and costs, and make use of Azure Cost Management to identify where savings can be made. Maybe a different VM size would be more cost-effective, or perhaps you could leverage Azure Reserved Instances or Azure Hybrid Benefit. Consider it like optimizing the energy efficiency or space usage in a building – small changes can lead to significant benefits.
Setting up proper monitoring and management is another vital post-migration activity. Azure provides a range of tools for this, such as Azure Monitor, Azure Security Center, and Azure Policy. These tools provide visibility into the operation and security of your Azure resources, help you maintain compliance, and enable you to respond swiftly to any issues. Just like a well-managed building has a maintenance team and security staff, a well-managed Azure environment utilizes these tools to keep things running smoothly.
Lastly, keep up with maintenance and updates. Azure regularly updates its services and introduces new features. Stay updated with these changes and incorporate them into your environment where beneficial. It’s like refurbishing a building to keep up with modern standards and expectations – staying current ensures your Azure environment continues to serve your business effectively.
Migrating your VMware VMs to Azure is a complex journey that doesn’t end with the cutover. It requires ongoing post-migration activities to ensure the migrated environment continues to deliver the benefits you sought from the migration. In the next section, we’ll look at some real-world examples of businesses that have successfully embarked on this journey.
Carbon Azure VM Download Scanning
Reverse Migration: Azure VMs to VMware or Hyper-V with Carbon
While our guide so far has primarily focused on migrating VMware VMs to Azure, it’s essential to understand that the migration journey is not always a one-way street. In fact, businesses may find the need to reverse their migration for various reasons, a process often referred to as cloud repatriation. In this section, we’ll discuss how to utilize a powerful tool, Carbon, developed by SmiKar, to streamline the process of migrating Azure VMs back to on-premises environments, specifically to VMware or Hyper-V.
When considering a reverse migration or cloud repatriation, the primary challenge is maintaining data integrity and system continuity. This is where Carbon comes into play, offering comprehensive VM management that provides detailed information about Azure VMs. It gives you insights into VM name, status, size, number of CPUs, memory allocation, IP address, VNET, operating system, resource group, subscription name, location, and more. Such extensive information about Azure VMs sizes and configurations allows users to make informed decisions about the migration and how to integrate them into their on-premise environment.
One of the stellar features of Carbon is the ease with which it carries out the migration and conversion process. Whether you’re looking to migrate Azure VMs to VMware or Hyper-V, Carbon integrates seamlessly with these environments. It enables users to download an Azure VM, replicate it, and convert it to the chosen on-premises hypervisor with just a few clicks. Carbon ensures that the replicated Azure VMs have the same CPU, memory, and disk configurations as the original VMs on Azure, aiding in a smooth transition.
It’s important to understand the differences and similarities when comparing Azure, VMware, and Hyper-V. Carbon not only bridges these differences but also leverages the advantages each platform offers. For instance, it effectively handles the variances between Hyper-V and VMware, two different but popular hypervisors. To ensure you’re leveraging the best practices while working with these platforms, you can refer to SmiKar’s guides on Hyper-V vs. VMware and Hyper-V best practices.
Lastly, Carbon takes user convenience to another level with automatic configuration and email notifications about the migration progress. Its customizable interface allows users to adjust settings to suit their preferences, including their chosen hypervisor, datastore, and Azure subscription.
In conclusion, migrating Azure VMs to VMware or Hyper-V is an intricate process. Yet, with a tool like Carbon, the complexity can be significantly reduced, ensuring a smooth, informed, and effective reverse migration. Whether it’s a strategic decision to repatriate certain workloads or a broader move towards hybrid cloud models, Carbon equips you with the capabilities to make the transition without a hitch.
Carbon Azure VM Download Splash Screen
VMWare migration to Azure FAQs
Question
Answer
1. What is Azure Migrate?
Azure Migrate is a Microsoft service that helps you assess and migrate your on-premises servers, databases, applications, and data to Azure.
2. Can I migrate VMware VMs directly to Azure?
Yes, you can directly migrate your VMware VMs to Azure using Azure Migrate, which provides tools to assess readiness, and migrate your workloads.
3. What are the key stages in the VMware to Azure migration process?
Key stages include preparation (including assessment of current environment), replication of VMware VMs on Azure, testing and migration (or cutover), and post-migration activities.
4. How can I monitor my Azure VMs post-migration?
Azure provides several tools to monitor the performance of your Azure VMs, including Azure Monitor and Azure Log Analytics.
5. What is cloud repatriation?
Cloud repatriation, also known as reverse cloud migration, is the process of moving data and applications from a cloud platform back to an on-premises data center, or from one cloud platform to another.
6. What is SmiKar’s Carbon?
Carbon is a software tool developed by SmiKar that is designed to streamline the process of migrating Azure VMs back to an on-premise environment, either on VMware or Hyper-V.
7. How does Carbon aid in reverse migration?
Carbon offers comprehensive VM management and easy migration and conversion process. It integrates with VMware or Hyper-V environments, replicating and converting Azure VMs to the chosen on-premise hypervisor.
8. Does Carbon support both VMware and Hyper-V for reverse migration?
Yes, Carbon integrates with both VMware and Hyper-V, allowing users to choose their preferred on-premise hypervisor for the reverse migration.
9. What are the advantages of using Carbon for reverse migration?
Carbon offers detailed VM information, easy replication and conversion, automatic configuration, email notifications, and a customizable interface for a seamless reverse migration process.
10. Can Carbon replicate the exact Azure VM configurations in the on-premise environment?
Yes, Carbon sets up replicated Azure VMs with the same CPU, memory, and disk configurations as the original Azure VMs, ensuring a smooth transition to the on-premise environment.
What Is Azure Service Bus? A Beginner-Friendly Guide
Azure Service Bus is a fully managed enterprise message broker from Microsoft. It allows applications, services, and systems to communicate with each other reliably—even if they’re running at different times or in different places.
If you’re building apps using microservices, serverless, or cloud-based architecture, Service Bus helps keep everything connected, decoupled, and scalable.
Why Use Azure Service Bus?
Reliable messaging: Send data between apps with guaranteed delivery.
Decoupled systems: Services don’t need to be online at the same time.
Scalable architecture: Easily handle from hundreds to millions of messages.
Built-in redundancy & security: Microsoft manages uptime and encryption for you.
Core Concepts of Azure Service Bus
Namespaces
A namespace is your container for Service Bus resources. It gives you a unique URL and helps organize your queues and topics.
Entities
Queues: One-to-one message delivery. The sender adds a message, and a receiver pulls it off the queue.
Topics & Subscriptions: Publish-subscribe pattern. One message goes to many subscribers.
Relays: Enable bi-directional communication between cloud and on-prem systems (less common).
Messaging Patterns
Point-to-Point: Basic queueing from sender to receiver.
Publish-Subscribe: One message, multiple subscribers.
Request-Reply: Sender expects a response after sending a message.
Key Features
Message Queuing
Processes messages in order (FIFO)
Supports sessions for grouped messages
Dead-letter queues catch errors for review
Publish-Subscribe Model
Senders post to a topic
Subscribers define filters to get only relevant messages
Supports auto-deletion of idle subscriptions
Integration with Azure Functions
Trigger serverless logic when a message arrives
Build event-driven workflows
Scale automatically without managing infrastructure
Real-World Use Cases
Order Processing: Queue orders and process them independently
Financial Transactions: Secure, reliable messaging between systems
IoT Telemetry: Handle large volumes of device data in real time
Microservices Integration: Connect services without direct dependencies
Reliable: No message loss even if the receiver is offline
Secure: Encrypted data with Azure AD integration
Scalable: Handles massive workloads with ease
Fully Managed: No infrastructure to maintain
Integrated: Works with Azure Functions, Logic Apps, Event Grid
Frequently Asked Questions
What is Azure Service Bus?
It’s a fully managed message broker for decoupling and connecting services reliably.
When should I use queues vs. topics?
Use queues for one-to-one messaging, and topics when multiple subscribers need the same message.
Does Service Bus work offline?
Yes, it stores messages until the receiver is online again.
Can I trigger Azure Functions from Service Bus?
Absolutely. Azure Functions can be triggered by new messages in a queue or topic.
What’s the max message size?
256 KB in Basic/Standard tiers, 100 MB in Premium.
Conclusion
Azure Service Bus makes it easy to build reliable, scalable, and decoupled systems in the cloud. Whether you’re handling financial transactions, integrating microservices, or processing IoT data, it’s one of the most versatile messaging solutions available on Azure.
Need to get started? Head to the Azure portal and create a Service Bus namespace today.
Understanding Azure: Storage Queue vs. Service Bus
Azure is a cloud computing service created by Microsoft to help businesses tackle challenges and build solutions through a comprehensive suite of cloud services. It offers a wide range of integrated cloud services and functionalities such as analytics, computing, database, mobile, networking, storage, and web, allowing developers to pick and choose from these services to develop and scale new applications, or run existing applications, in the public cloud.
Azure’s breadth of service offerings is truly staggering, but today we’ll focus on two key components: Azure Storage Queue and Azure Service Bus. These are both messaging services provided by Azure and are crucial tools for ensuring smooth communication and data flow between different parts of a cloud application. Understanding how they work and the fundamental differences between them can be vital for choosing the right tool for your needs.
What is Azure Storage Queue?
Azure Storage Queue is a service for storing large numbers of messages. Think of it as a post office: you send messages (or “letters”) to the queue (the “post office”), and whoever you’ve sent them to can pick them up when they’re ready. This allows for asynchronous message queueing that works by holding messages that are to be logged by an application.
Azure Storage Queues are simple to use, highly available, and ensure that your data is always accessible. They’re great for tasks that require a high level of throughput, where you’re dealing with many messages per second. This makes them suitable for various use cases, including the creation of backlog tasks, the delivery of updates or notifications, and the distribution of workload among different parts of a system.
What is Azure Service Bus?
On the other hand, Azure Service Bus is a more complex service that operates as a broker between applications, allowing them to exchange messages in a loosely coupled way for improved scale and resiliency. It provides broader messaging capabilities like message sessions, duplicate detection, transactions, and scheduling, among others.
Azure Service Bus is designed for high-value enterprise messaging and can handle a higher order of complexity in its operations. It’s like an advanced postal system that not only delivers letters but also tracks them, schedules deliveries, and even handles packages (larger and more complex messages). This makes it an ideal choice for tasks that need highly reliable messaging between applications and services, and when you need to maintain the order of queued messages.
In the next section, we’ll delve into the key differences between Azure Storage Queue and Azure Service Bus to help you decide which one fits your needs better.
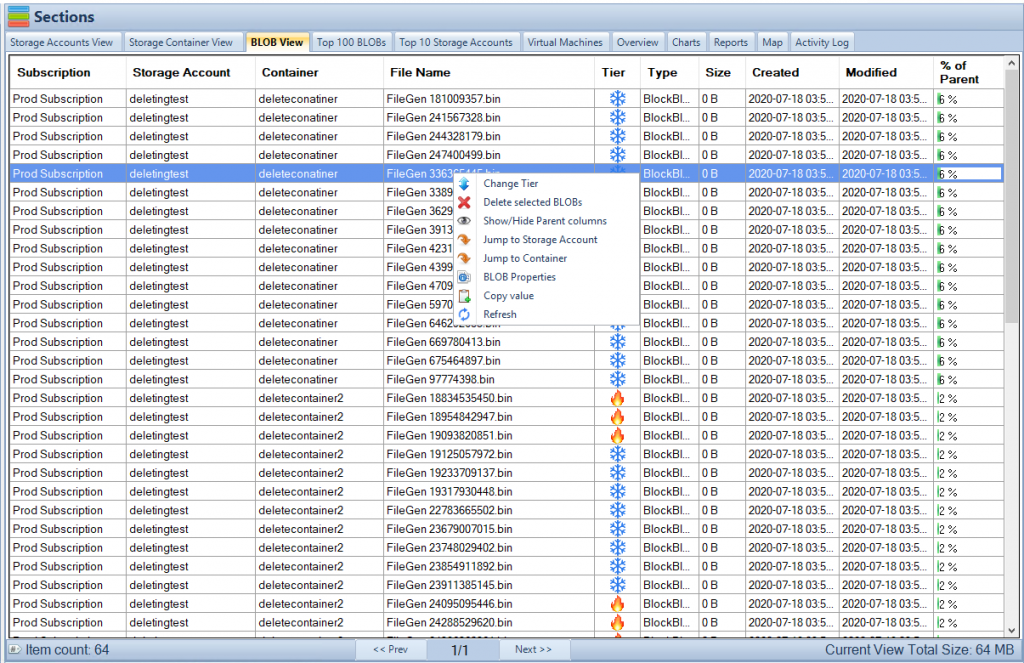
Cloud Storage Manager Blobs Tab
Key Differences
When you’re deciding between Azure Storage Queue and Azure Service Bus, it’s essential to understand the key differences. While both services offer robust messaging solutions, they are designed for different scenarios and offer distinct features.
Performance
The first thing to consider is performance. Azure Storage Queue, being the simpler of the two services, tends to excel in scenarios where high throughput is needed. It’s engineered to handle a large volume of messages, making it suitable for applications that need to process thousands of messages per second.
With Azure Storage Queue, you can use a single storage account to achieve up to 20,000 messages per second, which is quite impressive. This makes it an excellent choice for tasks that require high-speed message logging or when you need to distribute workload among different parts of your system rapidly.
On the other hand, Azure Service Bus is designed for more complex scenarios that require advanced features. While it might not offer the same raw performance as Azure Storage Queue in terms of the sheer number of messages, it makes up for it with its extended capabilities. It provides features like message sessions, duplicate detection, transactions, and scheduling, making it better suited for high-value enterprise-level messaging scenarios.
Message Delivery and Ordering
Another key difference between Azure Storage Queue and Azure Service Bus is how they handle message delivery and ordering. Azure Storage Queue provides basic FIFO (First-In-First-Out) message delivery. This means that if you put Message A into the queue before Message B, Message A will also be the first to be taken out.
Azure Service Bus, however, takes this a step further with its support for message sessions, which enable strict ordering of messages. This means you can ensure that Message A is processed before Message B, even if Message B is ready for processing first. This is particularly useful in scenarios where the order of operations matters.
Scalability
Scalability is yet another critical factor to consider. Both services are highly scalable, but in different ways. Azure Storage Queue’s scalability is primarily horizontal, meaning it can handle a high number of messages and can scale out to accommodate your needs.
On the other hand, Azure Service Bus offers more vertical scalability. It’s engineered to handle a large variety of message types, including more complex and larger messages. This means it can scale up to accommodate more complex scenarios and requirements, making it an excellent choice for enterprise-level applications.
Pricing
Last but certainly not least, there’s the matter of cost. Azure Storage Queue is generally more cost-effective for high-throughput scenarios where many messages need to be processed. Its pricing model is based on the number of operations, which means you pay for what you use.
Azure Service Bus, on the other hand, uses a tiered pricing model. It provides more advanced features and capabilities, so it tends to be more expensive. However, the cost can be justified if you require the advanced messaging capabilities that Azure Service Bus offers.
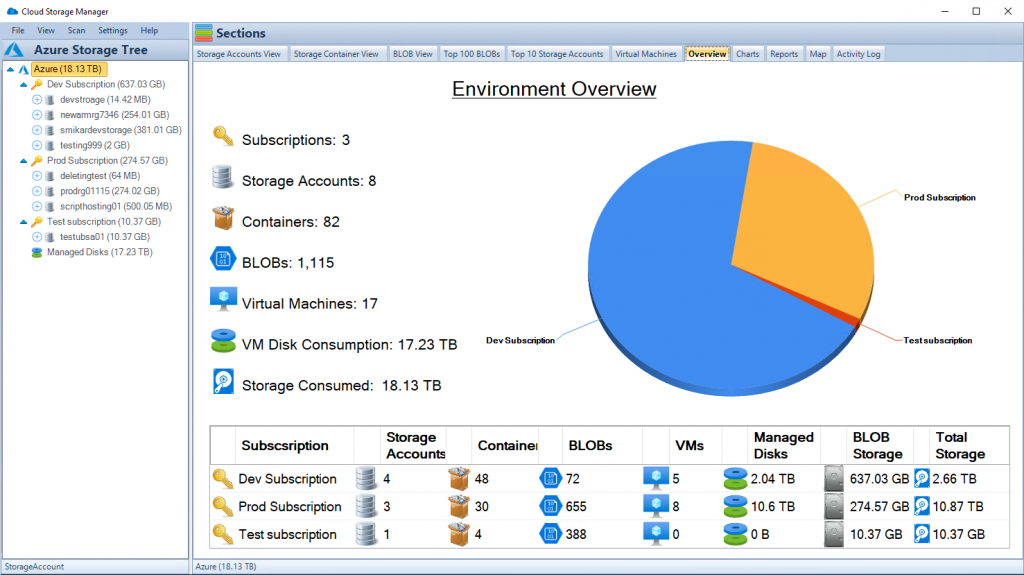
Cloud Storage Manager Main Window
Deep Dive: Azure Service Bus
Now that we’ve examined Azure Storage Queue in detail, let’s turn our attention to Azure Service Bus and see what it has to offer.
Pros of Azure Service Bus
One of the primary strengths of Azure Service Bus is its robust feature set. It offers a host of advanced messaging capabilities like message sessions, duplicate detection, transactions, and scheduling. These features allow you to handle complex messaging scenarios with ease, ensuring that your applications and services communicate efficiently and reliably.
Azure Service Bus also excels in the area of message delivery and ordering. Thanks to its support for message sessions, you can ensure strict ordering of messages. This is especially useful in situations where the order of operations is crucial, and you need to guarantee that Message A is processed before Message B, even if Message B is ready first.
Moreover, Azure Service Bus is designed for high-value enterprise messaging, capable of handling a variety of message types, including more complex and larger messages. This vertical scalability makes it an excellent choice for enterprise-level applications that need to manage complex scenarios and requirements.
Cons of Azure Service Bus
Despite its many strengths, Azure Service Bus isn’t without its drawbacks. For one, it’s a more complex service than Azure Storage Queue, which means it can be more challenging to set up and configure. This might pose a hurdle for those who are new to Azure or those who prefer a simpler setup.
Additionally, Azure Service Bus is typically more expensive than Azure Storage Queue. Its tiered pricing model means that you’ll pay more for the advanced features it offers. While the cost can be justified by the enhanced capabilities, it’s something to consider if you’re working with a tight budget.
In the following section, we will wrap up our discussion with a conclusion and address some frequently asked questions about Azure Storage Queue and Azure Service Bus.
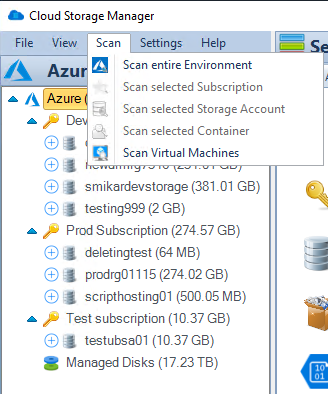
Cloud Storage Manager Scan Menu
Conclusion
Azure Storage Queue and Azure Service Bus both provide robust messaging solutions, but they are designed for different scenarios and offer unique features. Azure Storage Queue is the simpler and more cost-effective option, designed for high-throughput scenarios that require a large volume of messages. On the other hand, Azure Service Bus is a more complex service, offering advanced messaging capabilities that are ideal for high-value enterprise messaging scenarios.
When choosing between Azure Storage Queue and Azure Service Bus, consider the specific needs of your applications. If you need a simple, high-throughput messaging service, Azure Storage Queue might be the way to go. But if you require more advanced features and can handle a higher level of complexity, Azure Service Bus might be a better choice.
Frequently Asked Questions
What is the maximum message size for Azure Storage Queue and Azure Service Bus?
Azure Storage Queue supports a maximum message size of 64 KB, while Azure Service Bus supports a larger maximum message size of 256 KB in the standard tier and up to 100 MB in the premium tier.
Can Azure Storage Queue and Azure Service Bus maintain the order of messages?
Azure Storage Queue provides basic FIFO (First-In-First-Out) message delivery, which can maintain the order of messages to some extent. However, Azure Service Bus supports message sessions, which can ensure a strict ordering of messages, making it the better choice if the order of operations is crucial.
How can Cloud Storage Manager help me save money on Azure Storage?
Cloud Storage Manager provides insights into your Azure blob and file storage consumption. It offers detailed reports on storage usage and growth trends, helping you understand your usage better. This can enable you to manage your resources more effectively, potentially saving you money on your Azure Storage.
Which service should I choose if I’m new to Azure?
If you’re new to Azure, Azure Storage Queue might be a more accessible option due to its simplicity and straightforward setup process. However, as you become more familiar with Azure, you might find the advanced features of Azure Service Bus beneficial.
Can I switch from Azure Storage Queue to Azure Service Bus or vice versa?
Yes, you can switch between the two services if your needs change. However, keep in mind that this may require changes to your application code and could incur additional costs, depending on the features you need. Always consider your specific requirements and budget before making a switch.
Welcome to the forefront of virtualization technology, where innovation meets practicality, and the quest for optimal performance is a constant journey. If you’ve been keeping a close eye on developments in this space, you’ll know that Microsoft’s Hyper-V has been making significant strides. This article aims to guide you through what’s new with Hyper-V in 2022, taking you step by step through the groundbreaking updates and improvements, and explaining how they can elevate your virtualization experience.
Hyper-V, a hypervisor-based technology that enables you to create and manage virtual machines, has long been a cornerstone of Microsoft’s virtualization services. But with Hyper-V, Microsoft has pushed the envelope even further, introducing an array of new features and enhancements that promise to redefine the way you engage with virtualization technology. From advancements in the Task Scheduler and Hyper-V Manager for Server Core installations to the support of nested virtualization for AMD processors, and much more, the recent updates signal a new era for Hyper-V.
But what do these updates mean for administrators and organizations? How can you leverage these new features to get the most out of your virtualization setup? In this article, we will delve into the details of these enhancements and outline the key benefits they can bring to your virtualization environments. Whether you’re a seasoned Hyper-V user or just beginning your journey with virtualization, this comprehensive guide to the latest in Hyper-V will equip you with the knowledge you need to make the most of these exciting new developments.
So, buckle up and join us as we embark on a deep dive into the world of Hyper-V. By the end of this exploration, you will have a clear understanding of the new features, how to use them, and most importantly, how they can transform your virtualization experience. It’s time to uncover what’s new with Hyper-V.
SnapShot Master Power On
Hyper-V: A Quick Overview
Stepping into the realm of Hyper-V , you will encounter a virtualization environment that has been expertly fine-tuned and packed with features designed to enhance efficiency, performance, and ease-of-use. This version of Hyper-V marks a significant step forward in Microsoft’s commitment to providing robust, scalable, and secure virtualization services.
A standout feature of Hyper-V is the support for nested virtualization on AMD processors. Nested virtualization, a feature that allows you to run Hyper-V inside of a Hyper-V virtual machine (VM), has been a popular request among many Hyper-V users. With this update, administrators can now extend their virtualization capabilities, providing more flexibility and choice of hardware for their environments. This means that you can now create and manage VMs within VMs, offering an additional layer of abstraction, and making it easier to manage your virtual infrastructure.
Also noteworthy are the enhancements to the Hyper-V virtual switch. The virtual switches in Hyper-V have been updated with improved Receive Segment Coalescing (RSC). This feature allows the hypervisor network to coalesce packets and process them as one larger segment, thereby reducing CPU cycles. The result is improved performance for both network traffic from an external host received by a virtual NIC, and from a virtual NIC to another virtual NIC on the same host.
Another point of evolution in Hyper-V is its alignment with Azure Stack HCI. As the strategic direction for Microsoft’s hypervisor platform, Azure Stack HCI provides a hyper-converged infrastructure solution that combines storage, compute, and networking into a single system. With the free trial extended to 60 days for test and evaluation purposes, Microsoft recommends using Azure Stack HCI, signaling a shift towards a more integrated and cohesive virtualization platform.
The updates in Hyper-V represent a continuous effort by Microsoft to refine and enhance their virtualization platform. Each feature has been designed with the user in mind, aiming to provide a seamless, efficient, and high-performing virtualization environment. As we continue to delve into the specifics of these updates, we will see how these features interplay and contribute to the overall improved user experience in Hyper-V. Stay tuned as we break down these features and provide a detailed insight into what they mean for you and your virtualization needs.
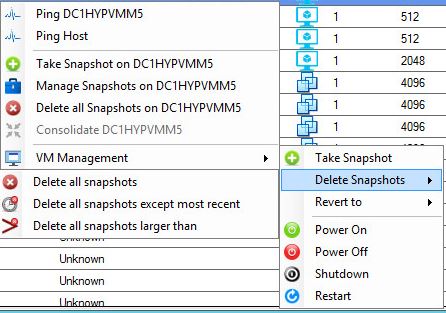
SnapShot Master Right Click Menu Single VM
Whats new with Hyper-V in 2022
Hyper-V comes with a host of new features and improvements that elevate its performance, usability, and integration capabilities. These enhancements not only increase the functionality of Hyper-V, but they also make it a more flexible and adaptable virtualization environment. Let’s dive into these new features to understand what they bring to the table.
Task Scheduler and Hyper-V Manager for Server Core installations
In the realm of management tools, Microsoft has incorporated the Task Scheduler and Hyper-V Manager into the Server Core installations. The addition of these tools into the App Compatibility Feature on Demand (FOD) feature package serves to streamline the administration process and enhance the user experience. Task Scheduler allows administrators to automate task execution based on predefined triggers, thus simplifying routine tasks and increasing efficiency. On the other hand, Hyper-V Manager provides a centralized interface for managing VMs and their respective host servers. This means that you can now more easily configure and control your virtual machines and their resources from a single location, simplifying the overall management process.
Nested Virtualization for AMD Processors
Hyper-V introduces support for nested virtualization using AMD processors. Nested virtualization is a feature that allows you to run a Hyper-V VM inside another Hyper-V VM, which can be incredibly beneficial for testing and development environments. With the addition of AMD processor support, administrators are given a wider choice of hardware for their environments, enhancing flexibility. This addition marks an important milestone in the development of Hyper-V, opening up new possibilities for virtualization.
Hyper-V Virtual Switch Improvements
The Hyper-V virtual switch has received a significant upgrade in Hyper-V. With enhanced Receive Segment Coalescing (RSC), the virtual switches can now coalesce packets and process them as a larger segment. This improvement leads to a reduction in CPU cycles and, as a result, an increase in performance. The impact of this enhancement extends to both network traffic from an external host received by a virtual NIC and from a virtual NIC to another virtual NIC on the same host. The enhanced RSC allows for more efficient network traffic management and improved overall performance.
Hyper-V Server : The Last of Its Kind?
Interestingly, Microsoft has indicated that Hyper-V Server 2019 could be the last of its kind, with its lifecycle policy continuing until January 2029. This suggests that Microsoft is steering its users towards Azure Stack HCI, a hyper-converged infrastructure solution that combines storage, compute, and networking into a single system. The Azure Stack HCI provides a highly integrated and cohesive virtualization platform that aligns with Microsoft’s strategic direction.
Updates to Sconfig
Finally, we have the updates to sconfig. The new sconfig now has dependencies on PowerShell, indicating a shift towards more script-based and automated management. This change is reflected in Windows Server core and Azure Stack HCI. The shift to a PowerShell-dependent sconfig could streamline and automate many management tasks, enhancing the ease and efficiency of managing your virtual environment. However, this change may also require users to familiarize themselves with PowerShell to fully utilize the new sconfig.
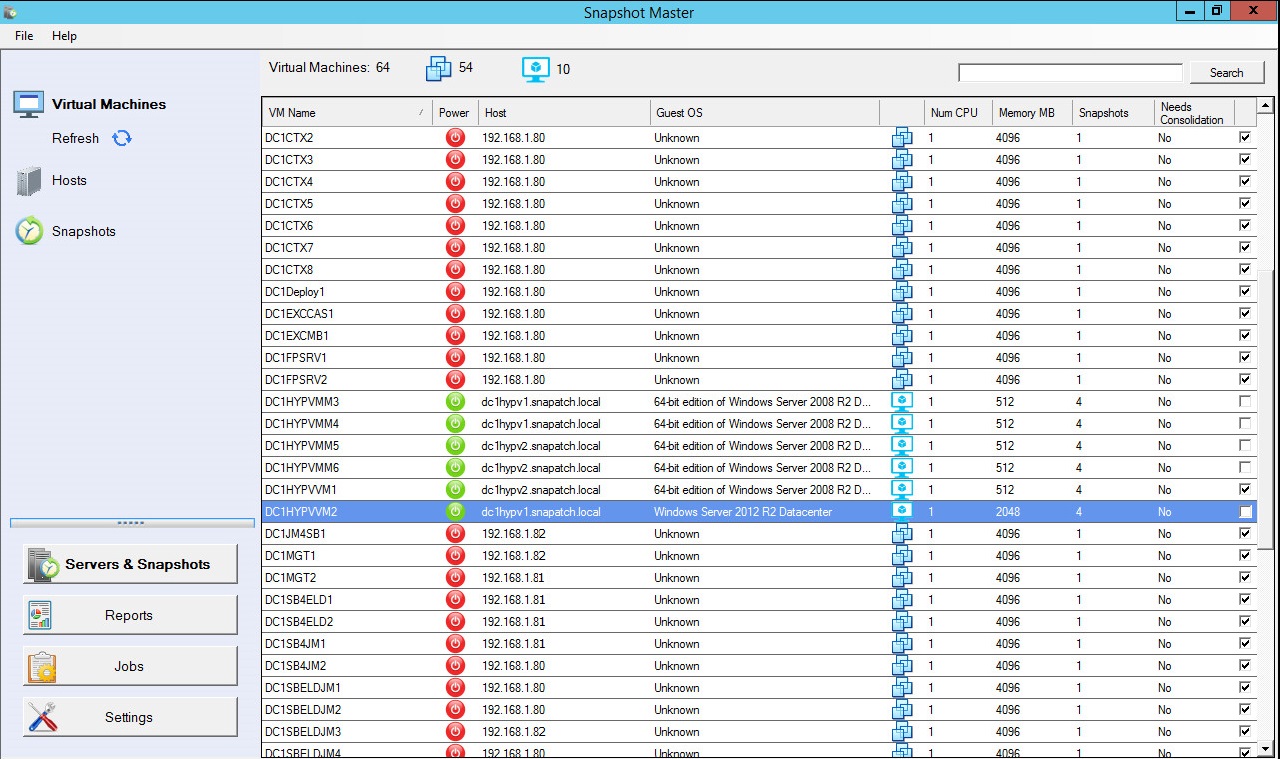
SnapShot Master Power On
Detailed Look at the New Features
The release of Hyper-V has brought a suite of new features that significantly enhance its capabilities. These features are designed to augment the functionality, flexibility, and performance of the Hyper-V environment. In the sections below, we will delve deeper into these features, explaining what they are, how they work, and what they mean for you as a user.
Task Scheduler and Hyper-V Manager: What it Means for You
The inclusion of Task Scheduler and Hyper-V Manager in the Server Core installations is a major enhancement in Hyper-V . Task Scheduler is a powerful tool that automates task execution based on predefined triggers. This means that administrators can automate routine tasks, such as system updates or report generation, freeing up valuable time for other critical tasks. Hyper-V Manager, on the other hand, serves as a centralized platform for managing VMs and their host servers. This feature simplifies the overall management process and improves efficiency by allowing you to control your virtual machines and their resources from one place. The implication of these additions is that users can now better streamline their management processes, leading to an overall increase in productivity and efficiency.
AMD Nested Virtualization: Expanding Your Options
With the advent of nested virtualization support for AMD processors in Hyper-V , users are now presented with a broader range of hardware choices for their virtualization environments. Nested virtualization, which allows for the running of a Hyper-V VM inside another Hyper-V VM, is an invaluable feature for testing and development environments. The introduction of support for AMD processors expands the hardware compatibility of Hyper-V, allowing for more flexibility when setting up your environment. For users, this means that they now have more options when it comes to selecting hardware that best fits their specific needs and requirements.
Virtual Switch Improvements: A Deep Dive
The improvements to the Hyper-V virtual switch in the version represent a significant upgrade in terms of performance and efficiency. The enhanced Receive Segment Coalescing (RSC) allows the virtual switches to coalesce packets and process them as a larger segment, leading to a reduction in CPU cycles and improved performance. For users, this means faster and more efficient network traffic management, which can translate to better performance of the VMs and a smoother overall user experience.
The Future of Hyper-V Server: Transitioning to Azure Stack HCI
With Microsoft signaling that Hyper-V Server 2019 could be the last in its line, it seems that the future of Hyper-V Server is transitioning towards Azure Stack HCI. This is a hyper-converged infrastructure solution that combines storage, compute, and networking into a single system. For users, this signifies a shift towards a more integrated and cohesive virtualization platform, which could offer more streamlined management and potential cost savings. The transition to Azure Stack HCI could represent a change in how organizations approach virtualization, moving towards more cloud-centric solutions.
Sconfig Updates: What’s Changed?
In Hyper-V , sconfig has been updated and now has dependencies on PowerShell. This shift towards a more script-based and automated management indicates a broader trend in the industry towards automation and programmability. With PowerShell, users can automate and streamline many management tasks, leading to improved efficiency. However, this shift may also necessitate a learning curve for users not familiar with PowerShell. Nevertheless, the change promises to make managing your virtual environment more streamlined and efficient, providing the potential for significant time and resource savings.
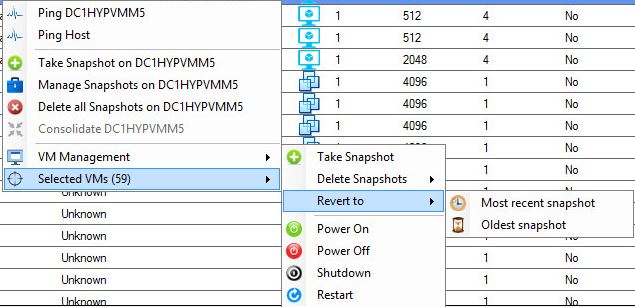
SnapShot Master Right Click Menu Single VM
Network Virtualization in Hyper-V
The networking aspect of Hyper-V has seen substantial enhancements with the introduction of new features and improvements to existing functionalities. The realm of network virtualization is central to these enhancements, with Microsoft introducing a programmable Hyper-V switch, support for VXLAN encapsulation, interoperability with the Microsoft Software Load Balancer, and improved compliance with IEEE Ethernet standards. Each of these upgrades brings its own set of advantages, offering users more control, versatility, and interoperability in their network virtualization endeavors.
Programmable Hyper-V Switch: A New Addition
The programmable Hyper-V switch is a fresh addition to the Hyper-V environment. This feature is a crucial element of Microsoft’s updated Software Defined Networking (SDN) solution and is fully integrated into the SDN stack. The programmable Hyper-V switch allows HNV policies to be pushed down to a host agent running on each host using the Open vSwitch Database Management Protocol (OVSDB) as the SouthBound Interface (SBI). This process allows for the programming of complex flow rules into a performant flow engine in the Hyper-V switch, the same engine used in Microsoft Azure™. The integration of a programmable switch significantly boosts the network virtualization capabilities of Hyper-V, offering users more flexibility and control in managing their network environments.
VXLAN Encapsulation Support: A Welcome Change
The introduction of VXLAN encapsulation support in Hyper-V marks a substantial shift, broadening the network virtualization options for users. VXLAN, or Virtual eXtensible Local Area Network, is a widely adopted protocol in the industry with support from vendors like Cisco, Brocade, Dell, HP, and others. This protocol is used for overlay network virtualization, allowing the creation of logical network partitions over physical networks. This development means that users can now take advantage of the VXLAN protocol within their Hyper-V environments, which can result in improved network performance and interoperability.
Software Load Balancer Interoperability
Hyper-V has also focused on improving interoperability, particularly with the Microsoft Software Load Balancer. HNV is now fully integrated with the Microsoft Software Load Balancer, enhancing its ability to handle network traffic. This integration ensures seamless interaction with HNV, ultimately improving the efficiency and reliability of network traffic management within a Hyper-V environment.
Compliance with IEEE Ethernet Standards
Hyper-V has made significant strides in ensuring compliance with IEEE Ethernet standards. This improvement ensures that all transmitted packets have compliant values in all fields, ensuring interoperability with third-party virtual and physical appliances that depend on industry-standard protocols. It also supports Jumbo Frames in the physical L2 network, which is required to account for packet overhead introduced by encapsulation protocols. These enhancements in compliance make Hyper-V a more robust platform for network virtualization, ensuring compatibility with a wide range of devices and protocols.
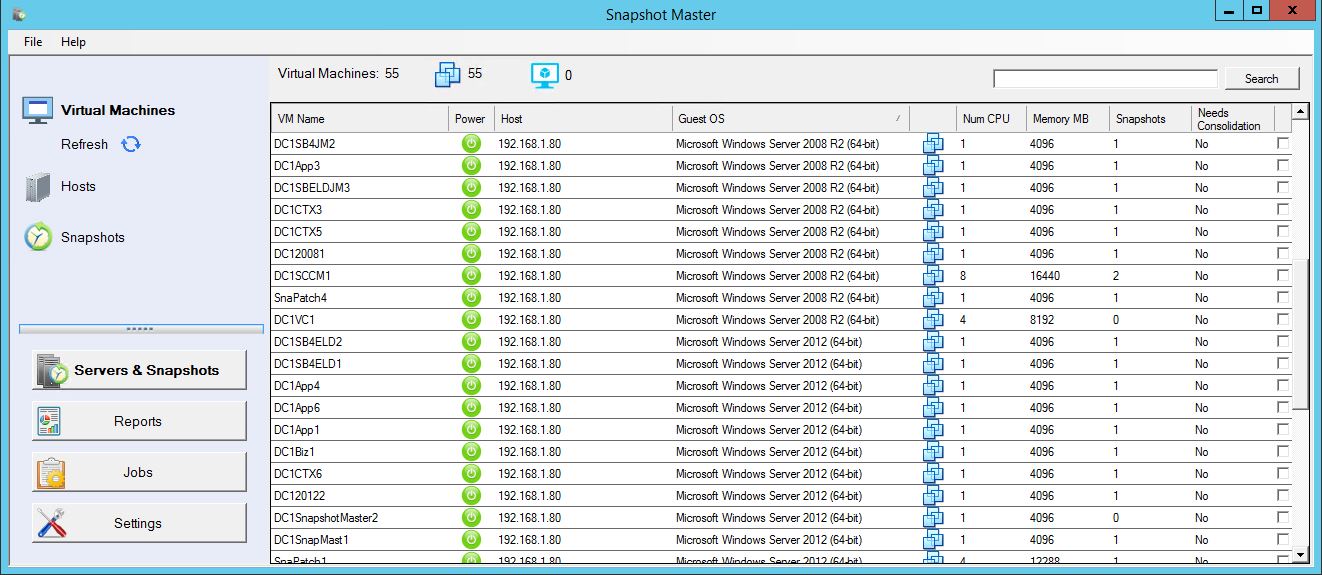
Snapshot Master Manage Snapshots
Conclusion
Reflecting on the enhancements and new features introduced in Hyper-V , it is evident that Microsoft has made significant strides in advancing its virtualization platform. Not only has the technology giant introduced new tools and improved upon existing features, but it has also shown a strategic shift towards a more cloud-oriented and hybrid virtualization approach.
The inclusion of the Task Scheduler and Hyper-V Manager for Server Core installations has notably improved the management capabilities of Hyper-V. These features add flexibility and control, making it easier for administrators to manage and troubleshoot their virtual environments. Additionally, the support for nested virtualization using AMD processors has opened up new hardware choices, providing a significant benefit for environments running AMD hardware.
The enhancements to the Hyper-V virtual switch, including the updated Receive Segment Coalescing, have improved network performance and efficiency. The updates have resulted in better CPU cycle usage and improved network traffic processing, which can lead to better overall performance in a virtualized environment. Similarly, the updates in network virtualization have seen the introduction of a programmable Hyper-V switch, support for VXLAN encapsulation, improved interoperability with the Microsoft Software Load Balancer, and better compliance with IEEE Ethernet standards. These developments have made Hyper-V a more flexible and robust solution for virtual network management.
In light of the fact that Hyper-V Server is likely to be the last standalone version of the product, with Microsoft recommending a transition to Azure Stack HCI, it’s clear that the future of Hyper-V lies in a more integrated, hybrid approach to virtualization. The Azure Stack HCI offers the familiar Hyper-V administration experience, but with added Azure integration for enhanced hybrid capabilities.
In conclusion, Hyper-V brings a wealth of improvements and new features to the table, making it a robust and versatile platform for virtualization tasks. Whether you’re managing a small business network or a large enterprise data center, Hyper-V offers the tools and capabilities needed to effectively handle your virtualization needs. As we look to the future, it will be interesting to see how the transition to Azure Stack HCI unfolds and how it shapes the landscape of virtualization.
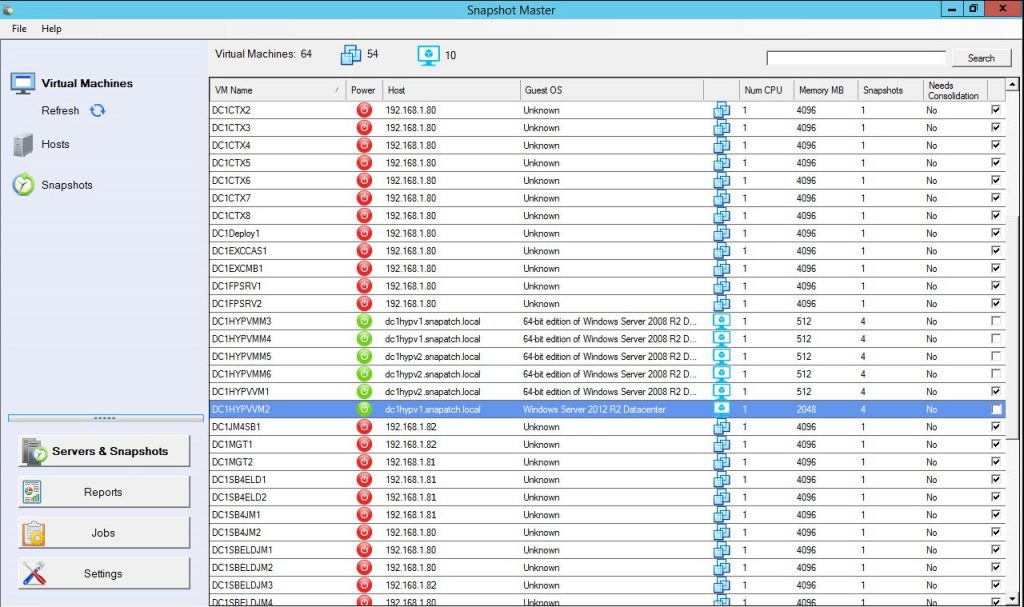
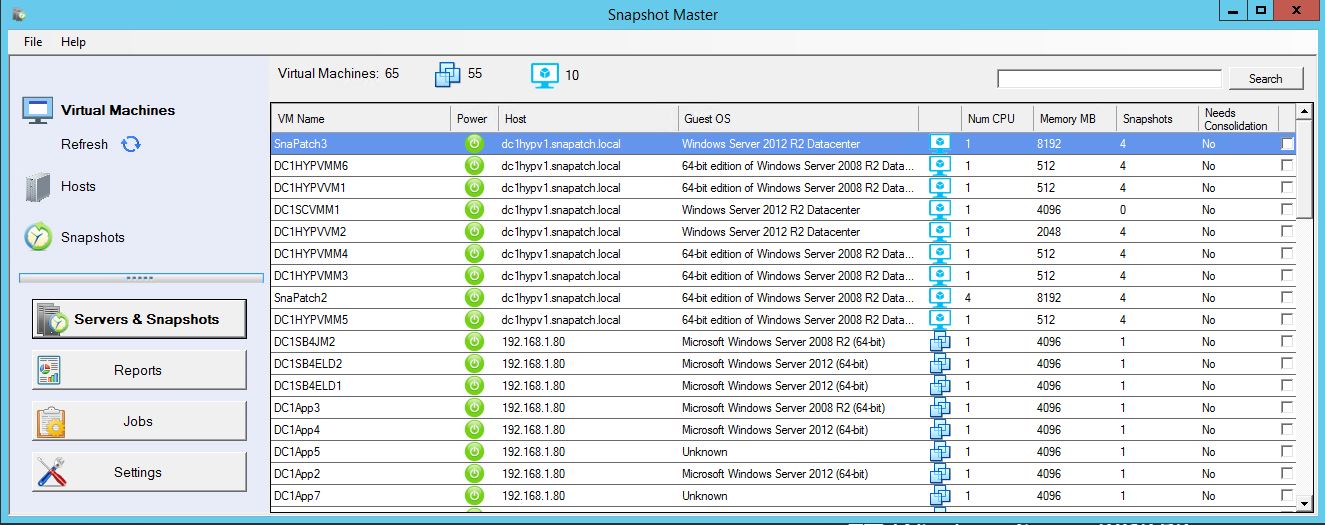
SnapShot Master Main Console Window
Hyper-V FAQs
What is Hyper-V ?
Hyper-V is the latest version of Microsoft’s virtualization platform. It allows you to run multiple operating systems simultaneously on a single computer. It introduces several new features and enhancements over the previous versions, including support for AMD processors for nested virtualization, improved virtual switches, and enhanced management tools for Server Core installations.
What are the key new features in Hyper-V ?
Some of the key features introduced in Hyper-V include Task Scheduler and Hyper-V Manager for Server Core installations, support for nested virtualization with AMD processors, and improvements to the Hyper-V virtual switch.
What does the support for nested virtualization with AMD processors mean?
Nested virtualization is a feature that allows you to run Hyper-V inside of a Hyper-V virtual machine (VM). The support for AMD processors means that environments running AMD hardware can now utilize this feature, providing more hardware choices.
How have Hyper-V virtual switches been improved?
Virtual switches in Hyper-V have been enhanced with updated Receive Segment Coalescing (RSC). This allows the hypervisor network to coalesce packets and process them as one larger segment, reducing CPU cycles and improving performance for both network traffic from an external host and between virtual NICs on the same host.
What is Azure Stack HCI and how does it relate to Hyper-V?
Azure Stack HCI is a hyper-converged infrastructure (HCI) solution from Microsoft that combines the familiarity and flexibility of Hyper-V with the power of Microsoft Azure services. It’s expected that future development efforts will focus on Azure Stack HCI, making Hyper-V Server likely the last standalone version of Hyper-V.
What updates have been made to Sconfig in Hyper-V ?
In Hyper-V , Sconfig has been updated with dependencies on PowerShell. This means that tasks previously handled by Sconfig can now be accomplished through PowerShell scripting, adding more flexibility and control.
What is a programmable Hyper-V switch?
A programmable Hyper-V switch is a new feature in Hyper-V that enables the customization of Hyper-V Network Virtualization (HNV) policies through the Microsoft Network Controller. This feature provides greater flexibility and control in managing network virtualization.
What is VXLAN encapsulation and how is it supported in Hyper-V ?
VXLAN, or Virtual Extensible Local Area Network, is a network virtualization technology that allows the creation of large-scale virtualized networks. Hyper-V now supports VXLAN encapsulation, which has been widely adopted in the market.
How does Hyper-V ensure compliance with IEEE Ethernet standards?
Hyper-V implements correct Layer 2 Ethernet headers to ensure interoperability with third-party virtual and physical appliances that depend on industry-standard protocols. This includes support for Jumbo Frames in the physical L2 network to account for packet overhead introduced by encapsulation protocols.
What is the future of Hyper-V with the transition to Azure Stack HCI?
Microsoft is recommending a transition to Azure Stack HCI, a hybrid solution that combines on-premises infrastructure with Azure services. This doesn’t mean the end of Hyper-V as it’s a key component of Azure Stack HCI. Rather, it signals a shift towards a more integrated, cloud-oriented approach to virtualization. Hyper-V administrators can continue to use their existing skillsets, with the added benefits that come from Azure integration
In the realm of virtualization, snapshots play an integral role in managing virtual machines (VMs). Essentially, a snapshot captures the state of a VM at a specific point in time, providing a reference point to which you can revert if necessary. This can be especially handy when implementing changes to your VM or its applications, allowing you to quickly undo the changes if they cause any unforeseen issues.
The Role of VM Snapshots
VM snapshots can be seen as a form of insurance policy for your virtual environment. By creating a snapshot before a significant update or modification, you’re ensuring that you have a way back in case something goes wrong. For instance, if you’re about to install a new software application on a VM, taking a snapshot beforehand can help you revert the VM to its pre-installation state if the new software causes any problems.
Types of VM Snapshots
There are mainly two types of VM snapshots: those with memory and those without memory. Each serves a different purpose and comes with its own set of characteristics and considerations. Understanding these differences is essential for effective VM management. Snapshots with memory include the VM’s memory state at the time the snapshot was taken, providing a complete snapshot of the VM’s operation. Conversely, snapshots without memory do not include the memory state and only capture the state of the VM’s disk.
The Importance of Effective Snapshot Management
While snapshots are undeniably useful, they also need to be managed effectively. Improper snapshot management can lead to a variety of issues, including wasted storage space, degraded performance, and even data loss in some cases. Fortunately, tools like Snapshot Master exist to help manage VM snapshots. These tools provide features like scheduled snapshot creation and deletion, snapshot consolidation, and automated reporting, significantly simplifying the task of snapshot management.
In this article, we will delve deeper into the differences between snapshots with memory and snapshots without memory. We’ll also discuss how tools like Snapshot Master can help you manage these snapshots more effectively, optimizing your VM operations while safeguarding your data.
The Purpose of VM Snapshots
VM snapshots serve an essential role in the management and operation of virtual machines. They provide a way to preserve the state of a VM at a given point in time, which can be highly beneficial in various scenarios. However, to utilize snapshots effectively, it’s critical to understand their purpose and how they function.
Capturing VM State
The primary purpose of a VM snapshot is to capture the state of the VM at a particular moment. This snapshot acts as a “checkpoint”, recording the VM’s current condition in terms of its memory, settings, and virtual disk.
For a snapshot with memory, this includes not only the disk’s state but also the state of the memory, along with the VM’s settings. This makes it possible to revert the VM to its previous state, including all running processes. This could be particularly beneficial in environments where applications require a continuous state of operation.
On the other hand, a snapshot without memory only captures the disk’s state and the VM’s settings but does not capture the memory’s state. This type of snapshot is quicker to create and uses less storage. However, when reverted, the VM may need to be rebooted, and ongoing processes will not be maintained.
Preventing Data Loss and Facilitating Recovery
Snapshots act as a safety net, helping prevent data loss and facilitate recovery. If you’re making significant changes to your VM, such as installing new software or updating the system, a snapshot taken beforehand can provide a fallback option. If the changes result in unforeseen issues or data loss, you can quickly revert the VM to its state at the time of the snapshot, effectively undoing the problematic changes.
Testing and Development
Snapshots are also extremely useful in testing and development scenarios. They allow developers and testers to experiment with different configurations, applications, or system updates without risking the stability of the primary VM. Once testing is complete, the VM can easily be reverted back to its original state by applying the snapshot, eliminating the need for a time-consuming manual rollback.
Snapshot Management
While snapshots are undeniably useful, they also need to be managed effectively. An unmanaged accumulation of snapshots can consume a large amount of storage space and degrade VM performance over time. Snapshot management tools like Snapshot Master can simplify the process of creating, managing, and deleting snapshots, ensuring that your VM environment remains efficient and performant.
In the following sections, we’ll delve into the differences between snapshots with memory and snapshots without memory, and explore how they can be managed effectively for optimal VM operation.
Understanding Snapshots: With Memory Vs. Without Memory
Understanding the nature of snapshots, specifically snapshots with memory and snapshots without memory, is crucial when dealing with virtual machines (VMs). In essence, both these types of snapshots are used to capture the state of the VM at a particular point in time, but they do so in slightly different ways and for different reasons.
What are Snapshots with Memory?
Snapshots with memory are a comprehensive form of VM snapshot. They encapsulate not just the state of the virtual disk but also the state of the VM’s memory at the time the snapshot was taken. This memory state is crucial for certain types of applications and processes that might be running on the VM. For instance, if your VM is running complex processes or transactions that would be disrupted by a restart, a snapshot with memory can be invaluable. This snapshot type maintains the full context of the VM’s operation, including all ongoing processes, allowing for seamless recovery with no loss of transactional data.
The ability to capture the memory state can also be useful in scenarios like software debugging, where you might want to revert the VM to a previous state without disturbing ongoing processes. While snapshots with memory tend to consume more storage space and can have a more significant impact on performance, they can also provide more granular recovery options for complex VM environments.
What are Snapshots without Memory?
On the flip side, snapshots without memory capture only the state of the virtual disk and not the memory state. These types of snapshots are lighter, faster to create, and consume less storage space. They can be created with minimal impact on the VM’s performance, making them suitable for VMs that do not run memory-sensitive processes.
However, the trade-off for these performance benefits is that a snapshot without memory may require the VM to reboot when you revert to that snapshot. Consequently, any running applications or processes would need to restart. For some environments, this is a negligible downside, especially if speed and storage efficiency are the priority. For others, particularly those with VMs running critical, continuous processes, it’s a crucial factor to consider.
Knowing the characteristics and implications of both snapshots with memory and snapshots without memory can help you make informed decisions when managing your VM environments. And tools like Snapshot Master can significantly simplify the process of creating, managing, and using these snapshots effectively.
Snapshot Considerations: Performance and Application Consistency
Taking snapshots, whether with memory or without, can impact your virtual machine’s performance and application consistency. Understanding these impacts can help you decide which type of snapshot is best suited for your specific use case.
Snapshot Performance Impacts
The process of taking a snapshot requires certain system resources. For a snapshot without memory, these resources include the storage required to record the VM’s disk state. As for a snapshot with memory, additional resources are required to also record the state of the VM’s memory. Therefore, creating a snapshot with memory typically consumes more resources and can take longer, which could potentially impact the VM’s performance.
However, this performance impact is generally temporary and diminishes once the snapshot is complete. Hence, it’s crucial to plan snapshot activities during off-peak hours to minimize the impact on VM performance and user experience.
Disk I/O Considerations
When a snapshot is taken, the VM’s writes are redirected to a delta disk file, a process known as disk I/O redirection. This process occurs regardless of whether the snapshot is with or without memory. The longer the snapshot is kept, the larger this delta file can grow, which can further influence disk I/O operations and hence VM performance. Therefore, snapshots should not be kept for an extended period, and ongoing snapshot management is necessary to mitigate any potential performance impacts.
Restoring VM State
The purpose of a snapshot is to be able to restore a VM to a specific point in time. Snapshots without memory, while faster and lighter, may need the VM to reboot when you revert to the snapshot. This can impact the availability of services running on the VM. In contrast, snapshots with memory can restore the VM without requiring a reboot, thereby maintaining service availability. The choice between these two types of snapshots will depend on the specific requirements and tolerance for service interruption in your VM environment.
Application Consistency
When it comes to application consistency, snapshots with memory hold an advantage. For applications that need to maintain a constant state even during recovery, snapshots with memory are the better option. They can restore the VM with all running applications and processes intact, ensuring application consistency. This is particularly useful in environments running critical applications that cannot tolerate disruptions.
On the other hand, snapshots without memory may require a reboot of the applications when you revert to the snapshot. This could potentially disrupt application consistency, which might not be ideal for certain environments.
By considering these factors, you can choose the appropriate snapshot type that balances performance, disk I/O, service availability, and application consistency according to your specific needs. Snapshot Master can help manage these aspects effectively, allowing for seamless snapshot operations.
Benefits of Using Snapshot Master for Managing VM Snapshots
Snapshot Master is an indispensable tool for anyone managing VM environments. It streamlines various aspects of VM management, especially dealing with snapshots, checkpoints, and data stores. Let’s look at some of its key features in more detail:
Scheduled Snapshot Creation and Deletion
One of the prominent features of Snapshot Master is the ability to schedule snapshot creation and deletion. This functionality ensures that you have up-to-date snapshots available for any point in time. You can set specific times for the software to create or delete snapshots according to your operational needs, thereby automating a significant aspect of VM management. This not only ensures optimal use of resources but also reduces the burden of manual oversight.
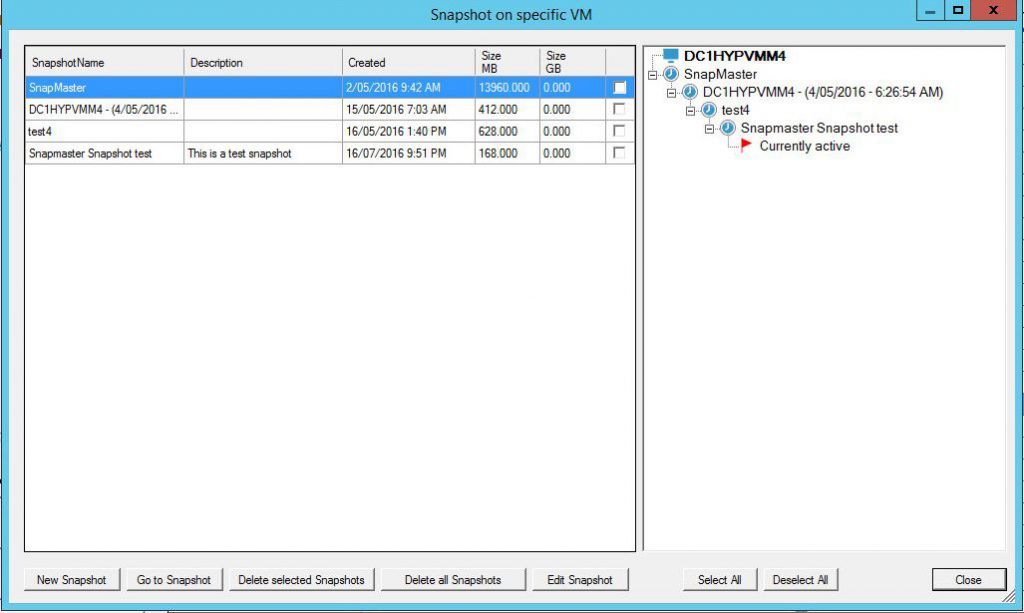
Snapshot Consolidation
Over time, you may end up with multiple snapshots for a single VM, which can consume a significant amount of storage space. Snapshot Master offers a snapshot consolidation feature to help with this. By merging these multiple snapshots into one, the tool ensures efficient usage of your storage resources, leading to improved overall performance of your VM environment. Moreover, consolidating snapshots also reduces the risk of running into storage issues due to excessive snapshots.
Automated Reports and Notifications
In the world of IT management, staying informed about your infrastructure’s status is crucial. Snapshot Master assists here by providing automated reports and email notifications. You can receive timely updates about your VM’s status, snapshot creation or deletion events, and data store usage. These reports can provide valuable insights into your VM operations and highlight potential issues before they escalate. The notifications ensure that you’re aware of significant events or changes in your VM environment, allowing for proactive management and timely intervention when necessary.
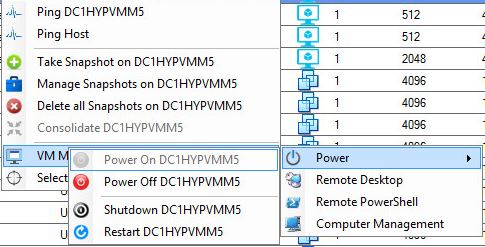
Remote VM Management
In addition to managing snapshots, Snapshot Master also offers remote VM management capabilities. You can power your VMs on or off, connect to them remotely via RDP or PowerShell, and execute Remote PowerShell commands. This feature is incredibly handy when managing a large number of VMs, allowing you to execute tasks or make changes without needing to access each VM individually.
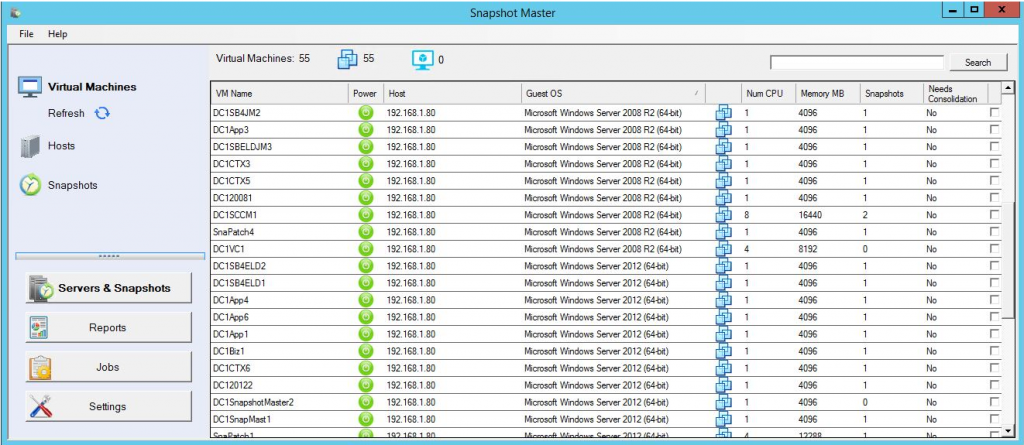
Comprehensive Compatibility
Snapshot Master’s compatibility with VMWare’s vCentre, Microsoft’s System Center Virtual Machine Manager (SCVMM), and Microsoft Azure means that you can have a unified view and control of your VM environment, regardless of the platform. This comprehensive compatibility makes it a versatile tool suitable for various VM setups.
By integrating these features into your VM management, Snapshot Master can significantly simplify your tasks and ensure efficient operations, making it a vital tool in any IT administrator’s toolkit.
Managing VM Snapshots: Some Practical Tips
Managing snapshots in a virtual environment requires a balance between operational needs and resource usage. Both snapshots with memory and without memory have their unique advantages and trade-offs. As such, it’s crucial to develop a snapshot management strategy that suits your specific VM environment and operational requirements. Let’s delve into some practical tips for managing your VM snapshots effectively:
Use Snapshots Judiciously
While snapshots are beneficial, they should not be overused. Every snapshot that you take consumes storage resources. Over time, excessive snapshot usage can lead to storage issues and impact your VM’s performance. Thus, it’s advisable to use snapshots judiciously, keeping them for necessary moments such as before implementing significant changes to your VM or its applications.
Regularly Delete Unnecessary Snapshots
Snapshots are not intended for long-term data retention. They are temporary entities designed to capture the state of a VM at a specific point in time. Therefore, maintaining old or unnecessary snapshots can consume valuable storage resources that could otherwise be utilized more efficiently. Regularly cleaning up old snapshots, especially those no longer needed, is an essential practice in VM management.
Rely on Robust Backup Solutions
While snapshots can provide a quick way to revert a VM to a previous state, they are not a substitute for a robust backup solution. VM snapshots, particularly those without memory, can’t guarantee complete data integrity over the long term. A comprehensive backup solution is necessary for long-term data retention and protection against data loss. It ensures that you have a complete copy of your data stored separately from your VM, which can be crucial in the event of hardware failure or data corruption.
Utilize Snapshot Management Tools
Effective VM snapshot management can be challenging without the right tools. Tools like Snapshot Master simplify this process significantly. They offer features such as scheduled snapshot creation and deletion, snapshot consolidation, automated reports and notifications, and more. With such a tool, you can manage your snapshots more efficiently, ensuring that your VM environment remains healthy and performant.
These practical tips serve as a guide to managing your VM snapshots. Remember, the ultimate goal of snapshot management is to maintain the optimal performance and availability of your VMs while ensuring data integrity. And tools like Snapshot Master can play an integral role in achieving this goal.
Frequently Asked Questions (FAQs)
Q1: Can I use Snapshot Master with any VM platform?
A1: Yes, Snapshot Master is designed to interface with VMWare’s vCentre, Microsoft’s System Center Virtual Machine Manager (SCVMM), and Microsoft Azure. So, it covers a wide range of popular VM platforms.
Q2: How long does it take to create a snapshot with memory compared to one without memory?
A2: The exact time will depend on the specific VM setup and the current workload. However, generally, creating a snapshot with memory takes longer due to the added task of capturing the memory state.
Q3: Do snapshots with memory affect VM performance?
A3: Yes, creating snapshots with memory can temporarily impact the VM’s performance due to the higher I/O workload. However, this effect is typically short-lived.
Q4: What is the best strategy for managing VM snapshots?
A4: A good strategy is to only use snapshots as short-term solutions for system changes or updates, and not as long-term backup solutions. Furthermore, regular cleanup of old snapshots can help maintain efficient storage usage.
Q5: Is it possible to automate the creation and deletion of VM snapshots?
A5: Yes, Snapshot Master provides the feature to schedule snapshot creations and deletions, helping automate the management of your VM environment.
Q6: Are snapshots with memory larger in size compared to those without memory?
A6: Yes, because snapshots with memory include the state of the VM’s memory in addition to the virtual disk’s state, they tend to be larger than snapshots without memory.
Q7: Is Snapshot Master useful only for snapshots?
A7: No, Snapshot Master also allows you to manage your virtual machines, schedule power on and off, connect to them remotely via RDP or PowerShell, and execute Remote Powershell.
Q8: Can I revert a VM to its previous state using Snapshot Master?
A8: Absolutely. Snapshot Master enables you to revert VMs to their previous states using the created snapshots, thus offering an effective way to recover from any potential issues.
Q9: Does Snapshot Master provide any reporting features?
A9: Yes, Snapshot Master lets you automate and schedule reporting of your virtual servers and VMware or Hyper-V environments via email, providing you with regular updates and insights.
Q10: Does a snapshot with memory ensure application consistency?
A10: Yes, a snapshot with memory can maintain a VM’s running applications and processes, ensuring application consistency during recovery.