In the realm of virtualization, snapshots play an integral role in managing virtual machines (VMs). Essentially, a snapshot captures the state of a VM at a specific point in time, providing a reference point to which you can revert if necessary. This can be especially handy when implementing changes to your VM or its applications, allowing you to quickly undo the changes if they cause any unforeseen issues.
The Role of VM Snapshots
VM snapshots can be seen as a form of insurance policy for your virtual environment. By creating a snapshot before a significant update or modification, you’re ensuring that you have a way back in case something goes wrong. For instance, if you’re about to install a new software application on a VM, taking a snapshot beforehand can help you revert the VM to its pre-installation state if the new software causes any problems.
Types of VM Snapshots
There are mainly two types of VM snapshots: those with memory and those without memory. Each serves a different purpose and comes with its own set of characteristics and considerations. Understanding these differences is essential for effective VM management. Snapshots with memory include the VM’s memory state at the time the snapshot was taken, providing a complete snapshot of the VM’s operation. Conversely, snapshots without memory do not include the memory state and only capture the state of the VM’s disk.
The Importance of Effective Snapshot Management
While snapshots are undeniably useful, they also need to be managed effectively. Improper snapshot management can lead to a variety of issues, including wasted storage space, degraded performance, and even data loss in some cases. Fortunately, tools like Snapshot Master exist to help manage VM snapshots. These tools provide features like scheduled snapshot creation and deletion, snapshot consolidation, and automated reporting, significantly simplifying the task of snapshot management.
In this article, we will delve deeper into the differences between snapshots with memory and snapshots without memory. We’ll also discuss how tools like Snapshot Master can help you manage these snapshots more effectively, optimizing your VM operations while safeguarding your data.
The Purpose of VM Snapshots
VM snapshots serve an essential role in the management and operation of virtual machines. They provide a way to preserve the state of a VM at a given point in time, which can be highly beneficial in various scenarios. However, to utilize snapshots effectively, it’s critical to understand their purpose and how they function.
Capturing VM State
The primary purpose of a VM snapshot is to capture the state of the VM at a particular moment. This snapshot acts as a “checkpoint”, recording the VM’s current condition in terms of its memory, settings, and virtual disk.
For a snapshot with memory, this includes not only the disk’s state but also the state of the memory, along with the VM’s settings. This makes it possible to revert the VM to its previous state, including all running processes. This could be particularly beneficial in environments where applications require a continuous state of operation.
On the other hand, a snapshot without memory only captures the disk’s state and the VM’s settings but does not capture the memory’s state. This type of snapshot is quicker to create and uses less storage. However, when reverted, the VM may need to be rebooted, and ongoing processes will not be maintained.
Preventing Data Loss and Facilitating Recovery
Snapshots act as a safety net, helping prevent data loss and facilitate recovery. If you’re making significant changes to your VM, such as installing new software or updating the system, a snapshot taken beforehand can provide a fallback option. If the changes result in unforeseen issues or data loss, you can quickly revert the VM to its state at the time of the snapshot, effectively undoing the problematic changes.
Testing and Development
Snapshots are also extremely useful in testing and development scenarios. They allow developers and testers to experiment with different configurations, applications, or system updates without risking the stability of the primary VM. Once testing is complete, the VM can easily be reverted back to its original state by applying the snapshot, eliminating the need for a time-consuming manual rollback.
Snapshot Management
While snapshots are undeniably useful, they also need to be managed effectively. An unmanaged accumulation of snapshots can consume a large amount of storage space and degrade VM performance over time. Snapshot management tools like Snapshot Master can simplify the process of creating, managing, and deleting snapshots, ensuring that your VM environment remains efficient and performant.
In the following sections, we’ll delve into the differences between snapshots with memory and snapshots without memory, and explore how they can be managed effectively for optimal VM operation.
Understanding Snapshots: With Memory Vs. Without Memory
Understanding the nature of snapshots, specifically snapshots with memory and snapshots without memory, is crucial when dealing with virtual machines (VMs). In essence, both these types of snapshots are used to capture the state of the VM at a particular point in time, but they do so in slightly different ways and for different reasons.
What are Snapshots with Memory?
Snapshots with memory are a comprehensive form of VM snapshot. They encapsulate not just the state of the virtual disk but also the state of the VM’s memory at the time the snapshot was taken. This memory state is crucial for certain types of applications and processes that might be running on the VM. For instance, if your VM is running complex processes or transactions that would be disrupted by a restart, a snapshot with memory can be invaluable. This snapshot type maintains the full context of the VM’s operation, including all ongoing processes, allowing for seamless recovery with no loss of transactional data.
The ability to capture the memory state can also be useful in scenarios like software debugging, where you might want to revert the VM to a previous state without disturbing ongoing processes. While snapshots with memory tend to consume more storage space and can have a more significant impact on performance, they can also provide more granular recovery options for complex VM environments.
What are Snapshots without Memory?
On the flip side, snapshots without memory capture only the state of the virtual disk and not the memory state. These types of snapshots are lighter, faster to create, and consume less storage space. They can be created with minimal impact on the VM’s performance, making them suitable for VMs that do not run memory-sensitive processes.
However, the trade-off for these performance benefits is that a snapshot without memory may require the VM to reboot when you revert to that snapshot. Consequently, any running applications or processes would need to restart. For some environments, this is a negligible downside, especially if speed and storage efficiency are the priority. For others, particularly those with VMs running critical, continuous processes, it’s a crucial factor to consider.
Knowing the characteristics and implications of both snapshots with memory and snapshots without memory can help you make informed decisions when managing your VM environments. And tools like Snapshot Master can significantly simplify the process of creating, managing, and using these snapshots effectively.
Snapshot Considerations: Performance and Application Consistency
Taking snapshots, whether with memory or without, can impact your virtual machine’s performance and application consistency. Understanding these impacts can help you decide which type of snapshot is best suited for your specific use case.
Snapshot Performance Impacts
The process of taking a snapshot requires certain system resources. For a snapshot without memory, these resources include the storage required to record the VM’s disk state. As for a snapshot with memory, additional resources are required to also record the state of the VM’s memory. Therefore, creating a snapshot with memory typically consumes more resources and can take longer, which could potentially impact the VM’s performance.
However, this performance impact is generally temporary and diminishes once the snapshot is complete. Hence, it’s crucial to plan snapshot activities during off-peak hours to minimize the impact on VM performance and user experience.
Disk I/O Considerations
When a snapshot is taken, the VM’s writes are redirected to a delta disk file, a process known as disk I/O redirection. This process occurs regardless of whether the snapshot is with or without memory. The longer the snapshot is kept, the larger this delta file can grow, which can further influence disk I/O operations and hence VM performance. Therefore, snapshots should not be kept for an extended period, and ongoing snapshot management is necessary to mitigate any potential performance impacts.
Restoring VM State
The purpose of a snapshot is to be able to restore a VM to a specific point in time. Snapshots without memory, while faster and lighter, may need the VM to reboot when you revert to the snapshot. This can impact the availability of services running on the VM. In contrast, snapshots with memory can restore the VM without requiring a reboot, thereby maintaining service availability. The choice between these two types of snapshots will depend on the specific requirements and tolerance for service interruption in your VM environment.
Application Consistency
When it comes to application consistency, snapshots with memory hold an advantage. For applications that need to maintain a constant state even during recovery, snapshots with memory are the better option. They can restore the VM with all running applications and processes intact, ensuring application consistency. This is particularly useful in environments running critical applications that cannot tolerate disruptions.
On the other hand, snapshots without memory may require a reboot of the applications when you revert to the snapshot. This could potentially disrupt application consistency, which might not be ideal for certain environments.
By considering these factors, you can choose the appropriate snapshot type that balances performance, disk I/O, service availability, and application consistency according to your specific needs. Snapshot Master can help manage these aspects effectively, allowing for seamless snapshot operations.
Benefits of Using Snapshot Master for Managing VM Snapshots
Snapshot Master is an indispensable tool for anyone managing VM environments. It streamlines various aspects of VM management, especially dealing with snapshots, checkpoints, and data stores. Let’s look at some of its key features in more detail:
Scheduled Snapshot Creation and Deletion
One of the prominent features of Snapshot Master is the ability to schedule snapshot creation and deletion. This functionality ensures that you have up-to-date snapshots available for any point in time. You can set specific times for the software to create or delete snapshots according to your operational needs, thereby automating a significant aspect of VM management. This not only ensures optimal use of resources but also reduces the burden of manual oversight.
Snapshot Consolidation
Over time, you may end up with multiple snapshots for a single VM, which can consume a significant amount of storage space. Snapshot Master offers a snapshot consolidation feature to help with this. By merging these multiple snapshots into one, the tool ensures efficient usage of your storage resources, leading to improved overall performance of your VM environment. Moreover, consolidating snapshots also reduces the risk of running into storage issues due to excessive snapshots.
Automated Reports and Notifications
In the world of IT management, staying informed about your infrastructure’s status is crucial. Snapshot Master assists here by providing automated reports and email notifications. You can receive timely updates about your VM’s status, snapshot creation or deletion events, and data store usage. These reports can provide valuable insights into your VM operations and highlight potential issues before they escalate. The notifications ensure that you’re aware of significant events or changes in your VM environment, allowing for proactive management and timely intervention when necessary.
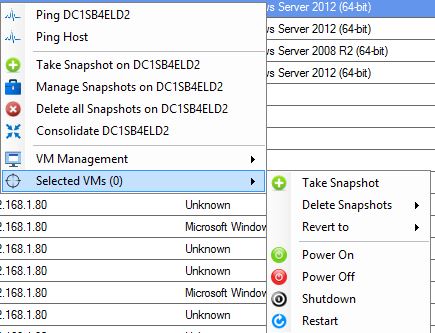
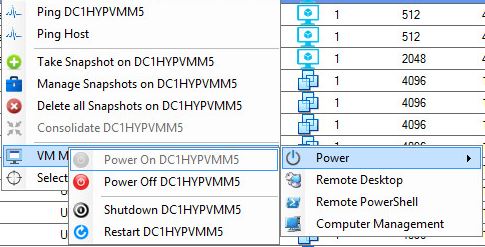
Remote VM Management
In addition to managing snapshots, Snapshot Master also offers remote VM management capabilities. You can power your VMs on or off, connect to them remotely via RDP or PowerShell, and execute Remote PowerShell commands. This feature is incredibly handy when managing a large number of VMs, allowing you to execute tasks or make changes without needing to access each VM individually.
Comprehensive Compatibility
Snapshot Master’s compatibility with VMWare’s vCentre, Microsoft’s System Center Virtual Machine Manager (SCVMM), and Microsoft Azure means that you can have a unified view and control of your VM environment, regardless of the platform. This comprehensive compatibility makes it a versatile tool suitable for various VM setups.
By integrating these features into your VM management, Snapshot Master can significantly simplify your tasks and ensure efficient operations, making it a vital tool in any IT administrator’s toolkit.
Managing VM Snapshots: Some Practical Tips
Managing snapshots in a virtual environment requires a balance between operational needs and resource usage. Both snapshots with memory and without memory have their unique advantages and trade-offs. As such, it’s crucial to develop a snapshot management strategy that suits your specific VM environment and operational requirements. Let’s delve into some practical tips for managing your VM snapshots effectively:
Use Snapshots Judiciously
While snapshots are beneficial, they should not be overused. Every snapshot that you take consumes storage resources. Over time, excessive snapshot usage can lead to storage issues and impact your VM’s performance. Thus, it’s advisable to use snapshots judiciously, keeping them for necessary moments such as before implementing significant changes to your VM or its applications.
Regularly Delete Unnecessary Snapshots
Snapshots are not intended for long-term data retention. They are temporary entities designed to capture the state of a VM at a specific point in time. Therefore, maintaining old or unnecessary snapshots can consume valuable storage resources that could otherwise be utilized more efficiently. Regularly cleaning up old snapshots, especially those no longer needed, is an essential practice in VM management.
Rely on Robust Backup Solutions
While snapshots can provide a quick way to revert a VM to a previous state, they are not a substitute for a robust backup solution. VM snapshots, particularly those without memory, can’t guarantee complete data integrity over the long term. A comprehensive backup solution is necessary for long-term data retention and protection against data loss. It ensures that you have a complete copy of your data stored separately from your VM, which can be crucial in the event of hardware failure or data corruption.
Utilize Snapshot Management Tools
Effective VM snapshot management can be challenging without the right tools. Tools like Snapshot Master simplify this process significantly. They offer features such as scheduled snapshot creation and deletion, snapshot consolidation, automated reports and notifications, and more. With such a tool, you can manage your snapshots more efficiently, ensuring that your VM environment remains healthy and performant.
These practical tips serve as a guide to managing your VM snapshots. Remember, the ultimate goal of snapshot management is to maintain the optimal performance and availability of your VMs while ensuring data integrity. And tools like Snapshot Master can play an integral role in achieving this goal.
Frequently Asked Questions (FAQs)
Q1: Can I use Snapshot Master with any VM platform?
A1: Yes, Snapshot Master is designed to interface with VMWare’s vCentre, Microsoft’s System Center Virtual Machine Manager (SCVMM), and Microsoft Azure. So, it covers a wide range of popular VM platforms.
Q2: How long does it take to create a snapshot with memory compared to one without memory?
A2: The exact time will depend on the specific VM setup and the current workload. However, generally, creating a snapshot with memory takes longer due to the added task of capturing the memory state.
Q3: Do snapshots with memory affect VM performance?
A3: Yes, creating snapshots with memory can temporarily impact the VM’s performance due to the higher I/O workload. However, this effect is typically short-lived.
Q4: What is the best strategy for managing VM snapshots?
A4: A good strategy is to only use snapshots as short-term solutions for system changes or updates, and not as long-term backup solutions. Furthermore, regular cleanup of old snapshots can help maintain efficient storage usage.
Q5: Is it possible to automate the creation and deletion of VM snapshots?
A5: Yes, Snapshot Master provides the feature to schedule snapshot creations and deletions, helping automate the management of your VM environment.
Q6: Are snapshots with memory larger in size compared to those without memory?
A6: Yes, because snapshots with memory include the state of the VM’s memory in addition to the virtual disk’s state, they tend to be larger than snapshots without memory.
Q7: Is Snapshot Master useful only for snapshots?
A7: No, Snapshot Master also allows you to manage your virtual machines, schedule power on and off, connect to them remotely via RDP or PowerShell, and execute Remote Powershell.
Q8: Can I revert a VM to its previous state using Snapshot Master?
A8: Absolutely. Snapshot Master enables you to revert VMs to their previous states using the created snapshots, thus offering an effective way to recover from any potential issues.
Q9: Does Snapshot Master provide any reporting features?
A9: Yes, Snapshot Master lets you automate and schedule reporting of your virtual servers and VMware or Hyper-V environments via email, providing you with regular updates and insights.
Q10: Does a snapshot with memory ensure application consistency?
A10: Yes, a snapshot with memory can maintain a VM’s running applications and processes, ensuring application consistency during recovery.
Implementing Azure DevOps can bring numerous benefits to your organization. The impact of Azure DevOps is felt across many aspects of the software development lifecycle, including planning, development, delivery, and operations.
Improved Collaboration
Azure DevOps shines a light on the importance of collaboration in the software development process. With its integrated features, it breaks down the silos that often exist between various teams in an organization. Through Azure Boards, teams can plan, track, and discuss work across the entire development effort. With customizable dashboards and a host of analytics tools, it provides a unified view of the work being done. This transparency fosters better communication and collaboration among team members.
In addition, Azure DevOps promotes collaboration through Azure Repos, which provides unlimited, cloud-hosted private Git repositories. It enables team members to work together on code in a secure and efficient manner. With pull requests, team members can review each other’s code, fostering a culture of shared responsibility and continuous learning.
Faster Delivery of Software
With Azure Pipelines, teams can automate the build, testing, and deployment of their applications. This continuous integration and continuous delivery (CI/CD) service works with just about any language, platform, and cloud. It can deploy applications to Azure, AWS, GCP, or on-premises infrastructure.
With its comprehensive DevOps toolchain, Azure DevOps enables teams to automate many of the routine tasks associated with software delivery. This automation reduces the risk of human error, accelerates the delivery process, and allows teams to deliver value to their customers faster.
Moreover, Azure Pipelines provides unlimited minutes and 10 parallel jobs for CI/CD on any OS, even if you’re using the free tier of Azure DevOps. This is a significant advantage for teams that are managing multiple applications or working on large projects.
Enhanced Quality Control
Quality control is crucial in software development, and Azure DevOps offers several tools to help teams achieve high-quality outputs. For instance, Azure Pipelines supports continuous integration, a practice that involves automatically building and testing code every time a team member commits changes. This approach allows teams to detect and fix problems early in the development process.
Furthermore, Azure Test Plans offer a comprehensive tool for managing, tracking, and planning testing efforts. It provides a complete toolkit for both manual and exploratory testing, which is integrated with the other components of Azure DevOps. This integration allows testers to collaborate closely with developers, ensuring that quality is built into the product from the start.
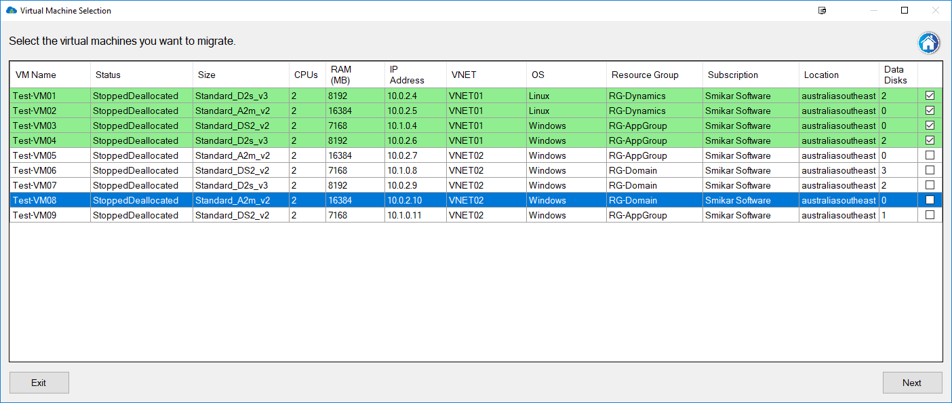
Carbon Azure VM Selection Screen
Getting Started with Azure DevOps
Azure DevOps is a comprehensive solution that meets the needs of developers, project managers, and IT operations teams. But how do you get started with it? Let’s take a closer look.
Creating Your First Project
The first step in getting started with Azure DevOps is to create a project. In Azure DevOps, a project represents a product or service that is under development. It contains all the work items, code, build and release definitions, and test plans associated with that product or service.
Creating a project in Azure DevOps is straightforward. After signing in to Azure DevOps, you can create a new project from the Azure DevOps dashboard by clicking on ‘New project’. You’ll then need to provide some basic information about the project, such as its name and description. You can also choose whether the project is public or private, and select the version control system and work item process for the project.
Understanding Azure Boards
Once you’ve created your project, you can start to use Azure Boards to manage your work. Azure Boards is a work tracking system that can be used to track ideas at every stage of development, from inception to retirement. It supports Scrum, Kanban, and other agile methodologies, as well as traditional approaches to project management.
Azure Boards allows you to create and manage work items, which can represent anything from a new feature to a bug to be fixed. Work items can be categorized into different types, such as user stories, tasks, and bugs, to reflect the nature of the work being done. Each work item has a set of fields that can be filled in to provide more information about the work, such as its title, description, assignment, priority, and status.
You can also use Azure Boards to create backlogs and boards. A backlog is a prioritized list of work items, while a board is a visual representation of the status of work items. Boards can be customized to reflect your team’s workflow, and they provide a real-time view of the progress being made.
Building and Releasing with Azure Pipelines
Azure Pipelines is a powerful tool for automating the build and release process. It supports both continuous integration and continuous delivery, allowing you to automate the process of building, testing, and deploying your applications.
In Azure Pipelines, a pipeline is a series of steps that are run in sequence. These steps can include tasks such as compiling code, running tests, and deploying applications. You can define your pipeline in a YAML file, which allows you to version control your pipeline configuration alongside your code.
Azure Pipelines supports a wide variety of languages, platforms, and cloud providers. It integrates with popular tools like GitHub, Jenkins, and Chef, and it provides a marketplace of extensions for even more functionality. Whether you’re developing a web app, a mobile app, or a microservice, Azure Pipelines provides a flexible and powerful way to automate your build and release process.
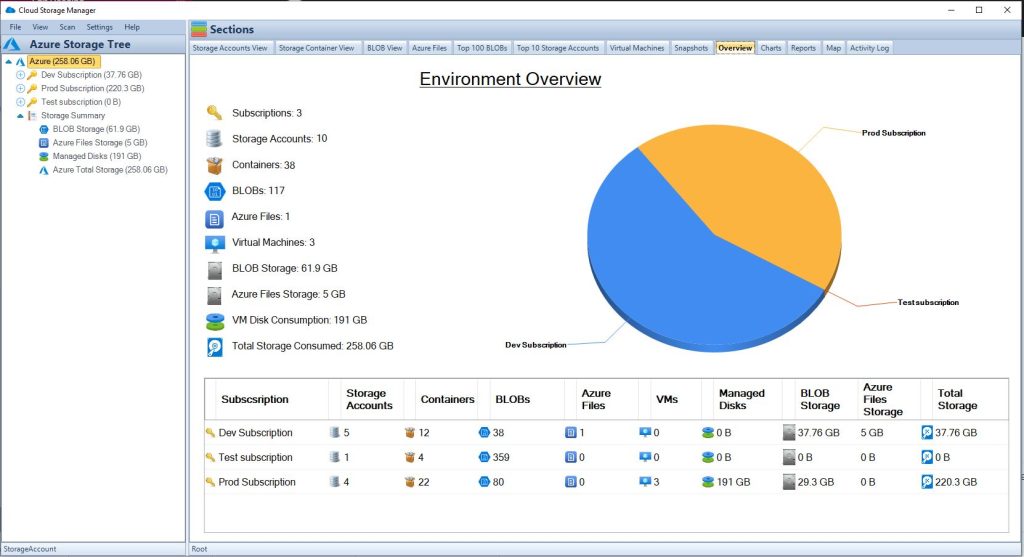
Cloud Storage Manager Overview
Managing Code with Azure Repos
Azure Repos provides a place for your team to store, manage, and track code. It supports both Git and Team Foundation Version Control (TFVC), so you can use the version control system that best suits your team’s needs.
With Azure Repos, you can create and manage repositories for your projects. A repository is a place where your code is stored and versioned. It’s like a database for your code, providing a history of all the changes that have been made.
Azure Repos also supports pull requests, which are a way to review and discuss changes before they’re merged into the main branch. With pull requests, you can ensure that your code is reviewed by other team members before it’s deployed, improving the quality of your code and fostering a culture of collaboration and continuous learning.
Testing with Azure Test Plans
Testing is an essential part of the software development process, and Azure Test Plans provides a suite of tools for managing, tracking, and planning your testing efforts. It offers a complete toolkit for manual and exploratory testing, and it’s integrated with the rest of Azure DevOps, so you can track your testing activities alongside your other work.
With Azure Test Plans, you can create test plans and test suites to organize your testing activities. A test plan is a set of test cases that are intended to be executed together, while a test suite is a collection of related test cases. You can also create test cases, which are detailed steps for verifying a particular functionality or feature.
Azure Test Plans also supports exploratory testing, which is an approach to testing that emphasizes the discovery of new information. With exploratory testing, testers are free to follow their intuition and experience, exploring the application in a less structured way. This allows them to uncover potential issues that may not be caught with traditional, scripted testing methods. Combined with the planning and tracking capabilities of Azure Test Plans, this provides a comprehensive solution for managing all aspects of the testing process within Azure DevOps.
Collaborating with Azure Artifacts
Azure Artifacts is an integrated package management solution provided by Azure DevOps. It allows teams to share and consume different types of packages in a single place, thus fostering collaboration and improving overall productivity. This could be packages produced by your team, or third-party packages that you are using in your projects.
With Azure Artifacts, you can create feeds to store your packages. A feed is a container for packages that can be used to group related packages together. You can control access to your feeds, ensuring that only the right people have access to your packages.
Moreover, Azure Artifacts supports a wide variety of package types, including NuGet, npm, Maven, Python, and more. This means that regardless of the type of project you’re working on or the languages you’re using, you can use Azure Artifacts to manage your packages. By centralizing package management in Azure Artifacts, you can ensure that all your packages are secure, reliable, and easily accessible.
Leveraging Azure Dashboards
Azure Dashboards is a service within Azure DevOps that allows you to create customizable dashboards for your projects. These dashboards can display a wide variety of data, including work items, build and release status, test results, and more. You can customize your dashboards to show the data that’s most relevant to you and your team, and you can create multiple dashboards to suit different needs.
One of the main benefits of Azure Dashboards is that it provides a visual representation of your project’s progress and status. By checking the dashboard, team members can quickly get a sense of how the project is progressing, what work is currently being done, and what work needs to be done next.
Azure Dashboards is fully integrated with the rest of Azure DevOps, meaning that data from Azure Boards, Azure Repos, Azure Pipelines, and Azure Test Plans can all be displayed on your dashboards. This level of integration makes Azure Dashboards a powerful tool for monitoring and managing your projects.
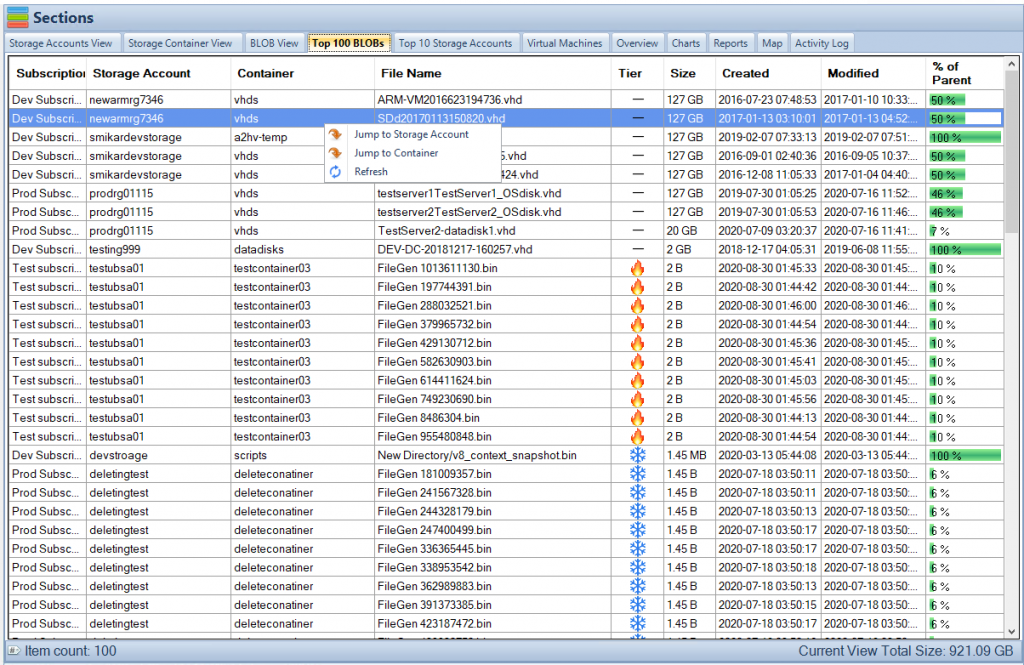
Cloud Storage Manager Top 100 Blobs Tab
Conclusion
Azure DevOps is a comprehensive suite of tools designed to support the entire software development lifecycle. With features for planning, developing, testing, and releasing software, Azure DevOps provides a centralized platform for managing your projects.
One of the key strengths of Azure DevOps is its integration. Each of the services within Azure DevOps – Azure Boards, Azure Pipelines, Azure Repos, Azure Test Plans, Azure Artifacts, and Azure Dashboards – is designed to work seamlessly with the others. This means that you can track your work from idea to release all within a single platform.
Whether you’re a developer, a tester, a project manager, or any other role involved in software development, Azure DevOps has something to offer you. It’s a flexible, powerful, and user-friendly tool that can help you and your team deliver high-quality software more efficiently and effectively.
FAQs
1. What is Azure DevOps?
Azure DevOps is a suite of development tools, services, and features that enables teams to plan work, collaborate on code development, and build and deploy applications. It includes Azure Boards, Azure Repos, Azure Pipelines, Azure Test Plans, Azure Artifacts, and Azure Dashboards.
2. Who can use Azure DevOps?
Azure DevOps can be used by software development teams of all sizes and across all industries. It’s suitable for both small teams working on a single project and large organizations managing multiple complex projects.
3. What are the main components of Azure DevOps?
The main components of Azure DevOps include Azure Boards, Azure Repos, Azure Pipelines, Azure Test Plans, Azure Artifacts, and Azure Dashboards. Each of these components serves a specific purpose in the software development lifecycle, from planning and coding to building, testing, and deploying.
4. Is Azure DevOps suitable for Agile methodologies?
Yes, Azure DevOps supports Agile methodologies. Azure Boards, one of the components of Azure DevOps, is particularly suitable for managing work in Agile teams, supporting Scrum, Kanban, and other Agile methodologies.
5. How does Azure DevOps support collaboration?
Azure DevOps supports collaboration through several of its features. Azure Boards allows for work item tracking and planning, Azure Repos provides version control for code collaboration, Azure Pipelines enables continuous integration and delivery, and Azure Artifacts allows for sharing and consuming packages among teams. All these features are integrated, allowing for seamless collaboration among team members.
In the realm of virtualization and cloud computing, VMware has been a leading name for years, offering robust and innovative solutions to businesses of all sizes. Their products have transformed the way organizations manage their IT infrastructure, enabling them to create flexible, scalable, and secure virtual environments.
On March 18, 2023, VMware introduced the latest version of their flagship product, VMware vSphere 8.0. This new release brings along a host of enhancements and new features that promise to revolutionize how enterprises operate their virtual and cloud environments. In this blog post, we will take a deep dive into what’s new with VMware ESXi Version 8, and how it can benefit your organization.
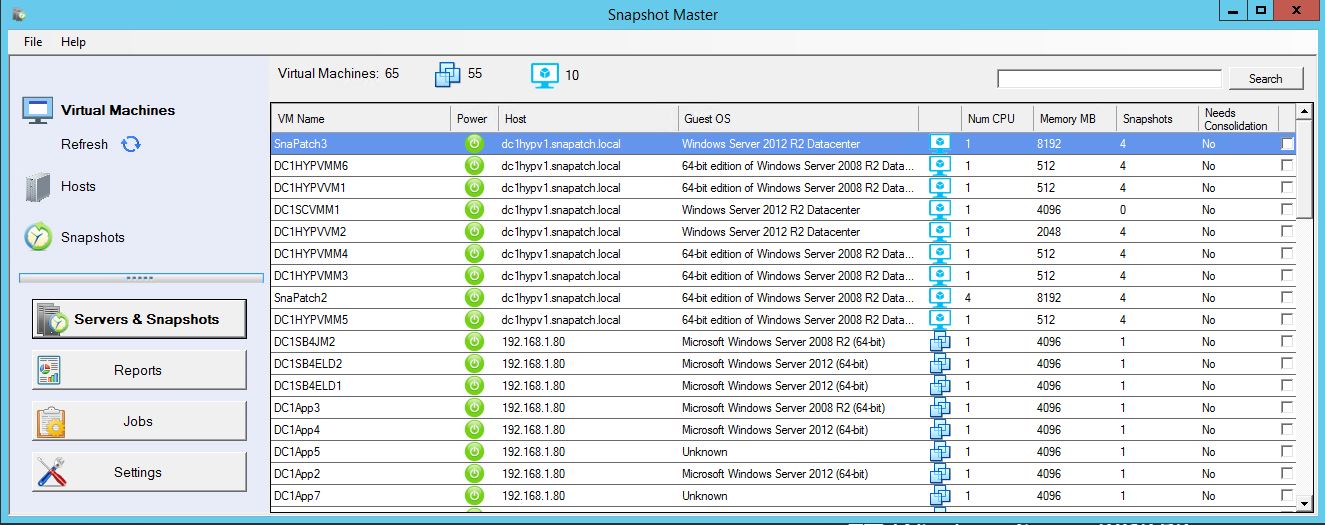
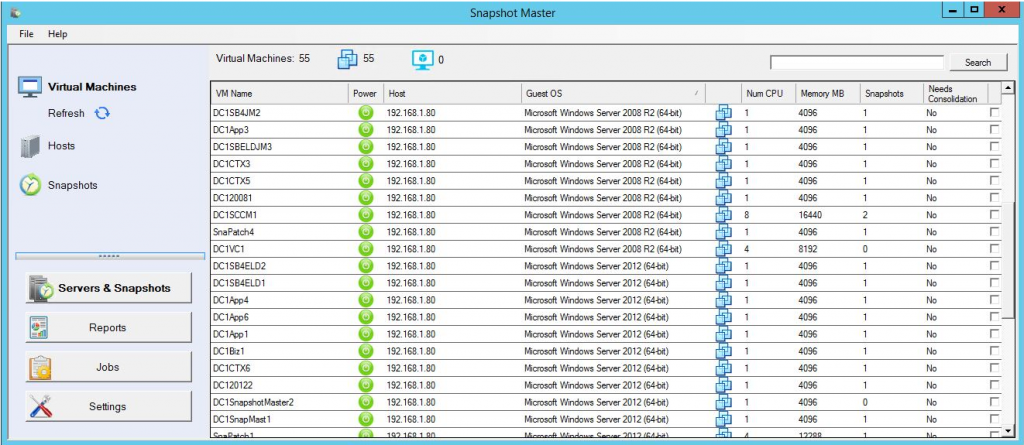
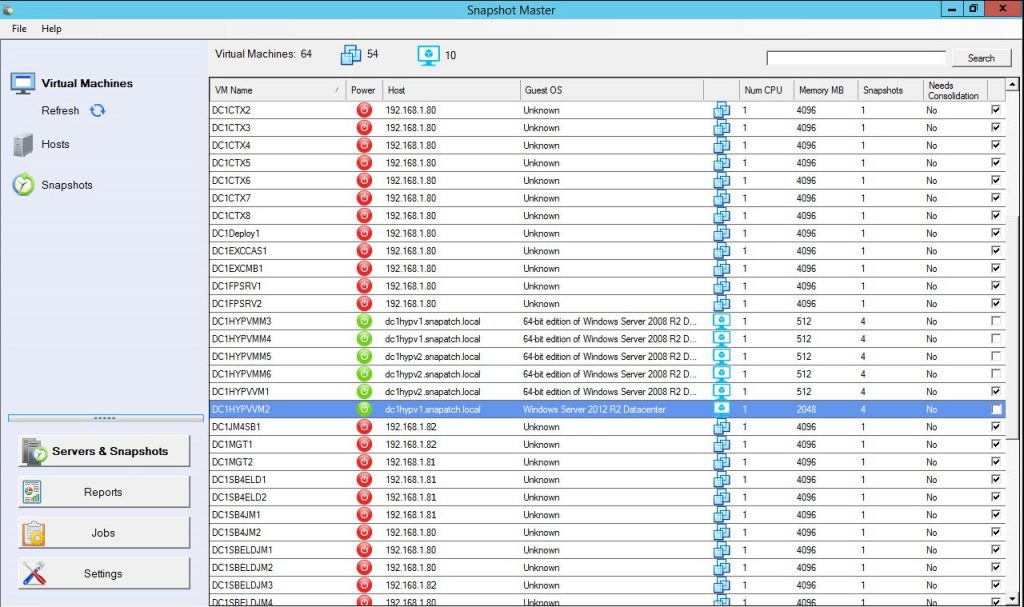
SnapShot Master Main Console Window
Enhanced Scalability: Ready for the Future
Scalability has always been one of the cornerstones of virtualization. VMware vSphere 8.0 takes this a notch higher by supporting the latest Intel and AMD CPUs, making it ready for the newest server hardware on the market. This means that businesses can fully leverage the capabilities of new hardware technologies as soon as they become available, ensuring they stay on the cutting edge of technology trends.
But that’s not all. VMware vSphere 8.0 also increases several limits compared to vSphere 7 U3, making it more scalable and capable of handling even larger workloads. Here’s a quick look at some of these improvements:
The number of vGPU devices has been increased to 8, which allows for more powerful virtual machines that can handle graphic-intensive tasks.
The number of ESXi hosts that can be managed by Lifecycle Manager has been increased from 400 to 1,000, offering greater flexibility in managing large-scale virtual environments.
The number of VMs per cluster has been increased from 8,000 to 10,000, meaning you can now manage more virtual machines within a single cluster.
The number of VM DirectPath I/O devices per host has been increased from 8 to 32, allowing for more direct and efficient hardware access for your VMs.
These improvements show VMware’s commitment to meeting the growing needs of businesses as they expand their virtual environments. Whether you’re running a few VMs or managing a large-scale virtualized infrastructure, vSphere 8.0 is equipped to handle your workloads efficiently and effectively.
Distributed Services Engine: Boosting Performance and Efficiency
One of the standout features in VMware vSphere 8.0 is the introduction of the Distributed Services Engine, a game-changer in terms of performance and efficiency. This new engine works with Data Processing Units (DPUs) to offload tasks from the central processing unit (CPU), thereby enhancing the overall performance of your virtual environment.
A DPU is a new class of programmable processors built on the ARM architecture, designed to work in tandem with CPUs and GPUs for computing operations, particularly those related to networking and communications. In vSphere 8.0, DPUs are incorporated into a Smart NIC controller, which is plugged into the motherboard. This approach can significantly boost network performance in a virtual environment and free up CPU resources for other tasks.
In fact, VMware claims that up to 20% of CPU workloads can be offloaded when using DPUs, resulting in significant performance improvements. This is especially beneficial for organizations running high-performance applications or managing large-scale virtual environments where every bit of performance counts.
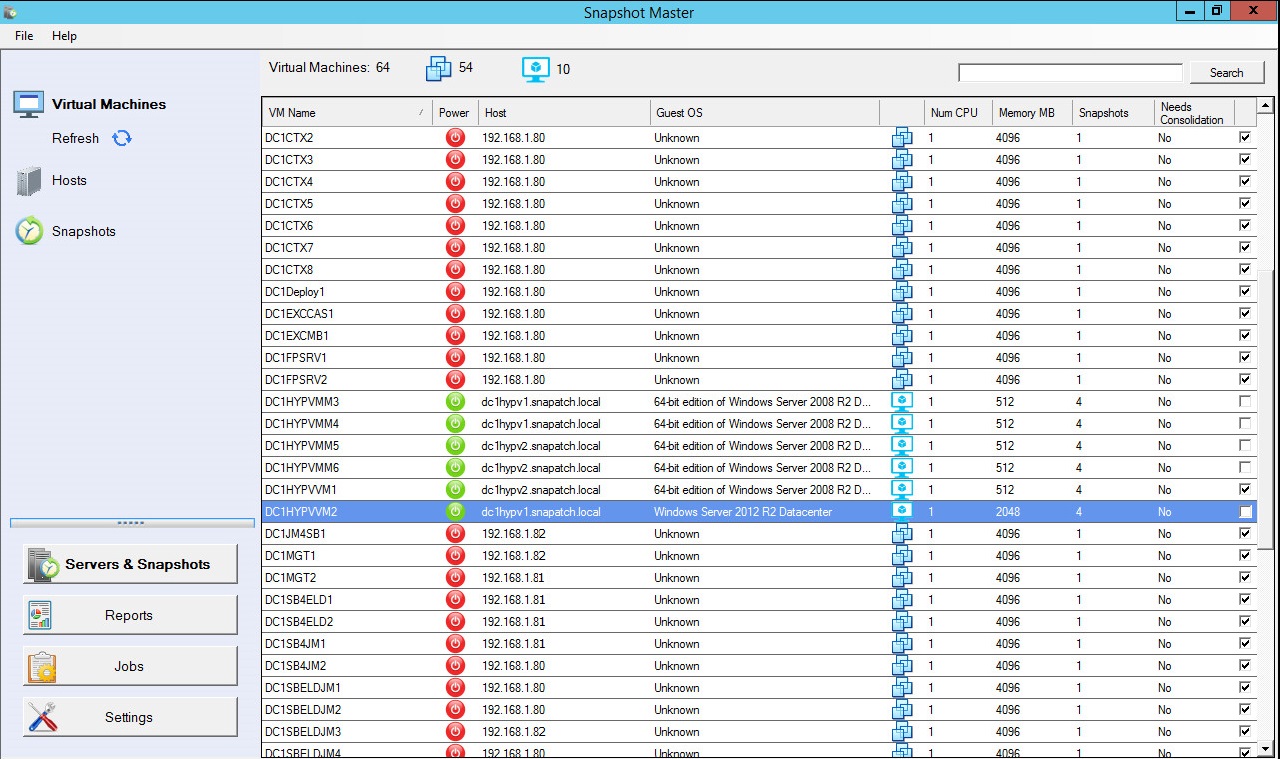
Snapshot Master Restart
Refined Device Management: Optimizing Resources for AI/ML WorkWorkloads
vSphere 8.0 introduces several enhancements aimed at optimizing the use of hardware resources, especially for workloads involving artificial intelligence (AI) and machine learning (ML). One such improvement is the ability to logically link multiple devices, such as GPUs, and connect them to a virtual machine. This feature can significantly boost the performance of AI/ML applications by allowing them to leverage multiple hardware resources simultaneously.
Furthermore, vSphere 8.0 introduces Device Virtualization Extensions (DVX), a new framework that changes how virtual machines use hardware. In previous versions of vSphere, virtual machines could access hardware resources directly via DirectPathIO. However, this approach had limitations, particularly when it came to migrating VMs with vMotion.
DVX resolves these issues by providing a new API framework that vendors can use to support advanced virtualization features such as:
These features give you more control over your virtual machines and make it easier to manage their resources, leading to more efficient and reliable operations.
Data Sharing: Bridging the Gap between vSphere and Guest Operating Systems
Another notable enhancement in vSphere 8.0 is the introduction of vSphere datasets. This feature offers a new way to share data between vSphere and a guest operating system running inside a VM. Datasets are stored with the VM and move with the VM during migration.
This feature is especially useful for applications that require real-time data exchange between the virtual machine and the vSphere management layer. By allowing seamless data sharing, vSphere datasets make it easier to manage complex applications and workflows that involve multiple virtual machines and systems.
Improved Security: Safeguarding Your Virtual Environment
Security is paramount in any IT environment, and virtual environments are no exception. vSphere 8.0 introduces several new security features aimed at making your virtual environment more secure.
SSH timeout: This feature automatically disables SSH access to an ESXi host after a specified period. This helps prevent accidental SSH access, which could potentially expose your system to security risks.
TPM Provision Policy: This feature enhances the security of virtual machines by allowing you to automatically replace a vTPM (Trusted Platform Module) device when cloning VMs. This helps prevent security risks associated with copying TPM secrets.
TLS 1.2 support: vSphere 8.0 now supports a minimum of TLS 1.2, with support for higher versions as well. This means that older, less secure versions of TLS are no longer supported, thereby enhancing the security of communications within your virtual environment.
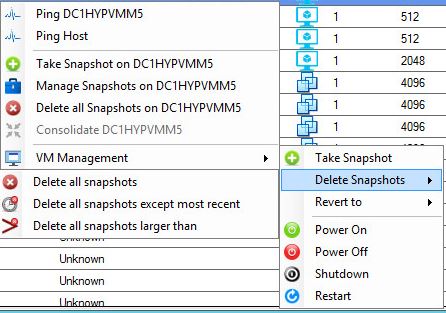
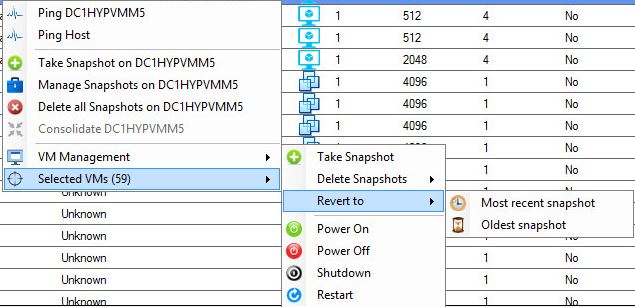
SnapShot Master Right Click Menu Single VM
Conclusion
VMware vSphere 8.0 is a significant upgrade that brings many improvements and new features to the table. With its enhanced scalability, improved performance, refined device management, and strengthened security features, vSphere 8.0 is set to revolutionize how businesses manage their virtual and cloud environments.
As you plan your upgrade to vSphere 8.0, keep in mind that this blog post provides an overview of some of the key new features and enhancements. For a complete list of all updates and changes, please refer to the official VMware release notes.
In a rapidly evolving digital world, staying up-to-date with the latest technologies is key to maintaining a competitive edge. With VMware vSphere 8.0, businesses can leverage cutting-edge virtualization technology to optimize their IT operations and drive business growth.
Snapshot quiescing, a technique employed in the world of virtualization, stands as a pivotal concept to grasp for anyone involved in IT operations. In particular, when working with VMware, understanding snapshot quiescing can significantly streamline your backup and restore operations. It’s a crucial process that ensures the data on a Virtual Machine (VM) is in a consistent state when a snapshot is taken. Imagine it as a photographer asking everyone to stay still for a moment to capture a clear picture. That’s precisely what quiescing does – it momentarily pauses or alters the state of running processes on a VM to get a clear, consistent snapshot.
Concept of VMWare Snapshots
Taking a snapshot is akin to capturing a moment in time. In VMware vSphere, snapshots allow you to preserve the state of a VM at a specific point in time. This includes the VM’s configuration settings, memory state, and disk state. Think of it as a time machine allowing you to go back to a particular moment when a change had not yet occurred or an error had not yet taken place. Snapshots are invaluable in situations like applying system updates or performing testing – if something goes wrong, you can simply revert the VM to the state it was in when the snapshot was taken, effectively undoing any negative impact.
The Quiescing Process
In essence, the quiescing process ensures that the data on a VM is in a consistent state suitable for backups. The operation of quiescing a VM suspends or alters the state of ongoing processes on a VM, especially if a particular process may modify stored data during a backup. When a snapshot is taken during the quiescing process, it represents a consistent view of the guest file system state at a specific point in time.
Understanding Types of VMWare Snapshots
Memory State Snapshots
Memory state snapshots are the default option for taking snapshots in VMware vSphere. They capture and retain the active state of a VM. For instance, if you’re running an application on your VM, a memory state snapshot will save the state of that application. If you revert to this snapshot later, the VM will return to that exact moment, with the application running in the same state. It’s important to note that memory state snapshots take longer to create than non-memory snapshots. The time it takes for the host to write the memory to disk is directly related to the amount of memory the VM is configured to use.
Quiesced Snapshots
On the other hand, quiesced snapshots are used when you need to perform operations on a VM that require a consistent state. The process of quiescing the guest file system ensures that a snapshot represents a consistent view of the guest file system state at a specific point in time. This involves suspending or altering the state of ongoing processes on a VM, especially those that may modify stored data during a backup.
To create a quiesced snapshot, VMware Tools must be installed and running on the VM. The process involves creating a new Volume Snapshot Service (VSS) snapshot inside the guest operating system using the VMware Snapshot Provider function, preparing active applications for backup with VSS writers, writing transactions from the memory to the disk, and signaling the completion of the writing process to the VMware Tools Service. At this point, the system is ready to take a quiesced snapshot. Quiesced snapshots are best used when you configure a VM for regular backups.
In terms of consistency, quiescing a VM achieves both file-system and application consistency. File-system consistency ensures that all file system metadata reflects the actual data on disk. Application consistency ensures that the application data is consistent with the application’s state. Quiescing is essential for highly transactional applications as it helps create transactionally consistent backups or replicas, guaranteeing the safety of application data.
Snapshots in VMware vSphere
Taking snapshots of a virtual machine (VM) in vSphere serves as a powerful tool in the management and protection of your data. These snapshots essentially capture a VM’s memory state, disk state, and configuration settings at particular moments in time, providing a robust mechanism for preserving the state of a VM.
With snapshots, you can effectively revert a VM to a state it was in before a snapshot was taken. This capability proves invaluable in scenarios such as testing new software or system updates. For instance, imagine you’ve just installed a new operating system on your VM. By taking a snapshot before applying any significant changes, such as updates or software installations, you establish a safety net. If any issues arise from these changes, you can effortlessly revert back to the state when the snapshot was taken, effectively undoing any problems.
However, it’s important to note that the process of taking a snapshot can be influenced by the ongoing activities on a VM. As such, snapshots are most effectively taken when a VM is not running I/O-intensive tasks or programs that are constantly communicating with other machines. This is because active data transfer or communication during a snapshot can lead to errors. For instance, if a snapshot is taken during the transfer of a file from a server to a VM, the file in question could appear to be corrupted when you revert back to that snapshot.
Memory State Snapshots vs Quiesced Snapshots
In the realm of snapshots, there are two primary types you can create in a VMware vSphere environment: memory state snapshots and quiesced snapshots. The choice between these two largely depends on your specific needs and the operations you intend to perform on a VM.
Memory state snapshots serve as the default option for taking snapshots in VMware vSphere. They capture and retain the active state of a virtual machine, allowing a running VM to be reverted to the state it was in when the snapshot was taken. This type of snapshot is ideal when you need to save the state of running applications. However, it’s important to note that memory snapshots take longer to create than non-memory snapshots. The time it takes the host to write the memory to disk is directly related to the amount of memory the VM is configured to use. It’s also recommended to avoid using memory snapshots as a replacement for true backups as they don’t provide the same level of data protection and recovery.
On the other hand, quiesced snapshots involve a process known as quiescing the guest file system. Quiescing essentially means bringing the data on a VM into a state suitable for backups. Backup solutions often use VM snapshots to copy data from a VM. The operation of quiescing a VM ensures that a snapshot represents a consistent view of the guest file system state at a specific point in time. This is particularly important if a process might modify stored data during a backup. Quiesced snapshots are most effective when you configure a VM for regular backups.
Quiesced Snapshots and the Importance of Quiescing
Quiescing a VM’s file system is crucial for creating a snapshot that represents a consistent view of the file system state at a specific point in time. This consistency is essential for backups and achieving both file-system and application consistency. During the process of creating a quiesced snapshot, the guest OS’s active applications are prepared for backup using VMware Tools and the VMware Snapshot Provider function, which creates a new Volume Snapshot Service (VSS) snapshot inside the guest operating system. As part of this process, transactions are written from memory to disk, and once the writing process is complete, a quiesced snapshot is taken.
There are two types of consistency to consider when quiescing a VM: file-system consistency and application consistency. File-system consistency refers to the state where all file system metadata reflects the actual data on disk. Application consistency, on the other hand, ensures that the application data is consistent with the application’s state. Quiescing is essential for highly transactional applications as it helps create transactionally consistent backups or replicas, guaranteeing the safety of application data.
However, obtaining more detailed, step-by-step information on the process of creating quiesced snapshots in VMware proved to be challenging within the given time frame. I recommend consulting the official VMware documentation or reaching out to a VMware technical support resource for a more thorough explanation.
Snapshot Master
Snapshot Master is a software solution designed to simplify the process of managing virtual machines (VMs), specifically in regards to maintaining backups and ensuring data security. It provides an automated process for creating snapshots or checkpoints of your virtual machines, ensuring regular backups and data protection. It offers a user-friendly interface for scheduling these snapshots or checkpoints, optimizing VM performance while safeguarding data.
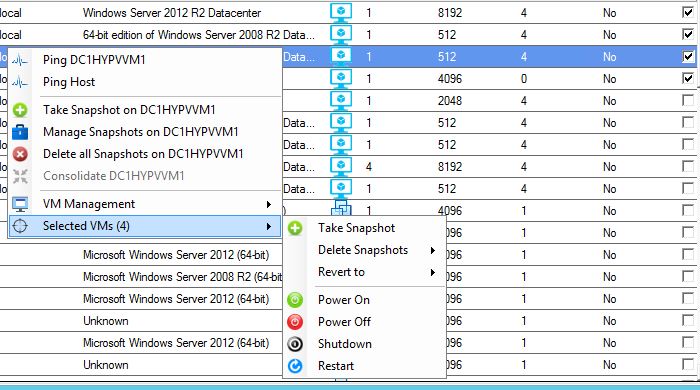
One of the key benefits of Snapshot Master is its compatibility with multiple platforms, including VMWare ESX, Microsoft’s Hyper-V, and Azure Virtual Machines, making it a versatile solution for IT professionals working across different systems. Additionally, it allows efficient management of multiple VMs by enabling you to schedule snapshots or checkpoints for all of them at once, saving time and effort on manual backups.
In conclusion, Snapshot Master is a valuable tool for IT professionals managing virtual machines across different platforms. It automates the process of creating snapshots or checkpoints, simplifies scheduling, and ensures data protection across multiple platforms and VMs, making it an essential solution for those seeking to streamline their backup process and maximize efficiency.
Snapshot FAQs
What is a VMware snapshot?
A VMware snapshot is a copy of the state of a virtual machine at a specific point in time. It preserves the VM’s memory state, disk state, and configuration settings, allowing you to revert the VM back to that state if needed.
What is quiescing in the context of VMware snapshots?
Quiescing is the process of bringing the data on a VM into a state suitable for backups. This process ensures that a snapshot represents a consistent view of the guest file system state at a specific point in time.
What is the difference between a memory state snapshot and a quiesced snapshot?
A memory state snapshot preserves the active state of a VM, including running applications. A quiesced snapshot, on the other hand, suspends or alters ongoing processes to provide a consistent state suitable for backups.
What are the benefits of quiesced snapshots?
Quiesced snapshots ensure that the data in the snapshot is in a consistent state, which is essential for reliable backups. This is particularly important for VMs running databases or other transactional applications that continuously modify data.
Why do memory state snapshots take longer to create?
The time it takes to create a memory state snapshot depends on the amount of memory the VM is configured to use. The more memory that is in use, the longer it will take for the host to write the memory to disk.
What are the requirements for creating a quiesced snapshot?
To create a quiesced snapshot, you need to have VMware Tools installed and running on the VM. The VMware Tools use the Snapshot Provider function to prepare the VM for the snapshot.
What does it mean for a snapshot to be file-system consistent or application consistent?
File-system consistency ensures that all files on the disk are in a consistent state, while application consistency ensures that all in-memory data and transactions have been committed to the disk.
What is SnapShot Master and how can it assist with VM snapshot management?
SnapShot Master is a software solution that simplifies the process of scheduling and managing snapshots for single or multiple VMs across different platforms. It helps automate the creation of backups and offers a user-friendly interface for scheduling snapshots.
Can SnapShot Master be used with different virtualization platforms?
Yes, SnapShot Master is compatible with a wide range of platforms, including VMware ESX, Microsoft’s Hyper-V, and Azure Virtual Machines.
What is the advantage of using SnapShot Master when managing multiple VMs?
With SnapShot Master, you can schedule snapshots for multiple VMs at once, saving time and effort. This is particularly useful for IT professionals managing a large number of VMs across different systems.
VMware ESXi (Elastic Sky X Integrated) is a powerful, enterprise-grade type-1 hypervisor that runs directly on physical hardware — no underlying operating system needed. It provides the foundation for running multiple virtual machines (VMs) on a single host, maximizing resource usage while simplifying IT infrastructure.
Why ESXi Matters in Virtualization
Virtualization has transformed modern computing by enabling organizations to run multiple OS environments on a single server. ESXi plays a central role in this transformation. It allows IT teams to consolidate hardware, reduce costs, and deploy scalable, flexible virtual infrastructures with ease.
Core Role of ESXi in VMware Infrastructure
As the core component of the VMware vSphere suite, ESXi powers VM creation, management, and performance optimization. It acts as the hypervisor layer within a VMware environment, offering seamless integration with vCenter, vMotion, and other key VMware features.
Key Benefits of Using ESXi
Lightweight footprint — no need for a general-purpose OS
Exceptional performance and low overhead
High reliability and uptime for business-critical applications
Advanced security through VM isolation and limited attack surfaces
How ESXi Works
ESXi Architecture
At the heart of ESXi is the VMkernel, which handles CPU, memory, storage, and networking for each VM. Its modular design ensures maximum efficiency and performance, even in large-scale environments.
ESXi vs. ESX – What’s the Difference?
ESXi is the modern evolution of VMware’s original hypervisor, ESX. Unlike ESX, which included a full Linux-based service console, ESXi eliminates this overhead, resulting in a smaller attack surface and better performance.
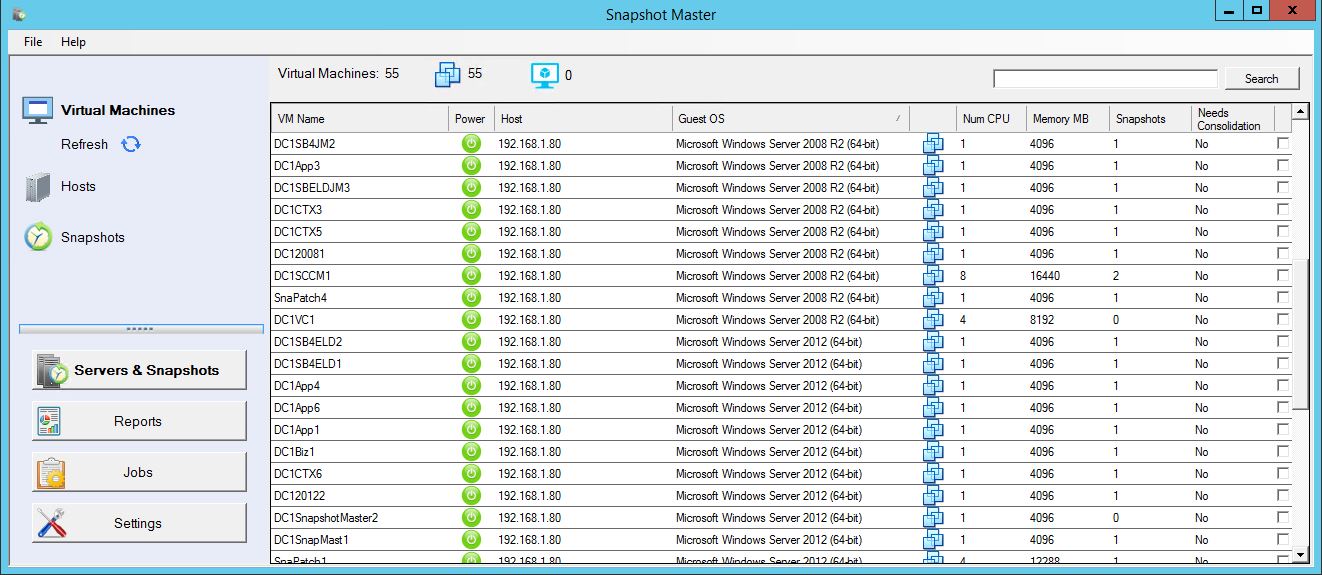
SnapShot Master Power On
ESXi Features & Capabilities
Scalability
ESXi supports massive scalability — ideal for businesses growing their VM footprint. You can manage thousands of VMs across hosts with ease.
Security
Security is built-in with VM isolation, minimal codebase, secure boot, and integration with tools like vSphere Trust Authority and TPM. ESXi also supports role-based access controls (RBAC).
Reliable VM Protection
ESXi limits the attack surface and integrates with security products for advanced threat detection and prevention, ensuring the safety of your virtual machines.
Installing and Configuring ESXi
System Requirements
Check VMware’s compatibility guide to ensure your server hardware is supported. ESXi works best on modern CPUs with virtualization extensions and RAID-capable storage.
Installation Process
Download the ESXi ISO from VMware.
Create a bootable USB or CD.
Boot the server and follow the on-screen installer prompts.
Post-Install Configuration
After installation, configure your host via the DCUI or web interface — set up networking, datastores, and create users. For advanced setups, connect it to vCenter.
Managing ESXi with vSphere
Why Use vSphere?
VMware vSphere provides a centralized platform to manage your ESXi hosts. It enables streamlined operations, automation, and real-time monitoring.
Key vSphere Features
vMotion – live migration of running VMs
HA & DRS – high availability and intelligent resource allocation
Snapshots & Backup Tools – create point-in-time states of VMs
Understanding ESXi Snapshots
What Are Snapshots?
Snapshots are point-in-time captures of VM states, including disk and memory. They allow you to roll back changes during updates or troubleshooting.
Snapshots vs Backups
Snapshots are not a substitute for full backups. They are temporary tools for short-term change tracking. For long-term data protection, use backup solutions.
Try Snapshot Master for managing snapshots across your environment easily.
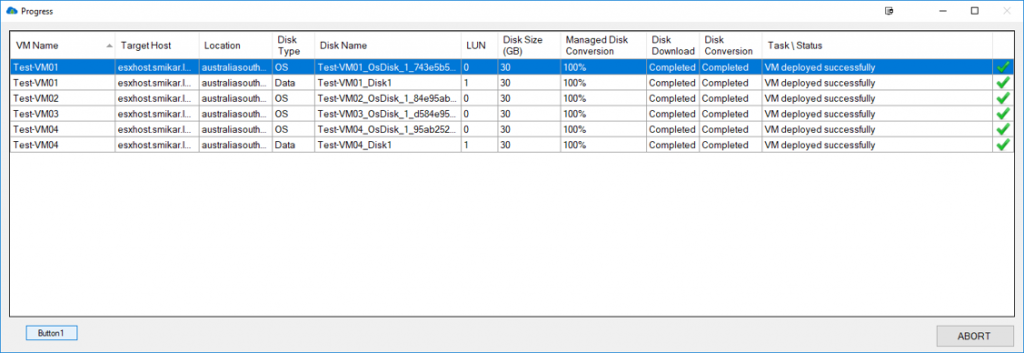
Carbon Azure Migration Progress Screen
Migrating Azure VMs to ESXi
Azure to ESXi Migration Checklist
Confirm VM compatibility and OS support
Export VMs from Azure and convert them to VMDK format