Essential Guide to Protecting Your Data: Mastering Azure Blob Storage Backups
The Importance of Azure Blob Storage Backups
Have you ever heard of Azure Blob Storage? If you work with data storage, then chances are you’ve at least heard the name.
But what exactly is it? In simple terms, Azure Blob Storage is a cloud-based storage solution provided by Microsoft.
It’s used to store and manage unstructured data such as text and binary data, including documents, images, videos, and more. Nowadays, more and more companies are taking advantage of cloud-based storage solutions like Azure Blob Storage due to their flexibility and scalability.
Not only does it provide an affordable option for storing massive amounts of data in the cloud, but it also allows for easy access to this data from anywhere in the world. But with great power comes great responsibility- especially when it comes to managing your company’s precious data.
That’s where backups come in – they allow you to recover your files if something goes wrong with your original source files or even if there is an accidental deletion or corruption. Therefore, backing up your Azure Blob Storage should be at the top of your priority list when considering disaster recovery strategies for your business-critical applications that rely on this type of data storage solution.
Without proper backups in place, any loss or corruption of valuable company information stored in Azure Blob Storage could lead to extensive downtime and revenue losses that could take weeks or even months to recover from. In short- backups = peace of mind!
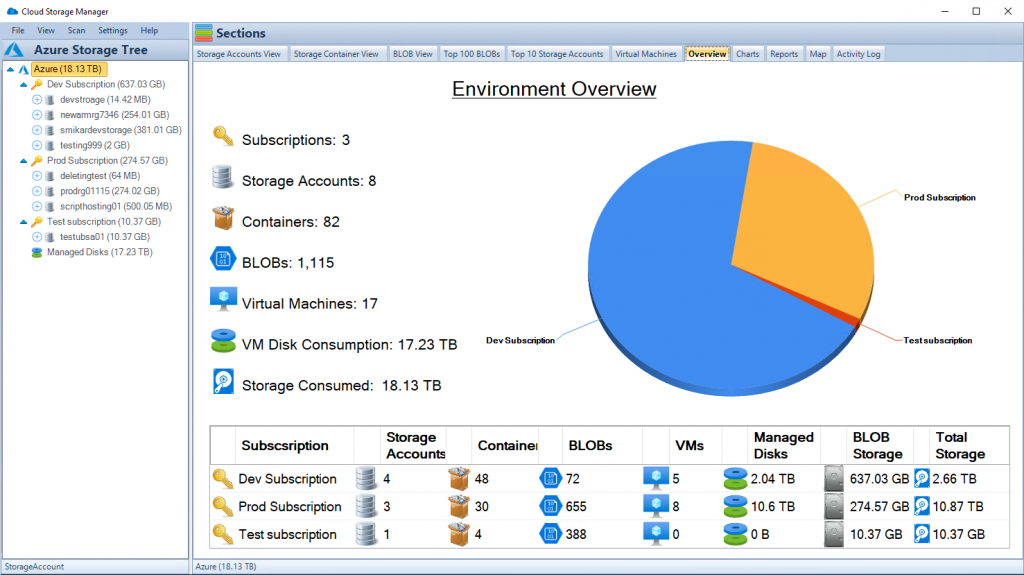
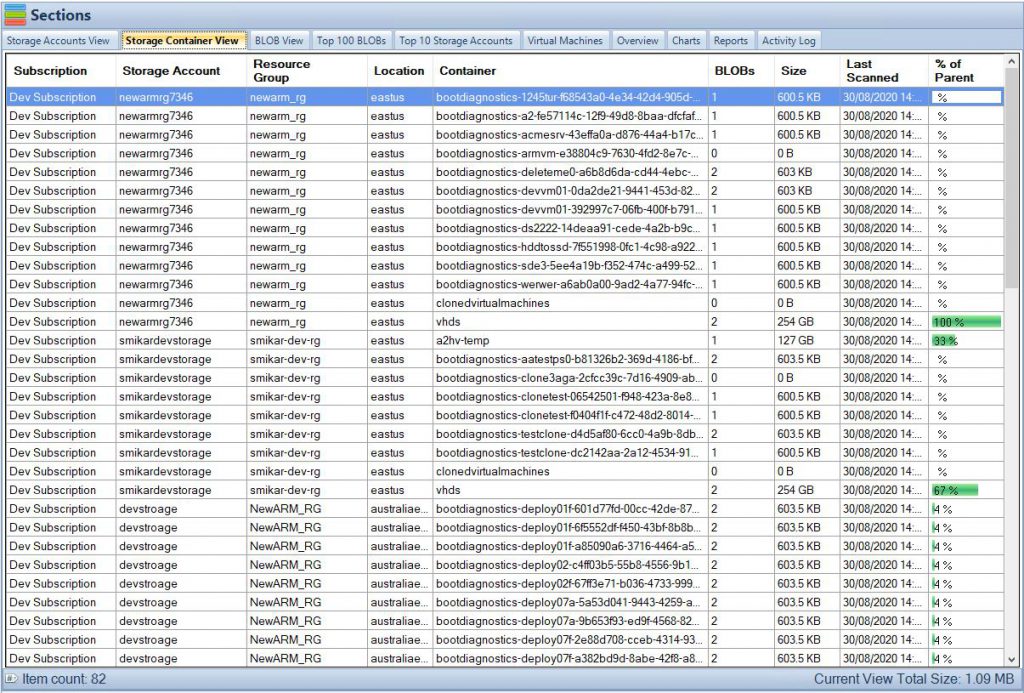
Cloud Storage Manager Main Window
Azure Blob Storage Backup Basics
Explanation of backup options available in Azure Blob Storage
Azure Blob Storage is a cloud-based storage solution that provides secure and scalable data storage for various applications. In order to protect your data stored in Azure Blob Storage, backup solutions are necessary.
There are several backup options available for Azure Blob Storage, including manual backups, automated backups using the Azure portal, and PowerShell commands. Manual backups involve manually copying data stored in Azure Blob Storage to another location such as an external hard drive or another cloud-based storage solution.
This method can be time-consuming and may not be practical for large amounts of data. Automated backups using the Azure portal allow you to schedule regular backups of your data stored in Azure Blob Storage.
This method is easy to set up and can be configured according to your specific needs. The automated backups can also be configured with retention policies that dictate how long the backed-up data will be retained.
PowerShell commands provide a programmatic approach to backing up your data stored in Azure Blob Storage. This method involves writing scripts that automate the backup process and allow for more granular control over the backup settings.
Comparison of different backup options and their benefits
When comparing these different backup options, there are several factors to consider. Manual backups may work well for small amounts of data but become impractical for larger datasets due to increased time requirements and potential human error. Automated backups provide an efficient and practical solution for most users while PowerShell scripting provides advanced functionality, but requires more technical knowledge.
Automated backups offer greater efficiency as they automatically create periodic scheduled snapshots of one’s blob container(s). With this feature enabled any changes made since the last snapshot will be safe-guarded by creating versioned copies without any manual intervention needed from you, thus freeing up valuable time.
PowerShell scripting allows users granular control over their automated backup solutions and allows for the creation of complex backup schedules and retention policies. This method is ideal for advanced users who require highly customized backup solutions.
Azure Blob Storage offers several backup options to choose from depending on your specific use case needs. Automated backups are a great place to start as they provide the greatest efficiency with the least amount of management.
PowerShell scripting provides the most customization for advanced users who prefer greater control over their backups. Ultimately, it is important to ensure that your data stored in Azure Blob Storage is regularly backed up in order to safeguard against data loss or corruption.
Setting up Azure Blob Storage Backups
Step-by-step Guide on How to Set Up Backups for Azure Blob Storage
Setting up backups for Azure Blob Storage can be done using either the Azure portal or PowerShell commands. In this guide, we will focus on using the Azure portal to set up backups.
To get started, log in to your Azure account and navigate to the storage account that you want to configure backups for. From there, select the “Backup” option under the “Data management” section of the menu.
Next, you will need to create a new backup policy. This policy will determine how often your data is backed up and how long these backups are retained for.
Select “Create” and then enter a name for your backup policy. Once you have created your backup policy, you can begin configuring your backup schedule and retention policies.
You can choose how often backups occur (daily, weekly or monthly) and what time of day they occur. You can also determine how long backups should be stored before they are automatically deleted.
Select which containers within your storage account should be included in the backup process. Once you have made all of these selections, click “Enable Backup” to activate your new backup policy.
Tips for Configuring Backup Schedules and Retention Policies
When setting up backup schedules and retention policies, there are a few things that you should consider:
– Determine how often data changes: If data within your storage account changes frequently, it may be necessary to set up more frequent backups.
– Decide on retention period: Consider compliance regulations or company policies when deciding on retention periods; ensure are not saving data more than needed.
– Monitor usage of resources by verifying performance during specific times of day
– Regularly verify that backups are working correctly
– Use test restores regularly
It is important to periodically review your backup policies to ensure that they are still meeting your needs and adjusting for any changes. By following these tips, you can ensure that your Azure Blob Storage backups are set up in a way that meets your needs while minimizing costs.
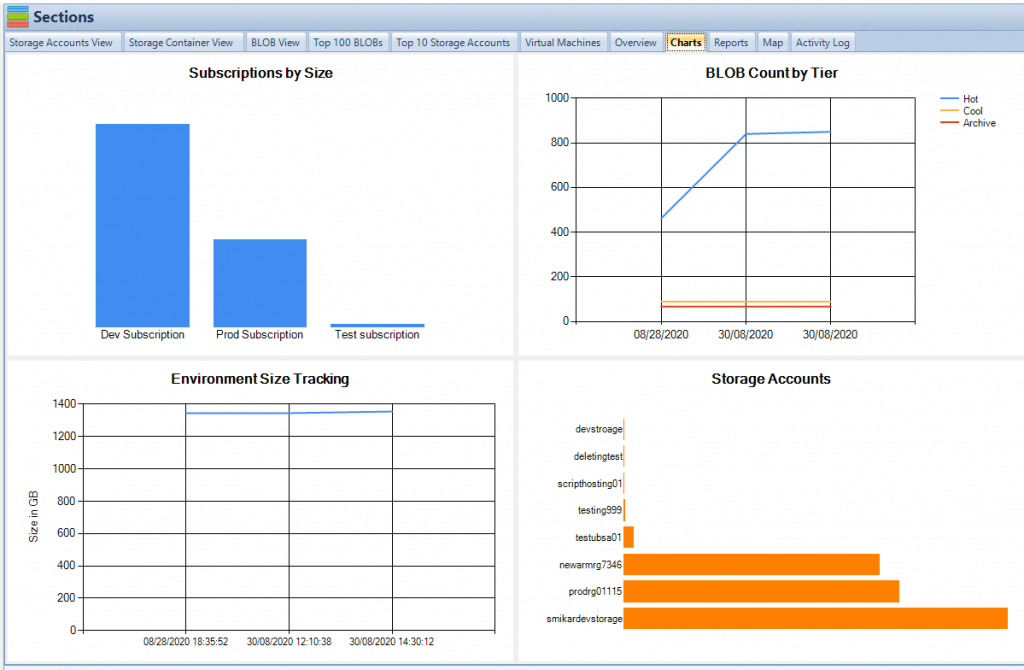
Cloud Storage Manager Charts Tab
Best Practices for Azure Blob Storage Backups
Recommendations for Ensuring Successful Backups
Backing up data stored in Azure Blob Storage is crucial for data protection and recovery. To ensure successful backups, it is essential to monitor backup status regularly.
Monitoring backups can help detect issues that may arise during the backup process and help you take necessary actions to resolve them promptly. You can monitor backup status using Azure Monitor, which provides a centralized dashboard that shows the latest backup status and alerts you if any issues are detected.
Additionally, setting up email notifications can keep you informed of any changes in the backup status. Verifying backups regularly is another important best practice that ensures data integrity.
Regularly verifying backups helps identify corrupted or incomplete backups and enables quick remediation before it’s too late. You can verify backups by restoring a few files from the backed-up data and comparing them with the original data.
Tips for Optimizing Backup Performance
Optimizing backup performance is essential to ensure that backups complete on time while minimizing costs. One way to optimize performance is by leveraging incremental backups, which only back up new or changed data since the last backup operation. This approach saves storage space and reduces backup times significantly.
Another way to optimize performance is by using parallelism when backing up large volumes of data. Parallelism enables multiple threads to perform simultaneous operations, reducing overall processing time significantly.
Compressing backed-up data also helps optimize performance by reducing storage requirements while minimizing network traffic during transmission. However, compression increases CPU usage, so it’s essential to find a balance between storage savings and CPU usage when compressing data.
Tips for Minimizing Costs
Azure Blob Storage offers several cost-saving options that organizations can leverage when backing up their data. One of these options includes defining retention policies that automatically delete old versions of backed-up files. This approach helps reduce storage costs by eliminating unnecessary data.
Another way to minimize costs is by leveraging geo-redundancy, which replicates backups across multiple regions automatically. Geo-redundancy protects against data loss due to regional disasters and ensures that backups are readily available when needed.
Backing up data during off-peak hours can help lower costs significantly. Azure Blob Storage offers lower pricing during off-peak hours, enabling organizations to back up their data at a reduced cost without compromising performance or reliability.
Adopting best practices for Azure Blob Storage backups is essential to ensure successful backups while minimizing costs and optimizing performance. By monitoring backup status regularly, verifying backups regularly, optimizing backup performance and minimizing costs, organizations can protect their valuable data effectively and ensure business continuity in case of disasters or disruptions.
Cloud Storage Manager, allows you to see how much data you are consuming, per storage account, container and subscription. See where you can save money on your Azure Storage.
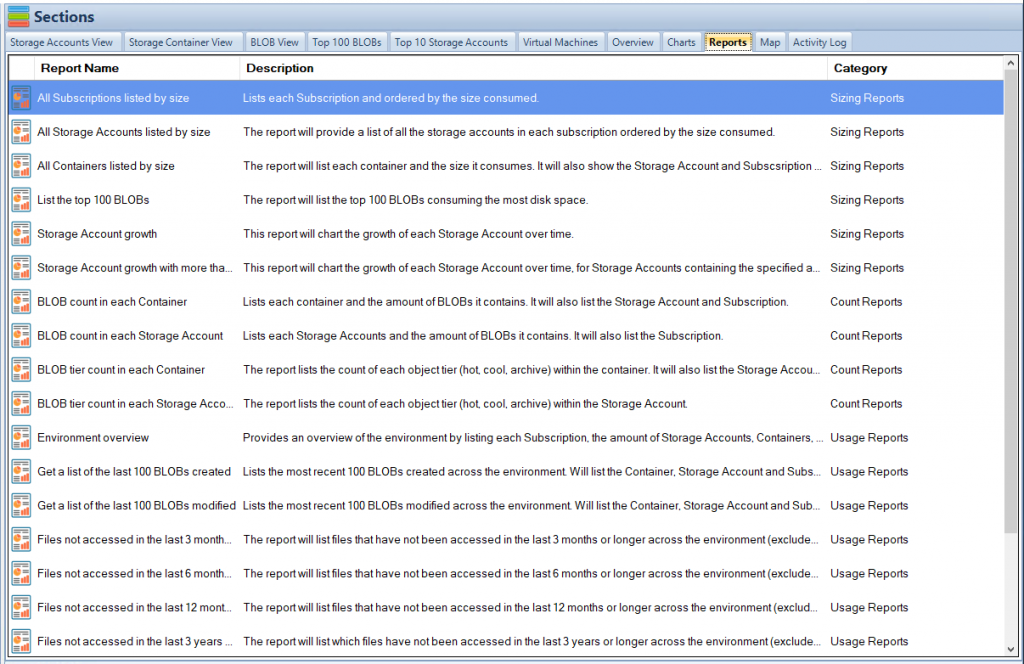
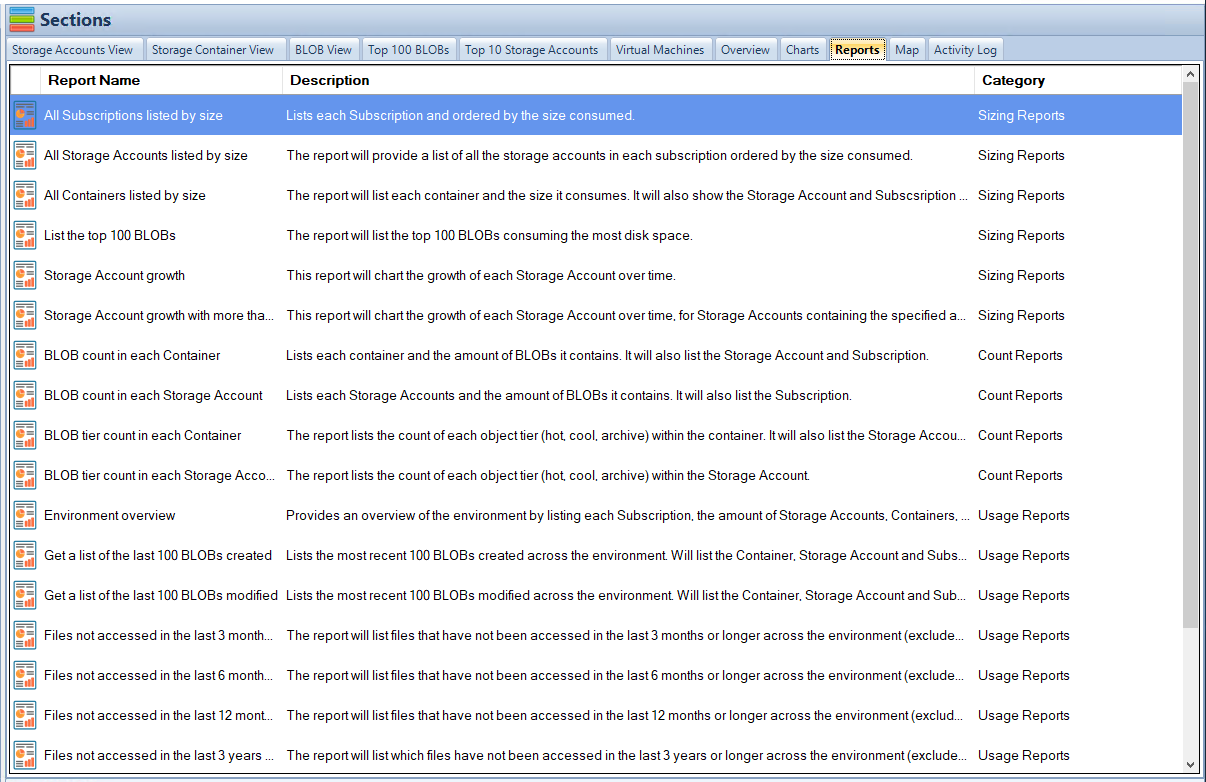
Cloud Storage Manager Reports Tab
Advanced Features for Azure Blob Storage Backups
Incremental Backups: The Next Step in Backup Efficiency
Azure Blob Storage offers incremental backups, a feature that allows for more efficient use of storage space and faster backup times. Incremental backups only copy the changes made since the last backup, rather than creating a full backup each time.
This means that, after the initial full backup, subsequent backups will take up much less space and be completed much faster. The benefits of incremental backups are clear: they save space on your storage account and reduce the time it takes to complete a backup.
Additionally, because less data is being transferred during each backup operation, overall network traffic is reduced. Incremental backups are ideal for large datasets that do not change frequently but still require regular backups.
Geo-Redundancy: Protecting Data from Local Disasters
Geo-redundancy is an advanced feature of Azure Blob Storage that allows you to create multiple copies of your data across different geographic regions. By replicating your data across different regions, you can ensure that it remains accessible even if one region experiences an outage or disaster.
The benefits of geo-redundancy are clear: it provides an additional layer of protection against natural disasters or other events that could cause data loss. Additionally, because your data is replicated across multiple regions, you can choose which region to access based on factors such as latency or cost.
Cross-Region Replication: Ensuring Data Availability Around the World
Cross-region replication is another advanced feature offered by Azure Blob Storage. With cross-region replication, you can replicate your data to different regions around the world. This ensures that your data remains available to users in different parts of the world with low latency.
The benefits of cross-region replication are clear: it ensures that your data is available to users in different regions around the world with low latency. Additionally, because your data is replicated in multiple regions, you can choose which region to access based on factors such as latency or cost.
Use Cases for Advanced Azure Blob Storage Backup Features
The advanced features of Azure Blob Storage backup have many use cases across a variety of industries. For example, incremental backups are ideal for large datasets that do not change frequently but still require regular backups. Companies with globally distributed user bases will benefit from cross-region replication and geo-redundancy as these features ensure that data remains accessible to users around the world.
In addition, companies that require high levels of regulatory compliance will benefit from advanced backup features. For example, geo-redundancy can help companies meet strict data residency requirements by ensuring that data is stored within specific geographic regions.
Overall, the advanced features available for Azure Blob Storage backups provide an extra layer of protection and efficiency for your organization’s critical data. By leveraging these features, you can ensure that your data remains safe and accessible at all times.
Overview of Common Issues that May Arise During the Backup Process
Backing up data in Azure Blob Storage is important, but it does not always go as planned. Some common issues that users encounter during the backup process include configuration errors, issues with connectivity or permissions, and problems with the backup software itself. Configuration errors can result in backups not being performed correctly or data being lost.
Connectivity or permission issues can cause backups to fail completely or result in incomplete backups. Another common issue is encountering an error message when trying to perform a backup.
Error messages can be cryptic and hard to understand, making troubleshooting difficult. However, these messages often provide important clues about what went wrong and how to fix it.
Users may run into problems when trying to restore from a backup. If the backup was not performed correctly, restoring from it may cause data loss or corruption.
Troubleshooting Tips to Resolve These Issues
To troubleshoot common issues during the backup process for Azure Blob Storage, there are several steps that users can take:
1. Check the configuration settings for backups and ensure they are correct.
2. Verify connectivity and permissions for both source data and target storage account.
3. Review error messages carefully for clues on what went wrong.
4. Use diagnostic tools such as Azure Storage Explorer or PowerShell commands to identify potential problems.
5. Test restores regularly to ensure backups are working correctly.
If these steps do not resolve the issue, reaching out to Microsoft support may be necessary for further assistance. It is also important to regularly review backup policies and schedules to ensure they meet changing business needs and comply with any regulatory requirements.
The Importance of Regular Monitoring
Monitoring should be an essential part of any Azure Blob Storage backup strategy because it helps identify potential issues before they become major problems. Regularly monitoring backup status and verifying backups can help ensure data is being backed up correctly and that it is recoverable in case of a disaster.
Users can set up alerts to notify them when backups have failed or when backup storage capacity is running low. This proactive approach helps prevent data loss and minimize downtime in case of a disaster.
The Benefits of Partnering with a Managed Service Provider
Partnering with a managed service provider (MSP) can provide benefits for companies that use Azure Blob Storage for data storage. MSPs offer expertise and support for backup solutions, helping prevent common issues from occurring and ensuring reliable backups are performed on schedule.
MSPs can also provide guidance on the best practices for configuring backups, testing restores, and monitoring backup status. By partnering with an MSP, companies can focus on their core business operations while relying on the expertise of professionals to handle their Azure Blob Storage backups.
Conclusion
Backing up data stored in Azure Blob Storage is of utmost importance. With the various backup options available, it is easy to set up a reliable backup system that ensures your data is always safe and secure.
In this article, we have covered the basics of Azure Blob Storage backups including available backup options, how to set up backups and best practices for successful backups. We have also explored advanced features such as incremental backups, geo-redundancy and cross-region replication.
These features allow for better redundancy and disaster recovery planning. It’s important to note that while these features do come at an additional cost, they are worth it for businesses that rely heavily on their data.
Common issues with backups were also discussed along with troubleshooting tips. By being proactive in monitoring the status of your backups and verifying them regularly, you can avoid potential issues and ensure that your data is always recoverable.
Recap of Key Takeaways
Azure Blob Storage provides various backup options including Full Backups, Incremental Backups, Geo-Redundant Backups and Cross-Region Replication
Setting up a backup system in Azure Blob Storage can be done easily using either the portal or PowerShell commands
The key to successful backups is being proactive by monitoring status regularly and verifying them often
Advanced features such as incremental backups, geo-redundancy and cross-region replication offer more redundancy options but come at an additional cost
Final Thoughts on the Importance of Backing Up Data Stored in Azure Blob Storage
In today’s digital world where data loss can result in serious consequences for businesses or individuals alike; backing up your data has become increasingly important. Failure to create backups can lead to data loss, which can be catastrophic for businesses especially in industries that rely heavily on data. By using Azure Blob Storage Backup solutions, you are able to ensure that your data is always available when you need it.
With simple and easy-to-use backup options available, setting up a backup system is not only simple but necessary. Overall, backing up your data in Azure Blob Storage should be a top priority.
It is best practice for any organization or individual using cloud storage to have reliable backups in place at all times. Whether it’s basic backups or advanced features such as incremental backups and cross-region replication, the benefits of having a backup system far outweigh the costs involved.
Azure Service Principals – The Key to Managing Your Azure Resources
Azure Service Principals are a crucial aspect of managing your Azure resources. They provide a secure and efficient way to manage your resources, without the need for human intervention.
In this article, we will explore what Azure Service Principals are, how they work, and why they are important. As you may already know, Azure is a cloud computing platform that allows you to host, deploy and manage your applications and services.
With its vast range of features and capabilities, it can be challenging to manage all of your resources effectively. This is where Azure Service Principals come in.
Azure Service Principals allow you to create and assign roles to an identity that can be used by applications or services that need access to specific resources in your Azure environment. This provides a secure way for these applications or services to access the resources they need while keeping them separate from end-users.
The Importance of Managing Your Azure Resources
Managing your Azure resources can be challenging as there are so many things to keep track of. You need to ensure that everything runs smoothly without any downtime or glitches affecting your end-users’ experience. And you need to protect against cyber threats such as unauthorized access or data breaches.
One way you can do this is by using role-based access control (RBAC). RBAC helps you specify what actions users or groups can perform on specific resources within the scope of their assigned roles.
By using RBAC with Service Principals, you can ensure that only authorized requests have access to critical data. Another advantage of using an Azure Service Principal is scalability – it allows multiple applications or services with varying degrees of access privileges to interact with the same resource securely and efficiently without conflicting with each other’s permissions.
How An Azure Service Principal Works
An azure service principal is essentially an identity created within your Azure Active Directory. It is similar to a user account but is used specifically for applications or services that need to access specific resources within the Azure environment.
So, how does it work? Let’s say you have an application that needs to access a database located in your Azure environment.
You create an Azure Service Principal and assign it the necessary roles and permissions required to access this database. The application can use this service principal’s credentials when connecting to the database securely.
These credentials can be configured with different authentication methods such as certificates or passwords, depending on your security requirements. Additionally, you can customize your service principal further by configuring its expiration date, adding owners or contributors, and applying additional policies and permissions.
Why Use An Azure Service Principal?
Using an Azure Service Principal provides several benefits for managing your Azure resources effectively. For one, it allows you to separate identity from applications or services that require access to resources – reducing risks of unauthorized access by end-users. Service principals also enable efficient delegation of permissions across different roles and allow for centralised management of resource access privileges.
By creating multiple service principals with varying degrees of permissions – you can grant project teams granular control over their own applications/resources without compromising overall data security. Overall: In summary, using an azure service principal as part of RBAC ensures secure management of all elements in your azure environment; thus helping prevent cyber-attacks while improving operational efficiency through streamlined resource management.
What are Azure Service Principals?
Azure Service Principals are an important part of managing Azure resources. They are essentially security objects that allow for non-human, automated tasks to be performed in Azure. In simpler terms, they provide a way for programs and applications to authenticate themselves when interacting with Azure resources.
When it comes to identities in Azure, there are three main types: user accounts, service accounts, and service principals. User accounts are what you or I use to login and interact with the portal.
Service accounts are used for applications that need access to resources but don’t require permissions beyond what is needed to perform their specific task. Service principals, on the other hand, can be thought of as a more specific type of service account – they represent an application or service rather than a user.
Service principals have a unique identifier called an Object ID which can be used to refer to them when assigning roles or permissions within Azure. They can be assigned roles just like users or groups can be – but because they aren’t tied to any one person’s account, they provide a more secure way for programs and applications to interact with resources.
Comparison to other types of identities in Azure
So how do service principals compare to user and service accounts? User accounts have their own set of login credentials and permissions associated with them; they’re meant for interacting with Azure manually through the portal or command line tools like PowerShell.
Meanwhile, service accounts are similar but intended for use by non-human entities such as application pools in IIS. Service principals bridge the gap between these two types by allowing programs and applications authenticating themselves using OAuth 2.0 protocol instead of manually entering credentials each time they need access.
This makes them ideal for scenarios where automation is required – such as CI/CD pipelines where code needs access permission too often without human intervention. Overall Azure Service Principals provide an essential way for non-human entities to interact with Azure resources without compromising on security.
Creating an Azure Service Principal
Azure Service Principal is a type of identity that allows you to manage Azure resources programmatically. It is widely used in automation scripts and applications because it provides secure and fine-grained access to resources. Creating an Azure Service Principal is a straightforward process that involves a few steps.
Step-by-step guide on how to create an Azure Service Principal
There are different ways to create an Azure Service Principal, but the easiest and most common method is using the Azure portal. Here are the steps:
1. Sign in to the Azure portal.
2. Navigate to your subscription and select “Access control (IAM)” from the menu.
3. Click on “Add” and select “Add role assignment” from the dropdown menu.
4. In the “Add role assignment” blade, select a role that you want to assign to your service principal, for example, “Contributor”. You can also create custom roles if needed.
5. In the “Assign access to” section, select “Azure AD user, group or service principal”. 6. Click on “Select” and then click on “Create new”.
Explanation of different authentication methods available
When creating an Azure Service Principal, you have two options for authentication: password-based authentication and certificate-based authentication. Password-based authentication involves creating a client secret which is essentially a password that you use with your application or automation script to authenticate with the service principal. This method is simple and easy but it requires managing passwords which can be challenging at scale.
Certificate-based authentication involves creating a self-signed certificate which is used by your application or automation script as a credential for authenticating with the service principal. This method offers higher security than password-based authentication because certificates can be revoked easily if needed.
In general, certificate-based authentication is recommended for applications that run in secure environments because it provides a higher level of protection. However, password-based authentication is still commonly used in many scenarios because it is easier to manage and implement.
Creating an Azure Service Principal is an easy and important step for managing Azure resources programmatically. By following the above steps and choosing the appropriate authentication method, you can create a secure and scalable identity that provides fine-grained access to your resources.
Assigning Roles to an Azure Service Principal
Azure Service Principals are a powerful tool for managing Azure resources, allowing you to automate the management of your resources without having to manually configure each resource individually. To properly manage your resources with a Service Principal, you need to assign it the appropriate roles. In this section, we’ll take a look at how roles work in Azure and how you can assign them to an Azure Service Principal.
How Roles Work in Azure
In Azure, roles are used to determine what actions users (or identities like service principals) can perform on specific resources. There are several built-in roles that come with different levels of access, ranging from read-only access to full control over the resource.
You can also create custom roles if none of the built-in ones meet your needs. When assigning a role to an identity such as a Service Principal, you will need to specify the scope at which the role should be assigned.
This scope determines which resources the identity has permission for. For example, if you assign a role at the subscription level, then that identity will have that role for all resources within that subscription.
Why Roles Are Important for Managing Resources
Roles are important for managing resources because they provide a way to control who has access and what level of access they have. By assigning appropriate roles to identities like service principals, you can ensure that only authorized individuals or applications have access and can perform actions on those resources.
Without proper role-based access control (RBAC), it becomes difficult and time-consuming to manage permissions for multiple users and identities across multiple resources. Additionally, RBAC helps with compliance requirements by ensuring only authorized personnel have access.
Guide on How to Assign Roles
Assigning roles is relatively simple once you understand how they work and why they are important. To assign a role:
1. Navigate to the Azure portal and open the resource group or resource you want to assign a role to.
2. Click on the “Access control (IAM)” tab on the left-hand side.
3. Click on the “+ Add” button and select “Add role assignment.”
4. Select the role you want to assign from the list of built-in roles or create a custom one. 5. Select your identity, in this case, your Azure Service Principal, and click “Save.”
That’s it! Your Azure Service Principal now has the appropriate role assigned to it for that resource.
Assigning roles is crucial for managing resources in Azure effectively and securely. Understanding how roles work, why they are important, and how to assign them is key to properly using Azure Service Principals for automation and management of resources.
Using an Azure Service Principal with APIs and Applications
The Role of Azure Service Principals in API and Application Authentication
Azure Service Principals provide a secure way to authenticate applications and APIs with Azure resources. By leveraging the OAuth 2.0 protocol for authentication, applications can be authorized to access specific resources in Azure without the need for user credentials or manual intervention.
To use an Azure Service Principal for authentication, you’ll need to create it first. Once created, you can obtain the necessary credentials (client ID, secret, and tenant ID) and use them in your application code to securely access your resources.
Scenarios where Using an Azure Service Principal is Useful
Using an Azure Service Principal with APIs and applications is ideal when you have a multi-tier architecture that requires secure communication between different tiers. For example, consider a web application that needs to communicate with a backend API hosted on Azure Functions or App Service. In this scenario, using an Azure Service Principal allows the web application to securely authenticate with the backend API without exposing any user credentials or relying on manual authentication.
Another common scenario where using an Azure Service Principal is useful is when you’re building automation scripts that need access to different resources in your subscription. By creating a service principal with specific role assignments (e.g., Contributor), your script can automatically access those resources without requiring any human intervention.
Implementing Authentication Using an Azure Service Principal
Implementing authentication using an Azure Service Principal involves obtaining the necessary credentials (client ID, secret, and tenant ID) from your service principal record in the portal or through PowerShell/CLI commands. Once you have these credentials, you can use them in your application code by passing them as parameters during runtime.
Here’s some sample C# code that demonstrates how this works:
var credential = new ClientCredential(clientId, clientSecret); var context = new AuthenticationContext(“https://login.windows.net/” + tenantId);
var result = await context.AcquireTokenAsync(“https://management.azure.com/”, credential); string accessToken = result.AccessToken;
This code obtains an access token using the acquired credentials and the Azure AD OAuth 2.0 authentication endpoint. The acquired access token can then be used to communicate with Azure resources that require authentication.
Best Practices for Using an Azure Service Principal with APIs and Applications
Here are some best practices to follow when using an Azure Service Principal for application and API authentication:
– Avoid hardcoding service principal credentials in your code. Instead, use environment variables or a secure configuration store to manage your secrets.
– Limit the scope of each service principal by assigning only the necessary role assignments based on the required permissions.
– Use RBAC auditing to monitor role assignments on your resources and identify any unauthorized changes.
– Rotate service principal secrets regularly to improve security posture and reduce risk of compromise. By following these best practices, you can ensure that your applications and APIs are securely communicating with Azure resources without exposing any unnecessary risks or vulnerabilities.
Best Practices for Managing Azure Service Principals
Tips on how to secure and manage your service principals effectively
When it comes to managing Azure Service Principals, there are several best practices that you can follow to ensure that they are secure and managed effectively. First and foremost, it’s important to limit the number of service principals that you create. Each service principal represents a potential entry point into your system, so creating too many can be risky.
Make sure you only create the ones you really need and delete any unused ones. Secondly, it’s important to keep track of who has access to your service principals.
This means keeping a log of all the users who have access to each one, as well as regularly reviewing the list of users with access to make sure it is up-to-date. You should also revoke access for anyone who no longer needs it.
Be sure to use strong passwords or keys for your service principals and change them regularly. This will help prevent unauthorized access and keep your system secure.
Discussion on common mistakes to avoid
There are several common mistakes that people make when managing Azure Service Principals. One is creating too many service principals, as mentioned earlier.
Another mistake is granting too many permissions to a single service principal. When this happens, if someone gains unauthorized access they will have broad control over the resources associated with that principal.
Another common mistake is not monitoring activity associated with a particular service principal closely enough. This can lead to security issues going unnoticed until it’s too late.
Failing to revoke unnecessary permissions or deleting unused service principals can also create security vulnerabilities in your system. It’s important for those who manage Azure Service Principals to be aware of these common mistakes so they can avoid them and keep their systems secure.
Conclusion
Azure Service Principals are a powerful tool for managing and securing your Azure resources. They allow you to grant specific permissions to applications and APIs without having to rely on user accounts, which can be a security risk. Creating an Azure Service Principal is straightforward, but it’s important to follow best practices for managing them.
Assigning roles to service principals is critical for ensuring that they have access only to the resources they need. When using service principals with APIs and applications, it’s essential that you choose the appropriate authentication method.
While client secrets are the most common method, they can pose a security risk if not managed properly. To ensure the security of your Azure resources, it’s important to follow best practices when managing your service principals.
For example, make sure that you keep client secrets secure and rotate them regularly. Additionally, monitor your applications and APIs closely for any unusual activity.
Overall, Azure Service Principals are an essential component of any organization’s cloud security strategy. By following best practices when creating and managing them, you can ensure that your Azure resources remain secure while still allowing your applications and APIs to access them as needed.
A Comprehensive Guide to Faster, Scalable, and Reliable Storage
Introduction
Are you tired of sluggish load times when uploading or downloading large files? Do you need a reliable and scalable storage solution for your business or personal use?
Look no further than Premium Block Blob Accounts! In this article, we’ll explore what these accounts are and why they’re essential for anyone dealing with large amounts of data.
Definition of Premium Block Blob Accounts
Before diving into the benefits of a Premium Block Blob Account, let’s define what it is. Essentially, it’s a type of storage account offered by Microsoft Azure that allows users to store and manage large unstructured data such as videos, images, audio files, backups, and static websites through block blobs.
Block blobs are used to store massive chunks of data in individual blocks that can be managed independently. When a file is uploaded to a block blob container, the file is split into blocks and uploaded in parallel to maximize upload speeds.
Importance of Using Premium Block Blob Accounts
Now that we’ve defined what Premium Block Blob Accounts are let’s dive into why they’re important. First and foremost, they offer faster upload and download speeds than regular block blob accounts because they use Solid-State Drives (SSDs) instead of Hard Disk Drives (HDDs). This results in improved performance when accessing frequently accessed files or hosting high traffic websites.
Additionally, premium block blob accounts offer higher scalability limits than standard block blob accounts which means more space for your data as needed. Premium block blob accounts offer improved reliability and availability making them ideal for storing critical data such as backups or media files.
With built-in redundancy features like geo-replication across regions and automatic failover options within the same region if one server goes down makes sure there’s never any downtime for your business. Premium Block Blob Accounts are an essential type of storage account that every business or individual dealing with large amounts of data should consider.
With faster speeds, higher scalability and performance, improved reliability and availability – what more could you ask for? Stay tuned to learn more about the benefits, use cases, and how to set up a Premium Block Blob Account.
Benefits of Using Premium Block Blob Accounts
Faster Upload and Download Speeds
When it comes to storing large files such as high-definition videos or large datasets, every second counts. Traditional storage options can be painfully slow when uploading or downloading large amounts of data.
However, with Premium Block Blob Accounts, you can expect lightning-fast speeds that will save you time and frustration. For example, with a Premium Block Blob Account, you can upload and download terabytes of data in a matter of hours rather than days.
Higher Scalability and Performance
One of the most significant benefits of using a Premium Block Blob Account is the ability to scale storage quickly without sacrificing performance. With traditional storage methods, scaling up often leads to reduced performance, which can cause delays and other issues. However, with Premium Block Blob Accounts, you can add or remove capacity as needed while maintaining fast access times.
In addition, as your storage needs grow over time, the system automatically adjusts to meet your demands without any manual intervention required on your end. This means you won’t have to worry about downtime or other disruptions when scaling up your storage capacity.
Improved Reliability and Availability
Another significant benefit of using Premium Block Blob Accounts is increased reliability and availability. With traditional storage methods such as hard drives or external drives, there is always a risk that something could go wrong – whether due to hardware failure or human error.
However, with a Premium Block Blob Account hosted on Microsoft Azure’s global network infrastructure backed by SLAs (service level agreements), you can be confident that your data will always be available when you need it most. Azure provides 99.9% availability for all services including block blob accounts which means even during an outage somewhere else in the world; your content remains globally available via caching points located around the world.
Cost-Effectiveness And Flexible Pricing
Using a Premium Block Blob Account is also cost-effective. You only pay for the storage you use, so there’s no need to worry about overprovisioning or wasting money on unused storage. Additionally, If you are storing less than 100TB of data and can tolerate slightly longer access times, you may opt for a premium tier such as Hot or Cool which offers up to 64TB of storage and other benefits.
Premium Block Blob Accounts offer faster upload and download speeds, higher scalability and performance, improved reliability and availability compared to traditional storage options. With flexible pricing options that only require payment for what you use, it is easy to see why businesses big and small are adopting this cloud-based technology.
Use Cases for Premium Block Blob Accounts
Storing Large Media Files such as Videos, Images, and Audio Files
When it comes to storing media files such as videos, images, and audio files, a Premium Block Blob Account is an excellent choice. Traditional storage solutions often have restrictions on file size or limit the amount of data that can be transferred at once.
With Premium Block Blob Accounts, there are no such limitations. You can upload and download large media files quickly and effortlessly.
Another advantage of storing large media files in a Premium Block Blob Account is the ability to access them from anywhere in the world. This means you can easily share your media with others without having to physically transfer bulky files.
Backing up Critical Data for Disaster Recovery Purposes
Disasters can strike at any time, which is why it’s essential to have backups of your critical data. A Premium Block Blob Account is a reliable option for backing up important information because it provides excellent durability and availability. The process of backing up data in a Premium Block Blob Account is straightforward and secure.
You can automate backups using Azure’s built-in tools or use third-party backup solutions that integrate seamlessly with Azure. In the event of a disaster or system failure, you can restore your data quickly from your Premium Block Blob Account without worrying about losing valuable information.
Hosting Static Websites with High Traffic Volume
If you’re looking for an affordable way to host a static website with high traffic volume, then a Premium Block Blob Account should be at the top of your list. Unlike traditional web hosting solutions that require expensive servers and ongoing maintenance costs, hosting your site on Azure’s cloud-based infrastructure provides scalable performance without breaking the bank. With features like automatic load balancing and content delivery networks (CDNs), static websites hosted on Premium Block Blob Accounts load quickly from anywhere in the world.
You can also take advantage of Azure’s built-in security features such as SSL certificates and role-based access control to keep your website secure. Overall, hosting a static website on a Premium Block Blob Account is an excellent choice for small businesses or individuals who want to create a strong online presence without spending a fortune.
Conclusion
Premium Block Blob Accounts are an excellent option for anyone looking for reliable and scalable storage solutions. Whether you’re storing large media files, backing up critical data, or hosting a static website with high traffic volume, Premium Block Blob Accounts offer numerous benefits that traditional storage solutions cannot match.
Remember to monitor your usage and performance metrics regularly and implement security measures such as encryption at rest and in transit to keep your data safe. With best practices in place, you can enjoy all the advantages of this powerful storage solution while keeping your data secure.
Monitor your Azure Storage Consumption
Use Cloud Storage Manager to monitor and see how much Azure Storage you are consuming, whether its across one subscription or multiple.
With Cloud Storage Manager you can;
🔍 Cloud Storage Manager is a tool for Azure users to gain insights into their storage consumption.
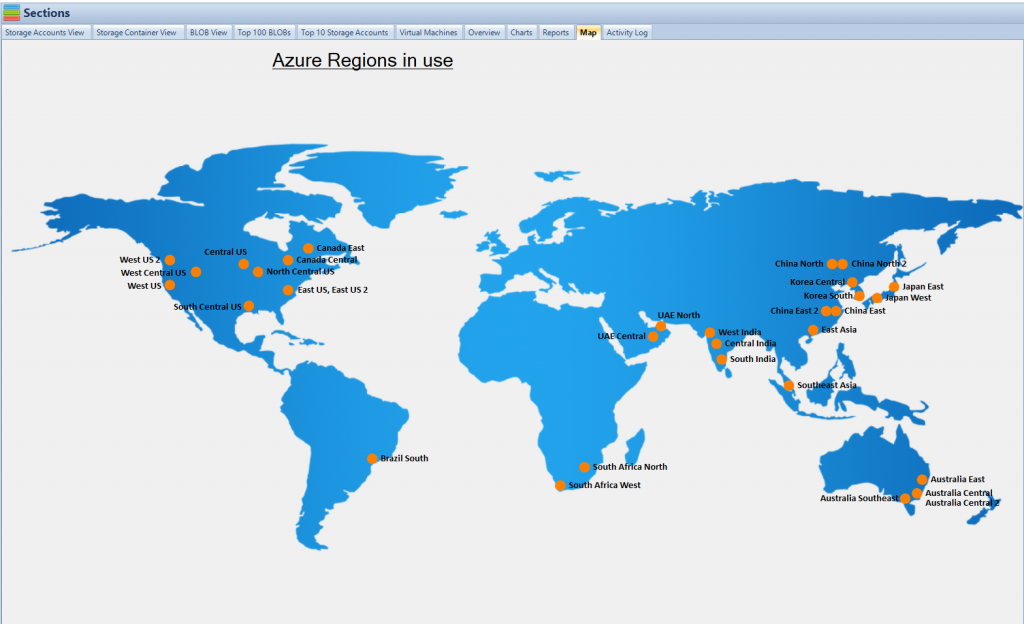
🗺️ It provides a world map of Azure locations and an overview of storage consumption.
📁 The tool allows users to view and manage storage accounts, containers, and blobs.
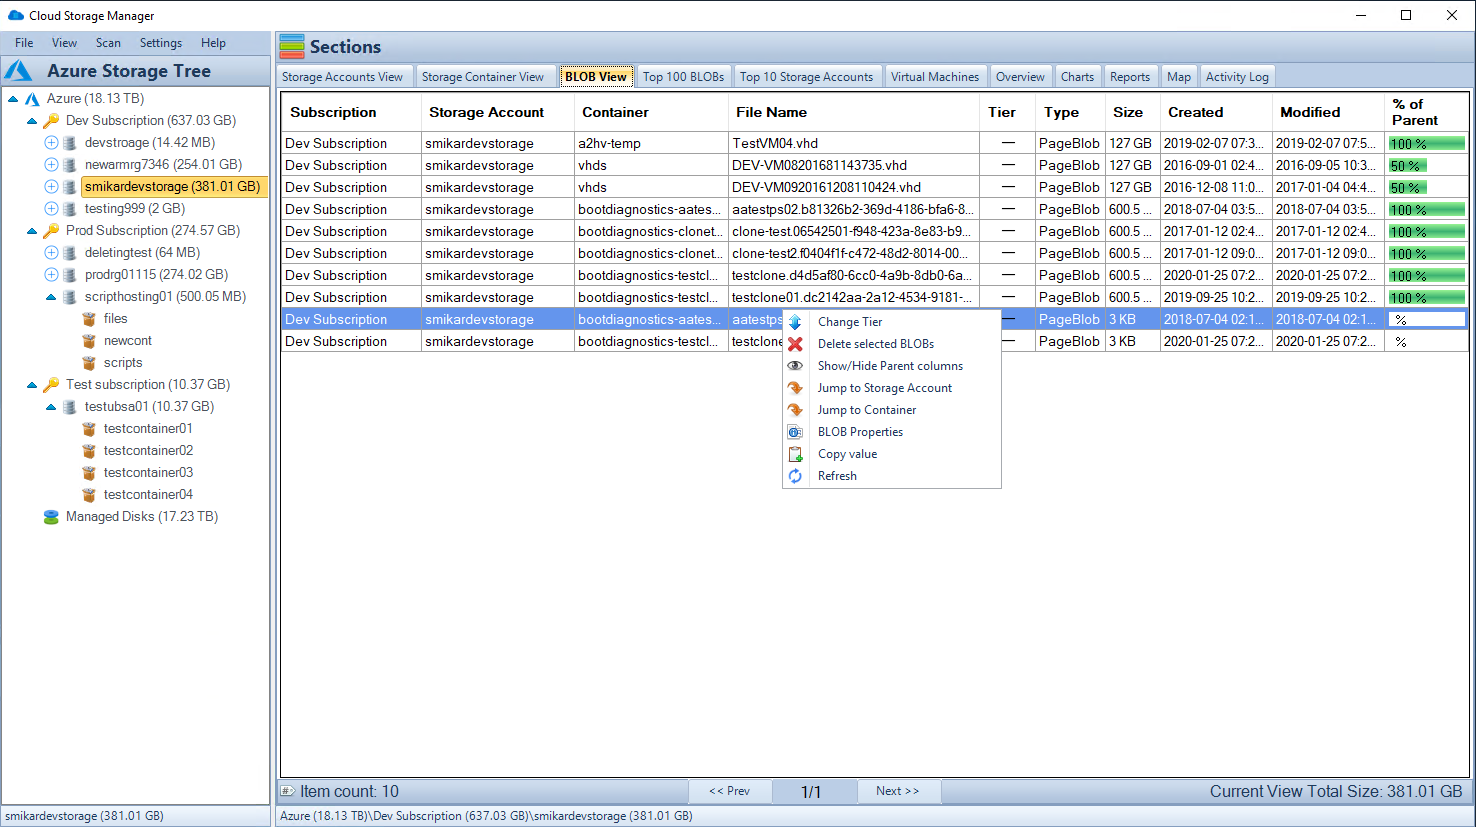
📋 The File Menu enables search, viewing log files, compressing the database, and exiting the manager.
👀 The View Menu allows expanding and collapsing details in the Azure Storage Tree, refreshing the view, and rebuilding the tree.
🔄 The Scan Menu enables scanning the entire Azure environment or selected subscriptions, storage accounts, containers, or virtual machines.
⚙️ The Settings Menu allows configuring Azure credentials and scheduling automatic scans.
❓ The Help Menu provides options for registration, information about the version, and purchasing different editions.
🌳 The Azure Storage Tree allows browsing Azure subscriptions, storage accounts, and containers, with right-click options for scanning, refreshing, and creating new storage containers.
📊 Different tabs provide detailed information about storage accounts, containers, blobs, and virtual machines, including their attributes, sizes, and creation/modification dates.
📈 The Overview tab shows a summary of Azure storage usage, broken down by subscription.
📊 Charts and reports offer graphical representations and detailed information about storage consumption, top blobs, storage account growth, blob counts, file access, virtual machines, and more.
🗺️ The Azure Location Storage Map visualizes the worldwide distribution of storage accounts and their consumption.
💡 Cloud Storage Manager comes in three editions: Lite, Advanced, and Enterprise, with varying limits on Azure storage size and pricing tiers.
How to Set Up a Premium Block Blob Account
Setting up a Premium Block Blob account is relatively straightforward, but it does require some knowledge of Microsoft Azure and storage concepts. Here are the steps you need to follow to set up your account:
Creating a Microsoft Azure Account
Before you can create a Premium Block Blob account, you will need to create a Microsoft Azure account if you don’t have one already. You can sign up for an account on the Azure website. Once you have an account, you will need to log in to the Azure portal.
Choosing the Appropriate Storage Tier
After logging in, navigate to the storage accounts section of the portal and select “Create.” You will be prompted to choose a storage account tier from among four options: Standard HDD, Standard SSD, Premium SSD, and Blob Storage. If you plan on using your Premium Block Blob account for storing large media files or other data-intensive applications that require high performance and low latency access times, then selecting “Premium SSD” may be suitable for your needs.
Configuring Access Keys and Permissions
Once you have chosen the appropriate storage tier for your needs, click on “Review + Create” at the bottom of the page. This will take you through several configuration options such as choosing between locally redundant storage (LRS) or geo-redundant storage (GRS), setting up virtual networks or firewalls around it etc.
Complete setup by clicking “Create,” which will provide access keys that allow access from apps that use them. These keys should be kept secure since they allow full control over data stored in your Premium Block Blob accounts.
It’s important to also configure permissions so that only authorized individuals or applications can access your data. You can do this by setting up role-based access control (RBAC) policies or configuring Azure Active Directory (AAD) integration.
Setting up a Premium Block Blob account can be an excellent investment for your business or personal storage needs. By following these guidelines, you will be able to create an account that meets your specific requirements and provides fast, reliable access to your data.
Best practices for managing Premium Block Blob Accounts
As with any type of storage solution, managing your Premium Block Blob Account effectively is crucial to its success. Here are some best practices to consider:
Monitoring usage and performance metrics
One of the key advantages of Premium Block Blob Accounts is their scalability and performance. However, in order to ensure that your account is meeting your needs, it’s important to regularly monitor its usage and performance metrics.
This can be done through Azure’s built-in monitoring tools, which provide real-time data on things like storage capacity, IOPS (input/output operations per second), and bandwidth usage. By keeping a close eye on these metrics, you can quickly identify any issues or potential bottlenecks and take proactive steps to address them.
Implementing security measures such as encryption at rest and in transit
Data security is always a top concern when it comes to storing sensitive information in the cloud. Thankfully, there are several ways to enhance the security of your Premium Block Blob Account.
One key measure is implementing encryption for both data at rest (i.e., stored within the account) and data in transit (i.e., being transferred between the account and other services). Azure offers multiple options for encrypting your data using industry-standard protocols like AES-256, making it easy to secure your files no matter how they’re being used.
Optimizing storage costs by leveraging features such as tiered storage
Another important aspect of managing a successful Premium Block Blob Account is optimizing storage costs. While these accounts offer excellent performance and scalability benefits, they can also be more expensive than other types of cloud storage solutions. To mitigate this cost factor, it’s important to leverage features like tiered storage.
This allows you to move less frequently accessed data into lower-cost tiers without sacrificing performance or reliability. Additionally, regularly reviewing your usage patterns and adjusting your storage allocation as needed can help ensure that you’re only paying for what you actually need.
Common Misconceptions About Premium Block Blob Accounts
It’s Only Necessary for Large Enterprises with Massive Amounts of Data
One of the biggest misconceptions about Premium Block Blob Accounts is that they are only necessary for large enterprises that deal with massive amounts of data. While it is true that these types of accounts are beneficial for large companies, they can also be useful for small to medium-sized businesses and even individuals who have a need for fast, reliable, and scalable storage. For example, if you have a small business that deals with video production or graphic design, you may find yourself needing to store and access large media files frequently.
Using a Premium Block Blob Account would provide faster upload and download speeds as well as higher scalability and performance than traditional storage options. Don’t let the misconception that only big companies need Premium Block Blob Accounts prevent you from considering this type of storage for your business or personal use.
It’s Too Expensive Compared to Other Storage Options
Another common misconception about Premium Block Blob Accounts is that they are too expensive compared to other storage options. While it is true that the cost per gigabyte may be higher than traditional hard drives or other cloud storage options, there are several factors to consider when evaluating the cost of using a Premium Block Blob Account. Firstly, the improved performance and reliability offered by these types of accounts can lead to increased productivity and reduced downtime.
This can result in significant cost savings over time. Additionally, Premium Block Blob Accounts offer features such as tiered storage which allow users to optimize their costs based on usage patterns.
By storing less frequently accessed data in lower-cost tiers, users can achieve significant cost savings without compromising performance or reliability. Ultimately, while there may be cheaper options available initially, it’s important to consider the long-term benefits and potential cost savings offered by using a Premium Block Blob Account.
Conclusion:
Recap of the benefits of using a Premium Block Blob Account
To recap, Premium Block Blob Accounts offer high scalability, faster upload and download speeds, improved reliability and availability. They are an excellent solution for businesses or individuals that need to store large amounts of data securely and efficiently. These accounts also provide several features like tiered storage to optimize costs and encryption for data protection.
One significant advantage of using Premium Block Blob Accounts is their flexibility in use cases. Whether you’re storing media files, backups or hosting static websites with high traffic volume, these accounts will provide the necessary resources.
Encouragement to consider using this type of storage for businesses or personal use
If you haven’t considered using a Premium Block Blob Account yet, we encourage you to give it a try. The benefits of this type of storage are undeniable, and they can be used by businesses or individuals alike.
For businesses looking for reliable storage solutions with fast upload and download speeds at an affordable price point, Premium Block Blob Accounts are an excellent choice. They offer better performance than standard block blob accounts while remaining cost-effective.
For individuals who have large amounts of data they want to store securely in the cloud without breaking the bank on storage fees, these accounts are ideal as well. Prices start at just pennies per gigabyte per month, making them one of the most affordable cloud storage solutions available today.
Whether you’re looking for reliable enterprise-level storage or secure personal file backup solutions – Premium Block Blob Accounts have got you covered! Try them out today and see how they can benefit your business or personal life!
Data is the new oil, and it’s crucial to protect it from prying eyes. With the increase in cyber attacks, encryption is more important now than ever before. Azure Storage Data Encryption offers robust security features that help safeguard data stored on Microsoft Azure Platform.
A Brief Overview of Azure Storage Data Encryption
Azure Storage Data Encryption is a feature of Microsoft’s cloud computing service, Azure platform. It provides a secure way to store and access data by encrypting data at rest and in transit. This feature enables users to protect sensitive information such as passwords, financial records and other confidential data from unauthorized access.
Whether you are storing your data in blobs (Binary Large Objects), files or tables, Azure Storage Data Encryption offers encryption capabilities at no additional cost. It uses Advanced Encryption Standard (AES) 256-bit encryption algorithm to protect the data stored on Azure platform.
The Importance of Data Encryption
Data breaches can have serious consequences for individuals or businesses that store sensitive information online. Identity theft, financial loss and reputational damage are just some examples of what can happen when data falls into wrong hands.
Encryption provides an extra layer of protection that makes it difficult for unauthorized parties to read or access sensitive information even if they manage to get their hands on it. In short, encrypting your data keeps it safe from hackers who might try to steal your important information.
It also protects you against any accidental exposure or leakage due to human errors such as misconfigured settings or insider threats from malicious employees. So whether you’re an individual with personal files that contain confidential information or a business owner who stores customer credit card details online, implementing encryption is essential for keeping their respective assets safe and secure.
Types of Azure Storage Data Encryption
Azure Storage Data Encryption provides two ways to encrypt data: client-side encryption and server-side encryption. Both techniques have their advantages and disadvantages, and the choice of which to use depends on the specific requirements of your application.
Client-Side Encryption
Client-side encryption, as the name suggests, involves encrypting data on the client side before sending it to Azure Storage. With client-side encryption, data is encrypted at rest in Azure Storage. It is an effective way to protect sensitive information from attackers who may gain access to your storage account keys.
With client-side encryption, you generate your own encryption keys and manage them outside of Azure Storage. You are responsible for managing and securing these keys properly; otherwise, you risk losing access to your data permanently.
A disadvantage of client-side encryption is that it can be more complex to implement than server-side encryption. It also requires more development effort because you must handle key management yourself.
Server-Side Encryption
Server-Side Encryption involves letting Azure Storage encrypt your data before writing it to disk. It is an automatic process that happens transparently in the background when you store or retrieve blobs using Azure SDKs.
With server-side encryption, Azure handles key management tasks such as key rotation automatically so that you don’t have to worry about it manually. The disadvantage with this method is that if a hacker gains access to your storage account keys or secrets, they will have unencrypted access to your files stored in server side encrypted form.
Server-Side Encryption offers simplicity since there are no extra steps or processes required for developers during implementation. It’s worth noting that Server-Side Encryption has two modes: Microsoft-managed keys and Customer-managed keys.
In Microsoft-managed mode (also known as “Azure managed”), Microsoft manages all aspects of key management in order for data protection. Whereas, in Customer-managed mode, you manage your own encryption keys outside of Azure and provide them to Azure when necessary.
The Magic of Client-Side Encryption
When it comes to data encryption in Azure Storage, there are two options available: client-side encryption and server-side encryption. Client-side encryption involves encrypting the data on the user’s device before uploading it to Azure Storage.
This means that the user holds the keys and is responsible for managing them. In contrast, server-side encryption involves encrypting the data on the server after it has been uploaded, with Azure Storage managing the keys.
Client-side encryption is a powerful security measure because it ensures that even if someone gains access to your data in transit or at rest in Azure Storage, they won’t be able to read it without access to your keys. This makes client-side encryption ideal for organizations that need an extra layer of security or are dealing with highly sensitive data.
In Azure Storage Data Encryption, client-side encryption works by using a client library provided by Microsoft. The library can encrypt or decrypt data on your behalf, ensuring that only you have access to your unencrypted data.
The library provides different modes of operations such as AES_CBC_256_PKCS7 and AES_CBC_128_HMAC_SHA256 which can be used according to your use case. One of the main benefits of client-side encryption is that you retain complete control over your keys, which means you have full control over who can decrypt and access your unencrypted data.
With server-side encryption, you are effectively entrusting Microsoft with key management and therefore relinquishing some control over who can access your unencrypted data. However, there are also some drawbacks associated with client-side encryption.
One issue is that if you lose your key or forget your password, you could potentially lose access to all of your encrypted data forever since nobody else has a copy of this information apart from yourself. Another drawback is that implementing client-side encryption requires more setup than server side-encryption because it requires additional steps such as generating and managing keys.
Client-side encryption is a powerful security measure that can provide an extra layer of protection for highly sensitive data. While there are some drawbacks to using client-side encryption, the benefits of complete key ownership and control make it a worthwhile investment for many organizations.
Server-Side Encryption
Definition and Explanation of Server-Side Encryption
When it comes to data encryption, server-side encryption is an option that encrypts data before it’s stored on the cloud. Azure Storage Data Encryption offers two types of server-side encryption: SSE with Microsoft-managed keys and SSE with customer-managed keys. The former stores the encryption keys in Azure Key Vault, while the latter requires customers to manage their own keys.
SSE with Microsoft-managed keys is easy to implement and doesn’t require any additional infrastructure or maintenance from customers. Meanwhile, SSE with customer-managed keys is suitable for customers who want more control over their encryption process.
How It Works in Azure Storage Data Encryption
With server-side encryption, data is encrypted before it’s saved to the storage service, but after it leaves the client machine. When using Azure Storage Data Encryption, this process takes place by default on Microsoft servers. SSE encrypts data using Advanced Encryption Standard (AES) 256-bit encryption.
This means that your data is secured by a strong algorithm that doesn’t have any known weaknesses. Azure Storage Data Encryption also provides support for secure transfer protocols like HTTPS and SSL/TLS for added security during transmission of encrypted data.
Benefits and Drawbacks
Server-side encryption offers a range of benefits when used on cloud storage services like Azure: 1. It reduces risks associated with unencrypted data being accidentally exposed.
2. It ensures compliance with industry regulations. 3. Customers don’t need to worry about managing their own infrastructure or key management.
4. It’s cost-effective since no hardware purchases are necessary. However, there are also some drawbacks:
1. Users relinquish a certain amount of control over their key management process. 2. There may be some performance impact due to the additional processing overhead required by encryption.
3. It’s still possible for encrypted data to be compromised if someone gains access to the keys or infrastructure used in the encryption process. All in all, server-side encryption is a powerful feature that can help businesses stay secure and compliant while making use of cloud-based storage solutions like Azure Storage Data Encryption.
Key Management
The Importance of Key Management in Data Encryption
When it comes to data encryption, key management is an essential part of the process. Key management refers to the procedures and policies involved in generating, storing, distributing, and revoking encryption keys. The importance of key management lies in its ability to ensure the security and integrity of your encrypted data.
Without proper key management, your encrypted data is vulnerable to attacks and breaches. Encryption keys are used to lock and unlock your data, giving you complete control over who can access it.
If an encryption key falls into the wrong hands or is compromised in any way, your data becomes vulnerable to unauthorized access. This is why it’s critical that you have strong key management policies and procedures in place.
How Key Management Works in Azure Storage Data Encryption
Azure Storage Data Encryption offers a fully managed solution for encrypting your data at rest. Part of this solution includes built-in key management capabilities that allow you to manage your encryption keys with ease.
When you create a storage account in Azure Storage Data Encryption, two types of encryption keys are generated: one for client-side encryption and another for server-side encryption. These keys are managed automatically by Azure Key Vault, which is a cloud-based service that provides secure storage for cryptographic keys.
Azure Key Vault offers several features that make key management easier for developers and IT professionals alike. For example, it allows you to rotate your encryption keys on a regular basis without having to change any code or configurations manually.
Additionally, it provides granular access controls that let you restrict who can view or modify specific keys. Overall, Azure Storage Data Encryption offers robust key management capabilities out-of-the-box so that you can focus on securing your data rather than worrying about managing encryption keys manually.
Key management plays a critical role in ensuring the security and integrity of your encrypted data. In Azure Storage Data Encryption, you can take advantage of built-in key management capabilities that make it easy to manage your encryption keys securely. By leveraging these features, you can ensure that your encrypted data is protected from unauthorized access and breaches.
How much Azure Storage are you using?
With Cloud Storage Manager see how much Azure Storage you are using, and where it could be costing you more than it should be. Azure storage consumption is increasing rapidly, leading to rising costs. Cloud Storage Manager provides a World Wide Map and graphs to visualize Azure storage growth and consumption. Azure Storage Tree view allows you to explore Azure Blobs and their details, including size and storage tiering. Cloud Storage Manager’s Overview tab provides information on Azure Subscriptions, Storage Accounts, Containers, and Blobs. Reports in Cloud Storage Manager offer insights into storage account growth, blob tiering, and access history. You can search across all Azure Storage accounts to find specific Blobs or Files. Cloud Storage Manager helps reduce Azure storage costs by identifying areas where savings can be made, such as moving Blobs to lower storage tiers. Cloud Storage Manager offers an Explorer-like view of Azure Storage, allowing actions like changing tiering and deleting Blobs. Cloud Storage Manager requires read-only access to your Azure account through Azure’s Role-Based Access Control (RBAC) feature. Cloud Storage Manager offers a free 14-day trial, with different editions available for different storage needs (Lite, Advanced, Enterprise).
Compliance and Regulations
Overview of Compliance Standards Related to Data Encryption
Ensuring compliance with data protection regulations is a critical aspect of any organization’s data management strategy. Data encryption plays a crucial role in ensuring compliance with various government regulations and industry standards, such as HIPAA, GDPR, PCI-DSS, FERPA, etc. These regulations have strict guidelines on how sensitive data should be stored and secured. Organizations that handle sensitive data are required by law to protect it from unauthorized access and disclosure.
Data encryption is one of the most effective ways to ensure compliance with these regulations as it provides a secure method for storing and transmitting sensitive information. Azure Storage Data Encryption provides a robust security framework that adheres to industry best practices and regulatory requirements.
How Azure Storage Data Encryption Complies with These Standards
Azure Storage Data Encryption helps organizations comply with different regulatory standards by providing robust security controls for data encryption, key management, access control, monitoring, auditing, and reporting. It offers the following features to ensure compliance:
Data At Rest Encryption: Azure Storage encrypts all data at rest using strong encryption algorithms like AES-256. This ensures that all stored data remains protected from unauthorized access.
Data In Transit Encryption: Azure Storage supports transport layer security (TLS) for encrypting data in transit between client applications and storage services. Key Management: With Azure Key Vault service integration within the platform users can easily manage keys used for client-side encryption of their Azure storage account or server-side encryption used by Microsoft over your account without additional complexity.
Audit Trail: The audit trail feature in Azure Storage tracks activities related to the creation, deletion or modification of resources from storage accounts via logs which help maintain accountability for any action taken on these accounts’ resources. Azure Storage Data Encryption assists organizations to meet regulatory compliance requirements by providing a secure and robust framework that adheres to industry best practices.
Azure Storage Data Encryption enables you to encrypt data at rest and in transit, provides key management, auditing, and reporting capabilities that comply with industry standards. By implementing Azure Storage Data Encryption within your organization, you can ensure that your sensitive data is protected from unauthorized access or disclosure while remaining compliant with various regulatory frameworks.
Best Practices for Implementing Azure Storage Data Encryption
Tips for implementing data encryption effectively on the platform
When it comes to implementing Azure Storage Data Encryption, there are some best practices to follow to ensure that your data is secure. Here are some tips to keep in mind:
1. Choose the Right Encryption TypeBefore you start encrypting your data, you need to choose the right encryption type. As we discussed earlier, there are two types of encryption available in Azure: client-side and server-side encryption. The right choice will depend on your specific needs and requirements. If you want more control over your encryption keys and want to manage them yourself, then client-side encryption is the way to go. However, if you want a simpler solution that still provides good security, then server-side encryption may be a better option.
2. Secure Your KeysEncryption keys are like the keys to a safe – if someone gets their hands on them, they can access all of your encrypted data. Therefore it’s important to secure and manage your keys properly. One best practice is to use Azure Key Vault for managing your encryption keys. This provides a centralized location for storing and managing all of your keys securely.
3. Use HTTPS for Transit EncryptionAnother important best practice is ensuring that any traffic between your application and Azure Storage is encrypted in transit using HTTPS (SSL/TLS). This will prevent anyone from intercepting or tampering with the traffic as it travels over the network. Azure Storage uses SSL/TLS by default but you should still configure your application or service code to use HTTPS when communicating with Azure Storage endpoints.
4. Regularly Review Your Security PoliciesIt’s important that you regularly review and update your security policies related to Azure Storage Data Encryption. This includes reviewing your key management policies, access controls, and auditing policies. By staying up-to-date with the latest security best practices and keeping your policies current, you can help keep your data secure.
Conclusion
Implementing Azure Storage Data Encryption is an important step in keeping your data safe in the cloud. By choosing the right encryption type, securing your keys properly, using HTTPS for transit encryption, and regularly reviewing your security policies – you can help prevent unauthorized access to your data.
Remember that implementing good security practices is an ongoing process and requires continuous attention. Stay vigilant and stay educated on the latest threats and best practices to keep your data safe.
Azure Storage Data Encryption is a necessary tool for protecting your data from unwanted access or examination. Whether you opt for client-side encryption or server-side encryption, you can be sure that your data is secure and out of reach from third parties. The key management feature ensures that only authorized personnel can access the encrypted data.
It’s essential to comply with the industry standards and regulations related to data encryption, such as GDPR and HIPAA. Azure Storage Data Encryption guarantees compliance with these standards, making it a trustworthy platform for securing your sensitive information.
Implementing Azure Storage Data Encryption doesn’t have to be complicated. With proper planning and execution of best practices, you can ensure that all your files are safe from prying eyes.
This includes choosing the right level of encryption based on the sensitivity of your data, rotating keys regularly, employing multi-factor authentication for accessing keys, and monitoring usage logs regularly. Overall, Azure Storage Data Encryption offers complete protection of your critical information through different levels of encryption that meet compliance standards.
With its user-friendly interface and straightforward implementation process, it’s an effective solution for businesses looking to safeguard their sensitive data without having to invest in expensive security solutions. If secured correctly using best practices discussed in this article and checked against regular audits – it provides peace of mind knowing that confidential business files are protected by high-end security measures.
Azure Virtual Machines (VMs) let you run applications and workloads in the cloud using flexible, scalable computing power. But Azure offers dozens of VM types and sizes — so how do you choose?
Each VM size offers a different mix of resources like CPU, memory (RAM), and disk speed. The key is choosing a VM size that matches the performance needs of your workload — without overspending.
Below is a breakdown of Azure’s main VM categories. We explain what each one is designed for and what makes them different, in a way that’s easy to understand.
Azure VM Categories: Explained Simply
Azure offers a wide range of virtual machine (VM) sizes, each tailored to different types of workloads. Choosing the right Azure VM size can help you balance performance and cost. Here’s an easy-to-understand breakdown of the four main Azure VM categories and what they’re best suited for.
Category
Best For
Key Features
Example Series
General Purpose
Web servers, dev/test, small databases
Balanced CPU-to-memory ratio; good for everyday use
B, D, Dv2, Av2
Compute Optimized
Batch processing, web front-ends, gaming servers
Higher CPU-to-memory ratio; ideal for compute-heavy tasks
F, Fsv2
Memory Optimized
Large databases, in-memory caching, SAP HANA
High memory per vCPU; optimized for RAM-intensive workloads
E, Ev3, Ev4, M
Storage Optimized
Big data, NoSQL databases, data warehousing
High disk throughput and IOPS; local SSD storage
Lsv2, Msv2
Tip: Not sure where to start? Try a B-Series (Burstable VM). It’s a low-cost, flexible option great for development, testing, or small web apps that don’t always need full CPU power.
How to Choose the Right Azure VM Size
The best Azure VM size for your workload depends on what your application needs most: CPU, memory, or storage.
– For general flexibility, start with General Purpose.
– If you’re running processor-intensive workloads like API servers or video encoding, Compute Optimized is the way to go.
– Memory Optimized VMs are great for database-heavy apps, and Storage Optimized VMs shine with IOPS-heavy apps and big data.
Microsoft regularly updates and adds new VM series, so always check the official Azure VM sizes documentation for the latest specs and availability in your region.
Introducing Carbon
Carbon is a purpose-built tool designed to simplify Azure VM management and streamline virtual machine migrations. Whether you’re moving workloads back to on-premises infrastructure or optimizing Azure environments, Carbon gives you full control and deep visibility into every VM.
Core Features
Effortless Migration: Seamlessly migrate Azure VMs to VMware or Hyper-V environments with just a few clicks.
Comprehensive VM Insights: Access detailed configuration, usage stats, and performance data for each virtual machine.
Automated Workflows: Carbon handles configuration, export, and setup automatically, reducing manual workload and errors.
Progress Alerts: Receive real-time email updates during each stage of migration or deployment.
Secure Transfers: All data is handled securely using encrypted connections and trusted authentication protocols.
Why Use Carbon?
Carbon was built for IT administrators, cloud engineers, and architects looking for a better way to manage their virtual environments in Azure. Whether you’re migrating, optimizing, or reporting, Carbon makes your job easier.
Reduce Azure Costs: Migrate or remove underutilized VMs to optimize billing and performance.
Gain Visibility: View all your VM data from a single pane of glass, including disk usage, VM size, and uptime.
Simplify Management: Automate the time-consuming tasks involved in VM administration.
Ensure Continuity: Minimize downtime and avoid misconfigurations with intelligent workflows.
Frequently Asked Questions About Azure VM Sizes
1. How do I choose the right Azure VM size?
Start with your workload. If your app needs balanced performance, go with General Purpose. For heavy compute or memory needs, pick Compute or Memory Optimized VMs. Azure also offers sizing recommendations in the portal when deploying VMs.
2. Can I resize a VM later?
Yes, you can resize most VMs in the Azure portal or using CLI. However, your VM may need to be stopped first, and the new size must be available in the region where your VM is hosted.
3. What’s the cheapest Azure VM size?
The B-Series (like B1s or B2s) is usually the most cost-effective. It’s ideal for workloads that don’t run at full CPU all the time, such as development or low-traffic websites.
4. What happens if I choose the wrong size?
Your VM might underperform or cost more than needed. Fortunately, you can always resize to a better-suited tier once you understand your actual usage and performance needs.
5. What’s the difference between vCPU and core?
A vCPU is a virtual CPU — essentially a portion of a physical core on a hypervisor. Azure charges and assigns VM power based on vCPUs, not actual physical cores.
Pro Tip: Always monitor your VM’s CPU, memory, and disk usage using Azure Monitor. This helps you adjust VM size to match performance and cost efficiency.