Hyper-V Best Practices – Optimize Your Virtualization Setup

Hyper-V Best Practices – Optimize Your Virtualization Setup

Virtualization has become an essential component of modern IT infrastructure, enabling organizations to optimize their resources, improve efficiency, and reduce costs. Microsoft Hyper-V, a popular virtualization technology, allows for the creation and management of virtual machines (VMs) on a physical server. It enables multiple operating systems to run simultaneously on the same hardware, providing both flexibility and scalability. In this comprehensive guide, we will explore Hyper-V best practices that will help you get the most out of your virtual environment, ensuring optimal performance, security, and manageability. We will discuss various aspects of Hyper-V, including understanding its architecture, setting it up, configuring hosts, managing storage, optimizing virtual machines, enhancing security, monitoring performance, and more.


hyper-v best practices

Understanding Hyper-V

What is Hyper-V?

Microsoft Hyper-V is a virtualization technology that enables the creation and management of virtual machines on a physical server. It allows multiple operating systems to run simultaneously on the same hardware, providing several benefits, such as cost reduction, increased efficiency, improved flexibility, and simplified management. By leveraging Hyper-V, organizations can consolidate their workloads, reduce their physical server footprint, and improve resource utilization.

Hyper-V Versions

Hyper-V has evolved through several versions since its initial release with Windows Server 2008. Each subsequent version has introduced enhancements and improvements in performance, security, and scalability. The most recent version, Hyper-V on Windows Server 2022, offers several new features and capabilities, such as improved virtual hardware, enhanced virtual network support, and more efficient storage management. Organizations should stay up-to-date with the latest Hyper-V releases to take advantage of new features and improvements


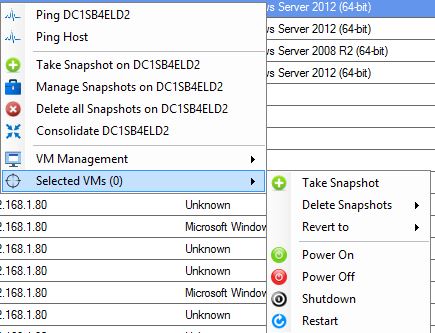
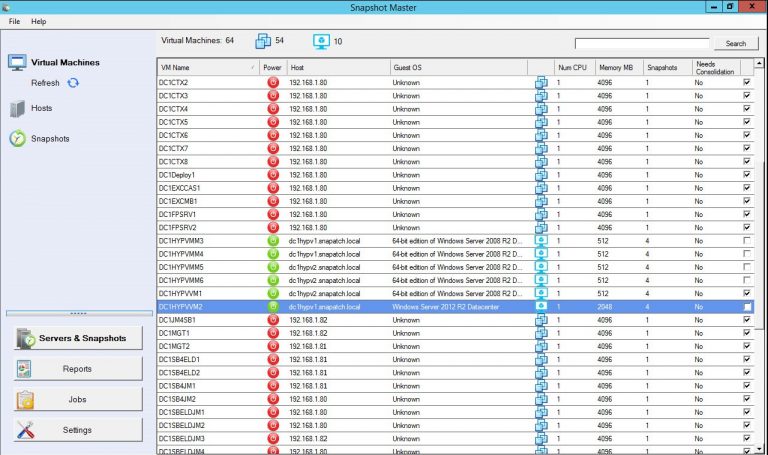
SnapShot Master Power On

Hyper-V Architecture

The Hyper-V architecture is a critical aspect of understanding how the technology works and how to optimize it for maximum performance and efficiency. The architecture consists of three main components: the parent partition, child partitions, and the virtualization stack.

Parent Partition

The parent partition is the primary partition on a Hyper-V host, which runs the Hyper-V hypervisor. It is responsible for managing child partitions and providing them with access to the physical hardware resources. The parent partition has direct access to the hardware and runs the management operating system, typically Windows Server. Administrators interact with the parent partition to configure and manage the virtual environment, create and manage virtual machines, and perform other administrative tasks.

Child Partitions

Child partitions are isolated environments where virtual machines run. Each virtual machine operates within its child partition, which has virtualized access to hardware resources such as CPU, memory, and storage. The child partitions are created and managed by the parent partition, ensuring isolation and resource allocation for each virtual machine.

Virtualization Stack

The virtualization stack is a critical component of the Hyper-V architecture that manages and allocates hardware resources to virtual machines. It is responsible for ensuring that VMs can access hardware resources efficiently and securely. The virtualization stack includes the hypervisor, virtual machine manager, and other components that work together to provide a seamless and efficient virtual environment.

Setting up Hyper-V

Hardware Requirements

Before setting up Hyper-V, it’s essential to ensure that your hardware meets the minimum requirements for running the technology. To run Hyper-V, you need a 64-bit processor with hardware-assisted virtualization and Second Level Address Translation (SLAT). Additionally, you should ensure that virtualization support is enabled in the BIOS of your server. Other factors to consider include the amount of memory and storage capacity required for your virtual environment, as well as the need for high-performance networking components.

Installation Process

Installing Hyper-V involves adding the Hyper-V role to a Windows Server operating system. This can be done through the Server Manager or using PowerShell commands. The installation process requires a server restart, after which you can begin creating and managing virtual machines. It’s essential to follow best practices during the installation process, such as ensuring that the latest updates and patches are applied to the server and that proper hardware and software configurations are in place.


hyperv best practices

Hyper-V Best Practices

Optimizing your Hyper-V environment requires attention to various aspects, such as host configuration, storage management, virtual machine optimization, and security. In this section, we will explore these areas in detail, providing recommendations for best practices that will help you achieve the best possible performance, security, and manageability.

Host Configuration

Hardware Selection

Choosing the right hardware for your Hyper-V host is a crucial aspect of ensuring optimal performance and reliability. Factors to consider when selecting hardware include the processor, memory, storage capacity, and networking components. Investing in high-quality, enterprise-grade hardware components will provide a more stable and reliable virtual environment.

When selecting a processor, consider the number of cores and threads, as well as the clock speed, to ensure sufficient processing power for your virtual machines. Additionally, ensure that the processor supports hardware-assisted virtualization and SLAT.

Memory is another critical factor, as it directly impacts the performance of your virtual machines. Ensure that your server has enough memory to support the number of virtual machines you plan to run, as well as any additional memory requirements for the host operating system and other software components.

Network Configuration

Properly configuring your Hyper-V host’s network settings is essential for improving performance and reducing latency. Key aspects of network configuration include setting up virtual switches, configuring virtual network adapters, and using dedicated network adapters for management and live migration.

Setting up virtual switches involves creating a virtual switch for each physical network adapter on the host. This allows virtual machines to connect to the physical network and communicate with other devices. When configuring virtual network adapters, ensure that they are connected to the appropriate virtual switch and configured with the correct network settings.

Using dedicated network adapters for management and live migration can help to improve performance by isolating these tasks from other network traffic. For instance, you can dedicate one network adapter for host management, another for live migration, and a third for virtual machine communication.

Storage

Storage Types

Selecting the appropriate storage type for your Hyper-V environment is crucial for achieving optimal performance and reliability. There are several storage options available, including local storage, network-attached storage (NAS), and storage area network (SAN). Each storage type has its advantages and disadvantages, so it’s essential to evaluate your needs and budget when making a decision.

Local storage is the simplest and most affordable option, as it involves using the server’s internal storage for virtual machine files. However, it may not offer the best performance or scalability, especially for larger virtual environments.

Network-attached storage (NAS) is a more scalable option, allowing you to connect multiple servers to a centralized storage device over the network. NAS devices typically offer better performance and reliability than local storage but can be more expensive and complex to set up and manage.

Storage area networks (SAN) provide the highest performance and scalability, as they allow for direct, high-speed connections between servers and storage devices. However, SANs can be the most expensive and complex storage option, requiring specialized hardware and expertise to manage effectively.

Storage Configuration

Optimizing your storage configuration is essential for improving performance and ensuring data redundancy. Some best practices for storage configuration include using RAID arrays for fault tolerance, separating storage workloads, and using storage tiering to optimize performance.

RAID arrays can help protect your data in the event of a disk failure, ensuring that your virtual environment remains operational. There are various RAID levels available, each offering different levels of performance and redundancy. Choose the RAID level that best suits your needs and budget.

Separating storage workloads can help improve performance by reducing contention for storage resources. For example, you can store virtual machine configuration files, virtual hard disks, and snapshots on separate storage devices or arrays to minimize the impact of storage-related tasks on the overall performance of your environment.

Storage tiering is another way to optimize performance, as it involves grouping storage devices based on their performance characteristics and automatically moving frequently accessed data to faster storage tiers. This can help to ensure that your most critical data is stored on the fastest available storage, while less frequently accessed data is stored on slower, more cost-effective storage devices.

Virtual Machines

VM Configuration

Properly configuring your virtual machines is essential for optimizing performance and resource utilization. This includes setting the right amount of virtual processors, memory, and storage. Avoid over-provisioning resources to prevent performance issues and ensure that resources are allocated efficiently across all virtual machines.

When configuring virtual processors, it’s important to consider the number of physical processor cores and threads available on the host, as well as the processing requirements of your virtual machines. Over-provisioning virtual processors can lead to performance issues, as it can cause contention for processing resources.

Similarly, when configuring virtual machine memory, ensure that you allocate enough memory for the guest operating system and applications to run smoothly, without over-allocating memory resources. Over-provisioning memory can lead to unnecessary resource contention and reduced performance.

Generation Selection

Choose the appropriate generation for your virtual machines based on their requirements. Generation 1 virtual machines offer legacy support for older operating systems, while Generation 2 virtual machines provide improved performance and support for newer features. To learn more about the differences between Gen 1 and Gen 2 virtual machines, you can refer to this comprehensive guide.

Security

Shielded VMs

Implement Shielded virtual machines to protect sensitive data and ensure the integrity of your virtual machines. Shielded VMs use encryption and secure boot features to protect against unauthorized access and tampering. By leveraging Shielded VMs, you can safeguard your virtual environment from potential security threats and maintain compliance with industry regulations.

Regular Patching and Updates

Ensure that your Hyper-V host, guest operating systems, and applications are regularly patched and updated to protect against security vulnerabilities. This includes applying security updates, hotfixes, and service packs to your host and guest operating systems, as well as updating any third-party applications running within your virtual environment.


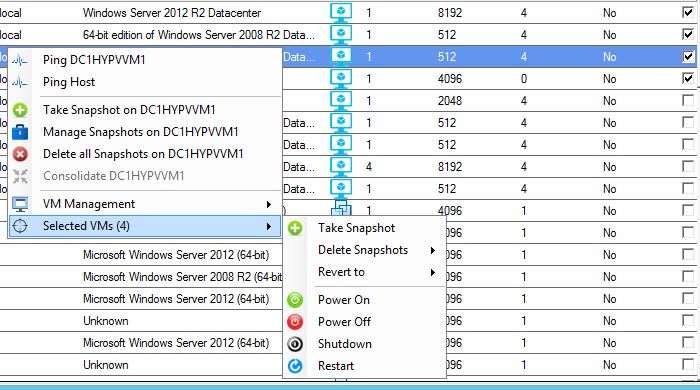
Snapshot Master Restart

Monitoring and Management

Proactive Monitoring

To ensure the stability and reliability of your Hyper-V environment, implement proactive monitoring of your host servers, virtual machines, storage, and network resources. Monitoring tools and services can help you identify potential issues before they escalate into more significant problems, allowing you to take corrective action promptly.

Monitoring should include tracking CPU, memory, and storage usage, as well as network traffic and latency. By setting up alerts and notifications for specific events or thresholds, you can receive timely information about the health and performance of your virtual environment.

Centralized Management

Utilize centralized management tools and solutions to simplify the administration of your Hyper-V environment. Centralized management allows you to manage and monitor multiple Hyper-V hosts and virtual machines from a single interface, reducing the complexity of managing your virtual infrastructure.

Tools like System Center Virtual Machine Manager (SCVMM) and SnapShot Master can help you manage and automate various tasks, such as creating, configuring, and deleting virtual machines, managing storage, and configuring networking. By leveraging centralized management tools, you can improve efficiency and reduce the potential for errors in your virtual environment.

Backup and Disaster Recovery

Implementing a robust backup and disaster recovery strategy is essential for protecting your virtual environment and ensuring business continuity in the event of a disaster or data loss. Regularly backing up your Hyper-V host, virtual machines, and their associated data will enable you to recover your environment quickly and with minimal downtime.

When developing a backup strategy, consider the use of incremental backups, which only capture changes made since the last backup, to reduce storage requirements and improve backup performance. Additionally, test your backups regularly to ensure that they can be restored successfully in the event of an emergency.

For disaster recovery, consider using replication and failover technologies to create redundant copies of your virtual machines and data, allowing you to quickly recover your environment in the event of a disaster. Hyper-V Replica is a built-in feature that enables you to replicate virtual machines between Hyper-V hosts, while other third-party solutions are also available for more advanced disaster recovery capabilities.

Optimizing Hyper-V Networking

Virtual Machine Queue (VMQ)

To optimize network performance for your virtual machines, enable Virtual Machine Queue (VMQ) on your Hyper-V host’s network adapters. VMQ is a feature that offloads the processing of network traffic from the host’s processor to the network adapter, reducing the CPU overhead and improving network throughput.

To enable VMQ, ensure that your network adapters support this feature and that it is enabled in the adapter’s settings. Additionally, configure the number of processor cores and memory resources allocated to VMQ based on your host’s hardware and network requirements.

Receive Side Scaling (RSS)

Receive Side Scaling (RSS) is another feature that can help improve network performance in your Hyper-V environment. RSS enables the network adapter to distribute incoming network traffic across multiple processor cores, reducing the CPU overhead and improving overall network throughput.

To enable RSS, ensure that your network adapters support this feature and that it is enabled in the adapter’s settings. Additionally, configure the number of processor cores and memory resources allocated to RSS based on your host’s hardware and network requirements.


hyperv

Hyper-V Conclusion

Following Hyper-V best practices is essential for optimizing the performance, security, and manageability of your virtual environment. By paying close attention to host configuration, storage management, virtual machine optimization, and security, you can ensure that your Hyper-V environment is operating at its full potential. As virtualization technology continues to evolve, staying up-to-date with the latest best practices and advancements in Hyper-V will help you maintain a reliable, high-performing, and secure virtual environment.

Frequently Asked Questions (FAQs)

What is the difference between Generation 1 and Generation 2 virtual machines in Hyper-V?

Generation 1 virtual machines offer legacy support for older operating systems, while Generation 2 virtual machines provide improved performance and support for newer features, such as UEFI firmware, secure boot, and larger virtual disk capacities.

Can I mix different storage types in my Hyper-V environment?

Yes, you can use a combination of local storage, NAS, and SAN storage in your Hyper-V environment, depending on your needs and budget. Each storage type has its advantages and disadvantages, so it’s essential to evaluate your requirements carefully when selecting storage solutions.

What are the hardware requirements for running Hyper-V?

To run Hyper-V, you need a 64-bit processor with hardware-assisted virtualization and Second Level Address Translation (SLAT) support. Additionally, you should ensure that virtualization support is enabled in the BIOS of your server. Other factors to consider include the amount of memory and storage capacity required for your virtual environment, as well as the need for high-performance networking components.

How can I improve the performance of my virtual machines in Hyper-V?

To improve the performance of your virtual machines, ensure that you allocate the appropriate amount of virtual processors, memory, and storage. Avoid over-provisioning resources to prevent performance issues and ensure that resources are allocated efficiently across all virtual machines. Additionally, follow best practices for storage configuration, such as using RAID arrays for fault tolerance, separating storage workloads, and implementing storage tiering.

  1. What are Shielded VMs, and why should I use them?

    Shielded virtual machines are a security feature in Hyper-V that protects sensitive data and ensures the integrity of your virtual machines. They use encryption and secure boot features to protect against unauthorized access and tampering. By implementing Shielded VMs, you can safeguard your virtual environment from potential security threats and maintain compliance with industry regulations.
Hyper-V vs VMware: A Comprehensive Comparison

Hyper-V vs VMware: A Comprehensive Comparison

Introduction to Virtualization Technologies

Virtualization has become an essential aspect of modern computing. By creating a virtual version of a computing resource, such as hardware, storage, or an entire operating system, virtualization allows businesses to optimize resource utilization, streamline management, and reduce costs. Two of the most popular virtualization platforms in the market are Microsoft’s Hyper-V and VMware’s vSphere. In this article, we will provide a comprehensive comparison of these two virtualization giants to help you decide which platform best suits your needs.

What is Hyper-V?

Hyper-V is a virtualization technology developed by Microsoft, which allows multiple operating systems to run concurrently on a single physical machine. It stands for “Hyper-Virtualization” and is a feature of Microsoft’s Windows Server operating system, though it is also available in some editions of Windows client operating systems, such as Windows 10 Pro and Windows 11 Pro.

With Hyper-V, users can create and manage virtual machines (VMs) that run different operating systems, such as Windows, Linux, and others, all sharing the same hardware resources. This enables greater efficiency in hardware utilization, improved application availability, and easier management of resources. Hyper-V is commonly used in data centers and enterprise environments to consolidate workloads, run legacy applications, and support disaster recovery scenarios.

Some key features of Hyper-V include:

  1. Virtualization of hardware: It allows the physical resources of a server, such as CPU, memory, and storage, to be shared across multiple virtual machines, optimizing hardware utilization and reducing costs.
  2. Isolation: Each virtual machine operates in its own isolated environment, ensuring that the activity of one VM does not affect the performance or stability of other VMs on the same host.
  3. Live Migration: This feature enables the seamless movement of running virtual machines from one Hyper-V host to another, without any downtime or disruption to the VMs.
  4. Dynamic Memory: Hyper-V allows the dynamic allocation of memory to virtual machines, enabling more efficient use of available resources and improved performance.
  5. Snapshots: Hyper-V supports the creation of snapshots, which are point-in-time representations of a virtual machine. This feature allows for easy rollback to a previous state in case of issues or for testing purposes.

What is VMware?

VMware is a global leader in virtualization and cloud infrastructure solutions, founded in 1998. The company develops a wide range of software and services that enable businesses to create, manage, and run virtual machines (VMs) on a single physical server or across multiple servers. These VMs can host different operating systems and applications, which allows for better hardware utilization, simplified management, and increased flexibility.

VMware’s flagship product is VMware vSphere, which consists of two main components:

  1. VMware ESXi: ESXi is a Type-1 hypervisor that provides the foundation for virtualization. It is installed directly on the physical server and acts as a platform for creating and managing VMs. ESXi is responsible for allocating hardware resources, such as CPU, memory, and storage, to each VM while maintaining isolation between them.
  2. VMware vCenter Server: vCenter Server is a centralized management solution that enables the administration of multiple ESXi hosts and their respective VMs from a single interface. It offers features such as VM provisioning, performance monitoring, high availability, and disaster recovery.

Some key features of VMware solutions include:

  1. High availability: VMware vSphere provides automatic failover and load balancing of VMs, ensuring minimal downtime and optimal performance in case of hardware failures or maintenance.
  2. Live Migration (vMotion): VMware allows administrators to move running VMs from one host to another with zero downtime, providing flexibility in managing resources and maintenance tasks.
  3. Storage vMotion: This feature enables the live migration of VM disks from one storage device to another, without impacting the VM’s availability.
  4. Distributed Resource Scheduler (DRS): DRS automatically balances workloads across multiple hosts, ensuring optimal resource allocation and performance for all VMs.
  5. Network virtualization (NSX): VMware NSX is a software-defined networking solution that allows for the creation and management of virtual networks, providing enhanced security and flexibility.

VMware’s virtualization products are widely used in enterprise environments, data centers, and cloud computing services to consolidate workloads, improve application availability, and streamline management.

Comparison of Key Features

Performance

Both Hyper-V and VMware are known for their high performance and efficient resource utilization. VMware has historically had an edge in this area, but recent updates to Hyper-V have significantly closed the gap. With support for nested virtualization, dynamic memory allocation, and advanced networking features, both platforms can deliver excellent performance to meet the needs of various workloads. Ultimately, the performance of your virtual environment will largely depend on your underlying hardware and the proper configuration of your virtual infrastructure.

Scalability

Scalability is another crucial aspect to consider when comparing virtualization platforms. Both Hyper-V and VMware support large-scale virtual environments, but there are some differences in terms of their maximum supported configurations. VMware vSphere supports up to 480 logical processors, 12TB of RAM, and 64 nodes per cluster, while Hyper-V supports up to 320 logical processors, 4TB of RAM, and 64 nodes per cluster. While these numbers may vary depending on the specific edition and version of each platform, it’s clear that VMware offers greater scalability for larger deployments.

Security

Security is a top priority for any IT infrastructure, and virtualization platforms are no exception. Both Hyper-V and VMware offer robust security features, including virtualization-based security, secure boot, and support for TPM (Trusted Platform Module) devices. Additionally, both platforms provide encryption for VM data and network traffic, ensuring the confidentiality and integrity of your data. However, VMware’s vSphere has a more mature security ecosystem, with a larger selection of third-party security solutions and integrations available.

Management and Integration

Managing your virtual environment is a critical task, and both Hyper-V and VMware offer powerful management tools to help you accomplish this. Hyper-V comes with Hyper-V Manager and System Center Virtual Machine Manager (SCVMM), while VMware offers vCenter Server and vSphere Client. Both platforms provide comprehensive management capabilities, including snapshot management, VM scheduling, and remote access via RDP or PowerShell.

In terms of integration with other platforms and services, both Hyper-V and VMware have extensive support for public cloud services like Microsoft Azure and Amazon Web Services. However, Hyper-V has a native advantage when it comes to integration with other Microsoft products, such as Active Directory, System Center, and Office 365.

Licensing and Pricing

Licensing and pricing are important factors to consider when choosing a virtualization platform. Hyper-V has a more straightforward licensing model compared to VMware. The standalone Hyper-V Server is available for free, while the Hyper-V role is included in the Windows Server license. Additional costs for Hyper-V come from System Center licensing for advanced management features.

VMware, on the other hand, has a more complex licensing structure, with several editions of vSphere available at different price points. VMware vSphere licensing is based on the number of physical processors in your servers and the features you require. Additionally, vCenter Server licensing is required for centralized management.


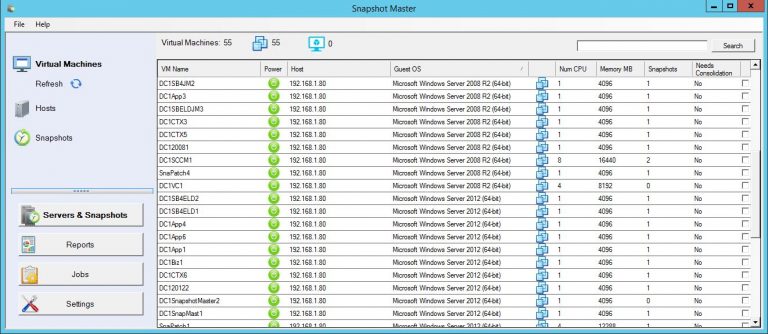
SnapShot Master Home Screen

Managing Virtual Snapshots.

SnapShot Master is a powerful tool that complements both Hyper-V and VMware virtualization platforms, providing a centralized solution for managing virtual machine (VM) snapshots, checkpoints, and data stores. In this section, we will explore the benefits of integrating SnapShot Master with your Hyper-V or VMware environment.

  • Unified Management Interface: SnapShot Master interfaces with VMware’s vCenter, Microsoft’s System Center Virtual Machine Manager (SCVMM), and Microsoft Azure, giving you a comprehensive view of your virtual environment. This unified interface simplifies the management of your VMs across multiple platforms, streamlining the process of creating and managing snapshots, checkpoints, and data stores.
  • Automated Snapshot Scheduling: SnapShot Master allows you to schedule snapshot creations and deletions, ensuring that you have consistent and up-to-date backups of your virtual machines. This automation helps reduce the risk of data loss and provides a more reliable recovery process in case of failures or disasters.
  • Power Management and Remote Access: With SnapShot Master, you can easily manage your virtual machines by scheduling power on and off operations, ensuring optimal resource utilization and energy efficiency. Additionally, you can connect to your VMs remotely via RDP or PowerShell, enabling you to perform maintenance tasks, troubleshoot issues, or access your virtual workloads from anywhere.
  • Consolidating VM Snapshots: SnapShot Master provides an efficient way to consolidate VM snapshots, helping you optimize storage usage and maintain optimal performance. Consolidating snapshots can help you reduce storage overhead, simplify management, and minimize the impact of snapshots on your virtual environment’s performance.
  • Email Notifications and Reporting: SnapShot Master allows you to automate and schedule reporting of your virtual servers and VMware or Hyper-V environments via email. You can receive email notifications and reports related to snapshot creation, deletion, and other critical events, helping you stay informed and aware of your virtual environment’s status and health.

Integrating SnapShot Master with your Hyper-V or VMware environment can significantly enhance your virtualization management experience, providing a comprehensive, automated, and efficient solution for managing your virtual machines and their associated snapshots, checkpoints, and data stores.


Schedule VM Snapshot Selection

Use Cases and Recommendations

Small and Medium-Sized Businesses

For small and medium-sized businesses, Hyper-V is often the more cost-effective option due to its simpler licensing model and integration with other Microsoft products. Additionally, Hyper-V’s performance and management capabilities are more than sufficient for most SMB workloads.

Large Enterprises

For large enterprises with complex and demanding virtual environments, VMware vSphere may be the better choice due to its greater scalability, more mature security ecosystem, and extensive third-party integrations. However, the higher licensing costs and complexity should be taken into account.

Cloud Providers

For organizations looking to build a multi-cloud or hybrid cloud environment, both Hyper-V and VMware have strong integration capabilities with major cloud providers like Microsoft Azure and Amazon Web Services. Choosing between the two platforms will depend on your specific requirements, existing infrastructure, and familiarity with each platform.

High Availability and Disaster Recovery

High availability and disaster recovery are essential components of any IT infrastructure, especially for mission-critical applications. Both Hyper-V and VMware offer solutions for ensuring high availability and facilitating disaster recovery.

Hyper-V provides built-in support for failover clustering, allowing you to create a cluster of multiple Hyper-V hosts for high availability. In the event of a host failure, VMs running on the failed host are automatically migrated to another host in the cluster. Hyper-V also supports replica functionality, allowing you to create a copy of a VM on another Hyper-V host for disaster recovery purposes.

VMware offers a suite of high availability and disaster recovery features as part of its vSphere product. VMware High Availability (HA) automatically restarts VMs on another host in the cluster if a host fails. VMware Fault Tolerance (FT) goes one step further, providing continuous availability for VMs by running a secondary copy of the VM on another host in lockstep with the primary VM. For disaster recovery, VMware offers Site Recovery Manager (SRM), a comprehensive solution for orchestrating and automating the recovery of VMs in case of a site failure.

Networking and Storage

Networking and storage are critical aspects of any virtualization platform. Both Hyper-V and VMware offer a range of networking and storage features to meet the needs of diverse workloads.

Hyper-V supports virtual switches, network virtualization, and advanced networking features such as Quality of Service (QoS) and bandwidth management. Hyper-V also offers a variety of storage options, including support for local storage, Storage Area Networks (SANs), and Network Attached Storage (NAS). Additionally, Hyper-V supports Storage Spaces Direct, a software-defined storage solution that allows you to build highly available and scalable storage systems using local storage on Hyper-V hosts.

VMware vSphere provides a rich set of networking features, such as distributed virtual switches, network I/O control, and support for software-defined networking (SDN) solutions like VMware NSX. VMware’s storage capabilities include support for local storage, SANs, NAS, and vSAN, a software-defined storage solution that enables the creation of high-performance and resilient storage clusters using local storage on ESXi hosts.

Backup and Recovery

Having a robust backup and recovery strategy is vital for protecting your virtual environment from data loss and downtime. Both Hyper-V and VMware offer a range of backup and recovery options, as well as support for third-party backup solutions.

Hyper-V includes built-in support for VM snapshots and checkpoints, allowing you to create point-in-time copies of your VMs for backup and recovery purposes. It is important to note that VMware snapshots are not meant to be used as a long-term backup solution but can be a useful tool for short-term recovery needs.

VMware vSphere also supports VM snapshots, as well as more advanced backup and recovery features like VMware Data Protection (VDP), a built-in backup solution that leverages vSphere APIs for Data Protection (VADP). There is also a wide array of third-party backup solutions available for both Hyper-V and VMware, such as Veeam, Altaro, and Acronis, which offer advanced backup and recovery features tailored for virtual environments.


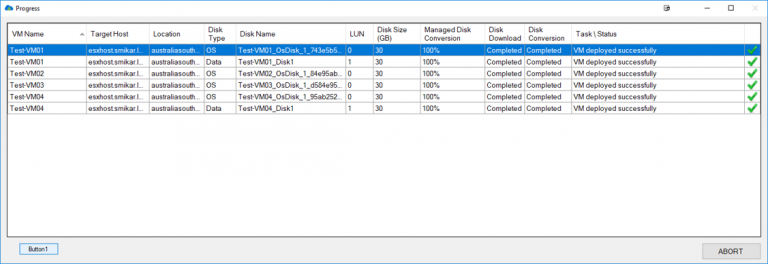
Carbon Azure Migration Progress Screen

Migrating to and from the Cloud

The ability to migrate workloads to and from the cloud is an important consideration for many organizations. Both Hyper-V and VMware offer robust support for migrating VMs to and from public cloud platforms like Microsoft Azure and Amazon Web Services (AWS).

Hyper-V includes built-in support for Azure Site Recovery (ASR), a cloud-based disaster recovery solution that can also be used for migrating VMs to Azure. Additionally, there are tools and guides available for migrating Hyper-V VMs to AWS, such as AWS Server Migration Service (SMS) and Azure VMs to VMware migration checklist.

VMware offers a range of cloud migration tools and services, such as VMware Cloud on AWS, which allows you to run your VMware workloads natively on the AWS infrastructure. VMware also provides the Hybrid Cloud Extension (HCX) for migrating VMs between on-premises vSphere environments and cloud platforms like Azure, AWS, and Google Cloud Platform (GCP).

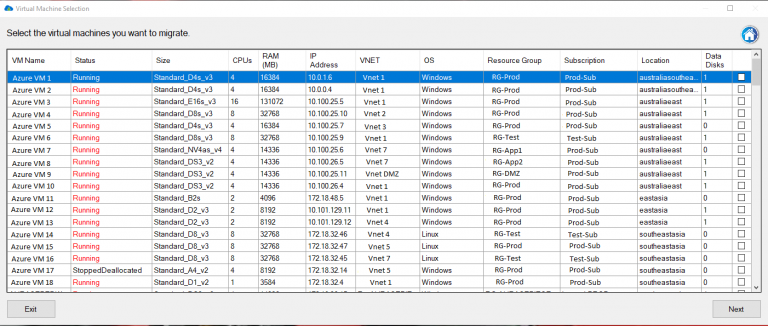
Use Carbon if you want to migrate your Azure VMs back to either your VMware or Hyper-V environment easily and quickly.


Carbon Azure VM Details

Ecosystem and Community Support

A strong ecosystem and community support can be a deciding factor for many organizations when choosing a virtualization platform. Both Hyper-V and VMware have well-established ecosystems and active user communities.

Hyper-V benefits from being a part of the larger Microsoft ecosystem, with strong integration with other Microsoft products and services. The Hyper-V community is active and growing, with numerous forums, blogs, and online resources available for learning and troubleshooting.

VMware has a more mature ecosystem, with a vast array of third-party integrations, plugins, and management tools available to enhance its virtualization offerings. VMware’s community is one of the largest and most active in the virtualization space, with numerous forums, user groups, and online resources available for learning and support.

Conclusion

In summary, both Hyper-V and VMware offer powerful virtualization platforms with a range of features to suit different needs. When deciding between the two, consider factors such as performance, scalability, security, management and integration, licensing and pricing, use cases, and ecosystem and community support. For small and medium-sized businesses, Hyper-V may be the more cost-effective and convenient option due to its simpler licensing model and integration with other Microsoft products. On the other hand, large enterprises with complex and demanding virtual environments may prefer VMware vSphere for its greater scalability, more mature security ecosystem, and extensive third-party integrations.

Ultimately, the best virtualization platform for your organization will depend on your specific requirements, existing infrastructure, and familiarity with each platform. By carefully evaluating the features, benefits, and drawbacks of both Hyper-V and VMware, you can make an informed decision that best meets the needs of your organization.

Frequently Asked Questions

Can I run both Hyper-V and VMware on the same physical server?

No, you cannot run both Hyper-V and VMware on the same physical server as they are both Type-1 hypervisors that require direct access to the hardware resources. However, you can use nested virtualization to run one hypervisor inside a VM running on the other hypervisor, although this setup is typically used for testing and experimentation purposes.

Can I migrate my existing VMs from one platform to the other?

Yes, you can migrate your existing VMs from Hyper-V to VMware and vice versa using various tools and methods. Some of these tools include VMware vCenter Converter, Microsoft Virtual Machine Converter (MVMC), and third-party solutions like Veeam and StarWind V2V Converter.

Can I use both Hyper-V and VMware in a mixed virtual environment?

While it is technically possible to use both Hyper-V and VMware in a mixed virtual environment, doing so can increase the complexity of managing and monitoring your virtual infrastructure. If you choose to use both platforms, it is essential to have proper management and monitoring tools in place that can handle the heterogeneous environment.

Is it possible to use Hyper-V on non-Windows platforms?

No, Hyper-V is a Microsoft technology and is only available on Windows Server and Windows 10 operating systems. If you need to run VMs on non-Windows platforms, you should consider using other virtualization solutions like VMware, KVM, or Xen.

Which virtualization platform has better support for containers?

Both Hyper-V and VMware have support for containers, but the level of support and integration varies between the platforms. Hyper-V has native support for Windows containers and integrates with Docker through the Docker Engine for Windows. VMware supports containers through its vSphere Integrated Containers (VIC) and VMware Tanzu offerings, which provide container runtime and orchestration capabilities within the vSphere environment.

How do performance and resource overhead compare between Hyper-V and VMware?

Both Hyper-V and VMware have made significant improvements in performance and resource efficiency over the years. While the performance differences between the two platforms may be minimal for most workloads, VMware has historically been considered to have a slight edge in performance, particularly for high-performance workloads. However, Hyper-V has made considerable strides in recent years, and the performance gap between the two platforms continues to narrow.

In terms of resource overhead, both platforms strive to minimize the impact on the host system’s resources. VMware’s ESXi hypervisor is known for its small footprint and efficient resource utilization, while Hyper-V also boasts a lightweight design, particularly in the case of the standalone Hyper-V Server. It is important to evaluate the performance and resource overhead of each platform within the context of your specific workloads and hardware configurations.

How does security compare between Hyper-V and VMware?

Both Hyper-V and VMware offer a range of security features to protect your virtual environment. Hyper-V has several security features built into the Windows platform, such as BitLocker encryption, Secure Boot, and Device Guard. Additionally, Hyper-V supports Shielded VMs, which provide an extra layer of protection for sensitive workloads by encrypting the VM’s state and data.

VMware also offers a robust set of security features, including VM Encryption, Secure Boot, and vSphere Trust Authority (vTA) for centralized management of trusted hosts. Furthermore, VMware has a more mature security ecosystem, with a vast array of third-party security solutions available to enhance the platform’s security capabilities.

While both platforms provide strong security features, it is essential to implement a comprehensive security strategy that includes securing the host systems, network, and storage, as well as regularly updating and patching your virtualization platform.

How do I choose between Hyper-V and VMware for my organization’s virtualization needs?

Selecting the right virtualization platform for your organization will depend on several factors, such as:

  • Performance and scalability requirements
  • Integration with existing infrastructure and software
  • Licensing and pricing considerations
  • Familiarity and expertise with each platform
  • Support for specific use cases, such as high availability, disaster recovery, and cloud migration
  • Ecosystem and community support

It is essential to carefully evaluate the features, benefits, and drawbacks of both Hyper-V and VMware in the context of your organization’s specific needs and resources. By conducting a thorough assessment, you can make an informed decision that best suits your organization’s virtualization requirements.

What are some best practices for managing and maintaining a virtual environment on either Hyper-V or VMware?

Regardless of the virtualization platform you choose, following some best practices can help ensure the smooth operation and maintenance of your virtual environment:

  • Regularly monitor and optimize the performance of your virtual environment, including host systems, VMs, networking, and storage.
  • Implement a comprehensive backup and recovery strategy to protect your VMs and data from loss and downtime.
  • Regularly update and patch your virtualization platform and guest operating systems to address security vulnerabilities and enhance stability.
  • Implement strong security measures, such as network segmentation, encryption, and access controls, to protect your virtual environment.
  • Leverage management and automation tools to simplify the administration of your virtual infrastructure and improve efficiency.
  • Continuously invest in training and knowledge development for your IT staff to ensure they are proficient in managing and troubleshooting your virtualization platform.

Can I use Hyper-V and VMware in a hybrid cloud or multi-cloud environment?

Yes, both Hyper-V and VMware offer robust support for hybrid cloud and multi-cloud environments. Hyper-V has native integration with Microsoft Azure, allowing you to easily extend your on-premises virtual environment to the Azure public cloud.

Similarly, VMware offers various tools and services for hybrid cloud and multi-cloud scenarios, such as VMware Cloud on AWS, Azure VMware Solution, and Google Cloud VMware Engine. These solutions allow you to run your VMware workloads natively on public cloud infrastructure, enabling seamless integration between your on-premises and cloud environments.

When considering a hybrid cloud or multi-cloud strategy, it’s essential to evaluate the compatibility and integration between your virtualization platform and the public cloud providers you plan to use. Both Hyper-V and VMware offer strong support for the major public cloud platforms, but it’s crucial to consider factors such as workload portability, management and monitoring, security, and cost optimization when designing your hybrid or multi-cloud architecture.

How does licensing and pricing compare between Hyper-V and VMware?

Licensing and pricing can be a significant factor in choosing a virtualization platform. Hyper-V is available as part of the Windows Server operating system, and its licensing is included with the Windows Server license. This means that organizations already using Windows Server can deploy Hyper-V at no additional cost. Additionally, Microsoft offers a free, standalone version of Hyper-V Server, which provides core virtualization features but lacks some advanced features and integration with other Microsoft products.

VMware, on the other hand, uses a per-socket licensing model for its vSphere platform. Organizations must purchase a license for each physical CPU socket in their servers. VMware offers various vSphere editions, each with different feature sets and pricing levels, allowing organizations to choose the edition that best meets their needs and budget. While VMware’s licensing model can be more expensive than Hyper-V’s, the additional features and capabilities offered by VMware may justify the higher cost for some organizations.

What are the main differences between Hyper-V and VMware in terms of networking capabilities?

Both Hyper-V and VMware offer a range of networking features for virtual environments, but there are some differences in their capabilities and implementations.

Hyper-V provides support for virtual switches, VLANs, NIC teaming, and virtual network adapters. It also offers extensible switch capabilities, allowing third-party vendors to develop plugins and extensions for the virtual switch. Additionally, Hyper-V supports Software-Defined Networking (SDN) through integration with Microsoft’s Azure Stack HCI and System Center Virtual Machine Manager (SCVMM).

VMware vSphere includes a more extensive set of networking features, such as distributed virtual switches, network I/O control, and support for SDN solutions like VMware NSX. VMware’s distributed virtual switch (vDS) enables centralized management and configuration of virtual switches across multiple ESXi hosts, providing more advanced features and granular control over network traffic than the standard virtual switches offered by Hyper-V.

Can I manage both Hyper-V and VMware environments using a single management tool?

While it is possible to manage both Hyper-V and VMware environments using a single management tool, doing so typically requires using third-party solutions that support both platforms. Examples of such tools include Veeam ONE, SolarWinds Virtualization Manager, and ManageEngine OpManager.

These third-party management tools can provide a unified interface for managing and monitoring your mixed virtual environment, offering features like performance monitoring, capacity planning, and alerting. However, using a single management tool for both platforms may not provide the same level of integration and functionality as using the native management tools for each platform, such as Hyper-V Manager or VMware vCenter.

How do I decide which type of virtual disk format to use for my VMs on Hyper-V or VMware?

Choosing the right virtual disk format for your VMs depends on factors like performance, storage efficiency, and compatibility with your virtualization platform. Hyper-V supports two main types of virtual disk formats: VHD and VHDX. VHD is the older format and has some

limitations, such as a maximum size of 2TB and lack of support for advanced features like online resizing. VHDX is the newer format and offers better performance, support for larger disk sizes (up to 64TB), and additional features like online resizing and data corruption protection. For most Hyper-V deployments, using the VHDX format is recommended.

VMware supports several virtual disk formats, including VMDK, VHD, and VHDX. The VMDK format is native to VMware and offers the best compatibility and performance for VMware environments. VMware also provides support for thin provisioning and thick provisioning, allowing you to choose the disk allocation method that best meets your storage efficiency and performance requirements.

When deciding on a virtual disk format, it’s essential to consider factors like compatibility with your virtualization platform, performance requirements, and storage efficiency. In most cases, using the native virtual disk format for your platform (VHDX for Hyper-V and VMDK for VMware) is recommended.

How do Hyper-V and VMware support automation and scripting?

Automation and scripting are essential for efficient management and operation of your virtual environment. Both Hyper-V and VMware offer support for automation and scripting through various tools and APIs:

  • Hyper-V:
    • PowerShell: Hyper-V includes a comprehensive set of PowerShell cmdlets that allow you to automate and script various management tasks, such as creating and managing VMs, configuring virtual switches, and performing live migrations.
    • System Center Orchestrator: Microsoft’s System Center Orchestrator provides a powerful automation platform that integrates with Hyper-V and other System Center components, enabling you to create complex automation workflows and runbooks.
  • VMware:
    • PowerCLI: VMware provides a powerful set of PowerShell cmdlets called PowerCLI, which allows you to automate and script various management tasks in VMware vSphere environments, such as creating and managing VMs, configuring virtual networks, and managing vSphere clusters.
    • vSphere Automation SDK: VMware offers a set of APIs and SDKs for automating and integrating with vSphere, including REST APIs, Python libraries, and other language bindings.

When implementing automation and scripting in your virtual environment, consider the ease of use, flexibility, and integration with your existing tools and processes.

How do Hyper-V and VMware handle resource allocation and overcommitment?

Resource allocation and overcommitment are essential aspects of managing a virtual environment, as they help ensure optimal performance and efficient use of hardware resources. Both Hyper-V and VMware offer various mechanisms for controlling resource allocation and overcommitment:

  • Hyper-V:
    • Dynamic Memory: Hyper-V includes a feature called Dynamic Memory, which allows you to automatically adjust the amount of memory assigned to VMs based on their current usage, helping to improve overall memory utilization.
    • Resource Pools: Hyper-V supports creating resource pools, which enable you to allocate specific amounts of CPU, memory, and storage resources to groups of VMs, ensuring that each group receives its fair share of resources.
  • VMware:
    • Resource Pools and Reservations: VMware vSphere allows you to create resource pools and set reservations, limits, and shares for CPU, memory, and storage resources, providing granular control over resource allocation and ensuring that VMs receive the resources they need.
    • Memory Overcommitment: VMware vSphere includes advanced memory management techniques, such as transparent page sharing, ballooning
    • , and memory compression, that allow you to overcommit memory resources, improving overall memory utilization and enabling you to run more VMs on a single host without sacrificing performance.

      Both Hyper-V and VMware provide you with the tools and features necessary to manage resource allocation and overcommitment effectively. When configuring resource allocation in your virtual environment, consider factors like performance requirements, hardware constraints, and the specific needs of your virtual machines and workloads.

How do Hyper-V and VMware handle live migrations and VM mobility?

Live migration and VM mobility are crucial for maintaining high availability, load balancing, and flexibility in your virtual environment. Both Hyper-V and VMware offer support for live migrations and VM mobility through various features and technologies:

  • Hyper-V:
    • Live Migration: Hyper-V includes support for live migrations, which allows you to move running VMs between Hyper-V hosts with minimal downtime and no loss of network connections. Hyper-V supports different types of live migrations, such as shared-nothing live migration and storage live migration.
    • Storage Spaces Direct: Microsoft’s Storage Spaces Direct technology enables you to create a software-defined storage solution that supports Hyper-V VMs, providing greater flexibility and mobility for your virtual workloads.
  • VMware:
    • vMotion: VMware vSphere includes a feature called vMotion, which allows you to move running VMs between vSphere hosts with no downtime. vMotion supports various types of migrations, such as shared storage vMotion, storage vMotion, and cross-vCenter vMotion.
    • VMware vSAN: VMware’s vSAN technology is a software-defined storage solution that integrates with vSphere, providing a highly flexible and scalable storage platform for your virtual workloads.

When evaluating live migration and VM mobility capabilities in Hyper-V and VMware, consider factors like ease of use, performance, and integration with your existing infrastructure and storage solutions.

How do Hyper-V and VMware handle network virtualization and software-defined networking (SDN)?

Network virtualization and software-defined networking (SDN) are essential components of modern virtual environments, providing greater flexibility, scalability, and security for your virtual workloads. Both Hyper-V and VMware offer support for network virtualization and SDN through various features and technologies:

  • Hyper-V:
    • Virtual Switches: Hyper-V includes support for creating and managing virtual switches, which allow you to connect VMs to physical networks or create isolated virtual networks for your workloads.
    • Network Virtualization: Hyper-V supports network virtualization using technologies like NVGRE and VXLAN, enabling you to create multi-tenant virtual networks that can span multiple physical networks.
    • Software-Defined Networking (SDN): Microsoft’s SDN solution, which is part of Windows Server and System Center, provides a comprehensive set of tools and features for managing and automating your virtual networks, including network virtualization, network controllers, and load balancing.
  • VMware:
    • Virtual Switches: VMware vSphere includes support for creating and managing virtual switches, which enable you to connect VMs to physical networks or create isolated virtual networks for your workloads.
    • VMware NSX: VMware’s NSX technology is a full-featured SDN solution that integrates with vSphere, providing advanced features like network virtualization, micro-segmentation, and load balancing.

When evaluating network virtualization and SDN capabilities in Hyper-V and VMware, consider factors like ease of use, scalability, security, and integration with your existing infrastructure and network solutions.

Azure Blob Storage Monitoring – Best Tools and Tips

Azure Blob Storage Monitoring – Best Tools and Tips

Azure Blob Storage Monitoring: A Comprehensive Guide

Introduction to Azure Blob Storage Monitoring

Azure Blob Storage is a cloud-based storage service provided by Microsoft Azure that allows users to store vast amounts of unstructured data like documents, images, videos, and more. Monitoring Azure Blob Storage is crucial for ensuring optimal performance, data security, and efficient cost management. In this comprehensive guide, we will explore the importance of monitoring Azure Blob Storage, various tools and techniques for monitoring, and how the Cloud Storage Manager can help you effectively manage your storage environment.

Importance of Monitoring Azure Blob Storage

Performance Optimization

Monitoring Azure Blob Storage ensures that your storage environment operates at peak performance. By identifying and addressing performance bottlenecks, you can optimize data access and improve the overall user experience.

Data Security

Azure Blob Storage monitoring enables you to identify potential security risks and implement appropriate measures to protect your data. This includes securing access to your storage account, encrypting data at rest and in transit, and integrating with Azure Active Directory for centralized identity management.

Cost Management

Effectively monitoring your Azure Blob Storage allows you to track your storage consumption and growth trends. By identifying areas for optimization, you can better control costs and allocate resources efficiently.

Monitoring Tools and Techniques

Azure Portal

The Azure Portal provides a comprehensive dashboard for monitoring your Azure Blob Storage. You can view metrics like data ingress, egress, and latency, as well as configure alerts for specific events.

Azure Monitor

Azure Monitor is a built-in monitoring service that collects and analyzes performance and diagnostic data from your Azure Blob Storage. It provides in-depth insights and allows you to set up custom alerts based on predefined metrics or custom queries.

Azure Storage Explorer

Azure Storage Explorer is a free, standalone application that enables you to manage and monitor your Azure Blob Storage accounts from a single interface. You can easily view and modify your storage account properties, access keys, and container-level permissions.


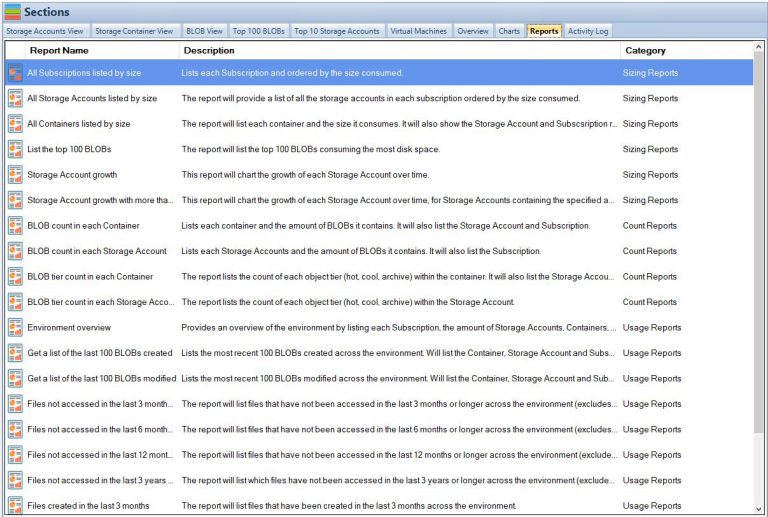
Cloud Storage Manager Reports Tab

Cloud Storage Manager: An Effective Solution

Insights into Storage Consumption

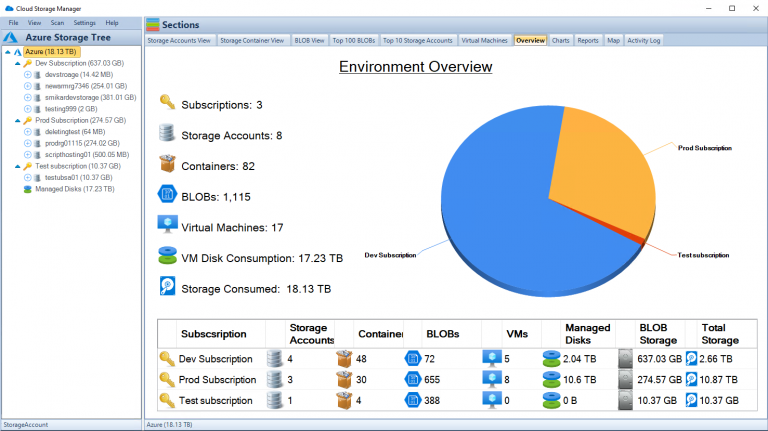
Our software, Cloud Storage Manager, provides you with valuable insights into your Azure Blob and file storage consumption. By tracking your storage usage, you can identify patterns and trends, enabling you to make informed decisions about your storage needs.

Storage Usage and Growth Reports

Cloud Storage Manager generates detailed reports on storage usage and growth trends. These reports help you understand your storage environment better, identify potential issues, and optimize your storage strategy.

Cost-saving Tips

Cloud Storage Manager helps you save money on your Azure Storage by providing cost-saving tips and recommendations. By implementing these suggestions, you can optimize your storage environment and reduce your overall expenses.


Cloud Storage Manager Main Window

Security Best Practices

Securing Azure Blob Storage

Securing your Azure Blob Storage is crucial to protecting your data from unauthorized access and potential threats. You can follow best practices, such as implementing access control policies, using Shared Access Signatures, and enabling Azure Private Link. Learn more about securing Azure Blob Storage here.

Azure Storage Service Encryption

Azure Storage Service Encryption (SSE) automatically encrypts your data at rest using Microsoft-managed keys or customer-managed keys. This ensures that your data is secure, even if an unauthorized user gains access to the storage account. Learn more about Azure Storage Service Encryption here.

Azure Active Directory Integration

Integrating Azure Blob Storage with Azure Active Directory (AD) enables you to centralize identity management and enforce role-based access control for your storage accounts. Learn more about connecting Azure Storage accounts to Active Directory here.

Performance Optimization Techniques

Azure Blob Storage Tiers

Azure Blob Storage offers three performance tiers – Hot, Cool, and Archive – to meet your storage needs. By selecting the appropriate tier for your data, you can optimize performance and reduce storage costs. Learn more about Azure Blob Storage tiers here.

Azure Data Lake vs. Blob Storage

Azure Data Lake Storage and Azure Blob Storage are both suitable for storing large volumes of unstructured data. Understanding the differences between these services can help you make the right choice for your data storage needs. Learn more about Azure Data Lake vs. Blob Storage here.

Azure File Sync

Azure File Sync allows you to synchronize your on-premises file servers with Azure Files, providing a centralized, cloud-based storage solution. This can improve performance by offloading your on-premises storage infrastructure and leveraging Azure’s scalability. Learn more about Azure File Sync here.

Cost Management Strategies

Azure Blob Storage Pricing

Understanding Azure Blob Storage pricing is essential for managing your storage costs effectively. By analyzing your storage usage patterns and selecting the right performance tiers, redundancy options, and data transfer rates, you can minimize your storage expenses. Learn more about Azure Blob Storage pricing here.

Azure Storage Lifecycle Policies

Azure Storage Lifecycle Policies allow you to automate the transition of your data between different performance tiers and deletion of old or unused data. Implementing lifecycle policies can help you optimize storage costs and ensure that you’re only paying for the storage you need. Learn more about creating Azure Storage Lifecycle policies here.

Reviewing Storage Usage

Regularly reviewing your storage usage can help you identify areas for optimization and cost reduction. Cloud Storage Manager can assist you in tracking your storage consumption and providing actionable insights to improve your storage environment.

Data Redundancy and Disaster Recovery

Azure Data Redundancy Options

Azure offers various data redundancy options, such as Locally Redundant Storage (LRS), Zone-Redundant Storage (ZRS), Geo-Redundant Storage (GRS), and Read-Access Geo-Redundant Storage (RA-GRS). These options ensure data durability and high availability, even in the event of a data center failure. Selecting the right redundancy option for your data can help you achieve a balance between cost and reliability. Learn more about Azure Data Redundancy options here.

Azure Fault and Update Domains

Azure Fault Domains and Update Domains are designed to improve the resiliency of your storage infrastructure. Fault Domains protect against hardware failures, while Update Domains ensure that updates do not impact your entire storage environment simultaneously. Learn more about Azure Fault and Update Domains here.

Integration with Other Azure Services

Azure Resource Groups

Azure Resource Groups enable you to organize and manage resources that belong to a specific project or application. By organizing your Azure Blob Storage accounts within resource groups, you can simplify management and ensure that resources share the same lifecycle and permissions. Learn more about Azure Resource Groups here.

Azure SFTP with Storage

Azure SFTP (Secure File Transfer Protocol) with Storage is an integrated solution that allows you to securely transfer files to and from your Azure Blob Storage accounts. This enables you to leverage the security and performance benefits of Azure for your file transfers. Learn more about Azure SFTP with Storage here.

Managing Azure Blob Storage Metadata

Azure Blob Storage Metadata Overview

Azure Blob Storage metadata consists of key-value pairs that describe your blobs and containers. This metadata can help you manage and organize your storage environment more effectively.

Azure Blob Storage Metadata Best Practices

Following metadata best practices can help you optimize your storage environment and improve data management. These practices include using consistent naming conventions, implementing versioning, and leveraging custom metadata properties.

Understanding Azure Blob Storage Types

Block Blobs

Block blobs are designed for storing large volumes of unstructured data, such as text or binary data. They are optimized for streaming and can handle up to 4.75 TB of data per blob. Learn more about block blobs here.

Append Blobs

Append blobs are ideal for storing log files, as they allow you to append new data to the end of the blob without modifying existing data. Append blobs can handle up to 195 GB of data per blob. Learn more about append blobs here.

Page Blobs

Page blobs are designed for storing random access files, such as virtual hard disks (VHDs) used by Azure Virtual Machines. They support up to 8 TB of data per blob and offer low latency and high throughput. Learn more about page blobs here.

Migrating Data to Azure Blob Storage

Using AzCopy with Azure Storage

AzCopy is a command-line utility that enables you to copy and transfer data between your on-premises storage and Azure Blob Storage. It supports various data transfer scenarios, including parallel uploads and downloads, and can significantly speed up the migration process. Learn more about using AzCopy with Azure Storage here.

Migrating On-premises File Shares

Migrating your on-premises file shares to Azure Blob Storage can help you leverage the benefits of cloud-based storage, such as improved scalability, performance, and cost-efficiency. You can use tools like Azure File Sync, Azure Import/Export service, and AzCopy to facilitate the migration process. Learn more about migrating on-premises file shares here.

Comparing Azure Blob Storage with Competitors

Azure Blob Storage vs. Google Cloud Storage

Both Azure Blob Storage and Google Cloud Storage offer scalable, cost-effective solutions for storing unstructured data in the cloud. However, they differ in terms of features, pricing, and integration with other cloud services. Comparing these storage options can help you choose the best solution for your specific needs. Learn more about Azure Blob Storage vs. Google Cloud Storage here.

Azure Blob Storage vs. AWS S3

Azure Blob Storage and Amazon Web Services (AWS) Simple Storage Service (S3) are two popular cloud storage options for storing unstructured data. Both offer a wide range of features, including data redundancy, security, and performance optimization. Comparing Azure Blob Storage and AWS S3 can help you identify the best cloud storage solution for your organization. Learn more about Azure Blob Storage vs. AWS S3 here.

Conclusion

Monitoring Azure Blob Storage is essential for optimizing performance, ensuring data security, and effectively managing costs. By leveraging the tools and techniques outlined in this comprehensive guide, you can gain valuable insights into your storage environment and make informed decisions about your storage strategy. Additionally, our software, Cloud Storage Manager, can help you effectively manage your Azure Blob Storage, providing valuable insights and recommendations to optimize your storage environment.

FAQs

Q: How do I monitor Azure Blob Storage usage?

A: You can monitor Azure Blob Storage usage using the Azure Portal, Azure Monitor, Azure Storage Explorer, or third-party tools. Additionally, Cloud Storage Manager can help you track storage consumption and provide valuable insights.

Q: How do I ensure the security of my Azure Blob Storage data?

A: Securing your Azure Blob Storage data involves implementing access control policies, using Shared Access Signatures, enabling Azure Private Link, and integrating with Azure Active Directory. Azure Storage Service Encryption can also help protect your data at rest.

Q: How do I optimize the performance of my Azure Blob Storage?

A: Performance optimization techniques for Azure Blob Storage include selecting the appropriate performance tiers (Hot, Cool, or Archive), understanding the differences between Azure Data Lake Storage and Azure Blob Storage, and leveraging Azure File Sync.

Q: How do I manage costs for my Azure Blob Storage?

A: To manage costs for Azure Blob Storage, you need to understand the pricing structure, implement Azure Storage Lifecycle Policies, and regularly review your storage usage. Cloud Storage Manager can help you track consumption and provide cost-saving recommendations.

Azure VM Types – A Comprehensive List and Uses

Azure VM Types – A Comprehensive List and Uses

Introduction to Azure Virtual Machines

Microsoft Azure, one of the leading cloud computing platforms, provides various services that enable businesses to run and manage applications efficiently. Among these services are virtual machines (VMs), which offer scalable computing resources to accommodate the diverse requirements of modern applications. In this article, we will delve into the different Azure VM types available and guide you on how to select the most suitable option for your specific needs.

Azure VMs play a crucial role in today’s technology landscape, as more organizations are shifting towards cloud-based solutions. These VMs allow businesses to provision and manage virtual machines on-demand, making it easier to scale resources according to changing requirements. Moreover, Azure VMs provide a secure and reliable environment for running applications, with various tools and features available for monitoring, management, and optimization. By understanding the various VM types and their use cases, you can make informed decisions on which VM type to deploy for your workloads, ensuring optimal performance and cost-efficiency.

Understanding VM Series and Sizes

Azure provides an extensive range of VM series and sizes to cater to different workloads and requirements. Each series is tailored for specific use cases, with various sizes available to offer granular control over the computing resources. This wide selection ensures that you can find a VM type that matches your workload requirements perfectly. In this section, we will explore the different VM series available in Azure and discuss their primary use cases.

General Purpose VMs

General Purpose VMs cater to a wide range of workloads, including web servers, application servers, and small to medium-sized databases. These VMs provide a balanced ratio of compute, memory, and storage resources, making them suitable for various applications that do not have extreme resource requirements. The most common general purpose VM series in Azure include the B, D, and Dv2 series.

The B series, for example, is designed for workloads that require low to moderate CPU performance but can benefit from the ability to burst CPU usage during peak times. This series is ideal for test environments, small databases, and web servers with low to medium traffic. On the other hand, the D and Dv2 series offer a higher baseline performance compared to the B series, with more powerful processors and faster storage. These VM types are suitable for applications that require consistent performance and can handle larger workloads.

Compute Optimized VMs

Compute Optimized VMs are designed for compute-intensive applications that demand a higher CPU-to-memory ratio. These VMs are ideal for high-performance web servers, scientific simulations, and batch processing tasks. In Azure, the F and Fv2 series are examples of compute-optimized VMs.

The F series provides a high-performance Intel Xeon processor, with a higher CPU-to-memory ratio than the General Purpose VMs. This makes the F series suitable for applications that require more processing power but do not need as much memory or storage. The Fv2 series, on the other hand, is the latest generation of Compute Optimized VMs, offering even better performance with the latest Intel Xeon Scalable processors. These VMs are perfect for the most demanding compute-intensive workloads, providing exceptional performance and scalability.

Memory Optimized VMs

Memory Optimized VMs are specifically designed for applications that require large amounts of memory, such as in-memory databases, data analytics, and real-time processing. These VMs offer a higher memory-to-CPU ratio compared to general-purpose VMs, ensuring that your memory-intensive workloads can run smoothly and efficiently. Examples of memory-optimized VM series in Azure include the E and M series.

The E series provides a balance between memory and compute resources, with ample memory capacity to handle large datasets and demanding applications. This series is ideal for applications like SAP HANA, SQL Server, and other in-memory databases that require high memory capacity and consistent performance. The M series, on the other hand, offers the highest memory capacity among Azure VMs, making it suitable for the most demanding memory-intensive workloads. With the M series, you can run large-scale in-memory databases, high-performance analytics, and other applications that need massive amounts of memory to perform optimally.

Storage Optimized VMs

Storage Optimized VMs are tailored for workloads that require high disk throughput and low-latency storage access, such as big data analytics, NoSQL databases, and data warehousing. These VMs are designed to provide fast and efficient storage access, ensuring that your data-intensive applications can process and analyze large amounts of data quickly. The L series is an example of storage-optimized VMs in Azure.

The L series VMs offer high disk throughput and low-latency storage access, making them perfect for applications that involve heavy read and write operations. With the L series, you can run big data workloads, NoSQL databases, and data warehousing solutions efficiently, ensuring that your data processing tasks are completed quickly and without delays.

GPU Optimized VMs

GPU Optimized VMs are designed for workloads that require graphics processing units (GPUs) for parallel processing and high-performance computing, such as deep learning, rendering, and video processing. These VMs offer powerful GPUs that can handle complex calculations and graphics processing tasks, providing exceptional performance for GPU-intensive workloads. The NV and NC series are examples of GPU-optimized VMs in Azure.

The NV series is optimized for visualization and rendering workloads, offering powerful NVIDIA GPUs that can handle graphics-intensive tasks such as 3D modeling and video editing. On the other hand, the NC series is optimized for high-performance computing and deep learning, with powerful NVIDIA Tesla GPUs that can handle complex calculations and parallel processing tasks. With GPU Optimized VMs, you can run GPU-intensive workloads efficiently, ensuring that your applications have the processing power they need to perform at their best.

High Performance Computing VMs

High Performance Computing (HPC) VMs are designed for the most demanding workloads, such as simulations, modeling, and scientific research. These VMs offer the highest level of compute power and network performance, ensuring that your HPC workloads can run smoothly and efficiently. The H and HB series are examples of HPC VMs in Azure.

The H series VMs are optimized for high-performance computing, offering powerful Intel Xeon processors and a high-speed InfiniBand network for low-latency communication between VMs. This makes the H series suitable for running complex simulations, modeling tasks, and other HPC workloads that require high levels of compute power and network performance. The HB series, on the other hand, is designed for even more demanding HPC workloads, offering AMD EPYC processors and a high-speed InfiniBand network for exceptional performance and scalability.

Choosing the Right Azure VM Type for Your Needs

Selecting the appropriate VM type for your workload is crucial to ensure optimal performance and cost efficiency. To choose the right VM type, you should consider the following factors:

Assessing Your Workload Requirements

Analyze the specific requirements of your workload, such as the amount of CPU, memory, storage, and GPU resources needed. Determine if your application can benefit from high-performance computing capabilities or if it has specific storage requirements. By understanding your workload’s needs, you can narrow down the list of suitable VM types and make a more informed decision.

Evaluating Cost and Performance

Compare the cost and performance of different VM types that meet your workload requirements. Consider the pricing model, such as pay-as-you-go or reserved instances, to find the most cost-effective option. Keep in mind that selecting a VM with more resources than needed might result in higher costs, while choosing a VM with insufficient resources can negatively impact performance. By evaluating cost and performance, you can strike the right balance between affordability and performance for your specific workloads.

Scalability and Flexibility Considerations

Choose a VM type that can scale with your application’s growth and adapt to changing requirements. Azure offers features like autoscaling and VM resizing to help you manage your infrastructure efficiently. As your workloads grow or evolve, it is essential to have a VM type that can accommodate these changes without causing significant disruptions to your operations. By considering scalability and flexibility, you can ensure that your VM infrastructure remains agile and responsive to your organization’s needs.

Best Practices for Deploying Azure VMs

To maximize the benefits of Azure VMs, it is essential to follow best practices for deployment and management. By adhering to these practices, you can ensure that your VM infrastructure remains efficient, secure, and cost-effective.

Monitoring and Management

Monitor your VMs to ensure they are performing optimally and to detect potential issues. Use Azure Monitor, Log Analytics, and other management tools to gain insights into your VMs’ performance, health, and usage patterns. By actively monitoring your VMs, you can identify and address performance issues before they become critical, ensuring that your workloads continue to run smoothly and efficiently.

Security and Compliance

Secure your VMs by implementing strong access controls, encrypting data at rest and in transit, and regularly updating your software. Additionally, ensure that your VMs meet any compliance requirements specific to your industry or organization. By maintaining a robust security posture and adhering to compliance standards, you can protect your VM infrastructure and sensitive data from unauthorized access and potential breaches.

Optimizing for Cost Efficiency

Monitor and optimize your VM usage to minimize costs. Use features like Azure Cost Management, reserved instances, and Azure Hybrid Benefit to save money and manage your cloud spending effectively. By keeping track of your VM usage and optimizing your resource allocation, you can reduce costs without compromising performance or reliability.


Carbon Azure VM Details

Migrate your Azure VM back to your On Premise Environment.

Migrate your Azure VMs back to your on-premise environment with a few clicks, using Carbon. Carbon automates the replication, conversion, and setup of your Azure VMs on either your VMWare of Hyper-V Environment.

Azure VM Types FAQs

What is the main difference between General Purpose and Compute Optimized VMs?

General Purpose VMs offer a balanced ratio of compute, memory, and storage resources, while Compute Optimized VMs have a higher CPU-to-memory ratio, making them more suitable for compute-intensive workloads.

Can I change the VM type after deployment?

Yes, you can resize your VMs after deployment by stopping the VM, changing the VM type, and restarting the VM. However, consider possible downtime and data migration when resizing.

What is Azure Hybrid Benefit?

Azure Hybrid Benefit is a cost-saving feature that allows customers with existing Windows Server and SQL Server licenses to use their on-premises licenses in Azure, reducing the cost of running VMs.

How do I monitor the performance of my Azure VMs?

You can use Azure Monitor, Log Analytics, and other management tools to monitor the performance, health, and usage patterns of your VMs.

What are the best practices for securing Azure VMs?

Best practices for securing Azure VMs include implementing strong access controls, encrypting data at rest and in transit, regularly updating software, and ensuring compliance with industry-specific or organizational requirements.

Azure VM Types FAQs

VM Type Series Description Use Cases
General Purpose B Series Balanced CPU-to-memory ratio, burstable CPU performance Test environments, small databases, low to medium traffic web servers
General Purpose D Series Higher baseline performance, powerful processors, faster storage Consistent performance, application servers, medium-sized databases
General Purpose Dv2 Series Improved performance over D series, powerful processors, faster storage Consistent performance, application servers, medium-sized databases
Compute Optimized F Series High-performance Intel Xeon processor, high CPU-to-memory ratio High-performance web servers, scientific simulations, batch processing
Compute Optimized Fv2 Series Latest generation Compute Optimized VMs, latest Intel Xeon Scalable processors High-performance web servers, scientific simulations, batch processing
Memory Optimized E Series Balanced memory and compute resources, high memory capacity SAP HANA, SQL Server, other in-memory databases
Memory Optimized M Series Highest memory capacity among Azure VMs Large-scale in-memory databases, high-performance analytics
Storage Optimized L Series High disk throughput, low-latency storage access Big data analytics, NoSQL databases, data warehousing
GPU Optimized NV Series Optimized for visualization and rendering, NVIDIA GPUs 3D modeling, video editing, rendering
GPU Optimized NC Series Optimized for high-performance computing and deep learning, NVIDIA Tesla GPUs Deep learning, parallel processing, high-performance computing
High Performance Computing H Series Optimized for HPC, powerful Intel Xeon processors, high-speed InfiniBand network Simulations, modeling, scientific research
High Performance Computing HB Series Optimized for demanding HPC workloads, AMD EPYC processors, high-speed InfiniBand network Simulations, modeling, scientific research

Please note that this table provides an overview of the different Azure VM types and their general specifications. For more detailed information on each VM series and their specific sizes, please refer to the official Azure documentation.


Cloud Storage Manager Virtual Machines Tab

Conclusion

Azure offers a wide range of VM types to meet the diverse needs of modern applications. By understanding the different VM series and sizes, assessing your workload requirements, and following best practices, you can select the right Azure VM type for your application and ensure optimal performance and cost efficiency. As your organization continues to leverage the power of the cloud, the ability to choose the appropriate VM type will be crucial in maintaining efficient and reliable workloads that drive your organization’s success.

How to Protect Your Storage Account Against Blob-Hunting

How to Protect Your Storage Account Against Blob-Hunting

Understanding Blob Storage and Blob-Hunting

What is Blob Storage?

Blob storage is a cloud-based service offered by various cloud providers, designed to store vast amounts of unstructured data such as images, videos, documents, and other types of files. It is highly scalable, cost-effective, and durable, making it an ideal choice for organizations that need to store and manage large data sets for applications like websites, mobile apps, and data analytics. With the increasing reliance on cloud storage solutions, data security and accessibility have become a significant concern. Organizations must prioritize protecting sensitive data from unauthorized access and potential threats to maintain the integrity and security of their storage accounts.

What is Blob-Hunting?

Blob-hunting refers to the unauthorized access and exploitation of blob storage accounts by cybercriminals. These malicious actors use various techniques, including scanning for public-facing storage accounts, exploiting vulnerabilities, and leveraging weak or compromised credentials, to gain unauthorized access to poorly protected storage accounts. Once they have gained access, they may steal sensitive data, alter files, hold the data for ransom, or use their unauthorized access to launch further attacks on the storage account’s associated services or applications. Given the potential risks and damage associated with blob-hunting, it is crucial to protect your storage account to maintain the security and integrity of your data and ensure the continuity of your operations.

Strategies for Protecting Your Storage Account

Implement Strong Authentication

One of the most effective ways to secure your storage account is by implementing strong authentication mechanisms. This includes using multi-factor authentication (MFA), which requires users to provide two or more pieces of evidence (factors) to prove their identity. These factors may include something they know (password), something they have (security token), or something they are (biometrics). By requiring multiple authentication factors, MFA significantly reduces the risk of unauthorized access due to stolen, weak, or compromised passwords.

Additionally, it is essential to choose strong, unique passwords for your storage account and avoid using the same password for multiple accounts. A strong password should be at least 12 characters long and include upper and lower case letters, numbers, and special symbols. Regularly updating your passwords and ensuring that they remain unique can further enhance the security of your storage account. Consider using a password manager to help you securely manage and store your passwords, ensuring that you can easily generate and use strong, unique passwords for all your accounts without having to memorize them.

When it comes to protecting sensitive data in your storage account, it is also important to consider the use of hardware security modules (HSMs) or other secure key management solutions. These technologies can help you securely store and manage cryptographic keys, providing an additional layer of protection against unauthorized access and data breaches.

Limit Access and Assign Appropriate Permissions

Another essential aspect of securing your storage account is limiting access and assigning appropriate permissions to users. This can be achieved through role-based access control (RBAC), which allows you to assign specific permissions to users based on their role in your organization. By using RBAC, you can minimize the risk of unauthorized access by granting users the least privilege necessary to perform their tasks. This means that users only have the access they need to complete their job responsibilities and nothing more.

Regularly reviewing and updating user roles and permissions is essential to ensure they align with their current responsibilities and that no user has excessive access to your storage account. It is also crucial to remove access for users who no longer require it, such as employees who have left the organization or changed roles. Implementing a regular access review process can help you identify and address potential security risks associated with excessive or outdated access permissions.

Furthermore, creating access policies with limited duration and scope can help prevent excessive access to your storage account. When granting temporary access, make sure to set an expiration date to ensure that access is automatically revoked when no longer needed. Additionally, consider implementing network restrictions and firewall rules to limit access to your storage account based on specific IP addresses or ranges. This can help reduce the attack surface and protect your storage account from unauthorized access attempts originating from unknown or untrusted networks.

Encrypt Data at Rest and in Transit

Data encryption is a critical aspect of securing your storage account. Ensuring that your data is encrypted both at rest and in transit makes it more difficult for cybercriminals to access and exploit your sensitive information, even if they manage to gain unauthorized access to your storage account.

Data at rest should be encrypted using server-side encryption, which involves encrypting the data before it is stored on the cloud provider’s servers. This can be achieved using encryption keys managed by the cloud provider or your own encryption keys, depending on your organization’s security requirements and compliance obligations. Implementing client-side encryption, where data is encrypted on the client-side before being uploaded to the storage account, can provide an additional layer of protection, especially for highly sensitive data.

Data in transit, on the other hand, should be encrypted using Secure Sockets Layer (SSL) or Transport Layer Security (TLS), which secures the data as it travels between the client and the server over a network connection. Ensuring that all communication between your applications, services, and storage account is encrypted can help protect your data from eavesdropping, man-in-the-middle attacks, and other potential threats associated with data transmission.

By implementing robust encryption practices, you significantly reduce the risk of unauthorized access to your sensitive data, ensuring that your storage account remains secure and compliant with industry standards and regulations.

Regularly Monitor and Audit Activity

Monitoring and auditing activity in your storage account is essential for detecting and responding to potential security threats. Setting up logging and enabling monitoring tools allows you to track user access, file changes, and other activities within your storage account, providing you with valuable insights into the security and usage of your data.

Regularly reviewing the logs helps you identify any suspicious activity or potential security vulnerabilities, enabling you to take immediate action to mitigate potential risks and maintain a secure storage environment. Additionally, monitoring and auditing activity can also help you optimize your storage account’s performance and cost-effectiveness by identifying unused resources, inefficient data retrieval patterns, and opportunities for data lifecycle management.

Consider integrating your storage account monitoring with a security information and event management (SIEM) system or other centralized logging and monitoring solutions. This can help you correlate events and activities across your entire organization, providing you with a comprehensive view of your security posture and enabling you to detect and respond to potential threats more effectively.

Enable Versioning and Soft Delete

Implementing versioning and soft delete features can help protect your storage account against accidental deletions and modifications, as well as malicious attacks. By enabling versioning, you can maintain multiple versions of your blobs, allowing you to recover previous versions in case of accidental overwrites or deletions. This can be particularly useful for organizations that frequently update their data or collaborate on shared files, ensuring that no critical information is lost due to human error or technical issues.

Soft delete, on the other hand, retains deleted blobs for a specified period, giving you the opportunity to recover them if necessary. This feature can be invaluable in scenarios where data is accidentally deleted or maliciously removed by an attacker, providing you with a safety net to restore your data and maintain the continuity of your operations.

It is important to regularly review and adjust your versioning and soft delete settings to ensure that they align with your organization’s data retention and recovery requirements. This includes setting appropriate retention periods for soft-deleted data and ensuring that versioning is enabled for all critical data sets in your storage account. Additionally, consider implementing a process for regularly reviewing and purging outdated or unnecessary versions and soft-deleted blobs to optimize storage costs and maintain a clean storage environment.

Perform Regular Backups and Disaster Recovery Planning

Having a comprehensive backup strategy and disaster recovery plan in place is essential for protecting your storage account and ensuring the continuity of your operations in case of a security breach, accidental deletion, or other data loss events. Developing a backup strategy involves regularly creating incremental and full backups of your storage account, ensuring that you have multiple copies of your data stored in different locations. This helps you recover your data quickly and effectively in case of an incident, minimizing downtime and potential data loss.

Moreover, regularly testing your disaster recovery plan is critical to ensure its effectiveness and make necessary adjustments as needed. This includes simulating data loss scenarios, verifying the integrity of your backups, and reviewing your recovery procedures to ensure that they are up-to-date and aligned with your organization’s current needs and requirements.

In addition to creating and maintaining backups, implementing cross-region replication or geo-redundant storage can further enhance your storage account’s resilience against data loss events. By replicating your data across multiple geographically distributed regions, you can ensure that your storage account remains accessible and functional even in the event of a regional outage or disaster, allowing you to maintain the continuity of your operations and meet your organization’s recovery objectives.


Cloud Storage Manager Main Window

Implementing Security Best Practices

In addition to the specific strategies mentioned above, implementing general security best practices for your storage account can further enhance its security and resilience against potential threats. These best practices may include:

  • Regularly updating software and applying security patches to address known vulnerabilities
  • Training your team on security awareness and best practices
  • Performing vulnerability assessments and penetration testing to identify and address potential security weaknesses
  • Implementing a strong security policy and incident response plan to guide your organization’s response to security incidents and minimize potential damage
  • Segmenting your network and implementing network security controls, such as firewalls and intrusion detection/prevention systems, to protect your storage account and associated services from potential threats
  • Regularly reviewing and updating your storage account configurations and security settings to ensure they align with industry best practices and your organization’s security requirements
  • Implementing a data classification and handling policy to ensure that sensitive data is appropriately protected and managed throughout its lifecycle
  • Ensuring that all third-party vendors and service providers that have access to your storage account adhere to your organization’s security requirements and best practices.

Conclusion

Protecting your storage account against blob-hunting is crucial for maintaining the security and integrity of your data and ensuring the continuity of your operations. By implementing strong authentication, limiting access, encrypting data, monitoring activity, and following security best practices, you can significantly reduce the risk of unauthorized access and data breaches. Being proactive in securing your storage account and safeguarding your valuable data from potential threats is essential in today’s increasingly interconnected and digital world.