Office 365 E3 vs Office 365 E5

Office 365 E3 vs Office 365 E5

Choosing the Right Microsoft Productivity Solution for Your Business

In today’s fast-paced business environment, cloud-based productivity solutions have become essential tools for organizations of all sizes. These platforms offer a range of benefits, including improved collaboration, enhanced accessibility, and reduced IT overhead. At the forefront of this digital transformation is Microsoft 365, a comprehensive suite of productivity applications and services designed to empower businesses in the modern workplace.

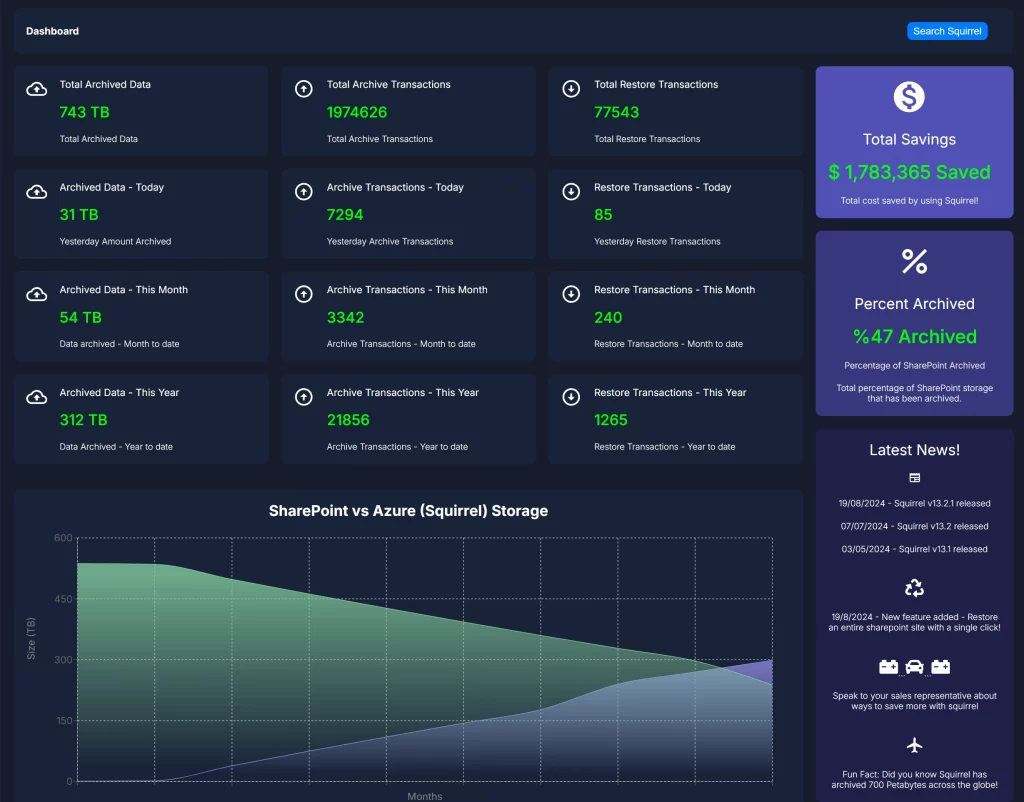
Squirrel Main Dashboard

Microsoft 365 comes in various subscription plans, each tailored to meet different business needs and budgets. Among these, Office 365 E3 and Office 365 E5 stand out as popular choices for medium to large enterprises. Both plans offer a robust set of tools, but they differ in key areas that can significantly impact your organization’s productivity, security, and bottom line.

In this blog post, we’ll dive deep into a comparison of Office 365 E3 and Office 365 E5, helping you understand the features, benefits, and differences between these two powerful business solutions.

Office E3 vs E5 Licensing

Head-to-Head Comparison

To begin our analysis, let’s look at a side-by-side comparison of the key features offered by Office 365 E3 and Office 365 E5:

Feature Office 365 E3 Office 365 E5
Core Applications Word, Excel, PowerPoint, Outlook, OneNote, Publisher (PC only) Same as E3
Email and Calendar Exchange Online with 100 GB mailbox Same as E3
File Storage and Sharing OneDrive for Business with 1 TB storage per user Same as E3
Team Collaboration Microsoft Teams Microsoft Teams with advanced features
Security and Compliance Basic features Advanced features including Azure Information Protection P2
Voice Capabilities Not included Phone System, Audio Conferencing
Analytics Basic Advanced with Power BI Pro and MyAnalytics
Data Loss Prevention (DLP) Basic Advanced
eDiscovery Basic Advanced with Advanced eDiscovery
Threat Protection Not included Microsoft Defender for Office 365 Plan 2
Price per user/month* $23 $38

*Prices are subject to change. Please check the official Microsoft website for the most current pricing.

Now, let’s break down some of these key features:

Core Applications: Both E3 and E5 plans include the full suite of Microsoft Office applications that businesses rely on daily. This includes Word for document creation, Excel for spreadsheets and data analysis, PowerPoint for presentations, and Outlook for email and calendar management.

Email and Calendar: Exchange Online is included in both plans, providing a robust email and calendar solution. The 100 GB mailbox per user is generous and sufficient for most business needs.

File Storage and Sharing: OneDrive for Business offers 1 TB of cloud storage per user in both plans, allowing for easy file storage, sharing, and collaboration.

Team Collaboration: While both plans include Microsoft Teams, E5 offers some advanced features like real-time translation in meetings, which can be beneficial for global organizations.

Security and Compliance: This is where E5 starts to differentiate itself. While E3 offers basic security features, E5 includes advanced tools like Azure Information Protection P2, which provides enhanced data protection capabilities.

Voice Capabilities: One of the most significant differences between E3 and E5 is in the voice capabilities. E5 includes Phone System and Audio Conferencing, which are not available in E3. Phone System allows you to replace traditional PBX systems with a comprehensive cloud-based solution, while Audio Conferencing enables participants to join Teams meetings via phone.

Analytics: E5 offers more advanced analytics tools. It includes Power BI Pro, a powerful business intelligence platform that allows users to visualize data and share insights across the organization. E5 also features MyAnalytics, which provides personal productivity insights to help employees work smarter.

Data Loss Prevention (DLP): While both plans offer DLP capabilities, E5 provides more advanced features. This includes more sophisticated policy creation and management, helping organizations better protect sensitive information.

eDiscovery: E5 includes Advanced eDiscovery, which uses machine learning and text analytics to help you identify relevant data quickly. This can be crucial for organizations dealing with large amounts of data in legal or compliance scenarios.

Threat Protection: E5 includes Microsoft Defender for Office 365 Plan 2, offering advanced security features like safe attachments, safe links, and anti-phishing capabilities. This is not included in the E3 plan.

Mastering SharePoint Online

Please fill out the form below to get our free Ebook "Mastering SharePoint Online" emailed to you

FREE DOWNLOAD

Send download link to:

I confirm that I have read and agree to the End User License Agreement.

Breakdown of Key Differences

Now that we’ve compared the features, let’s dive deeper into the most significant differences between Office 365 E3 and E5:

Security Features

Security is perhaps the most notable area where E5 pulls ahead of E3. While E3 offers solid basic security, E5 provides a comprehensive security suite designed for organizations with high security and compliance requirements.

E5’s advanced security features include:

  • Microsoft Defender for Office 365 Plan 2: This provides real-time protection against sophisticated threats like zero-day malware and phishing attacks.
  • Azure Information Protection P2: This allows for more granular control over document access and sharing, including the ability to encrypt documents and emails.
  • Advanced Data Loss Prevention: E5 offers more sophisticated DLP policies and endpoints, helping prevent the accidental sharing of sensitive information.

For businesses in regulated industries or those handling sensitive data, these advanced security features can be crucial in maintaining compliance and protecting against data breaches.

Analytics and Reporting

E5 offers significantly more robust analytics and reporting capabilities:

  • Power BI Pro: This powerful business intelligence tool allows users to create interactive dashboards and reports, providing deep insights into business data.
  • Advanced MyAnalytics: While E3 includes some MyAnalytics features, E5 offers the full suite, providing more comprehensive personal productivity insights.
  • Advanced Compliance Analytics: E5 includes tools for analyzing compliance risks and insider threats, which can be valuable for large enterprises or those in heavily regulated industries.

These advanced analytics tools can help businesses make more informed decisions, improve productivity, and better manage compliance risks.

Voice and Telephony

E5’s inclusion of Phone System and Audio Conferencing is a major differentiator:

  • Phone System: This cloud-based phone system can replace traditional PBX systems, potentially leading to significant cost savings and improved flexibility.
  • Audio Conferencing: This allows participants to join Teams meetings via phone, which can be crucial for participants who are on the go or in areas with poor internet connectivity.

For businesses looking to unify their communications systems or those with significant teleconferencing needs, these features can be a compelling reason to choose E5.

Target Audience

While both E3 and E5 are designed for businesses, they cater to somewhat different needs:

  • E3 is well-suited for businesses that need a comprehensive productivity suite with solid security and compliance features. It’s a good fit for many small to medium-sized businesses and organizations with straightforward IT needs.
  • E5 is designed for larger enterprises or organizations with more complex needs, particularly in terms of security, compliance, and analytics. It’s also ideal for businesses looking to integrate their phone systems with their productivity suite.

SharePoint Storage Explorer

Gain insights in to your SharePoint Online Storage Consumption


Download our completely FREE TOOL

FREE DOWNLOAD

Send download link to:

I confirm that I have read and agree to the End User License Agreement.

Office E3 vs E5 Licensing

Head-to-Head Comparison

To begin our analysis, let’s look at a side-by-side comparison of the key features offered by Office 365 E3 and Office 365 E5:

Feature Office 365 E3 Office 365 E5
Core Applications Word, Excel, PowerPoint, Outlook, OneNote, Publisher (PC only) Same as E3
Email and Calendar Exchange Online with 100 GB mailbox Same as E3
File Storage and Sharing OneDrive for Business with 1 TB storage per user Same as E3
Team Collaboration Microsoft Teams Microsoft Teams with advanced features
Security and Compliance Basic features Advanced features including Azure Information Protection P2
Voice Capabilities Not included Phone System, Audio Conferencing
Analytics Basic Advanced with Power BI Pro and MyAnalytics
Data Loss Prevention (DLP) Basic Advanced
eDiscovery Basic Advanced with Advanced eDiscovery
Threat Protection Not included Microsoft Defender for Office 365 Plan 2
Price per user/month* $23 $38

*Prices are subject to change. Please check the official Microsoft website for the most current pricing.

Now, let’s break down some of these key features:

Core Applications: Both E3 and E5 plans include the full suite of Microsoft Office applications that businesses rely on daily. This includes Word for document creation, Excel for spreadsheets and data analysis, PowerPoint for presentations, and Outlook for email and calendar management.

Email and Calendar: Exchange Online is included in both plans, providing a robust email and calendar solution. The 100 GB mailbox per user is generous and sufficient for most business needs.

File Storage and Sharing: OneDrive for Business offers 1 TB of cloud storage per user in both plans, allowing for easy file storage, sharing, and collaboration.

Team Collaboration: While both plans include Microsoft Teams, E5 offers some advanced features like real-time translation in meetings, which can be beneficial for global organizations.

Security and Compliance: This is where E5 starts to differentiate itself. While E3 offers basic security features, E5 includes advanced tools like Azure Information Protection P2, which provides enhanced data protection capabilities.

Voice Capabilities: One of the most significant differences between E3 and E5 is in the voice capabilities. E5 includes Phone System and Audio Conferencing, which are not available in E3. Phone System allows you to replace traditional PBX systems with a comprehensive cloud-based solution, while Audio Conferencing enables participants to join Teams meetings via phone.

Analytics: E5 offers more advanced analytics tools. It includes Power BI Pro, a powerful business intelligence platform that allows users to visualize data and share insights across the organization. E5 also features MyAnalytics, which provides personal productivity insights to help employees work smarter.

Data Loss Prevention (DLP): While both plans offer DLP capabilities, E5 provides more advanced features. This includes more sophisticated policy creation and management, helping organizations better protect sensitive information.

eDiscovery: E5 includes Advanced eDiscovery, which uses machine learning and text analytics to help you identify relevant data quickly. This can be crucial for organizations dealing with large amounts of data in legal or compliance scenarios.

Threat Protection: E5 includes Microsoft Defender for Office 365 Plan 2, offering advanced security features like safe attachments, safe links, and anti-phishing capabilities. This is not included in the E3 plan.

Mastering SharePoint Online

Please fill out the form below to get our free Ebook "Mastering SharePoint Online" emailed to you

FREE DOWNLOAD

Send download link to:

I confirm that I have read and agree to the End User License Agreement.

Choosing the Right Plan

Selecting between Office 365 E3 and E5 depends on several factors specific to your business. Here’s a decision-making guide to help you choose:

Business Size and Complexity: E3 is often sufficient for small to medium-sized businesses with straightforward IT needs. E5 is typically more suitable for larger enterprises or organizations with complex infrastructure.

Security and Compliance Requirements: If your business operates in a highly regulated industry (e.g., healthcare, finance) or deals with sensitive data, E5’s advanced security features may be necessary. For businesses with standard security needs, E3’s features may be adequate.

Budget Considerations: Consider whether the additional features in E5 justify the higher cost for your organization. E3 is more cost-effective if you don’t need the advanced features of E5.

Communication Needs: If you’re looking to replace your existing phone system or require extensive audio conferencing capabilities, E5’s voice features could provide significant value.

Analytics Requirements: If data-driven decision making is crucial for your business, E5’s advanced analytics tools like Power BI Pro could be a game-changer.

Existing Infrastructure: Consider how either plan would integrate with your current systems and whether you’re planning any major IT changes in the near future.

Real-World Examples:

  • A mid-sized law firm might opt for E5 due to its advanced eDiscovery and security features, which are crucial for handling sensitive client information.
  • A small marketing agency might find E3 sufficient, as it provides all the necessary productivity tools without the additional cost of advanced features they may not need.
  • A large multinational corporation might choose E5 for its advanced analytics, global audio conferencing capabilities, and comprehensive security suite.

Conclusion

Both Office 365 E3 and E5 offer powerful tools to boost productivity and collaboration in the modern workplace. E3 provides a comprehensive suite of applications and services that will meet the needs of many businesses. It offers robust productivity tools, basic security features, and sufficient storage for most organizations.

E5, while more expensive, delivers advanced capabilities that can be invaluable for larger enterprises or those with specific needs in security, compliance, analytics, or voice communications. The additional investment in E5 can potentially lead to significant returns in terms of enhanced productivity, better decision-making through advanced analytics, and more robust security.

Ultimately, the choice between E3 and E5 should be based on a careful assessment of your organization’s specific needs, budget, and long-term IT strategy. Consider not just your current requirements, but also your anticipated needs in the coming years as your business grows and evolves.

Remember, it’s also possible to mix licenses within your organization. Some users might require E5 capabilities, while others could work effectively with E3 licenses. This hybrid approach can help optimize costs while ensuring that power users have access to advanced features.

To make the best decision for your organization, we recommend:

  1. Conduct a thorough needs assessment across your organization.
  2. Evaluate the potential return on investment for the additional features in E5.
  3. Consider a pilot program with a small group of users to test the features of each plan.
  4. Consult with a Microsoft partner or IT professional who can provide personalized advice based on your specific situation.

By carefully considering your options and aligning your choice with your business objectives, you can ensure that you’re making the most of what Microsoft 365 has to offer, driving productivity, collaboration, and innovation in your organization.

Archive Smart, Save Big

Squirrel by SmiKar automates SharePoint Online archiving to Azure Blob Storage, saving you costs and ensuring seamless data access.

Squirrel for SharePoint Archive

Want to reduce SharePoint Storage?

Comparing Manual vs. Automated Archiving in SharePoint Online

Comparing Manual vs. Automated Archiving in SharePoint Online

Manual or Automated SharePoint Archiving?

In today’s digital age, efficient document management is crucial for organisations to maintain productivity, ensure compliance, and manage storage costs. SharePoint Online, a popular platform for document management, offers robust archiving capabilities to help organisations handle their growing data. However, the approach to archiving can significantly impact efficiency and costs. This article compares manual archiving processes with automated solutions like Squirrel, highlighting the benefits of automation for SharePoint Online.

Squirrel Main Dashboard
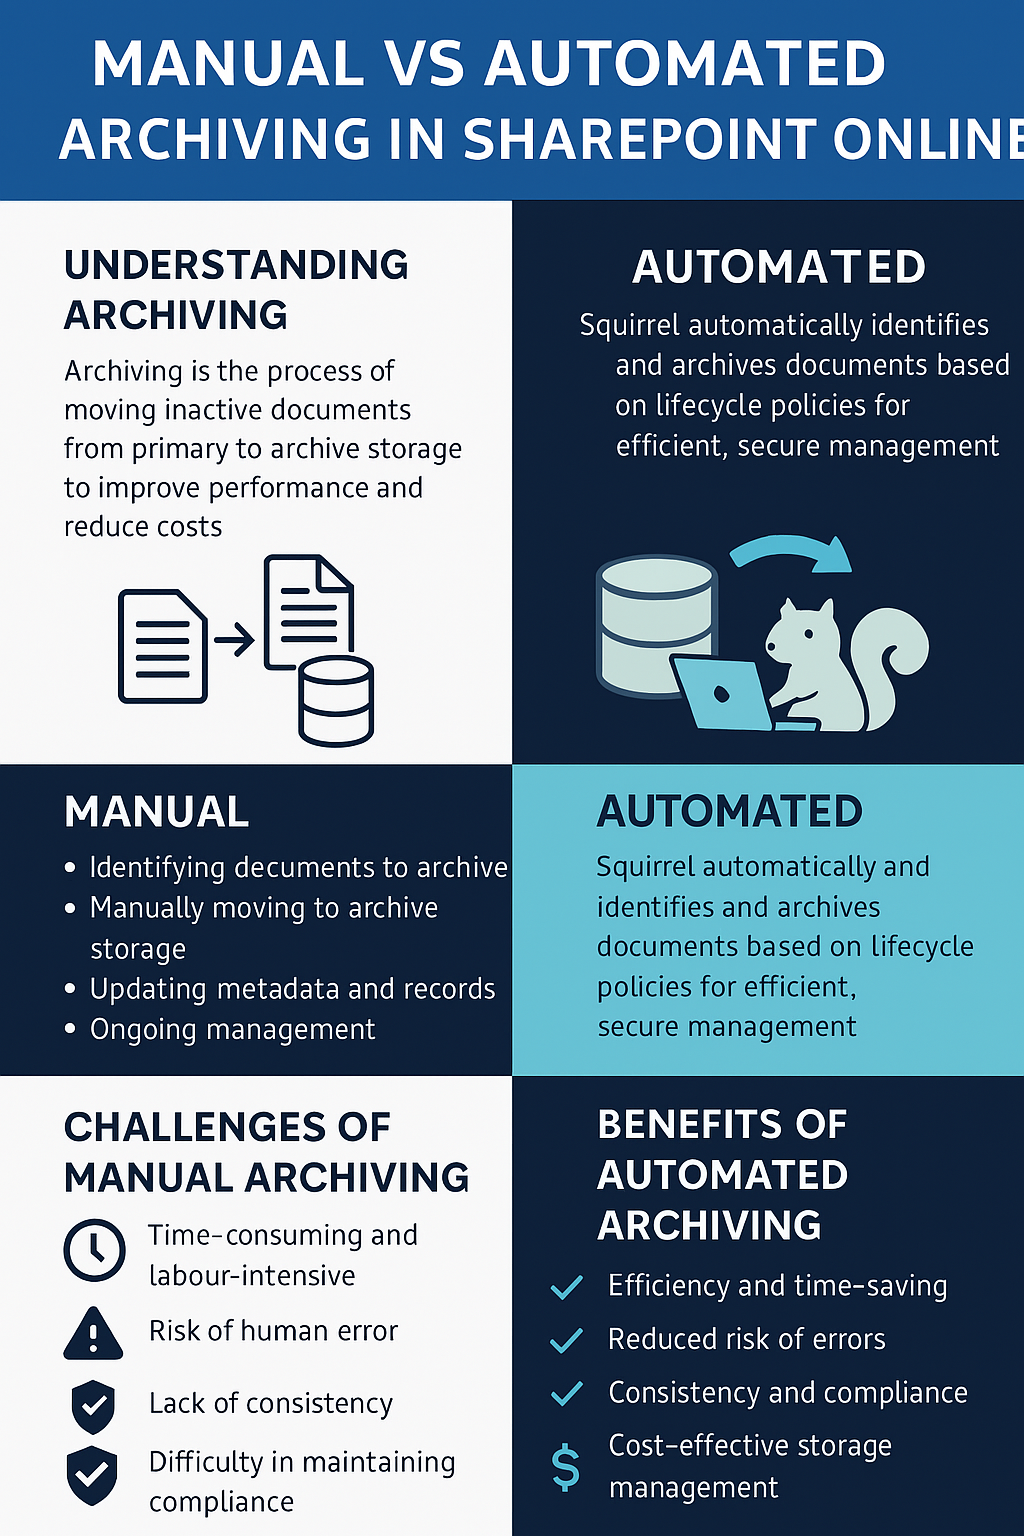
Manual vs automated archiving infographic

SharePoint Manual vs Automated Archiving: What’s Best for Your Organization?

Archiving in SharePoint Online is essential for performance, compliance, and cost control. But should your organization rely on manual processes, or shift to an automated solution like Squirrel? In this guide, we break down both approaches and show you how to modernize your document management strategy.

What Is Archiving in SharePoint Online?

Archiving is the process of moving inactive documents from SharePoint’s primary libraries to a secondary storage system, such as Azure Blob. It improves performance, reduces costs, and helps ensure compliance. Archived documents are typically less accessed, but still important to retain.

Manual Archiving: What’s Involved?

  • Identifying documents manually: Users or admins comb through libraries to flag old or inactive files.
  • Moving files: Files are copied or moved into separate folders or exported from SharePoint manually.
  • Updating metadata: Information about each document’s location, archive status, or retention period must be logged.
  • Monitoring: Ongoing tracking of archive locations and access logs is often required.

Challenges of Manual Archiving

  • Time-consuming and labor-intensive
  • Prone to human error
  • Inconsistent across departments or teams
  • Difficult to enforce compliance uniformly

Automated Archiving with Squirrel

Squirrel is a SharePoint-integrated solution that automates the archiving of old or unused documents. It works in the background based on rules you define, moving files to cost-effective Azure Blob Storage while preserving user access.

Key Features

  • Lifecycle Policies: Define criteria for archiving (e.g. last opened date, age, document type).
  • Automated Archival: Files are moved automatically without user input.
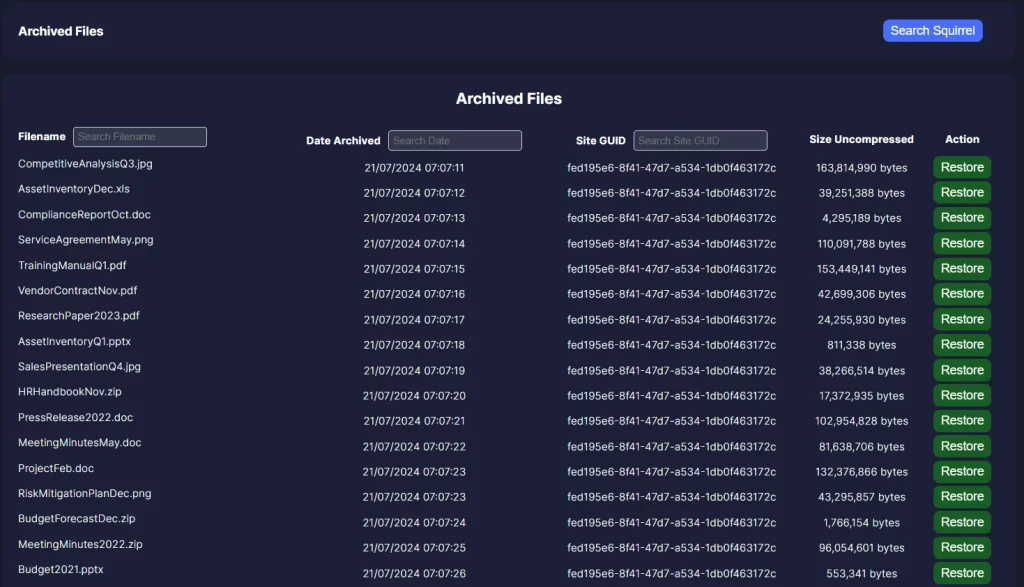
  • Stub Files: Archived files leave behind a clickable link in SharePoint for instant retrieval.
  • Encryption: Files are encrypted at rest and in transit for secure compliance.
  • Reporting: View audit logs and storage usage reports in real time.

Manual vs Automated: Head-to-Head

Aspect Manual Archiving Automated with Squirrel
Time Required High – manual review and archiving Low – fully automated process
Error Risk High – human mistakes likely Minimal – consistent rules and logic
Compliance Manual enforcement of rules Built-in policies and audit logs
Cost Control Dependent on user discipline Automatically moves to low-cost storage

Conclusion

Manual archiving may work for small teams, but it’s slow, error-prone, and hard to scale. Automated solutions like Squirrel streamline the process, ensure consistency, and offer measurable cost savings.

If your organization is looking to modernize its SharePoint archiving process and control storage growth, Squirrel offers a seamless, secure, and scalable solution.

Mastering SharePoint Online

Please fill out the form below to get our free Ebook "Mastering SharePoint Online" emailed to you

FREE DOWNLOAD

Send download link to:

I confirm that I have read and agree to the End User License Agreement.

Cutting SharePoint Costs Made Easy.

Squirrel simplifies the archiving process, making it effortless to manage SharePoint Online storage efficiently. Reduce your expenses with a user-friendly solution that’s quick to set up and simple to operate.

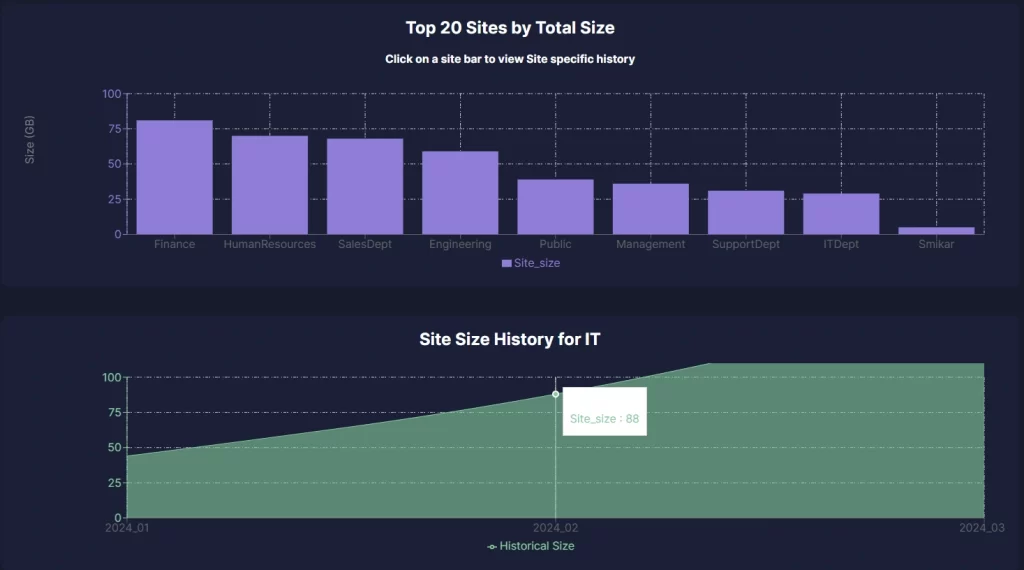
Squirrel for SharePoint Site Size Reporting

Squirrel is an innovative automated archiving solution designed for SharePoint Online. It seamlessly integrates with Azure Blob Storage to streamline document management, enhance compliance, and significantly reduce storage costs. Easy to implement and use, Squirrel automates the identification and archiving of inactive documents, ensuring a consistent, efficient, and secure archiving process.

Curious about Squirrel?

SharePoint Online Document Library Reporting

SharePoint Online Document Library Reporting

Comprehensive Reporting for SharePoint Document Libraries

In today’s data-driven world, efficient document management is crucial for organizational success. SharePoint Document library reporting helps track and analyze the usage, storage, and compliance of documents within SharePoint Online. To streamline this process, tools like SharePoint Storage Explorer offer comprehensive solutions that enhance your reporting capabilities.

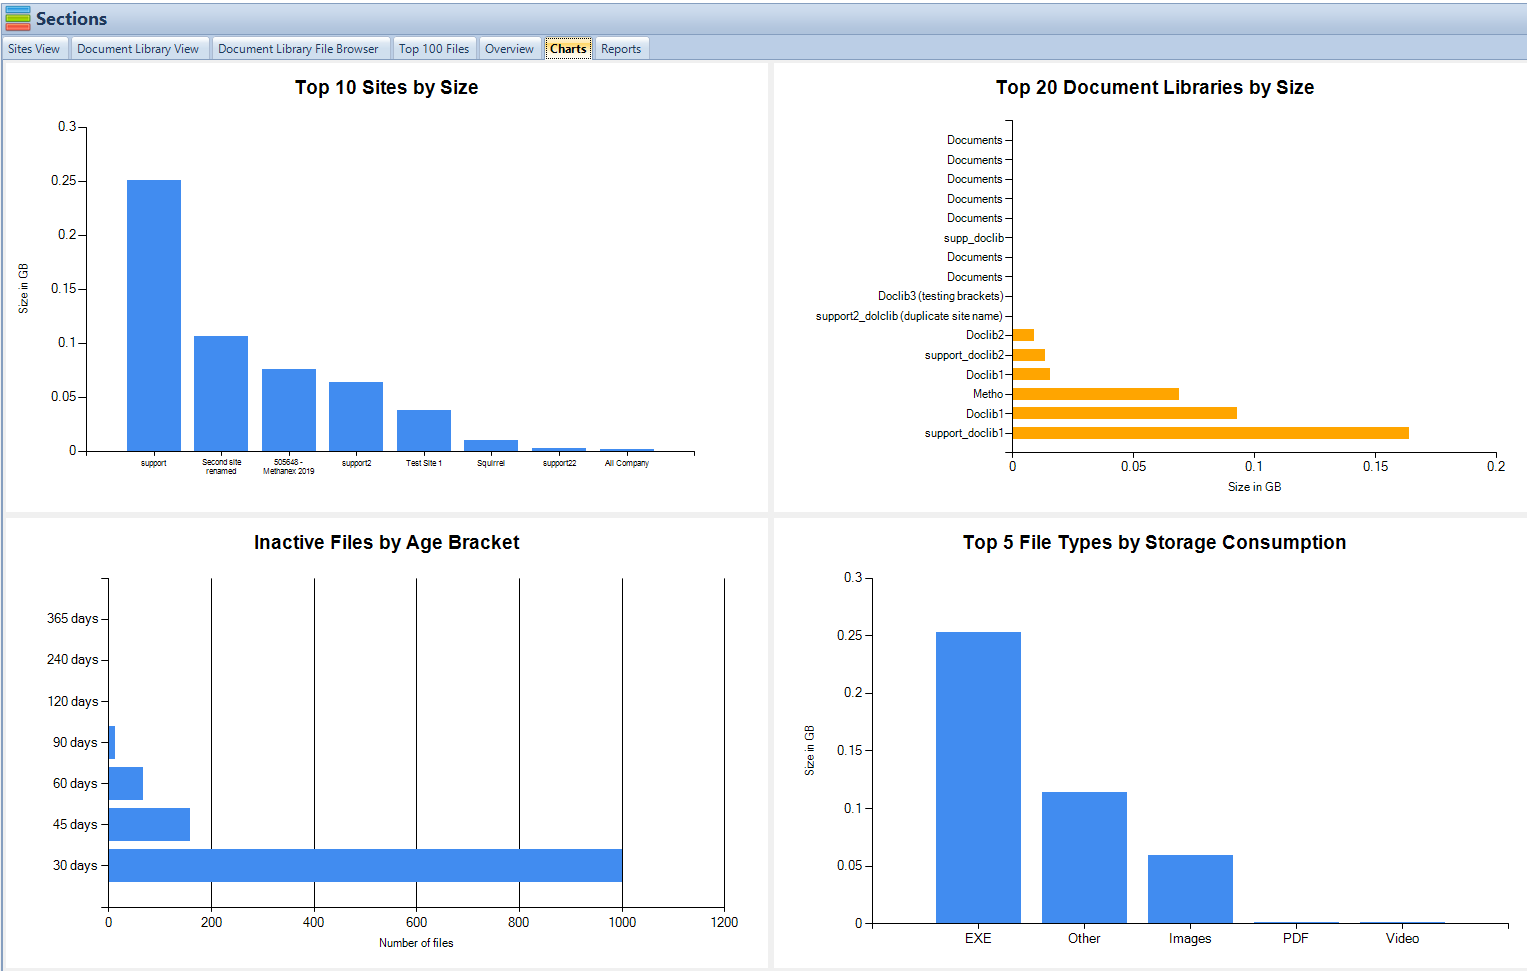
SharePoint Storage Explorer Charts
Key Takeaway Description
Improved Storage Management Identify and optimize large or underutilized files to free up storage space and enhance efficiency.
Enhanced Compliance Generate detailed reports to ensure adherence to data regulations and industry standards.
Informed Decision-Making Utilize data-driven insights from detailed reports for better document management strategies.
Advanced Reporting Features Access a comprehensive suite of reports, including site sizes, file counts, and storage consumption.
Customizable Search and Analytics Tailor search functionalities and transform raw data into visual insights with charts and graphs.
Proactive Issue Resolution Identify and address potential issues before they become significant problems.
Enhanced Collaboration Improve team collaboration by analyzing document usage and access patterns.
Streamlined User Interface Easy installation and navigation, with user-friendly report generation and review.

Understanding Document Library Reporting

What is Document Library Reporting?

Document library reporting involves generating detailed reports on the contents and usage of document libraries in SharePoint. These reports provide insights into storage usage, document activity, and user interactions, helping organizations optimize their document management strategies. Regular reporting ensures data integrity, regulatory compliance, and efficient storage management.

Benefits of Regular Reporting

  • Improved Storage Management: Identifying large or underutilized files for optimization.
  • Enhanced Compliance: Ensuring adherence to data regulations with detailed reports.
  • Informed Decision-Making: Data-driven insights for better document management.

Features of SharePoint Storage Explorer for Document Reporting

Detailed Insights SharePoint Storage Explorer offers a comprehensive ‘Document Library View’ feature, providing an in-depth look at each library’s storage usage, file composition, and user activity. This feature is crucial for understanding how space is utilized and identifying areas that need attention.

Advanced Reporting Suite The tool’s advanced reporting suite includes various types of reports such as site sizes, file counts, and storage consumption. These reports are designed to be user-friendly and provide a thorough analysis, making it easier to manage SharePoint storage.

Charts and Analytics Transforming raw data into visual insights is one of the key strengths of SharePoint Storage Explorer. It offers charts and graphs, such as the Top 10 Sites by Size and the Top 5 File Types by Storage Consumption, helping users quickly grasp important information and make informed decisions.

Practical Applications

Optimizing Storage Management With the detailed insights and reports generated by SharePoint Storage Explorer, you can easily identify large files that are taking up excessive storage space. This allows you to make informed decisions about archiving, deleting, or relocating these files to optimize storage usage. Additionally, the tool helps in spotting underutilized content that can be archived or removed to free up space and improve overall efficiency.

Ensuring Compliance Compliance with data regulations is a critical aspect of document management. SharePoint Storage Explorer aids in ensuring compliance by providing detailed reports that highlight areas where your document management practices may fall short. You can customize these reports to meet specific regulatory requirements, making it easier to stay compliant with industry standards and legal obligations.

Improving Search and Retrieval Efficient search and retrieval of archived documents are essential for productivity. SharePoint Storage Explorer’s customization options for search functionalities enable you to tailor the search experience to your organization’s needs. This ensures that users can quickly find and access the documents they need, improving overall efficiency and reducing the time spent on searching for information.

SharePoint Storage Explorer

Gain insights in to your SharePoint Online Storage Consumption


Download our completely FREE TOOL

FREE DOWNLOAD

Send download link to:

I confirm that I have read and agree to the End User License Agreement.

Getting Started with SharePoint Storage Explorer

Installation and Setup Getting started with SharePoint Storage Explorer is straightforward. Begin by downloading the tool from the SmiKar website. Follow the installation instructions provided, and configure the tool to connect with your SharePoint Online environment. The user-friendly interface and intuitive setup process ensure that you can start generating reports and gaining insights without any hassle.

User Guide Once installed, familiarize yourself with the SharePoint Storage Explorer interface. The tool provides easy navigation through various features and functionalities. To access and generate reports, follow these simple steps:

  1. Open the SharePoint Storage Explorer application.
  2. Navigate to the ‘Reports’ section.
  3. Select the type of report you wish to generate (e.g., site sizes, file counts, storage consumption).
  4. Customize the report parameters to suit your needs.
  5. Generate and review the report, and utilize the insights for optimizing your document management strategies.

For more details about SharePoint Storage Explorer, visit SmiKar.

SharePoint Storage Explorer

Gain insights in to your SharePoint Online Storage Consumption


Download our completely FREE TOOL

FREE DOWNLOAD

Send download link to:

I confirm that I have read and agree to the End User License Agreement.

Conclusion

Summary of Benefits

SharePoint Storage Explorer significantly enhances document library reporting in SharePoint Online. Its detailed insights, advanced reporting suite, and customizable features provide organizations with the tools they need to optimize storage, ensure compliance, and improve overall efficiency. Whether you are managing a small team or a large enterprise, SharePoint Storage Explorer offers valuable solutions for effective document management.

What is SharePoint Storage Explorer?
SharePoint Storage Explorer is a tool designed to provide detailed insights and reporting capabilities for managing document libraries in SharePoint Online.

How do I install SharePoint Storage Explorer?

You can download SharePoint Storage Explorer from the SmiKar website and follow the installation instructions provided.

What types of reports can I generate with SharePoint Storage Explorer?

The tool offers reports on site sizes, file counts, storage consumption, user activity, and more.

What is Squirrel, and how does it help with document archiving?

Squirrel is a tool designed to streamline the archiving process in SharePoint Online. It helps efficiently manage storage, reduce costs, and automate various archiving tasks, making it easy to implement and use.

How can Squirrel reduce SharePoint costs?

Squirrel optimizes storage management by identifying large or unused files for archiving or deletion. This reduces storage expenses and improves overall efficiency.

Is Squirrel easy to implement in SharePoint Online?

Yes, Squirrel is designed to be user-friendly and easy to implement. It integrates seamlessly with SharePoint Online, allowing you to quickly start optimizing your document archiving processes.

Can Squirrel automate the archiving process?

Absolutely. Squirrel automates many aspects of the archiving process, such as applying retention policies and managing metadata, to ensure efficient and compliant document management.

How does Squirrel help with compliance?
Squirrel provides detailed reports and automation features that help ensure your document management practices meet regulatory requirements, making compliance easier to achieve.

Lowering SharePoint Costs Made Easy.

Squirrel offers an effortless way to streamline archiving, manage SharePoint Online storage efficiently, and cut expenses with a simple, user-friendly solution.

Squirrel for SharePoint Archive

Reduce SharePoint Expenses with Ease. Utilize Squirrel to simplify the archiving process, manage SharePoint Online storage effectively, and minimize costs with an easy-to-implement, intuitive solution.

Ready To Get Started?

Mastering Version Control in SharePoint

Mastering Version Control in SharePoint

A Guide to Keeping Track of Changes

In today’s fast-paced work environment, effective document collaboration is crucial for productivity and success. Teams often work simultaneously on projects, requiring seamless communication and coordination to ensure everyone is on the same page. However, managing multiple versions of documents can become a daunting task, leading to potential confusion and errors.

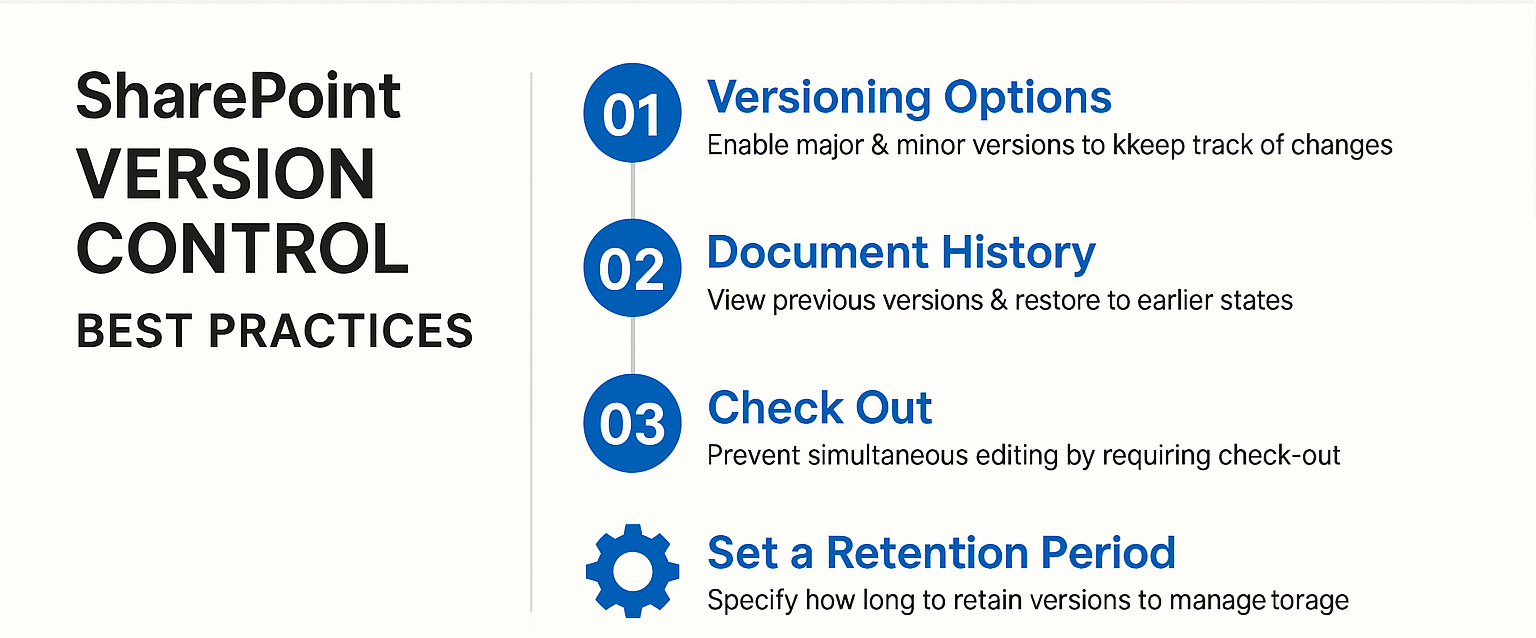
sharepoint versioning best practices

Imagine working on an important document only to discover conflicting versions and lost edits. This is where version control comes to the rescue. SharePoint version control offers a robust solution for tracking changes and maintaining a comprehensive document history, ensuring that your team can collaborate efficiently without the chaos of version mishaps.

Section Key Takeaways
Introduction Importance of document collaboration and challenges of managing multiple versions. SharePoint version control as a solution.
What is Version Control in SharePoint? Defines version control, major vs minor versions, and interaction with editing permissions and checkout/check-in features.
Benefits of Using Version Control Improved collaboration, enhanced tracking, reduced errors, increased transparency.
How to Use Version Control in SharePoint Step-by-step guide to enabling version control, viewing version history, reverting to previous versions, and advanced features like comments and content approval.
Best Practices for Effective Version Control Clear document naming conventions, descriptive comments, utilizing check-out/check-in, and setting up retention policies.
Utilizing Squirrel for Enhanced Management Automated document archiving, comprehensive dashboard, enhanced security, cost-effective storage, and seamless integration with SharePoint.

What is Version Control in SharePoint?

Version control in SharePoint is a powerful feature designed to help teams manage changes to documents efficiently. It allows users to create and track different versions of a document, providing a clear record of modifications over time. This functionality is vital for maintaining the integrity and accuracy of shared documents, especially in a collaborative environment.

In SharePoint, version control can be set up to differentiate between major and minor versions. Major versions are typically used to denote significant changes, while minor versions capture smaller edits or drafts. This distinction is particularly useful for tracking the progress of a document from its initial draft to the final version.

Version control also interacts seamlessly with editing permissions and the checkout/check-in features of SharePoint. When a document is checked out, it is locked for editing by other users until it is checked back in, preventing simultaneous edits that could lead to conflicts. This ensures that changes are made in an orderly manner, with a clear history of who made what changes and when.

SharePoint Storage Explorer

Gain insights in to your SharePoint Online Storage Consumption


Download our completely FREE TOOL

FREE DOWNLOAD

Send download link to:

I confirm that I have read and agree to the End User License Agreement.

Benefits of Using Version Control

Using version control in SharePoint offers numerous advantages, transforming how teams collaborate on documents. Here are some key benefits:

Improved Collaboration: Version control enables teams to work together more effectively by allowing all members to see changes made to a document and, if necessary, revert to previous versions. This ensures that everyone is always working with the most up-to-date information, reducing the risk of errors and miscommunication.

Enhanced Tracking: With SharePoint’s version history, every change made to a document is recorded, providing a detailed audit trail. This makes it easy to track modifications, understand the evolution of a document, and identify contributions from different team members.

Reduced Errors: Version control helps prevent the accidental overwriting of the latest edits. By maintaining a history of changes, users can easily revert to previous versions if a mistake is made, ensuring that valuable work is not lost.

Increased Transparency: Version control promotes accountability by clearly identifying who made changes and when. This transparency helps foster a culture of responsibility and trust within the team, as everyone can see the contributions of their colleagues.

In the next sections, we will delve deeper into how to use version control in SharePoint, providing a step-by-step guide to enable this feature and best practices to ensure its effective use. Whether you’re a seasoned SharePoint user or new to the platform, mastering version control can significantly enhance your document management and collaboration capabilities.

Mastering SharePoint Online

Please fill out the form below to get our free Ebook "Mastering SharePoint Online" emailed to you

FREE DOWNLOAD

Send download link to:

I confirm that I have read and agree to the End User License Agreement.

How to Use Version Control in SharePoint

To fully leverage the benefits of version control in SharePoint, it’s essential to understand how to enable and use this feature effectively. Below is a step-by-step guide to get you started.

Enabling Version Control for a Document Library


Access Document Library Settings:

Navigate to the document library where you want to enable version control.

Click on the Settings icon (gear icon) in the top-right corner.

Select Library settings from the dropdown menu.

Configure Versioning Settings:

In the Library settings page, click on Versioning settings under the General Settings section.

Here, you can enable versioning for your document library. Choose between major versions only or both major and minor (draft) versions, depending on your needs.

Set the number of versions to retain. This helps manage storage by limiting the number of versions saved.

Click OK to save your changes.

Setting Up Approval Workflow (Optional):

If your organization requires content approval before publishing, you can enable the content approval workflow.

In the Versioning settings page, set Require content approval for submitted items to Yes.

Configure additional settings for the approval workflow as needed.

Viewing the Version History of a Document

Once version control is enabled, you can easily view the version history of any document within the library:

Locate the Document:

Navigate to the document library and find the document you want to check.

Open Version History:

Right-click on the document name or click the ellipsis () next to it.

Select Version History from the context menu.

Review Changes:

A list of all versions of the document will appear, showing the version number, date modified, and the user who made the changes.

Click on any version to view its details, compare it with the current version, or restore it if needed.

Reverting to a Previous Version

If you need to revert to a previous version of a document, SharePoint makes this process straightforward:

Access Version History:

Follow the steps outlined above to open the version history for the document.

Restore a Previous Version:

Identify the version you want to revert to.

Click the dropdown arrow next to the version number and select Restore.

Confirm your action when prompted. The selected version will now be the current version of the document.

Advanced Features

SharePoint’s version control also offers advanced features to enhance document management:

Version Comments: Encourage users to add comments when saving new versions. This provides context for the changes made and aids in tracking the document’s evolution.

Content Approval Workflows: For documents requiring approval before being published, set up workflows to automate the approval process. This ensures that only reviewed and approved content is shared.

SharePoint Storage Explorer

Gain insights in to your SharePoint Online Storage Consumption


Download our completely FREE TOOL

FREE DOWNLOAD

Send download link to:

I confirm that I have read and agree to the End User License Agreement.

Best Practices for Effective Version Control

To maximize the benefits of version control in SharePoint, consider implementing the following best practices:

Define a Clear Document Naming Convention:

Use a consistent and descriptive naming convention for documents. This helps in easily identifying the purpose and version of each document.

Encourage Descriptive Comments:

Train users to provide meaningful comments when saving new versions. This practice enhances understanding of changes and streamlines collaboration.

Utilize Check-Out/Check-In Functionalities:

Make use of the check-out/check-in features to avoid simultaneous edits. This ensures that only one user can make changes at a time, reducing the risk of conflicts and overwrites.

Set Up Retention Policies:

Establish retention policies to automatically manage version history based on predefined rules. This helps maintain an organized document library and conserves storage space.

Conclusion

Mastering version control in SharePoint is a game-changer for document management and collaboration. By enabling version control, viewing version history, and reverting to previous versions when necessary, teams can work more efficiently and effectively. The advanced features and best practices further enhance the document management experience, promoting accountability, reducing errors, and improving overall productivity.

Embrace version control in SharePoint to streamline your document workflows and elevate your team’s collaborative efforts. With these tools and strategies, you’ll be well-equipped to manage document versions seamlessly, ensuring clarity and consistency in your work.

Mastering SharePoint Online

Please fill out the form below to get our free Ebook "Mastering SharePoint Online" emailed to you

FREE DOWNLOAD

Send download link to:

I confirm that I have read and agree to the End User License Agreement.

Utilizing Squirrel for Enhanced Document Management in SharePoint

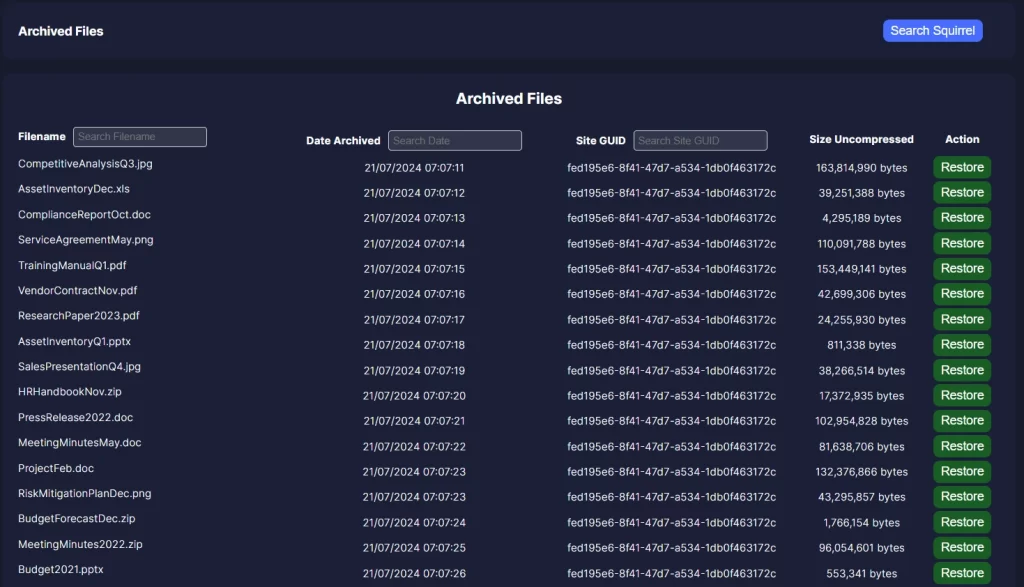
In addition to SharePoint’s built-in version control features, integrating advanced tools like Squirrel can further optimize your document management. Squirrel is designed to enhance SharePoint’s capabilities by offering efficient archiving, storage solutions, and advanced analytics.

Key Features of Squirrel

Automated Document Archiving:

Transfers inactive documents from SharePoint to Azure Blob Storage based on customizable policies, reducing storage costs and freeing up space.

Comprehensive Dashboard:

Provides real-time data visualization and analytics for monitoring archived and restored files, viewing storage usage, and generating detailed reports.

Enhanced Security and Compliance

Utilizes industry-leading encryption and integrates with Azure Active Directory for robust authentication, ensuring compliance with security standards.

Cost-Effective Storage Solutions

Leverages Azure Blob Storage to significantly lower storage expenses while maintaining document accessibility and security.

Seamless Integration and Scalability:

Integrates smoothly with SharePoint, providing a scalable solution that grows with your organization’s needs.

Integrating Squirrel with SharePoint enhances document management by automating archiving, providing advanced analytics, and optimizing storage costs. Leveraging Squirrel’s features ensures efficient, secure, and compliant document workflows, improving overall productivity. For more information, visit the Squirrel Overview.

Mastering SharePoint Online

Please fill out the form below to get our free Ebook "Mastering SharePoint Online" emailed to you

FREE DOWNLOAD

Send download link to:

I confirm that I have read and agree to the End User License Agreement.

How to use SharePoint Powershell

How to use SharePoint Powershell

PowerShell Power Up: Mastering SharePoint Online Management Shell

The PowerShell SharePoint Online Management Shell (SPO Management Shell) is an indispensable tool for administrators seeking to harness the full potential of SharePoint Online. Unlike the standard user interface, the PowerShell SPO Management Shell offers advanced users granular control over their SharePoint environments. Whether you’re managing a complex network of sites or automating routine tasks, PowerShell within the SPO Management Shell provides the flexibility and power to streamline your operations efficiently.

The primary benefit of using the SPO Management Shell lies in its ability to execute complex tasks with precision and efficiency. Advanced users, in particular, can leverage its capabilities to automate repetitive processes, enforce security policies consistently, and manage large-scale deployments with ease. This level of control can significantly enhance productivity and ensure that your SharePoint Online environment runs smoothly and securely.

Topic Key Points
Introduction SPO Management Shell offers granular control and automation capabilities for SharePoint Online.
Getting Started Detailed steps to install and connect to the SPO Management Shell.
Basic Navigation Commands Examples of commands to navigate and manage SharePoint Online sites and lists.
Common Use Cases Practical examples of creating sites, managing permissions, and automating tasks with PowerShell.
Learning Resources Official documentation, online communities, training courses, and blogs for further learning.
Conclusion Emphasizes the power and flexibility of the SPO Management Shell and encourages further exploration.

Getting Started with SharePoint Powershell

To begin your journey with the SharePoint Online Management Shell, you’ll first need to install and connect it to your SharePoint Online environment. Here’s a step-by-step guide to get you started:

Step 1: Install the SharePoint Online Management Shell

  1. Download the SharePoint Online Management Shell: Visit the Microsoft Download Center and download the latest version of the SPO Management Shell.
  2. Run the Installer: Execute the downloaded file and follow the on-screen instructions to install the SPO Management Shell on your computer.
  3. Verify the Installation: Open PowerShell and run the following command to ensure the SPO Management Shell is installed correctly:

Get-Module -ListAvailable -Name Microsoft.Online.SharePoint.PowerShell

Mastering SharePoint Online

Please fill out the form below to get our free Ebook "Mastering SharePoint Online" emailed to you

FREE DOWNLOAD

Send download link to:

I confirm that I have read and agree to the End User License Agreement.

Step 2: Connect to SharePoint Online

  1. Open the SharePoint Online Management Shell: Launch the SPO Management Shell from your Start menu or by running powershell and importing the module manually.
  2. Connect to Your SharePoint Online Admin Center: Use the following command to connect to your SharePoint Online Admin Center:
    Connect-SPOService -Url https://<your-admin-center-url>
  3. Replace <your-admin-center-url> with the URL of your SharePoint Online Admin Center (e.g., https://contoso-admin.sharepoint.com).
  4. Authenticate: When prompted, enter your SharePoint Online admin credentials.

Step 3: Basic Commands for Navigating SharePoint Online

Once connected, you can start using basic commands to navigate and manage your SharePoint Online environment. Here are a few essential commands to get you started:

  • Get a list of all site collections:
    Get-SPOSite
  • Retrieve details of a specific site collection:
    Get-SPOSite -Identity https://contoso.sharepoint.com/sites/HR 
  • List all SharePoint Online users:
    Get-SPOUser -Site https://contoso.sharepoint.com/sites/HR

    These commands provide a solid foundation for navigating your SharePoint Online environment. As you become more comfortable with the SPO Management Shell, you can start exploring more advanced commands and scripts to automate tasks and streamline your workflows.

SharePoint Storage Explorer

Gain insights in to your SharePoint Online Storage Consumption


Download our completely FREE TOOL

FREE DOWNLOAD

Send download link to:

I confirm that I have read and agree to the End User License Agreement.

Common Use Cases

The true power of the SharePoint Online Management Shell shines when you start using it to perform common administrative tasks. Here are a few practical examples with code snippets:

Create and Manage SharePoint Sites and Lists

Creating and managing sites and lists is a frequent task for SharePoint administrators. With the SPO Management Shell, you can easily create new site collections and lists:

  • Create a new site collection:
    New-SPOSite -Url https://contoso.sharepoint.com/sites/NewSite -Owner admin@contoso.com -StorageQuota 1000 -Title “New Site Collection”
  • Create a new list within a site:

    Connect-PnPOnline -Url https://contoso.sharepoint.com/sites/NewSite -UseWebLogin
    New-PnPList -Title “New List” -Template GenericList

Set User Permissions and Security Settings

Managing user permissions is crucial for maintaining the security and integrity of your SharePoint Online environment. With the SPO Management Shell, you can efficiently manage user access:

  • Add a user to a site collection:
    Add-SPOUser -Site https://contoso.sharepoint.com/sites/NewSite -LoginName user@contoso.com -Role “Site Owner”
  • Remove a user from a site collection:
    Remove-SPOUser -Site https://contoso.sharepoint.com/sites/NewSite -LoginName user@contoso.com

Automate Tasks with Scripting

Automation is one of the most powerful features of the SPO Management Shell. By scripting common tasks, you can save time and reduce the potential for errors:

  • Bulk user provisioning:
    $users = Import-Csv -Path “C:\Users\NewUsers.csv”
    foreach ($user in $users) {
    Add-SPOUser -Site https://contoso.sharepoint.com/sites/NewSite -LoginName $user.Email -Role “Member”
    }

SharePoint Storage Explorer

Gain insights in to your SharePoint Online Storage Consumption


Download our completely FREE TOOL

FREE DOWNLOAD

Send download link to:

I confirm that I have read and agree to the End User License Agreement.

Learning Resources

To master the SharePoint Online Management Shell, it’s essential to tap into a variety of learning resources. These resources can provide you with the latest updates, best practices, and troubleshooting tips to enhance your knowledge and efficiency.

Official Microsoft Documentation

The first stop for any SharePoint Online Management Shell user should be the official Microsoft documentation. This comprehensive resource offers detailed explanations, syntax for commands, and examples to help you get the most out of the SPO Management Shell.

  • SharePoint Online Management Shell Documentation: Visit the official Microsoft documentation for detailed information on connecting to and using the SharePoint Online Management Shell. This resource is regularly updated with new features and best practices.

Online Communities and Forums

Engaging with online communities can provide invaluable insights and support from fellow SharePoint administrators and PowerShell enthusiasts. These communities are great places to ask questions, share experiences, and learn from others’ challenges and solutions.

  • Microsoft Tech Community: The Microsoft Tech Community is a vibrant forum where you can discuss SharePoint Online and PowerShell topics. It’s a great place to find answers to specific questions and to stay updated on the latest developments.
  • Reddit SharePoint Community: The Reddit SharePoint Community is another excellent resource for troubleshooting and discussion. With a wide range of topics and active participants, you can gain diverse perspectives on managing SharePoint Online with PowerShell.

Training Courses and Tutorials

Structured training courses and video tutorials can offer step-by-step guidance and hands-on experience with the SharePoint Online Management Shell. These resources are particularly useful for visual learners and those who prefer a more guided learning experience.

  • Pluralsight: Pluralsight offers comprehensive courses on SharePoint Online and PowerShell. These courses cover everything from basic commands to advanced scripting techniques, helping you build a solid foundation.
  • YouTube Tutorials: Numerous YouTube channels provide free tutorials on SharePoint Online and PowerShell. Channels like SharePoint Maven offer practical tips and demonstrations that can help you understand and apply various commands.

Conclusion

The SharePoint Online Management Shell is a powerful tool that offers unmatched flexibility and control for managing your SharePoint Online environment. By leveraging the resources mentioned above, you can deepen your understanding, enhance your skills, and unlock the full potential of the SPO Management Shell.

Whether you’re looking to automate routine tasks, enforce security policies, or manage complex deployments, the SharePoint Online Management Shell provides the tools you need to succeed. Embrace the power and flexibility it offers, and continue exploring its capabilities to become a SharePoint Online PowerShell expert.

SharePoint PowerShell Commands

Command Description
Get-Module -ListAvailable -Name Microsoft.Online.SharePoint.PowerShell Verify the installation of the SPO Management Shell.
Connect-SPOService -Url https://<your-admin-center-url> Connect to the SharePoint Online Admin Center.
Get-SPOSite Get a list of all site collections.
Get-SPOSite -Identity https://contoso.sharepoint.com/sites/HR Retrieve details of a specific site collection.
Get-SPOUser -Site https://contoso.sharepoint.com/sites/HR List all SharePoint Online users within a specific site.
New-SPOSite -Url https://contoso.sharepoint.com/sites/NewSite -Owner admin@contoso.com -StorageQuota 1000 -Title "New Site Collection" Create a new site collection.
Connect-PnPOnline -Url https://contoso.sharepoint.com/sites/NewSite -UseWebLogin Connect to a specific SharePoint Online site using PnP PowerShell.
New-PnPList -Title "New List" -Template GenericList Create a new list within a site using PnP PowerShell.
Add-SPOUser -Site https://contoso.sharepoint.com/sites/NewSite -LoginName user@contoso.com -Role "Site Owner" Add a user to a site collection.
Remove-SPOUser -Site https://contoso.sharepoint.com/sites/NewSite -LoginName user@contoso.com Remove a user from a site collection.
powershell<br>$users = Import-Csv -Path "C:\Users\NewUsers.csv"<br>foreach ($user in $users) {<br>Add-SPOUser -Site https://contoso.sharepoint.com/sites/NewSite -LoginName $user.Email -Role "Member"<br>} Script to bulk provision users from a CSV

Squirrel: Effortless SharePoint Archiving

Streamline your SharePoint archiving with Squirrel! Automate document archiving to Azure Blob Storage and ensure easy access and security. Make SharePoint management simple and efficient with Squirrel.

Squirrel for SharePoint Site Size Reporting

Save costs with Squirrel. Automate SharePoint archiving to Azure Blob Storage, reducing expenses while ensuring secure and accessible data. Efficient and budget-friendly.

Ready To Reduce SharePoint Online Costs?