SharePoint Online Document Retention
What is SharePoint Document Retention?
| Takeaway | Description |
|---|---|
| Automated Retention Policies | SharePoint allows the automation of retention policies, simplifying compliance and data management. |
| Retention Labels | Labels can be created and applied to manage the lifecycle of documents within SharePoint. |
| Security & Compliance Center | Central hub for managing retention policies and ensuring compliance across SharePoint sites. |
| Policy Application | Policies can be applied manually or automatically based on content types or sensitivity. |
| Monitoring Tools | SharePoint offers reporting and auditing tools to monitor compliance and effectiveness of retention policies. |
| SharePoint Storage Explorer | Enhances storage management capabilities with detailed views and reporting on SharePoint storage. |
| Accessibility | Suitable for businesses of all sizes, SharePoint’s retention tools are designed to be user-friendly. |
| Regular Updates | Regularly updating retention policies ensures ongoing compliance with legal and operational requirements. |
| Staff Training | Educating staff on the importance and application of retention policies is crucial for effective implementation. |
| Integration Capabilities | SharePoint integrates with Microsoft 365, allowing for uniform data governance across platforms. |
SharePoint Document retention is a critical component of modern data governance, requiring meticulous strategy and precise execution. In today’s digital age, businesses are inundated with vast quantities of data, making effective document management not just advisable but essential. This is particularly true when considering the legal and compliance obligations that organizations must navigate. SharePoint, a widely adopted platform by Microsoft, offers robust tools tailored for this purpose, providing businesses with a sophisticated framework for managing their document lifecycle.
The concept of document retention involves maintaining records for a predetermined period for administrative, legal, and historical reasons. Effective document retention ensures that important records are preserved to meet legal standards and business needs, while redundant records are systematically disposed of, thereby optimizing storage management and reducing unnecessary overhead. Using SharePoint for document management enables organizations to automate these processes, ensuring compliance and enhancing efficiency. This introduction sets the stage for a deeper exploration into SharePoint’s document retention capabilities, showcasing how it can transform organizational data management practices.
Understanding SharePoint Document Retention
SharePoint document retention is defined by policies that control how long documents are kept before they are eligible for disposal. These policies are critical for organizations to ensure they comply with industry regulations, legal requirements, and internal data governance policies. Retention policies in SharePoint can be configured to apply to various content types, including emails, documents, and other records. This configuration is crucial because it allows for the automation of retention and disposal, thereby reducing the risk of human error and ensuring that the policies are applied uniformly across the board.
The need for such policies is driven by several factors: legal compliance requires certain documents to be kept for specific periods; operational needs dictate retaining records for smooth business processes; and data optimization strategies necessitate the deletion of obsolete, redundant, or trivial items that clutter systems and complicate management. SharePoint’s retention policies help organizations address these needs by providing tools to specify retention and deletion schedules based on content types, usage, and sensitivity. The ability to automate these functions means that organizations can maintain better control over their information architecture, making data easier to manage and access while ensuring compliance with external and internal policies.
Key Features of SharePoint Document Retention
SharePoint offers a range of features designed to facilitate effective document retention. One of the core functionalities is the creation and management of retention labels. These labels can be applied to content manually by users or automatically by administrators through classification rules. Once labeled, content is managed according to the rules defined in the retention policy tied to the label, which might specify retaining a document for a certain period, then reviewing it or disposing of it automatically.
Another significant feature is the retention policy itself, which is managed through SharePoint’s Security & Compliance Center. Here, administrators can define the conditions under which different types of content are retained or deleted. Policies can be finely tuned, for example, by specifying different retention durations for different types of documents or by varying the action taken when the retention period expires, such as deletion or transfer to a different storage location.
The integration of these retention policies into the wider Microsoft 365 compliance framework is another pivotal feature. This integration allows for a uniform governance approach across all platforms within the Microsoft 365 suite, not just SharePoint. By leveraging the comprehensive compliance solutions offered by Microsoft, organizations can ensure that their document retention practices are up to standard across all their communication and collaboration tools, providing a seamless data management experience that enhances productivity and maintains regulatory compliance.
Mastering SharePoint Online
Please fill out the form below to get our free Ebook "Mastering SharePoint Online" emailed to you
Send download link to:
Setting Up Document Retention in SharePoint
1. Accessing the Security & Compliance Center:
The first step in setting up document retention in SharePoint is to access the Security & Compliance Center. This is the hub for all your compliance-related activities within Microsoft 365. Users need administrative permissions to access this center. Once there, you can navigate to the ‘Data governance’ section, where you will find the options for ‘Retention’ policies. This centralized access ensures that managing retention policies remains straightforward and integrates seamlessly with other compliance features offered by Microsoft 365.
2. Creating Retention Labels:
Retention labels are powerful tools within SharePoint that help classify and manage content based on your organization’s retention policies. To create a retention label, go to the ‘Labels’ section under the ‘Information governance’ or ‘Records management’ tab, depending on your setup. Here, you can create a new label and define the retention settings. You can specify how long the content remains in SharePoint before an action is taken, such as deletion or review. Labels can also be configured to trigger disposition reviews, where designated reviewers are notified to examine content before it is disposed of.
3. Publishing Labels:
Once labels are created, they need to be published so they can be applied to content across your organization. This is done through a label policy in the ‘Publish labels’ tab under the ‘Labels’ section. When publishing a label, you can choose specific locations where the label should be available, such as specific SharePoint sites or all sites, including OneDrive accounts. This step is crucial as it ensures that retention labels are available where they are needed and can be applied consistently across all designated content.
4. Applying Retention Policies:
After publishing, retention labels are ready to be applied to documents and emails. This can be done manually by users or automatically through auto-apply policies based on content types or sensitive information types detected in the content. For example, a retention label might be automatically applied to all content containing financial information to comply with industry regulations. This automation is a significant advantage, reducing the burden on users and ensuring compliance through consistent application of policies.
5. Automating Retention with Policies:
For greater efficiency, SharePoint allows the automation of retention through policy settings. You can set rules that automatically apply specific retention labels based on conditions such as the type of content, its location, or metadata. This feature is particularly useful for ensuring that all relevant documents are covered by appropriate retention policies without requiring manual intervention, thus minimizing the risk of non-compliance.
Best Practices for SharePoint Document Retention
When implementing document retention policies in SharePoint, following best practices can significantly enhance the effectiveness of your data governance strategy. It is advisable to start by clearly defining your organization’s retention requirements in consultation with legal, IT, and records management teams to ensure all regulatory and operational needs are met. Regular training and communication with staff about the importance of compliance and how to apply retention labels are also critical for successful adoption.
Additionally, it is beneficial to periodically review and update retention policies and labels to align with changing legal requirements and business needs. Leveraging analytics and reporting tools within SharePoint to monitor compliance and identify areas for improvement can help maintain an effective retention strategy.
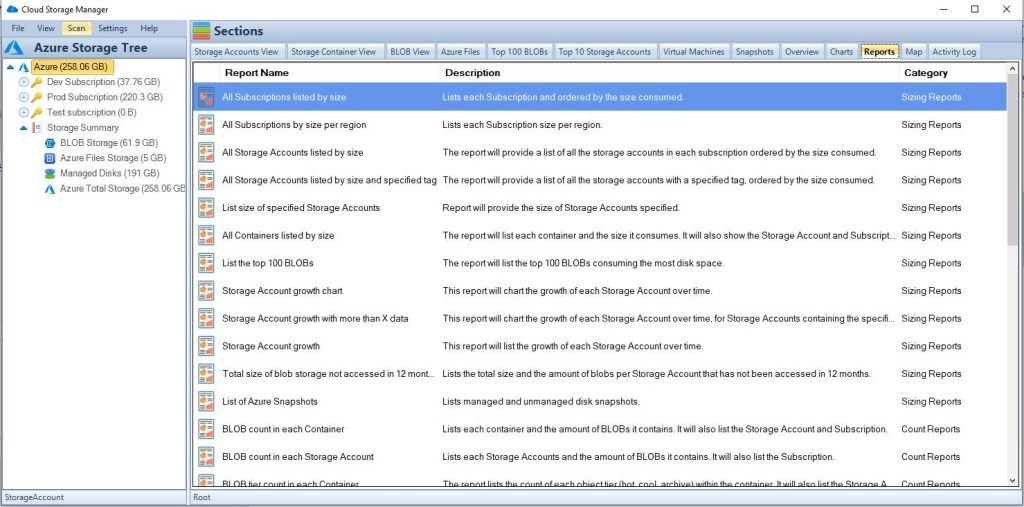
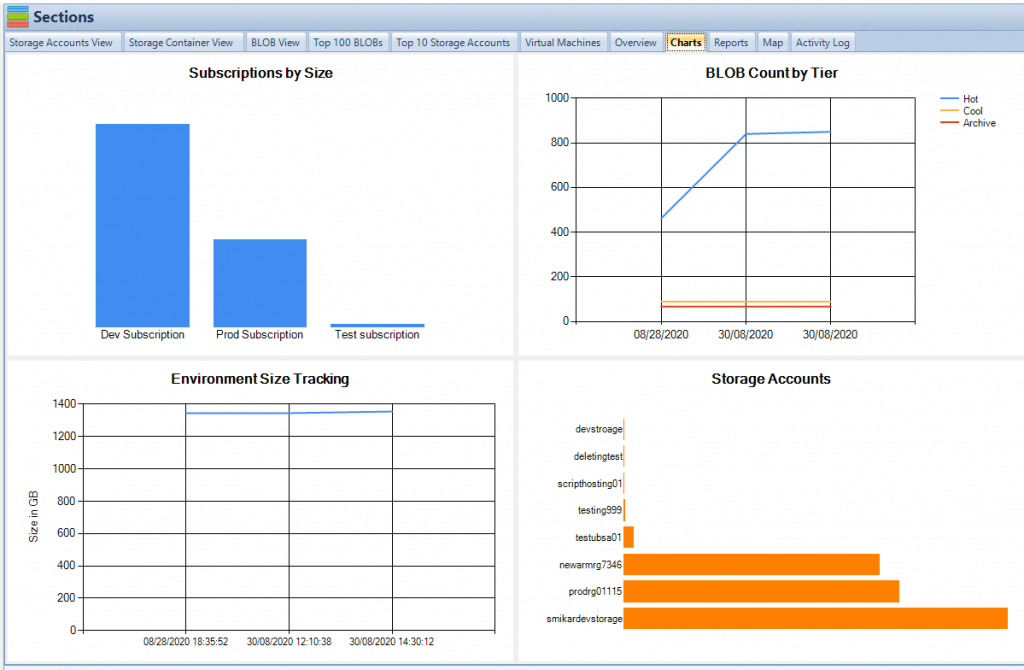
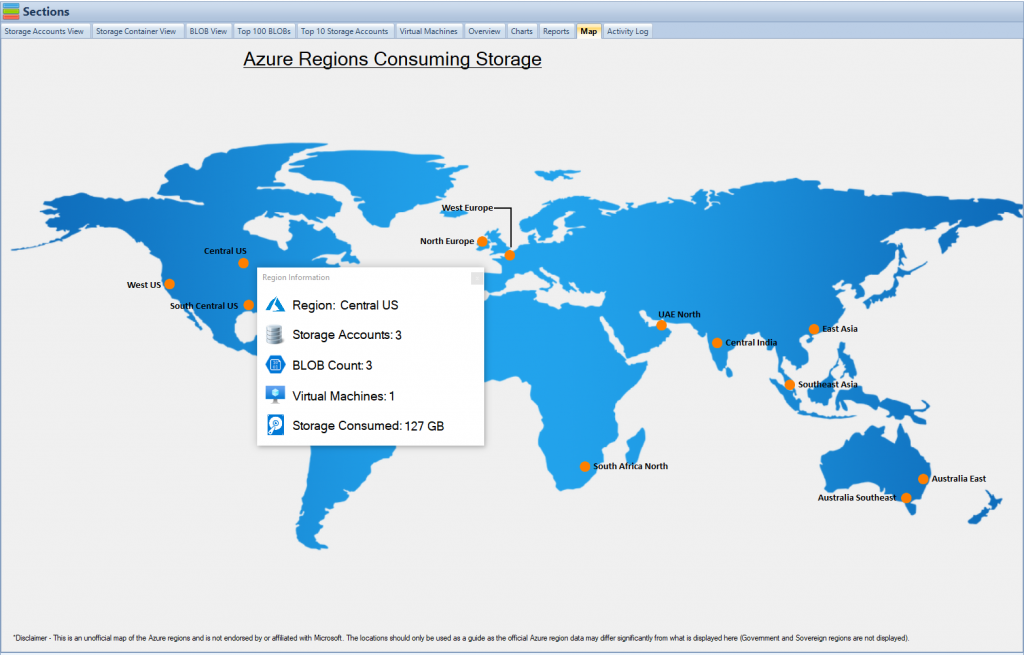
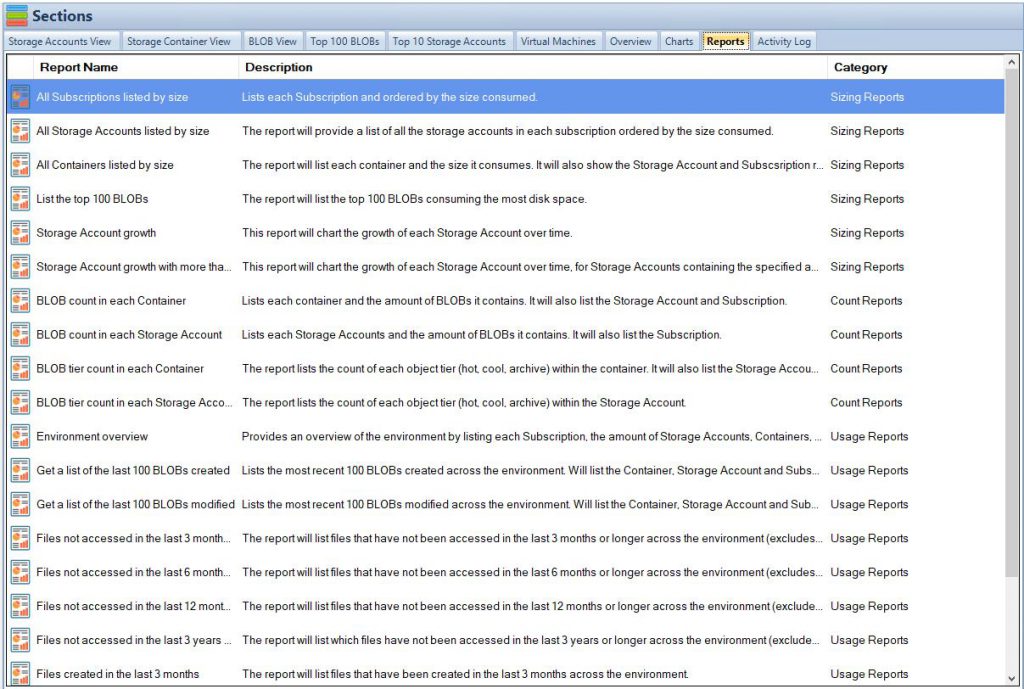
SharePoint Storage Explorer
Gain insights in to your SharePoint Online Storage Consumption
Download our completely FREE TOOL
Send download link to:
Step-by-Step Guide to Setting Up Document Retention in SharePoint
1. Accessing the Security & Compliance Center:
- Log in to Microsoft 365: Start by logging into your Microsoft 365 admin account.
- Open the Security & Compliance Center: Once logged in, navigate to the Security & Compliance Center. This can usually be done by finding the app launcher (often called the “waffle” icon) in the top left corner of the Office portal, then selecting the “Security” or “Compliance” option. Alternatively, you can directly access it via URL:
https://protection.office.com. - Navigate to Retention Policies: In the Security & Compliance Center, find the ‘Information governance’ section or ‘Records management’, depending on your configuration. Click on ‘Retention’ to proceed to the policy management area.
2. Creating Retention Labels:
- Initiate a New Label: Inside the retention policy section, choose ‘Labels’ and then click on ‘Create a label’. Give your label a name, description, and configure the retention settings.
- Set Retention Period and Action: Define how long the content should be retained (e.g., 5 years, 10 years). You can also specify what happens after the retention period ends, such as automatically deleting the content or triggering a review.
- Review and Save the Label: After configuring the label settings, review the details and save the label.
3. Publishing Labels:
- Create a Label Policy: Go to the ‘Publish labels’ section under ‘Labels’. Click on ‘Publish labels’ and select the labels you want to publish.
- Choose Locations: Decide where these labels should be available. You can select specific SharePoint sites, all SharePoint sites, or extend them to OneDrive accounts and Exchange email.
- Review and Publish: Confirm the settings and publish the labels. It may take some time for the labels to become available across selected locations.
4. Applying Retention Policies:
- Manual Application: Users can manually apply published labels to documents and emails as they create or modify content.
- Auto-apply Using Content Types: Set up auto-apply rules if you want SharePoint to automatically apply labels based on certain conditions like content type or sensitive information present in the content. This is done by returning to the ‘Labels’ section, choosing ‘Auto-apply a label’, and setting the conditions for automatic application.
5. Automating Retention with Policies:
- Set Up Retention Policies: Besides labels, you can create broader retention policies by navigating back to the ‘Retention’ section in the Security & Compliance Center. Here, you can specify more complex rules that apply to broader sets of content across SharePoint, OneDrive, and Exchange.
- Configure Rules: Configure these policies by selecting locations, setting retention durations, and defining what actions should occur when the retention period expires. This might include deleting the content permanently or transferring it to a different storage location.
Monitoring and Compliance
- Monitor Policy Application: Regularly check the application of your policies through the compliance center’s reporting features.
- Audit and Compliance Logs: Utilize audit logs and compliance reports to ensure policies are adhered to and to identify any potential issues.
Mastering SharePoint Online
Please fill out the form below to get our free Ebook "Mastering SharePoint Online" emailed to you
Send download link to:
Conclusion
Implementing effective document retention in SharePoint ensures that your organization can meet compliance requirements and manage data efficiently. With SharePoint, you can automate much of the retention process, allowing you to focus on strategic data management initiatives. Regularly revising your retention policies and ensuring your staff is knowledgeable about these practices are key steps towards maintaining a robust information governance framework.
SharePoint Storage Explorer
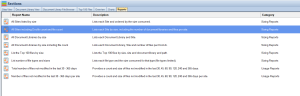
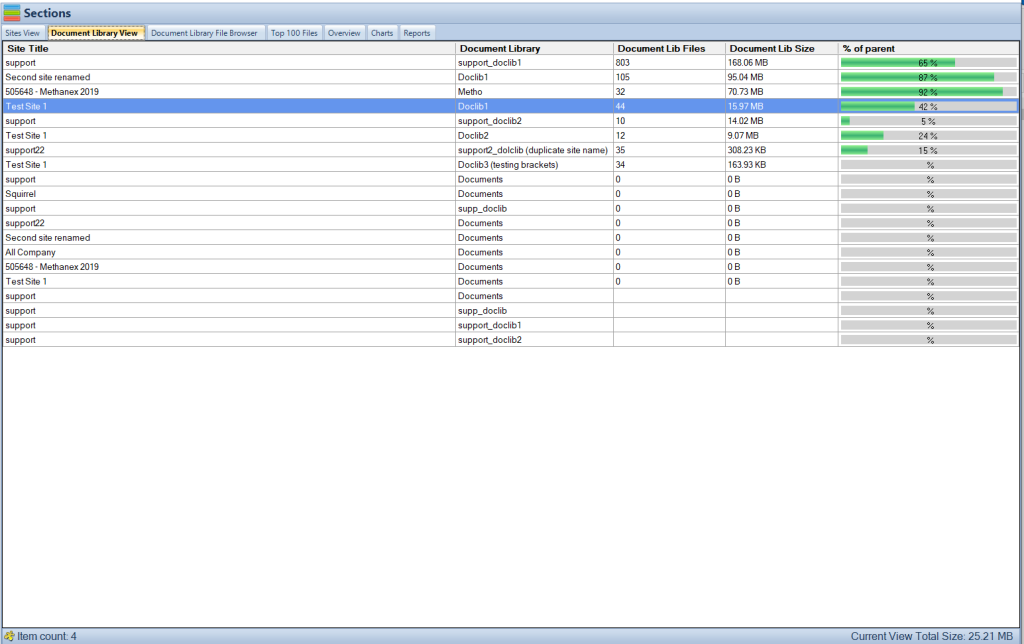
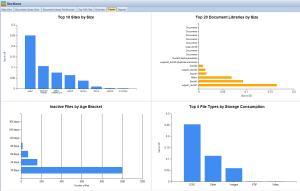
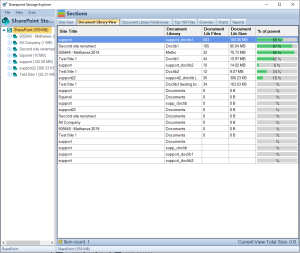
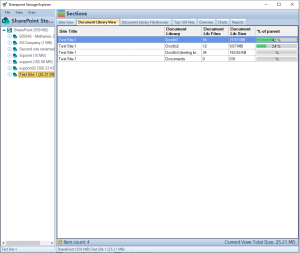
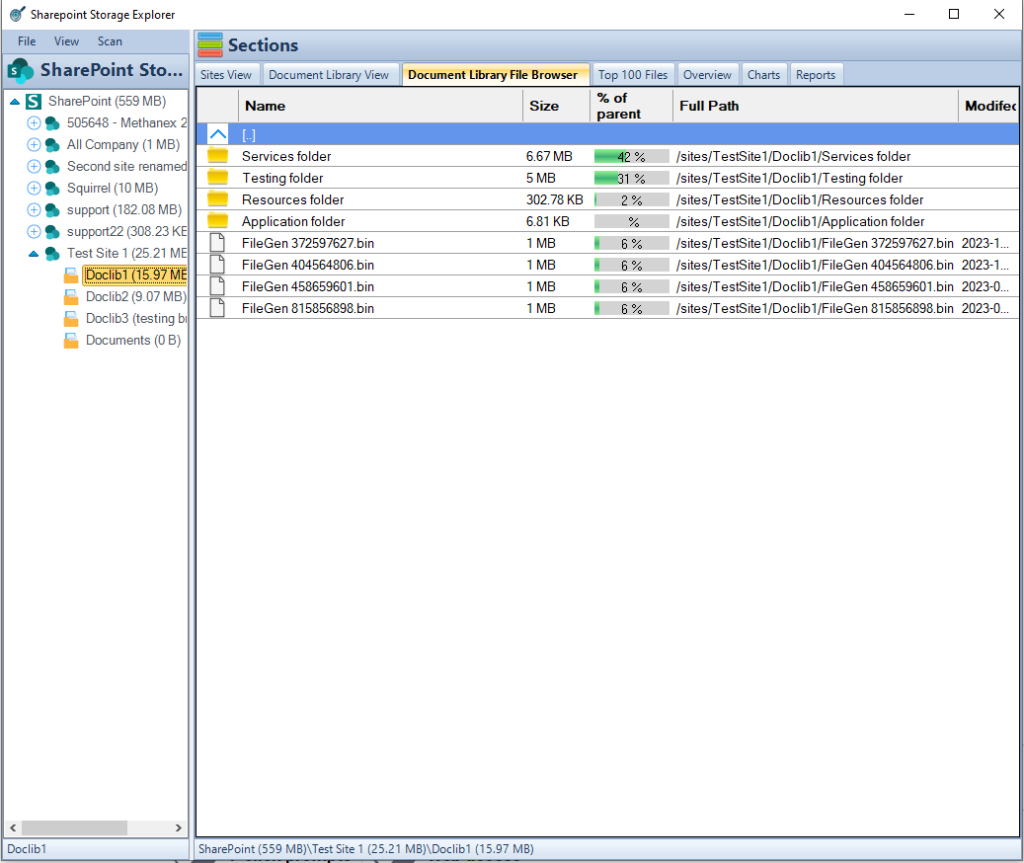
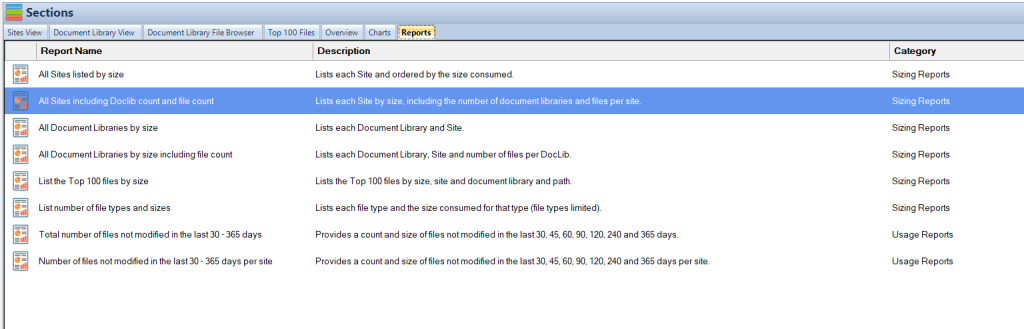
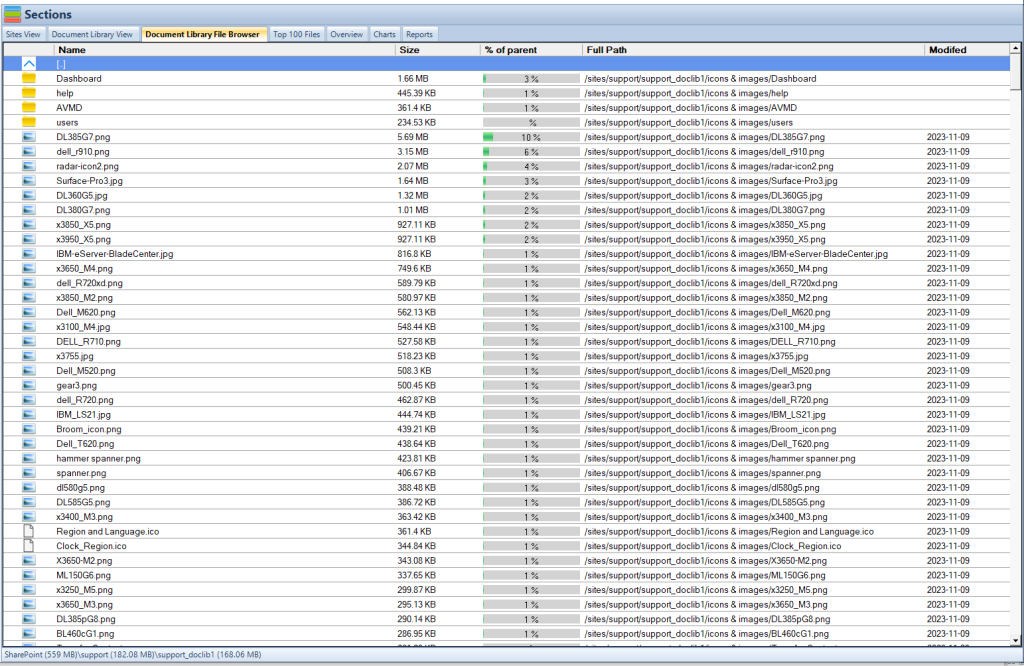
To further enhance your SharePoint document management capabilities, consider utilizing SharePoint Storage Explorer. This powerful tool offers comprehensive insights into your SharePoint storage, providing features like detailed site and document library views, an intuitive file browser, and extensive reporting. These features enable you to manage and optimize SharePoint storage effectively, making informed decisions about file storage and organization.
SharePoint Storage Explorer is free to use and designed to accommodate both small businesses and large enterprises, making it accessible for all SharePoint users. If you’re ready to elevate your SharePoint experience and streamline your storage management, download SharePoint Storage Explorer today. Visit SharePoint Storage Explorer to get started and discover how you can make the most of your SharePoint environment.
FAQs on SharePoint Document Retention
- What is document retention in SharePoint?
Document retention in SharePoint involves managing how long documents are stored before being deleted or archived according to legal and policy requirements. - How do I create a retention label in SharePoint?
Retention labels are created in the Security & Compliance Center under the ‘Labels’ section where you can define retention settings and actions. - Can retention policies be applied automatically?
Yes, SharePoint allows for automatic application of retention policies based on content type, metadata, or sensitive information. - What is the purpose of the SharePoint Storage Explorer?
SharePoint Storage Explorer provides enhanced visibility and management of SharePoint storage, allowing users to optimize and organize their document storage efficiently. - How often should retention policies be reviewed?
Retention policies should be reviewed annually or whenever there are significant changes to compliance requirements or business operations. - Can I apply different retention policies to different types of content?
Yes, SharePoint supports applying different retention policies to various content types, including emails, documents, and more. - What happens when a retention policy expires?
Actions specified in the policy, such as deletion or review, will be executed once the retention period expires. - Is SharePoint compliant with industry regulations?
SharePoint’s retention tools are designed to help organizations comply with industry regulations, though policies should be specifically tailored to meet particular regulatory requirements. - How do I train my staff on using retention policies in SharePoint?
Training can be conducted using SharePoint’s in-built guidance tools, external training resources, or through hands-on sessions led by IT. - What are the benefits of automating retention policies?
Automating retention policies ensures consistent application, reduces manual errors, and saves time, enhancing overall compliance and data management efficiency. - How does Squirrel enhance SharePoint’s retention capabilities?
Squirrel complements SharePoint’s retention policies by providing an automated solution to archive documents to Azure Blob Storage based on predefined lifecycle policies. This integration allows organizations to seamlessly manage the lifecycle of documents, ensuring that storage is optimized and documents are archived securely and in compliance with retention schedules. - What added value does Squirrel offer in managing compliance with retention policies?
Squirrel ensures that archived documents are encrypted and stored securely, helping organizations meet stringent compliance and regulatory requirements. Additionally, Squirrel’s automation reduces the risk of human error in document management, enhancing compliance and governance within SharePoint environments.