Azure Storage is a cloud-based service that provides scalable, secure and highly available data storage solutions for applications running in the cloud. It offers different types of storage options like Blob storage, Queue storage, Table storage and File storage.
Blob storage is used to store unstructured data like images, videos, audios and documents while Queue storage helps in building scalable applications with loosely coupled architecture. Table storage is a NoSQL key-value store used for storing structured datasets and File share manages files in the same way as traditional file servers.
Azure Storage provides developers with a massively scalable object store for text and binary data hosting that can be accessed via REST API or by using various client libraries in languages like .NET, Java and Python. It also offers features like geo-replication, redundancy options and backup policies which provide high availability of data across regions.
The Importance of Implementing Best Practices
Implementing best practices when using Azure Storage can save you from many problems down the road. For instance, security breaches or performance issues can lead to downtime or loss of important data which could have severe consequences on your organization’s reputation or revenue.
By following best practices guidelines provided by Microsoft or other industry leaders you can ensure improved security, better performance and cost savings. Each type of Azure Storage has its own unique characteristics that may require specific best practices to be followed to achieve optimal results.
Therefore it’s essential to understand the type of data being stored and usage patterns before designing the storage solution architecture. In this article we’ll explore some best practices for securing your Azure Storage account against unauthorized access attempts as well as optimizing its performance based on your needs while also ensuring high-availability through replication options and disaster recovery strategies.
Security Best Practices
Use of Access Keys and Shared Access Signatures (SAS)
The use of access keys and shared access signatures (SAS) is a critical aspect of security best practices in Azure Storage. Access keys are essentially the username and password for your storage account, and should be treated with the same level of security as you would any other sensitive information. To minimize risk, it is recommended to use SAS instead of access keys when possible.
SAS provide granular control over permissions, expiration dates, and access protocol restrictions. This allows you to share specific resources or functionality with external parties without exposing your entire storage account.
Implementation of Role-Based Access Control (RBAC)
Role-based access control (RBAC) allows you to assign specific roles to users or groups based on their responsibilities within your organization. RBAC is a key element in implementing least privilege access control, which means that users only have the necessary permissions required for their job function. This helps prevent unauthorized data breaches and ensures compliance with privacy regulations such as GDPR.
Encryption and SSL/TLS usage
Encryption is essential for securing data at rest and in transit. Azure Storage encrypts data at rest by default using service-managed keys or customer-managed keys stored in Azure Key Vault.
For added security, it is recommended to use SSL/TLS for data transfers over public networks such as the internet. By encrypting data in transit, unauthorized third-parties will not be able to read or modify sensitive information being transmitted between client applications and Azure Storage.
Conclusion: Security Best Practices
Implementing proper security measures such as using access keys/SAS, RBAC, encryption, and SSL/TLS usage can help protect your organization’s valuable assets stored on Azure Storage from unauthorized access and breaches. It’s important to regularly review and audit your security protocols to ensure that they remain effective and up-to-date.
Performance Best Practices
Proper Use of Blob Storage Tiers
When it comes to blob storage, Azure offers three different tiers: hot, cool, and archive. Each tier has a different price point and is optimized for different access patterns. Choosing the right tier for your specific needs can result in significant cost savings.
For example, if you have data that is frequently accessed or modified, the hot tier is the most appropriate option as it provides low latency access to data and is intended for frequent transactions. On the other hand, if you have data that is accessed infrequently or stored primarily for backup/archival purposes, then utilizing the cool or archive tiers may be more cost-effective.
It’s important to note that changing storage tiers can take some time due to data movement requirements. Hence you should carefully evaluate your usage needs before settling on a particular tier.
Utilization of Content Delivery Network (CDN)
CDNs are an effective solution when it comes to delivering content with high performance and low latency across geographical locations. By leveraging a CDN with Azure Storage Account, you can bring your content closer to users by replicating blobs across numerous edge locations across the globe.
This means that when a user requests content from your website or application hosted in Azure Storage using CDN, they will receive that content from their nearest edge location rather than waiting for content delivery from a central server location (in this case – Azure storage). By using CDNs with Azure Storage Account in this way, you can deliver high-performance experiences even during peak traffic times while reducing bandwidth costs.
Optimal Use of Caching
Caching helps improve application performance by storing frequently accessed data closer to end-users without having them make requests directly to server resources (in this case – Azure Storage). This helps reduce latency and bandwidth usage.
Azure offers several caching options, including Azure Redis Cache and Azure Managed Caching. These can be used in conjunction with Azure Storage to improve overall application performance and reduce reliance on expensive server resources.
When utilizing caching with Azure Storage, it’s important to consider the cache size and eviction policies based on your application needs. Also, you need to evaluate the type of data being cached as some data types are better suited for cache than others.
Availability and Resiliency Best Practices
One of the most important considerations for any organization’s data infrastructure is ensuring its availability and resiliency. In scenarios where data is critical to business operations, any form of downtime can result in significant losses. Therefore, it is important to have a plan in place for redundancy and disaster recovery.
Replication options for data redundancy
Azure Storage provides users with multiple replication options to ensure that their data is safe from hardware failures or other disasters. The three primary replication options available are:
However, this option does not replicate your data across different regions or geographies, so there’s still a risk of data loss in case of a natural disaster that affects the entire region.
Zone-redundant storage (ZRS): This option replicates your data synchronously across three availability zones within a single region, increasing fault tolerance.
Geo-redundant storage (GRS):this option replicates your data asynchronously to another geographic location, providing an additional layer of protection against natural disasters or catastrophic events affecting an entire region.
Implementation of geo-redundancy
The GRS replication option provides a higher level of resiliency as it replicates the user’s storage account to another Azure region without manual intervention required. In the event that the primary region becomes unavailable due to natural disaster or system failure, the secondary copy will be automatically promoted so that clients can continue accessing their information without any interruptions.
Azure Storage offers GRS replication at a nominal cost, making it an attractive option for organizations that want to ensure their data is available to their clients at all times. It is important to note that while the GRS replication option provides additional resiliency, it does not replace the need for proper backups and disaster recovery planning.
Use of Azure Site Recovery for disaster recovery
Azure Site Recovery (ASR) is a cloud-based service that allows you to replicate workloads running on physical or virtual machines from your primary site to a secondary location. ASR is integrated with Azure Storage and can support the replication of your data from one region to another. This means that in case of a complete site failure or disaster, you can use ASR’s failover capabilities to quickly bring up your applications and restore access for your customers.
ASR also provides automated failover testing at no additional cost (up to 31 tests per year), allowing customers to validate their disaster recovery plans regularly. Additionally, Azure Site Recovery supports cross-platform replication, making it an ideal solution for organizations with heterogeneous environments.
Implementing these best practices will help ensure high availability and resiliency for your organization’s data infrastructure. By utilizing Azure Storage’s built-in redundancy options such as GRS and ZRS, as well as implementing Azure Site Recovery as part of your disaster recovery planning process, you can minimize downtime and guarantee continuity even in the face of unexpected events.
Cost Optimization Best Practices
While Azure Storage offers a variety of storage options, choosing the appropriate storage tier based on usage patterns is crucial to keeping costs low. Blob Storage tiers, which include hot, cool, and archive storage, provide different levels of performance and cost. Hot storage is ideal for frequently accessed data that requires low latency and high throughput.
Cool storage is designed for infrequently accessed data that still requires quick access times but with lower cost. Archive storage is perfect for long-term retention of rarely accessed data at the lowest possible price.
Effective utilization of storage capacity is also important for cost optimization. Azure Blob Storage allows users to store up to 5 petabytes (PB) per account, but this can quickly become expensive if not managed properly.
By monitoring usage patterns and setting up automated policies to move unused or infrequently accessed data to cheaper tiers, users can avoid paying for unnecessary storage space. Another key factor in managing costs with Azure Storage is monitoring and optimizing data transfer costs.
As data moves in and out of Azure Storage accounts, transfer fees are incurred based on the amount of data transferred. By implementing strategies such as compression or batching transfers together whenever possible, users can reduce these fees.
To further enhance cost efficiency and optimization, utilizing an intelligent management tool can make a world of difference. This is where SmiKar Software’s Cloud Storage Manager (CSM) comes in.
CSM is an innovative solution designed to streamline the storage management process. Its primary feature is its ability to analyze data usage patterns and minimise storage costs with analytics and reporting.
Cloud Storage Manager also provides an intuitive, user-friendly dashboard which gives a clear overview of your storage usage, helping you make more informed decisions about your storage needs.
CSM’s intelligent reporting can also identify and highlight opportunities for further savings, such as potential benefits from compressing certain files or batching transfers.
Cloud Storage Manager is an essential tool for anyone looking to make the most out of their Azure storage accounts. It not only simplifies storage management but also helps to significantly reduce costs. Invest in Cloud Storage Manager today, and start experiencing the difference it can make in your cloud storage management.
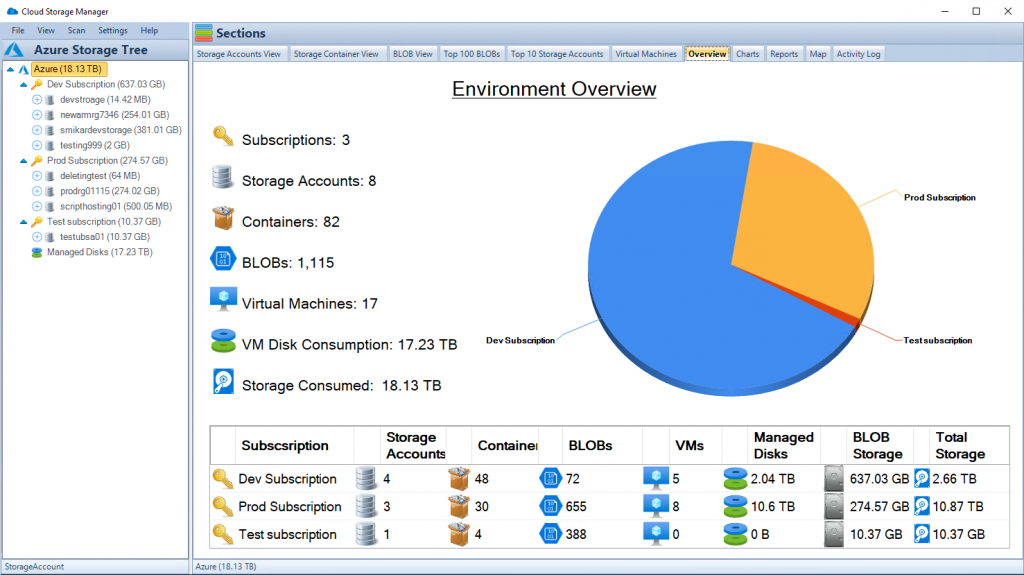
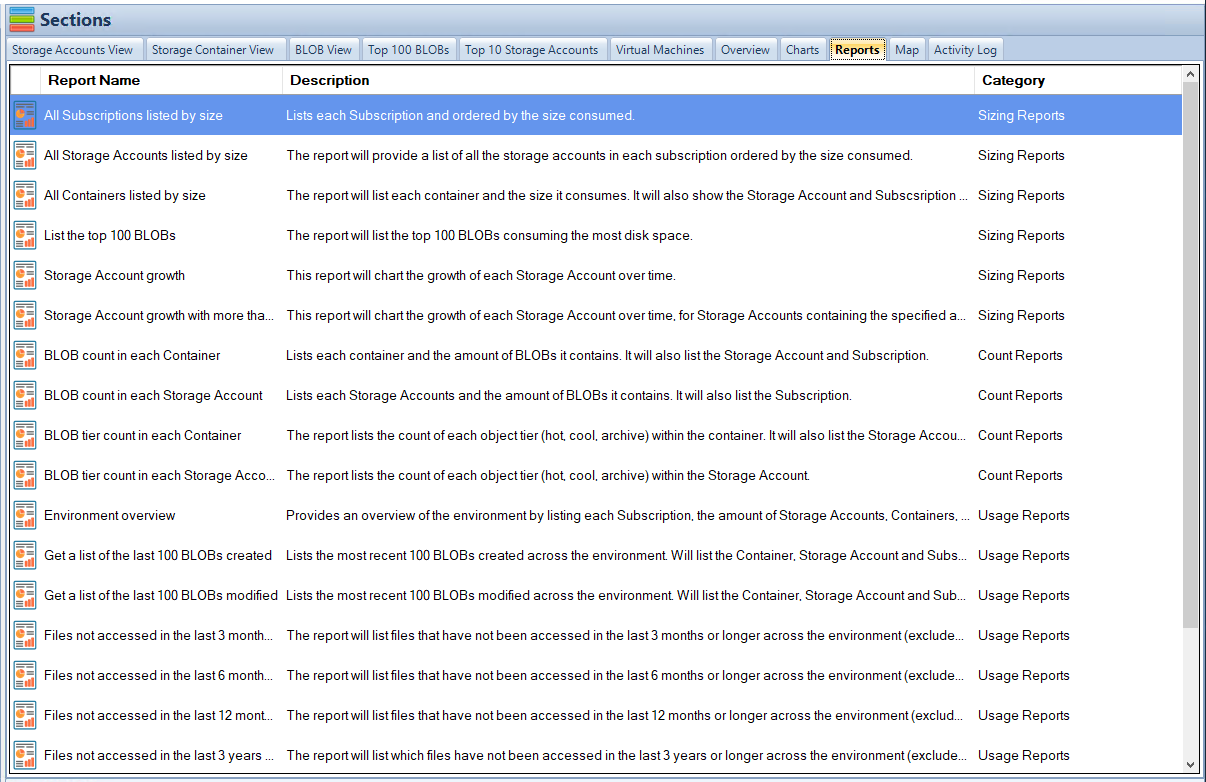
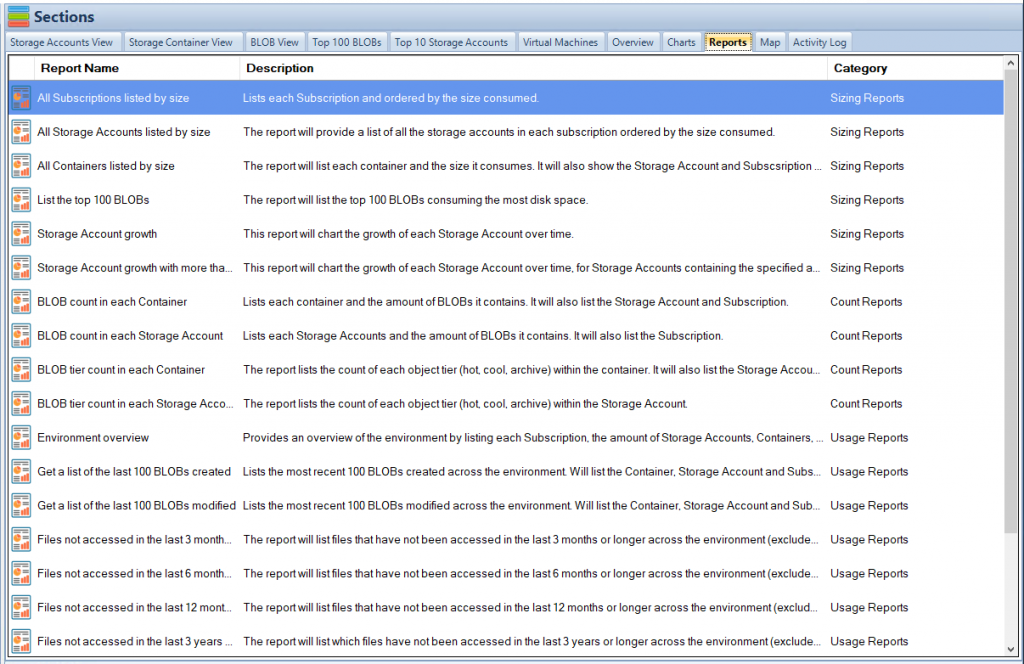
Cloud Storage Manager Main Window
The Importance of Choosing the Appropriate Storage Tier Based on Usage Patterns
Choosing the appropriate Blob Storage tier based on usage patterns can significantly impact overall costs when using Azure Storage. For example, if a user has frequently accessed but small files that require low latency response times (such as images used in a website), hot storage would be an appropriate choice due to its fast response times but higher cost per GB stored compared to cooler tiers like Cool or Archive.
Cooler tiers are ideal for less frequently accessed files such as backups or archives where retrieval times are not as critical as with hot tier files because the cost per GB stored is lower. Archive tier is perfect for long-term retention of rarely accessed data at a lower price point than Cool storage.
However, access times to Archive storage can take several hours. This makes it unsuitable for frequently accessed files, but ideal for long term backups or archival data that doesn’t need to be accessed often.
Effective Utilization of Storage Capacity
One important aspect of effective utilization of storage capacity is understanding how much data each application requires and how much space it needs to store that data. An application that requires a small amount of storage space should not be given large amounts of space in hot or cool storage tiers as these are more expensive options compared to archive tier which is cheaper but slower. Another way to optimize Azure Storage costs is by setting up automated policies that move unused or infrequently accessed files from hot or cool tiers to archive tiers where retrieval times are slower but the cost per GB stored is significantly less than cooler tiers.
Monitoring and Optimizing Data Transfer Costs
Data transfer fees can quickly add up when using Azure Storage, especially if there are large volumes of traffic. To minimize these fees, users should consider compressing their data before transfer as well as batching transfers together whenever possible.
Compressing will reduce overall file size which will reduce the amount charged per transfer while batching transfers allows users to combine multiple transfers into one larger transfer thus avoiding individual charges on each single transfer operation. Additionally, monitoring usage patterns and implementing strategies such as throttling connections during peak usage periods can also help manage costs associated with data transfer fees when using Azure Storage.
Cost optimization best practices for Azure Storage consist of choosing the appropriate Blob Storage tier based on usage patterns, effective utilization of storage capacity through automated policies and proper monitoring strategies for optimizing data transfer costs. By adopting these best practices, users can reduce their overall expenses while still enjoying the full benefits of Azure Storage.
Data Management Best Practices
Implementing retention policies for compliance purposes
Implementing retention policies is an important aspect of data management. Retention policies ensure that data is kept for the appropriate amount of time and disposed of when no longer needed.
This can help organizations comply with various industry regulations such as HIPAA, GDPR, and SOX. Microsoft Azure provides retention policies to manage this process effectively.
Retention policies can be set based on various criteria such as content type, keywords in the file name or metadata, or even by department or user. Once a policy has been created, it can be automatically applied to new data as it is created or retroactively applied to existing data.
In order to ensure compliance, it is important to regularly review retention policies and make adjustments as necessary. This will help avoid any legal repercussions that could arise from failure to comply with industry regulations.
Use of metadata to organize and search data effectively
Metadata is descriptive information about a file that helps identify its properties and characteristics. Metadata includes information such as date created, author name, file size, document type and more.
It enables easy searching and filtering of files using relevant criteria. By utilizing metadata effectively in Azure Storage accounts, you can easily organize your files into categories such as client names or project types which makes it easier for you to find the right files when you need them quickly.
Additionally, metadata tags can be used in search queries so you can quickly find all files with a specific tag across your organization’s entire file system regardless of its location within Azure Storage accounts. The use of metadata also ensures consistent naming conventions which makes searching through old documents easier while making sure everyone on the team understands the meaning behind each piece of content stored in the cloud.
Efficiently managing large-scale data transfers
With Azure Blob Storage account comes an improved scalability which is capable of handling large-scale data transfers with ease. However, managing such data transfers isn’t always easy and requires proper planning and management. Azure offers effective data transfer options such as Azure Data Factory that can help you manage large scale data transfers.
This service helps in scheduling and orchestrating the transfer of large amounts of data from one location to another. Furthermore, Azure Storage accounts provide an efficient way to move large amounts of data into or out of the cloud using a few different methods including AzCopy or the Azure Import/Export service.
AzCopy is a command-line tool that can be used to upload and download data to and from Blob Storage while the Azure Import/Export service allows you to ship hard drives containing your data directly to Microsoft for import/export. Effective management and handling of large-scale file transfers ensures that your organization’s critical information is securely moved around without any loss or corruption.
Conclusion
Recap on the importance of implementing Azure Storage best practices
Implementing Azure Storage best practices is critical to ensure optimal performance, security, availability, and cost-effectiveness. By utilizing access keys and SAS, implementing RBAC, and utilizing encryption and SSL/TLS usage for security purposes; proper use of Blob Storage tiers, CDN utilization, and caching for performance optimization; replication options for data redundancy, geo-redundancy implementation, and disaster recovery measures through Azure Site Recovery for availability and resiliency; appropriate storage tier selection based on usage patterns, effective utilization of storage capacity, monitoring data transfer costs for cost optimization; retention policies implementation for compliance purposes; using metadata to organize data effectively; efficiently managing large-scale data transfers – all these measures can help enterprises to achieve their business goals more efficiently.
Encouragement to continuously review and optimize storage strategies
However, it’s essential not just to implement these best practices but also continuously review them. As technology advances rapidly over time with new features being added frequently by cloud providers like Microsoft Azure – there may be better ways or new tools available that companies can leverage to optimize their storage strategies further. By continually reviewing the efficiency of your existing storage strategy against your evolving business needs – you’ll be able to identify gaps or areas that require improvements sooner rather than later.
Therefore it’s always wise to keep a lookout for industry trends related to cloud computing or specifically in this case – Microsoft Azure Storage best practices. Industry reports from reputable research firms like Gartner or IDC can provide you with insights into current trends around cloud-based infrastructure services.
The discussion forums within the Microsoft community where professionals discuss their experiences with Azure services can also give you an idea about what others are doing. – implementing Azure Storage best practices should be a top priority for businesses looking forward to leveraging modern-day cloud infrastructure services.
By adopting these practices and continuously reviewing and optimizing them, enterprises can achieve optimal performance, security, availability, cost-effectiveness while ensuring compliance with industry regulations. The benefits of implementing Azure Storage best practices far outweigh the costs of not doing so.
Azure Storage offers a robust set of data storage solutions including Blob Storage, Queue Storage, Table Storage, and Azure Files. A critical component of these services is the Shared Access Signature (SAS), a secure way to provide granular access to Azure Storage services. This article explores the intricacies of Azure Storage SAS Tokens.
Introduction to Azure Storage SAS Tokens
Azure Storage SAS tokens are essentially strings that allow access to Azure Storage services in a secure manner. They are a type of URI (Uniform Resource Identifier) that offer specific access rights to Azure Storage resources. They are a pivotal part of Azure Storage and are necessary for most tasks that require specific access permissions.
Types of SAS Tokens
There are different types of SAS tokens, each serving a specific function.
Service SAS
A Service SAS (Shared Access Signature) is a security token that grants limited access permissions to specific resources within a storage account. It is commonly used in Microsoft Azure’s storage services, such as Azure Blob Storage, Azure File Storage, and Azure Queue Storage.
A Service SAS allows you to delegate access to your storage resources to clients without sharing your account access keys. It is a secure way to control and restrict the operations that can be performed on your storage resources by specifying the allowed permissions, the time duration for which the token is valid, and the IP addresses or ranges from which the requests can originate.
By generating a Service SAS, you can provide temporary access to clients or applications, allowing them to perform specific actions like reading, writing, or deleting data within the specified resource. This approach helps enhance security by reducing the exposure of your storage account’s primary access keys.
Service SAS tokens can be generated using the Azure portal, Azure CLI (Command-Line Interface), Azure PowerShell, or programmatically using Azure Storage SDKs (Software Development Kits) in various programming languages.
It’s important to note that a Service SAS is different from an Account SAS. While a Service SAS grants access to a specific resource, an Account SAS provides access to multiple resources within a storage account.
Account SAS
An Account SAS (Shared Access Signature) is a security token that provides delegated access to multiple resources within a storage account. It is commonly used in Microsoft Azure’s storage services, such as Azure Blob Storage, Azure File Storage, and Azure Queue Storage.
Unlike a Service SAS, which grants access to specific resources, an Account SAS provides access at the storage account level. It allows you to delegate limited permissions to clients or applications to perform operations across multiple resources within the storage account, such as reading, writing, deleting, or listing blobs, files, or queues.
By generating an Account SAS, you can specify the allowed permissions, the time duration for which the token is valid, and the IP addresses or ranges from which the requests can originate. This allows you to control and restrict the actions that can be performed on the storage account’s resources, while still maintaining security by not sharing your account access keys.
Account SAS tokens can be generated using the Azure portal, Azure CLI (Command-Line Interface), Azure PowerShell, or programmatically using Azure Storage SDKs (Software Development Kits) in various programming languages.
It’s worth noting that an Account SAS has a wider scope than a Service SAS, as it provides access to multiple resources within the storage account. However, it also carries more responsibility since a compromised Account SAS token could potentially grant unauthorized access to all resources within the account.
Ad hoc SAS
Ad Hoc SAS (Shared Access Signature) refers to a dynamically generated SAS token that provides temporary and limited access to specific resources. Unlike a regular SAS token, which is typically created and configured in advance, an Ad Hoc SAS is generated on-demand and for a specific purpose.
The term “ad hoc” implies that the SAS token is created as needed, usually for short-term access requirements or specific scenarios where immediate access is necessary. It allows you to grant time-limited permissions to clients or applications for performing certain operations on designated resources within a storage account.
Ad Hoc SAS tokens can be generated using the appropriate APIs, SDKs, or command-line tools provided by the cloud storage service. When generating an Ad Hoc SAS, you specify the desired permissions, expiration duration, and optionally other restrictions such as IP addresses or protocol requirements.
The flexibility of Ad Hoc SAS tokens makes them particularly useful when you need to grant temporary access to resources without the need for long-term keys or complex authorization mechanisms. Once the token expires, the access granted by the SAS token is no longer valid, reducing the risk of unauthorized access.
Working of SAS Tokens
A SAS token works by appending a special set of query parameters to the URI that points to a storage resource. One of these parameters is a signature, created using the SAS parameters and signed with the key used to create the SAS. Azure Storage uses this signature to authorize access to the storage resource
SAS Signature and Authorization
In the context of Azure services, a SAS token refers to a Shared Access Signature token. SAS tokens are used to grant limited and time-limited access to specified resources or operations within an Azure service, such as storage accounts, blobs, queues, or event hubs.
When you generate a SAS token, you define the permissions and restrictions for the token, specifying what operations can be performed and the duration of the token’s validity. This allows you to grant temporary access to clients or applications without sharing your account’s primary access keys or credentials.
SAS tokens consist of a string of characters that include a signature, which is generated using your account’s access key and the specified permissions and restrictions. The token also includes other information like the start and expiry time of the token, the resource it provides access to, and any additional parameters you define.
By providing a client or application with a SAS token, you enable them to access the designated resources or perform specific operations within the authorized time frame. Once the token expires, the access is no longer valid, and the client or application would need a new token to access the resources again.
SAS tokens offer a secure and controlled way to delegate limited access to Azure resources, ensuring fine-grained access control and minimizing the exposure of sensitive account credentials.
What is a SAS Token
A SAS token is a string generated on the client side, often with one of the Azure Storage client libraries. It is not tracked by Azure Storage, and one can create an unlimited number of SAS tokens. When the client application provides the SAS URI to Azure Storage as part of a request, the service checks the SAS parameters and the signature to verify its validity
When to Use a SAS Token
SAS tokens are crucial when you need to provide secure access to resources in your storage account to a client who does not have permissions to those resources. They are commonly used in a scenario where usersread and write their own data to your storage account. In such cases, there are two typical design patterns:
Clients upload and download data via a front-end proxy service, which performs authentication. While this allows for the validation of business rules, it can be expensive or difficult to scale, especially for large amounts of data or high-volume transactions.
A lightweight service authenticates the client as needed and then generates a SAS. Once the client application receives the SAS, it can directly access storage account resources. The SAS defines the access permissions and the interval for which they are allowed, reducing the need for routing all data through the front-end proxy service.
A SAS is also required to authorize access to the source object in a copy operation in certain scenarios, such as when copying a blob to another blob that resides in a different storage account, or when copying a file to another file in a different storage account. You can also use a SAS to authorize access to the destination blob or file in these scenarios
Best Practices When Using SAS Tokens
Using shared access signatures in your applications comes with potential risks, such as the leakage of a SAS that can compromise your storage account, or the expiration of a SAS that may hinder your application’s functionality. Here are some best practices to mitigate these risks:
Always use HTTPS to create or distribute a SAS to prevent interception and potential misuse.
Use a User Delegation SAS when possible, as it provides superior security to a Service SAS or an Account SAS.
Have a revocation plan in place for a SAS to respond quickly if a SAS is compromised.
Configure a SAS expiration policy for the storage account to specify a recommended interval over which the SAS is valid.
Create a Stored Access Policy for a Service SAS, which allows you to revoke permissions for a Service SAS without regenerating the storage account keys.
Use near-term expiration times on an Ad hoc SAS, so even if a SAS is compromised, it’s valid only for a short time
Conclusion
In conclusion, Azure Storage SAS Tokens play a vital role in providing secure, granular access to Azure Storage services. Understanding the different types of SAS tokens, how they work, and best practices for their use is critical for managing access to your storage account resources effectively and securely.
Frequently Asked Questions
FAQs
Answers
1
What is a Shared Access Signature (SAS)?
A SAS is a signed URI that points to one or more storage resources. The URI includes a token that contains a special set of query parameters. The token indicates how the resources may be accessed by the client
2
What are the types of SAS?
There are three types of SAS: Service SAS, Account SAS, and User Delegation SAS. Service and Account SAS are secured with the storage account key. User Delegation SAS is secured with Azure AD credentials
3
How does a SAS work?
A SAS works by including a special set of query parameters in the URI, which indicate how the resources may be accessed. When a request includes a SAS token, that request is authorized based on how that SAS token is signed. The access key or credentials that you use to create a SAS token are also used by Azure Storage to grant access to a client that possesses the SAS
4
When should I use a SAS?
Use a SAS to give secure access to resources in your storage account to any client who does not otherwise have permissions to those resources. It’s particularly useful in scenarios where clients need to read and write their own data to your storage account and when copying a blob to another blob, a file to another file, or a blob to a file
5
What are the best practices when using SAS?
Always use HTTPS to create or distribute a SAS, use a user delegation SAS when possible, have a revocation plan in place, configure a SAS expiration policy for the storage account, create a stored access policy for a service SAS, and use near-term expiration times on an ad hoc SAS service SAS or account SAS
As we continue to journey through 2023, one of the highlights in the tech world has been the evolution of Azure Storage, Microsoft’s cloud storage solution. Azure Storage, known for its robustness and adaptability, has rolled out several exciting updates this year, each of them designed to enhance user experience, improve security, and provide more flexibility and control over data management.
Azure Storage has always been a cornerstone of the Microsoft Azure platform. The service provides a scalable, durable, and highly available storage infrastructure to meet the demands of businesses of all sizes. However, in the spirit of continuous improvement, Azure Storage has introduced new features and changes, setting new standards for cloud storage.
A New Era of Security with Azure Storage
A significant update this year has been the disabling of anonymous access and cross-tenant replication on new storage accounts by default. This change, set to roll out from August 2023, is an important step in bolstering the security posture of Azure Storage.
Traditionally, Azure Storage has allowed customers to configure anonymous access to storage accounts or containers. Although anonymous access to containers was already disabled by default to protect customer data, this new rollout means anonymous access to storage accounts will also be disabled by default. This change is a testament to Azure’s commitment to reducing the risk of data exfiltration.
Moreover, Azure Storage is disabling cross-tenant replication by default. This move is aimed at minimizing the possibility of data exfiltration due to unintentional or malicious replication of data when the right permissions are given to a user. It’s important to note that existing storage accounts are not impacted by this change. However, Microsoft highly recommends users to follow these best practices for security and disable anonymous access and cross tenant replication settings if these capabilities are not required for their scenarios.
Azure Files: More Power to You
Azure Files, a core component of Azure Storage, has also seen some significant updates. With a focus on redundancy, performance, and identity-based authentication, the changes bring more power and control to the users.
One of the exciting updates is the public preview of geo-redundant storage for large file shares. This feature significantly improves capacity and performance for standard SMB file shares when using geo-redundant storage (GRS) and geo-zone redundant storage (GZRS) options. This preview is available only for standard SMB Azure file shares and is expected to make data replication across regions more efficient.
Another noteworthy update is the introduction of a 99.99 percent SLA per file share for all Azure Files Premium shares. This SLA is available regardless of protocol (SMB, NFS, and REST) or redundancy type, meaning users can benefit from this SLA immediately, without any configuration changes or extra costs. If the availability drops below the guaranteed 99.99 percent uptime, users are eligible for service credits.
Microsoft has also rolled out Azure Active Directory support for Azure Files REST API with OAuth authentication in public preview. This update enables share-level read and write access to SMB Azure file shares for users, groups, and managed identities when accessing file share data through the REST API. This means that cloud native and modern applications that use REST APIs can utilize identity-based authentication and authorization to access file shares.
A significant addition to Azure Files is AD Kerberos authentication for Linux clients (SMB), which is now generally available. Azure Files customers can now use identity-based Kerberos authentication for Linux clients over SMB using either on-premises Active Directory Domain Services (AD DS) or Azure Active Directory Domain Services (Azure AD DS).
Also, Azure File Sync, a service that centralizes your organization’s file shares in Azure Files, is now a zone-redundant service. This update means thatan outage in a zone has limited impact while improving the service resiliency to minimize customer impact. To fully leverage this improvement, Microsoft recommends users to configure their storage accounts to use zone-redundant storage (ZRS) or geo-zone redundant storage (GZRS) replication.
Another feature that Azure Files has made generally available is Nconnect for NFS Azure file shares. Nconnect is a client-side Linux mount option that increases performance at scale by allowing you to use more TCP connections between the Linux client and the Azure Premium Files service for NFSv4.1. With nconnect, users can increase performance at scale using fewer client machines, ultimately reducing the total cost of ownership.
Azure Blob Storage: More Flexibility and Control
Azure Blob Storage has also seen significant updates in 2023, with one of the highlights being the public preview of dynamic blob containers. This feature offers customers the flexibility to customize container names in Blob storage. This may seem like a small change, but it’s an important one as it provides enhanced organization and alignment with various customer scenarios and preferences. By partitioning their data into different blob containers based on data characteristics, users can streamline their data management processes.
Azure Storage – More Powerful than Ever
The 2023 updates to Azure Storage have further solidified its position as a leading cloud storage solution. With a focus on security, performance, flexibility, and control, these updates represent a significant step forward in how businesses can leverage Azure Storage to meet their unique needs.
The disabling of anonymous access and cross-tenant replication by default is a clear sign of Azure’s commitment to security and data protection. Meanwhile, the updates to Azure Files, including the introduction of a 99.99 percent SLA, AD Kerberos authentication for Linux clients, Azure Active Directory support for Azure Files REST API with OAuth authentication, and the rollout of Azure File Sync as a zone-redundant service, illustrate Microsoft’s dedication to improving user experience and performance.
The introduction of dynamic blob containers in Azure Blob Storage is another example of how Azure is continually evolving to meet customer needs and preferences. By allowing users to customize their container names, Azure has given them more control over their data organization and management.
Overall, the updates to Azure Storage in 2023 are a testament to Microsoft’s commitment to continually enhance its cloud storage offerings. They show that Azure is not just responding to the changing needs of businesses and the broader tech landscape, but also proactively shaping the future of cloud storage. As we continue to navigate 2023, it’s exciting to see what further innovations Azure Storage will bring.
Azure Blob Storage is a scalable, cost-effective, and durable cloud storage solution provided by Microsoft Azure. Serving as the backbone for many Azure services, it enables businesses to store a colossal amount of unstructured data ranging from documents, images, backup data, to log files, etc. Azure Blob Storage can handle all your static data that’s stored and read but not changed frequently, making it an indispensable part of any cloud data management strategy.
Components of Azure Blob Storage
In Azure Blob Storage, data resides in storage accounts. These accounts serve as top-level organizational structures that provide a unique namespace for your data. Within storage accounts, we have containers, which function similarly to directories in a file system, holding blobs – the fundamental data entities. Understanding these core components of Azure Blob Storage is crucial to effectively managing and organizing data.
Azure Blob Storage Service Types
Azure Blob Storage offers different service types to cater to varying business needs. The three types of blobs include block blobs for storing text or binary data, append blobs for append operations (ideal for logging scenarios), and page blobs for frequent read/write operations.
The Imperative of Data Security in Azure Blob Storage
Common Scenarios for Data Deletion
Unintentional data deletion in Azure Blob Storage can occur due to various reasons. These range from user errors, like accidental deletion, to policy-based deletions or during data migration processes. Managed Disks, a feature of Azure, can be susceptible to these issues as well. While Azure does provide mechanisms to secure your blob storage, having an extra layer of security like soft delete is invaluable.
Consequences of Unintended Data Loss
Data loss, particularly of critical information, can result in dire consequences for businesses. It could lead to operational disruptions, financial losses, and even regulatory non-compliance, given that certain industries mandate strict data retention policies. This underlines the importance of data loss prevention strategies and backup solutions to safeguard your valuable data stored in Azure Blob Storage.
The Necessity of Robust Data Protection Strategies
Given the potential fallout of unintended data deletion, businesses need to prioritize robust data protection strategies. Features like Azure Storage Service Encryption for data at rest and advanced threat protection can help protect data. One of the most important features that serve as a safety net for data loss due to deletion is Azure Blob Storage Soft Delete.
Azure Blob Storage Soft Delete: A Solution to Unintended Data Deletion
Soft Delete in Azure Blob Storage: An Overview
Soft delete in Azure Blob Storage acts as a recoverable state for blobs. When turned on, it allows blobs or blob versions that have been deleted to be restored, thereby preventing data loss from accidental or unwarranted deletions.
The Working Mechanism of Soft Delete
Soft delete works by maintaining the deleted data in the system for a specified retention period. During this period, the deleted data can be read or recovered, providing a safety net for businesses against data loss. After the retention period, the data is permanently deleted.
Noteworthy Benefits of Soft Delete
Soft delete offers several benefits. Not only does it protect against accidental data loss, but it also aids in maintaining regulatory compliance, particularly in industries that require strict data retention policies. Additionally, with soft delete, businesses can avoid the time and effort that would otherwise be required to recover data from backups.
Activating Soft Delete in Azure Blob Storage
A Stepwise Guide to Enable Soft Delete
Enabling Soft Delete is a simple process involving a few steps. However, it requires careful consideration of the data retention period, which will vary depending on business requirements and potential regulatory obligations.
Important Considerations When Activating Soft Delete
When activating soft delete, businesses should be aware of the increased costs associated with retaining deleted data. Therefore, careful planning of the retention period is vital to balance between data protection and cost efficiency.
How to Retrieve Data Using Azure Blob Storage Soft Delete
The Process of Data Retrieval with Soft Delete
Data retrieval with soft delete involves restoring the deleted blobs or blob versions during the retention period. While the process is straightforward, it does require careful attention to avoid overwriting existing data.
How to Retrieve Data Using Azure Blob Storage Soft Delete
Prerequisites
Before you proceed, ensure that you’ve already enabled Soft Delete on your Azure Blob Storage. If you haven’t done this yet, you can follow the guide here.
Step-by-Step Guide
Step 1: Log into the Azure Portal
To start with, open your web browser and go to the Azure Portal. Enter your credentials to log in.
Step 2: Navigate to your storage account
From the left-hand menu, select “Storage accounts.” This will show you a list of all your storage accounts. Choose the storage account where the deleted blob was located.
Step 3: Open the Blob service
In your storage account window, find and click on “Blob service” under the “Services” section. This will open a list of all your Blob Containers.
Step 4: Locate your blob container
Search for the blob container where your deleted data was stored. Once found, click on it to open.
Step 5: Change the view to show deleted blobs
By default, deleted blobs are hidden from view. To show them, look for the “Show deleted blobs” toggle at the top of the page and turn it on.
Step 6: Find your deleted blob
Now that deleted blobs are visible, scroll through the list or use the search function to locate your deleted blob.
Step 7: Undelete the blob
Once you’ve found your deleted blob, click on the three dots beside it to open a context menu. From there, select “Undelete.”
Now, your deleted blob is restored, and you can access it like before. It’s worth noting that the blob will be restored with the same tier, metadata, and access level it had before deletion.
Conclusion
Retrieving data using Azure Blob Storage Soft Delete is a straightforward process. With just a few clicks, you can restore deleted blobs and protect your business from data loss. It’s essential to have Soft Delete enabled to use this feature. You might want to check Cloud Storage Manager as a tool for managing your Azure storage. It can provide insights into your Azure blob and file storage consumption, generate storage usage reports, and help optimize costs.
Please note that these steps might vary slightly depending on the updates or changes made to Azure after the time of writing this guide (as of May 2023). For the most up-to-date instructions, always refer to the official Microsoft Azure documentation.
Potential Limitations and Considerations
While soft delete is an excellent feature, it is not a substitute for a comprehensive backup strategy. Businesses should also implement robust backup and restore strategies to ensure they can recover from significant data loss scenarios.
Enhancing Data Protection with Cloud Storage Manager
An Introduction to Cloud Storage Manager
Cloud Storage Manager, a powerful solution for managing Azure Blob Storage, can help businesses effectively manage their data, optimize costs, and enhance security.
The Role of Cloud Storage Manager in Enhancing Azure Blob Storage Soft Delete
By providing unique insights and reporting capabilities, Cloud Storage Manager can help businesses optimize the use of Azure Blob Storage Soft Delete, ensuring data protection while minimizing costs.
The Unique Insights and Reporting Capabilities of Cloud Storage Manager
The unique insights and reporting capabilities of Cloud Storage Manager, such as usage trends and cost analysis, can provide businesses with valuable information to make informed decisions about their data management strategies.
Wrapping Up
Azure Blob Storage, with its features like Soft Delete, offers a robust solution for businesses to prevent unintended data loss. Coupled with effective management tools like Cloud Storage Manager, businesses can ensure optimal data protection in Azure Blob Storage.
Frequently Asked Questions
Q1: What is Azure Blob Storage Soft Delete? Azure Blob Storage Soft Delete is a feature that, when enabled, allows you to recover blobs or blob versions that have been deleted. This serves as a crucial safety net against data loss due to accidental or malicious deletions.
Q2: How does Soft Delete work in Azure Blob Storage? Soft delete works by keeping the deleted data in the system for a specified retention period. During this period, the deleted data can be read or recovered. However, once the retention period is over, the data is permanently deleted.
Q3: How can I enable Soft Delete in Azure Blob Storage? Enabling Soft Delete is straightforward, but it requires careful consideration of the data retention period. This period will depend on your business requirements and potential regulatory obligations.
Q4: Can I retrieve data once it’s been permanently deleted? No, once the retention period is over and the data has been permanently deleted, it can no longer be retrieved. This highlights the importance of carefully setting your retention period when enabling Soft Delete.
Q5: What role does Cloud Storage Manager play in managing Azure Blob Storage?Cloud Storage Manager is a powerful tool for managing Azure Blob Storage. It provides unique insights into your data, offers usage trend reports, and helps optimize costs. Additionally, it can help businesses effectively utilize Azure Blob Storage Soft Delete, ensuring both data protection and cost efficiency.
In conclusion, Azure Blob Storage Soft Delete is an essential feature for any business aiming to protect their data from unintended deletion. Leveraging it with powerful tools like Cloud Storage Manager can significantly enhance data protection and cost-efficiency in Azure Blob Storage. Be sure to explore the various features of Azure Blob Storage and how they can help secure and manage your data. For more information on this topic, you can explore these other resources:
Remember, successful data management requires a comprehensive understanding of available tools and features, strategic planning, and constant vigilance.
Azure Blob Storage is a cloud-based storage solution provided by Microsoft as part of its Azure platform. It enables users to store and manage unstructured data such as text, images, videos, and binary data in the cloud. This makes it a highly scalable and cost-effective way to store large amounts of data without having to worry about hardware maintenance or infrastructure management.
Azure Blob Storage is highly available and durable, with multiple copies of data stored across different locations within a region or even across regions for disaster recovery purposes. It also supports various access tiers, including hot, cool, and archive tiers with different pricing models depending on the frequency of access.
Overview of REST API
REST (Representational State Transfer) API is an architectural style for building web services that are lightweight, flexible, and scalable. It uses HTTP methods such as GET, POST, PUT, DELETE to interact with resources identified by URIs (Uniform Resource Identifiers).
Azure Blob Storage REST API follows the REST architectural style for accessing blobs stored in Azure storage accounts. This means that you can use HTTP methods like PUT to upload data into the blob container or GET to download data from it.
REST APIs have several benefits over traditional APIs. Firstly they offer better scalability since they are stateless and have a simple request/response model.
Secondly they enable developers to build powerful applications using lightweight clients like mobile devices or web browsers. RESTful APIs are also language-agnostic which means that you can use any programming language that supports HTTP requests/response protocols to interact with them.
Benefits of Using Azure Blob Storage REST API
The benefits offered by Azure Blob Storage REST API include:
Scalability: The RESTful architecture ensures your application can scale horizontally without needing additional hardware.
Flexibility: RESTful APIs are flexible and easy to use which makes it easy to integrate Azure blob storage with other applications.
Cost-effective: With Azure Blob Storage, you only pay for what you use, and the pricing tiers allow for cost optimization based on usage patterns.
High Availability: Azure Blob Storage provides multiple copies of data stored across different locations within a region or even across regions for disaster recovery purposes.
Security: The RESTful API provides several security features such as SSL encryption and SAS (Shared Access Signature) tokens to ensure secure access to resources.
Overall, Azure Blob Storage REST API is a powerful tool that enables developers to store, manage and retrieve large amounts of unstructured data in the cloud. Its ease of use, scalability, and flexibility make it an ideal solution for organizations looking to modernize their data storage infrastructure.
Getting Started with Azure Blob Storage REST API
Creating an Azure Storage Account
If you’re new to Azure, the first step in using the Blob Storage REST API is to create a storage account. This can be done through the Azure portal, or programmatically using an Azure SDK. When creating a storage account, you’ll need to choose a unique name and specify the account type (standard or premium).
You’ll also need to choose the replication type, which determines how your data is stored and replicated across multiple locations for redundancy. Once you’ve created your storage account, you can start using it to store data in blob containers.
Obtaining Access Keys for the Storage Account
To access your storage account from code, you’ll need to obtain two access keys – a primary key and a secondary key. These keys are used for authentication when making requests to the Blob Storage REST API.
To obtain these keys, navigate to your storage account in the Azure portal and click on “Access Keys” under “Settings”. From here, you can copy either key and use it in your code.
Understanding the Structure of a Blob Storage URL
In order to interact with blobs in your storage account via REST API calls, you’ll need to understand how URLs are structured. A typical blob URL has four components:
1) The base URL of your storage account (e.g., https://mystorageaccount.blob.core.windows.net)
2) The container name
3) The blob name (optional)
4) Query parameters (optional)
For example: https://mystorageaccount.blob.core.windows.net/mycontainer/myblob?sv=2021-06-01&st=2022-01-01&se=2022-02-01&sr=b&sp=r&w=bf The query parameters are used to specify the shared access signature (SAS) for the blob, which determines the permissions and expiration time for accessing the blob.
Using Azure SDKs
While it’s possible to interact with Blob Storage REST API directly using HTTP calls and JSON payloads, it might be easier to use one of the various Azure SDKs available in multiple programming languages. These SDKs abstract away many of the details of making REST API requests and handling authentication. The Python SDK for Azure is called “azure-storage-blob” and can be installed via pip.
Testing Your Connection
After creating your storage account, obtaining access keys, understanding URL structure, and possibly configuring an SDK, you can test your connection by uploading a file to a container or downloading a blob. It’s important to note that every action against Blob Storage REST API incurs charges – these charges may vary based on storage account type, region etc. So make sure you know what features cost before using them in production!
Uploading and Downloading Data with Azure Blob Storage REST API
Using HTTP PUT method to upload data to a blob container
Uploading data to an Azure Blob Storage container is simple using the REST API. To upload data, authenticate with your storage account using either your account key or a stored access policy.
Once authenticated, you can create a new blob in the container and upload the data using a HTTP PUT request. You must include the content type and content length headers in your request.
To create a new blob, append the blob name to the container URL. The resulting URL is called the destination URL.
Then, issue an HTTP PUT request that includes the content of your blob in the message body of your request. “`http PUT https://myaccount.blob.core.windows.net/mycontainer/myblob Content-Type: text/plain Content-Length: 11 Hello World “`
This example uploads “Hello World” as plain text to a file named “myblob” in “mycontainer”. If successful, this command returns status code 201 (Created).
Using HTTP GET method to download data from a blob container
Downloading blobs from an Azure Blob Storage container is just as easy as uploading them with REST API. You simply issue an HTTP GET request for any given resource within a container by providing its URL.
To download from Azure Blob Storage using REST API, you must first authenticate by providing either your storage account key or one of its access policies on each request made against resources belonging to that storage account. After authenticating against Azure Blob Storage with either of these methods, you can then issue GET requests against URLs pointing to individual blobs within specified containers or even entire containers themselves.
This example retrieves the content of a blob named “myblob” in “mycontainer”. If successful, the response message contains the content of the blob along with its HTTP status code.
Uploading and downloading data is a critical part of Azure Blob Storage REST API. Using HTTP PUT method to upload data to a blob container and using HTTP GET method to download data from a blob container is simple once you understand the specific headers required for each request.
Managing Containers with Azure Blob Storage REST API
Creating and Deleting Containers in Azure Blob Storage REST API
Azure Blob Storage REST API allows developers to create and delete containers using HTTP PUT and DELETE methods, respectively. A container is a logical unit of storage in which blobs are stored. To create a new container, developers can send an HTTP PUT request to the URL of the container they want to create.
The name of the container must be unique within the storage account, and it can only contain alphanumeric characters and hyphens. On successful creation, an HTTP status code of 201 (Created) is returned along with the ETag value for the newly created container.
When deleting containers, developers can remove all blobs within it or delete it outrightly. Using a DELETE request will completely remove this container permanently.
Listing All Containers in Azure Blob Storage REST API
Listing all containers within an Azure storage account is made possible by sending an HTTP GET request to a specific URL that lists them out. To retrieve this list, developers need to include their authentication credentials as part of the URL. The response payload contains information about each listed container like its name, properties like metadata, lease status (if any), etag value among others.
Developers can then use this information to make further changes or obtain more information about each particular container. In addition to listing out all containers within an account, developers also have access to listing out only specific subsets under certain criteria such as those created before or after certain dates or those that match specific prefixes.
Caveats
When creating or deleting containers using Azure Blob Storage REST API, it’s important not just to consider performance optimization but also data integrity when working with large amounts of data across multiple accounts simultaneously. Also remember that while there are no restrictions on how many blobs you may store in one storage account, the number of blobs per container is limited to 5000 and maximum size of a single block blob is 200GB.
Conclusion
Managing containers efficiently and effectively within Azure Blob Storage REST API is essential for good data management. Creating new containers, deleting old ones and listing all containers efficiently can save time, space and contribute to a better organized system.
Working with Blobs in Azure Blob Storage REST API
Uploading, Downloading, and Deleting Blobs
Blobs are the fundamental entities stored in Azure Blob Storage. They can contain any type of data, such as text, images, videos, or binary files. In order to upload a blob to Azure Blob Storage using REST API, you need to use the HTTP PUT method with the following URL format: https://{accountname}.blob.core.windows.net/{containername}/{blobname}.
When uploading a blob, you also need to specify its MIME type and any custom metadata associated with it. To download a blob from Azure Blob Storage using REST API, you need to use the HTTP GET method with the same URL format as for uploading.
You then receive a response that contains the content of the blob in its body. If you want to download part of a blob instead of its entire content, you can specify byte ranges in your GET request by setting the Range header.
Deleting blobs from Azure Blob Storage using REST API is done through an HTTP DELETE request that uses the same URL format as for uploading and downloading. Once deleted, blobs cannot be recovered.
Copying Blobs within or Across Storage Accounts
Copying blobs within or across storage accounts is another useful feature provided by Azure Blob Storage REST API. The basic idea is that you can replicate blobs across different containers or accounts without manually downloading them first. To copy a blob within the same storage account using REST API, you can use either synchronous or asynchronous copy operations.
A synchronous copy operation creates an exact replica of an existing blob at another location within the same storage account. An asynchronous copy operation allows you to copy blobs between containers or accounts asynchronously without blocking other operations.
To copy a blob across different storage accounts using REST API requires a two-step process: – First obtain a Shared Access Signature (SAS) token for the source blob.
– Then use the token to initiate an asynchronous copy operation from the source blob URL to the destination blob URL. Note that when copying blobs across storage accounts, you may incur additional network egress charges and higher latency compared to copying within the same storage account.
Use Case: Uploading Images with Azure Blob Storage REST API
One common use case for Azure Blob Storage REST API is uploading images from a web application. For example, you might want to allow your users to upload profile pictures or other visual content without having to store them on your own server.
To achieve this, you can create a container in your Azure Blob Storage account that is publicly accessible. When a user uploads an image through your web application, you can send a PUT request to the container’s URL with the appropriate headers and body data.
Once uploaded, you can obtain the public URL of the image by concatenating its container name and blob name with https://{accountname}.blob.core.windows.net/. By using Azure Blob Storage REST API for image uploads, you not only reduce storage costs but also improve scalability and reliability of your web application.
Best Practices for Working with Blobs in Azure Blob Storage REST API
When working with blobs in Azure Blob Storage using REST API, there are several best practices that you should follow: – Always use HTTPS instead of HTTP to ensure secure data transmission. – Use SAS tokens instead of Access Keys whenever possible to minimize security risks.
– Avoid hardcoding connection strings or keys in your code; instead use environment variables or other secure configuration methods. – Use asynchronous copy operations when copying large blobs or across different storage accounts.
– Consider using CDN (Content Delivery Network) integration for serving frequently accessed blobs faster and closer to end-users. By following these best practices, you can optimize performance and security while minimizing costs when working with blobs in Azure Blob Storage using REST API.
Securing Access to Azure Blob Storage REST API
Implementing Shared Access Signature (SAS) for Secure Access to Blobs
One of the most important aspects of using the Azure Blob Storage REST API is ensuring that your data is secure. The implementation of Shared Access Signature (SAS) allows you to create a secure and time-limited access to a specific blob or container in your storage account.
To implement SAS, you need to generate a token that includes an expiration time, permissions granted, and cryptographic signature. This token can then be appended as a query string parameter to the URL used for accessing the blob or container.
By using SAS, you are able to grant temporary access with limited permissions, minimizing the risk of unauthorized access or misuse of your data. It is important to note that SAS tokens should always be kept private and only shared with trusted parties.
Configuring CORS Rules for Cross-origin Requests
Another important aspect of securing access to Azure Blob Storage REST API is configuring Cross-Origin Resource Sharing (CORS) rules. CORS enables web applications running on different domains than your storage account’s domain name to make requests against it without restriction. Without proper CORS configuration, web browsers may block requests from other websites attempting to access data in your storage account.
This could result in degraded functionality or security vulnerabilities. To configure CORS rules for cross-origin requests, you must specify which domains are allowed and which HTTP methods are supported.
This can be done through Azure Portal or programmatically through REST API calls. By configuring CORS rules correctly, you enable cross-domain requests while maintaining control over which domains can access your data and what type of requests they can make.
Securing access within any system is an essential factor when dealing with sensitive data storage such as blobs in Azure. By implementing Shared Access Signatures (SAS), you limit access to your blobs based on permissions and time limitations, making sure that only the right people have the necessary permissions.
On the other hand, configuring CORS rules for cross-origin requests ensures that web browsers don’t block requests from other websites attempting to access data in your storage account. With SAS and CORS, you can rest assured that your data is secure and accessible to those who are permitted to use it.
Monitoring and Logging in Azure Blob Storage REST API
Enabling logging for diagnostic purposes
When working with Azure Blob Storage, it’s essential to have a way to monitor the activity happening within your storage account. Enabling logging can help you diagnose errors, track usage, and understand how your application is interacting with blob storage.
To enable logging, you must configure your storage account to send log data to an Azure Storage account or a third-party log analytics tool. Once enabled, logs are created for each storage service API operation that occurs in the account.
These logs contain information such as the timestamp of the operation, the user who initiated it, and any error messages associated with it. You can then use these logs to troubleshoot issues or identify trends in usage.
Monitoring performance metrics using metrics APIs
In addition to logging, Azure Blob Storage also provides metrics APIs that allow you to monitor performance and usage over time. These APIs provide data on various aspects of your storage account’s performance, such as transactions per second (TPS), ingress/egress bandwidth utilization, and availability. To use the metrics APIs, you must first enable them for your storage account.
Once enabled, you can retrieve metric data using REST API calls or by accessing them through Azure Monitor. This data can be used to create custom dashboards or alerts based on specific thresholds.
Conclusion
Monitoring and logging are crucial aspects of managing Azure Blob Storage accounts through REST API calls. By enabling logging and utilizing the metrics APIs available through Azure Monitor, developers gain valuable insight into their application’s usage patterns within blob storage accounts which is critical when identifying bottlenecks that could be causing problems for users running applications on these platforms.
When used together effectively with other tools like SAS for secure access control among others mentioned earlier in this article; monitoring and logging can help ensure that your Azure Blob Storage accounts are performing optimally to deliver reliable, scalable storage solutions. So whether you’re an application developer, a cloud architect, or anyone working with blob storage accounts in Azure, implementing monitoring and logging should be a top priority for managing these services effectively.
Essential Guide to Protecting Your Data: Mastering Azure Blob Storage Backups
The Importance of Azure Blob Storage Backups
Have you ever heard of Azure Blob Storage? If you work with data storage, then chances are you’ve at least heard the name.
But what exactly is it? In simple terms, Azure Blob Storage is a cloud-based storage solution provided by Microsoft.
It’s used to store and manage unstructured data such as text and binary data, including documents, images, videos, and more. Nowadays, more and more companies are taking advantage of cloud-based storage solutions like Azure Blob Storage due to their flexibility and scalability.
Not only does it provide an affordable option for storing massive amounts of data in the cloud, but it also allows for easy access to this data from anywhere in the world. But with great power comes great responsibility- especially when it comes to managing your company’s precious data.
That’s where backups come in – they allow you to recover your files if something goes wrong with your original source files or even if there is an accidental deletion or corruption. Therefore, backing up your Azure Blob Storage should be at the top of your priority list when considering disaster recovery strategies for your business-critical applications that rely on this type of data storage solution.
Without proper backups in place, any loss or corruption of valuable company information stored in Azure Blob Storage could lead to extensive downtime and revenue losses that could take weeks or even months to recover from. In short- backups = peace of mind!
Cloud Storage Manager Main Window
Azure Blob Storage Backup Basics
Explanation of backup options available in Azure Blob Storage
Azure Blob Storage is a cloud-based storage solution that provides secure and scalable data storage for various applications. In order to protect your data stored in Azure Blob Storage, backup solutions are necessary.
There are several backup options available for Azure Blob Storage, including manual backups, automated backups using the Azure portal, and PowerShell commands. Manual backups involve manually copying data stored in Azure Blob Storage to another location such as an external hard drive or another cloud-based storage solution.
This method can be time-consuming and may not be practical for large amounts of data. Automated backups using the Azure portal allow you to schedule regular backups of your data stored in Azure Blob Storage.
This method is easy to set up and can be configured according to your specific needs. The automated backups can also be configured with retention policies that dictate how long the backed-up data will be retained.
PowerShell commands provide a programmatic approach to backing up your data stored in Azure Blob Storage. This method involves writing scripts that automate the backup process and allow for more granular control over the backup settings.
Comparison of different backup options and their benefits
When comparing these different backup options, there are several factors to consider. Manual backups may work well for small amounts of data but become impractical for larger datasets due to increased time requirements and potential human error. Automated backups provide an efficient and practical solution for most users while PowerShell scripting provides advanced functionality, but requires more technical knowledge.
Automated backups offer greater efficiency as they automatically create periodic scheduled snapshots of one’s blob container(s). With this feature enabled any changes made since the last snapshot will be safe-guarded by creating versioned copies without any manual intervention needed from you, thus freeing up valuable time.
PowerShell scripting allows users granular control over their automated backup solutions and allows for the creation of complex backup schedules and retention policies. This method is ideal for advanced users who require highly customized backup solutions.
Azure Blob Storage offers several backup options to choose from depending on your specific use case needs. Automated backups are a great place to start as they provide the greatest efficiency with the least amount of management.
PowerShell scripting provides the most customization for advanced users who prefer greater control over their backups. Ultimately, it is important to ensure that your data stored in Azure Blob Storage is regularly backed up in order to safeguard against data loss or corruption.
Setting up Azure Blob Storage Backups
Step-by-step Guide on How to Set Up Backups for Azure Blob Storage
Setting up backups for Azure Blob Storage can be done using either the Azure portal or PowerShell commands. In this guide, we will focus on using the Azure portal to set up backups.
To get started, log in to your Azure account and navigate to the storage account that you want to configure backups for. From there, select the “Backup” option under the “Data management” section of the menu.
Next, you will need to create a new backup policy. This policy will determine how often your data is backed up and how long these backups are retained for.
Select “Create” and then enter a name for your backup policy. Once you have created your backup policy, you can begin configuring your backup schedule and retention policies.
You can choose how often backups occur (daily, weekly or monthly) and what time of day they occur. You can also determine how long backups should be stored before they are automatically deleted.
Select which containers within your storage account should be included in the backup process. Once you have made all of these selections, click “Enable Backup” to activate your new backup policy.
Tips for Configuring Backup Schedules and Retention Policies
When setting up backup schedules and retention policies, there are a few things that you should consider:
– Determine how often data changes: If data within your storage account changes frequently, it may be necessary to set up more frequent backups.
– Decide on retention period: Consider compliance regulations or company policies when deciding on retention periods; ensure are not saving data more than needed.
– Monitor usage of resources by verifying performance during specific times of day
– Regularly verify that backups are working correctly
– Use test restores regularly
It is important to periodically review your backup policies to ensure that they are still meeting your needs and adjusting for any changes. By following these tips, you can ensure that your Azure Blob Storage backups are set up in a way that meets your needs while minimizing costs.
Cloud Storage Manager Charts Tab
Best Practices for Azure Blob Storage Backups
Recommendations for Ensuring Successful Backups
Backing up data stored in Azure Blob Storage is crucial for data protection and recovery. To ensure successful backups, it is essential to monitor backup status regularly.
Monitoring backups can help detect issues that may arise during the backup process and help you take necessary actions to resolve them promptly. You can monitor backup status using Azure Monitor, which provides a centralized dashboard that shows the latest backup status and alerts you if any issues are detected.
Additionally, setting up email notifications can keep you informed of any changes in the backup status. Verifying backups regularly is another important best practice that ensures data integrity.
Regularly verifying backups helps identify corrupted or incomplete backups and enables quick remediation before it’s too late. You can verify backups by restoring a few files from the backed-up data and comparing them with the original data.
Tips for Optimizing Backup Performance
Optimizing backup performance is essential to ensure that backups complete on time while minimizing costs. One way to optimize performance is by leveraging incremental backups, which only back up new or changed data since the last backup operation. This approach saves storage space and reduces backup times significantly.
Another way to optimize performance is by using parallelism when backing up large volumes of data. Parallelism enables multiple threads to perform simultaneous operations, reducing overall processing time significantly.
Compressing backed-up data also helps optimize performance by reducing storage requirements while minimizing network traffic during transmission. However, compression increases CPU usage, so it’s essential to find a balance between storage savings and CPU usage when compressing data.
Tips for Minimizing Costs
Azure Blob Storage offers several cost-saving options that organizations can leverage when backing up their data. One of these options includes defining retention policies that automatically delete old versions of backed-up files. This approach helps reduce storage costs by eliminating unnecessary data.
Another way to minimize costs is by leveraging geo-redundancy, which replicates backups across multiple regions automatically. Geo-redundancy protects against data loss due to regional disasters and ensures that backups are readily available when needed.
Backing up data during off-peak hours can help lower costs significantly. Azure Blob Storage offers lower pricing during off-peak hours, enabling organizations to back up their data at a reduced cost without compromising performance or reliability.
Adopting best practices for Azure Blob Storage backups is essential to ensure successful backups while minimizing costs and optimizing performance. By monitoring backup status regularly, verifying backups regularly, optimizing backup performance and minimizing costs, organizations can protect their valuable data effectively and ensure business continuity in case of disasters or disruptions.
Cloud Storage Manager, allows you to see how much data you are consuming, per storage account, container and subscription. See where you can save money on your Azure Storage.
Cloud Storage Manager Reports Tab
Advanced Features for Azure Blob Storage Backups
Incremental Backups: The Next Step in Backup Efficiency
Azure Blob Storage offers incremental backups, a feature that allows for more efficient use of storage space and faster backup times. Incremental backups only copy the changes made since the last backup, rather than creating a full backup each time.
This means that, after the initial full backup, subsequent backups will take up much less space and be completed much faster. The benefits of incremental backups are clear: they save space on your storage account and reduce the time it takes to complete a backup.
Additionally, because less data is being transferred during each backup operation, overall network traffic is reduced. Incremental backups are ideal for large datasets that do not change frequently but still require regular backups.
Geo-Redundancy: Protecting Data from Local Disasters
Geo-redundancy is an advanced feature of Azure Blob Storage that allows you to create multiple copies of your data across different geographic regions. By replicating your data across different regions, you can ensure that it remains accessible even if one region experiences an outage or disaster.
The benefits of geo-redundancy are clear: it provides an additional layer of protection against natural disasters or other events that could cause data loss. Additionally, because your data is replicated across multiple regions, you can choose which region to access based on factors such as latency or cost.
Cross-Region Replication: Ensuring Data Availability Around the World
Cross-region replication is another advanced feature offered by Azure Blob Storage. With cross-region replication, you can replicate your data to different regions around the world. This ensures that your data remains available to users in different parts of the world with low latency.
The benefits of cross-region replication are clear: it ensures that your data is available to users in different regions around the world with low latency. Additionally, because your data is replicated in multiple regions, you can choose which region to access based on factors such as latency or cost.
Use Cases for Advanced Azure Blob Storage Backup Features
The advanced features of Azure Blob Storage backup have many use cases across a variety of industries. For example, incremental backups are ideal for large datasets that do not change frequently but still require regular backups. Companies with globally distributed user bases will benefit from cross-region replication and geo-redundancy as these features ensure that data remains accessible to users around the world.
In addition, companies that require high levels of regulatory compliance will benefit from advanced backup features. For example, geo-redundancy can help companies meet strict data residency requirements by ensuring that data is stored within specific geographic regions.
Overall, the advanced features available for Azure Blob Storage backups provide an extra layer of protection and efficiency for your organization’s critical data. By leveraging these features, you can ensure that your data remains safe and accessible at all times.
Overview of Common Issues that May Arise During the Backup Process
Backing up data in Azure Blob Storage is important, but it does not always go as planned. Some common issues that users encounter during the backup process include configuration errors, issues with connectivity or permissions, and problems with the backup software itself. Configuration errors can result in backups not being performed correctly or data being lost.
Connectivity or permission issues can cause backups to fail completely or result in incomplete backups. Another common issue is encountering an error message when trying to perform a backup.
Error messages can be cryptic and hard to understand, making troubleshooting difficult. However, these messages often provide important clues about what went wrong and how to fix it.
Users may run into problems when trying to restore from a backup. If the backup was not performed correctly, restoring from it may cause data loss or corruption.
Troubleshooting Tips to Resolve These Issues
To troubleshoot common issues during the backup process for Azure Blob Storage, there are several steps that users can take:
1. Check the configuration settings for backups and ensure they are correct.
2. Verify connectivity and permissions for both source data and target storage account.
3. Review error messages carefully for clues on what went wrong.
4. Use diagnostic tools such as Azure Storage Explorer or PowerShell commands to identify potential problems.
5. Test restores regularly to ensure backups are working correctly.
If these steps do not resolve the issue, reaching out to Microsoft support may be necessary for further assistance. It is also important to regularly review backup policies and schedules to ensure they meet changing business needs and comply with any regulatory requirements.
The Importance of Regular Monitoring
Monitoring should be an essential part of any Azure Blob Storage backup strategy because it helps identify potential issues before they become major problems. Regularly monitoring backup status and verifying backups can help ensure data is being backed up correctly and that it is recoverable in case of a disaster.
Users can set up alerts to notify them when backups have failed or when backup storage capacity is running low. This proactive approach helps prevent data loss and minimize downtime in case of a disaster.
The Benefits of Partnering with a Managed Service Provider
Partnering with a managed service provider (MSP) can provide benefits for companies that use Azure Blob Storage for data storage. MSPs offer expertise and support for backup solutions, helping prevent common issues from occurring and ensuring reliable backups are performed on schedule.
MSPs can also provide guidance on the best practices for configuring backups, testing restores, and monitoring backup status. By partnering with an MSP, companies can focus on their core business operations while relying on the expertise of professionals to handle their Azure Blob Storage backups.
Conclusion
Backing up data stored in Azure Blob Storage is of utmost importance. With the various backup options available, it is easy to set up a reliable backup system that ensures your data is always safe and secure.
In this article, we have covered the basics of Azure Blob Storage backups including available backup options, how to set up backups and best practices for successful backups. We have also explored advanced features such as incremental backups, geo-redundancy and cross-region replication.
These features allow for better redundancy and disaster recovery planning. It’s important to note that while these features do come at an additional cost, they are worth it for businesses that rely heavily on their data.
Common issues with backups were also discussed along with troubleshooting tips. By being proactive in monitoring the status of your backups and verifying them regularly, you can avoid potential issues and ensure that your data is always recoverable.
Recap of Key Takeaways
Azure Blob Storage provides various backup options including Full Backups, Incremental Backups, Geo-Redundant Backups and Cross-Region Replication
Setting up a backup system in Azure Blob Storage can be done easily using either the portal or PowerShell commands
The key to successful backups is being proactive by monitoring status regularly and verifying them often
Advanced features such as incremental backups, geo-redundancy and cross-region replication offer more redundancy options but come at an additional cost
Final Thoughts on the Importance of Backing Up Data Stored in Azure Blob Storage
In today’s digital world where data loss can result in serious consequences for businesses or individuals alike; backing up your data has become increasingly important. Failure to create backups can lead to data loss, which can be catastrophic for businesses especially in industries that rely heavily on data. By using Azure Blob Storage Backup solutions, you are able to ensure that your data is always available when you need it.
With simple and easy-to-use backup options available, setting up a backup system is not only simple but necessary. Overall, backing up your data in Azure Blob Storage should be a top priority.
It is best practice for any organization or individual using cloud storage to have reliable backups in place at all times. Whether it’s basic backups or advanced features such as incremental backups and cross-region replication, the benefits of having a backup system far outweigh the costs involved.