by Mark | May 17, 2023 | Azure, Azure Blobs, Cloud Storage, Storage Accounts
Azure Service Principals – The Key to Managing Your Azure Resources
Azure Service Principals are a crucial aspect of managing your Azure resources. They provide a secure and efficient way to manage your resources, without the need for human intervention.
In this article, we will explore what Azure Service Principals are, how they work, and why they are important. As you may already know, Azure is a cloud computing platform that allows you to host, deploy and manage your applications and services.
With its vast range of features and capabilities, it can be challenging to manage all of your resources effectively. This is where Azure Service Principals come in.
Azure Service Principals allow you to create and assign roles to an identity that can be used by applications or services that need access to specific resources in your Azure environment. This provides a secure way for these applications or services to access the resources they need while keeping them separate from end-users.
The Importance of Managing Your Azure Resources
Managing your Azure resources can be challenging as there are so many things to keep track of. You need to ensure that everything runs smoothly without any downtime or glitches affecting your end-users’ experience. And you need to protect against cyber threats such as unauthorized access or data breaches.
One way you can do this is by using role-based access control (RBAC). RBAC helps you specify what actions users or groups can perform on specific resources within the scope of their assigned roles.
By using RBAC with Service Principals, you can ensure that only authorized requests have access to critical data. Another advantage of using an Azure Service Principal is scalability – it allows multiple applications or services with varying degrees of access privileges to interact with the same resource securely and efficiently without conflicting with each other’s permissions.
How An Azure Service Principal Works
An azure service principal is essentially an identity created within your Azure Active Directory. It is similar to a user account but is used specifically for applications or services that need to access specific resources within the Azure environment.
So, how does it work? Let’s say you have an application that needs to access a database located in your Azure environment.
You create an Azure Service Principal and assign it the necessary roles and permissions required to access this database. The application can use this service principal’s credentials when connecting to the database securely.
These credentials can be configured with different authentication methods such as certificates or passwords, depending on your security requirements. Additionally, you can customize your service principal further by configuring its expiration date, adding owners or contributors, and applying additional policies and permissions.
Why Use An Azure Service Principal?
Using an Azure Service Principal provides several benefits for managing your Azure resources effectively. For one, it allows you to separate identity from applications or services that require access to resources – reducing risks of unauthorized access by end-users. Service principals also enable efficient delegation of permissions across different roles and allow for centralised management of resource access privileges.
By creating multiple service principals with varying degrees of permissions – you can grant project teams granular control over their own applications/resources without compromising overall data security. Overall: In summary, using an azure service principal as part of RBAC ensures secure management of all elements in your azure environment; thus helping prevent cyber-attacks while improving operational efficiency through streamlined resource management.
What are Azure Service Principals?
Azure Service Principals are an important part of managing Azure resources. They are essentially security objects that allow for non-human, automated tasks to be performed in Azure. In simpler terms, they provide a way for programs and applications to authenticate themselves when interacting with Azure resources.
When it comes to identities in Azure, there are three main types: user accounts, service accounts, and service principals. User accounts are what you or I use to login and interact with the portal.
Service accounts are used for applications that need access to resources but don’t require permissions beyond what is needed to perform their specific task. Service principals, on the other hand, can be thought of as a more specific type of service account – they represent an application or service rather than a user.
Service principals have a unique identifier called an Object ID which can be used to refer to them when assigning roles or permissions within Azure. They can be assigned roles just like users or groups can be – but because they aren’t tied to any one person’s account, they provide a more secure way for programs and applications to interact with resources.
Comparison to other types of identities in Azure
So how do service principals compare to user and service accounts? User accounts have their own set of login credentials and permissions associated with them; they’re meant for interacting with Azure manually through the portal or command line tools like PowerShell.
Meanwhile, service accounts are similar but intended for use by non-human entities such as application pools in IIS. Service principals bridge the gap between these two types by allowing programs and applications authenticating themselves using OAuth 2.0 protocol instead of manually entering credentials each time they need access.
This makes them ideal for scenarios where automation is required – such as CI/CD pipelines where code needs access permission too often without human intervention. Overall Azure Service Principals provide an essential way for non-human entities to interact with Azure resources without compromising on security.
Creating an Azure Service Principal
Azure Service Principal is a type of identity that allows you to manage Azure resources programmatically. It is widely used in automation scripts and applications because it provides secure and fine-grained access to resources. Creating an Azure Service Principal is a straightforward process that involves a few steps.
Step-by-step guide on how to create an Azure Service Principal
There are different ways to create an Azure Service Principal, but the easiest and most common method is using the Azure portal. Here are the steps:
1. Sign in to the Azure portal.
2. Navigate to your subscription and select “Access control (IAM)” from the menu.
3. Click on “Add” and select “Add role assignment” from the dropdown menu.
4. In the “Add role assignment” blade, select a role that you want to assign to your service principal, for example, “Contributor”. You can also create custom roles if needed.
5. In the “Assign access to” section, select “Azure AD user, group or service principal”. 6. Click on “Select” and then click on “Create new”.
Explanation of different authentication methods available
When creating an Azure Service Principal, you have two options for authentication: password-based authentication and certificate-based authentication. Password-based authentication involves creating a client secret which is essentially a password that you use with your application or automation script to authenticate with the service principal. This method is simple and easy but it requires managing passwords which can be challenging at scale.
Certificate-based authentication involves creating a self-signed certificate which is used by your application or automation script as a credential for authenticating with the service principal. This method offers higher security than password-based authentication because certificates can be revoked easily if needed.
In general, certificate-based authentication is recommended for applications that run in secure environments because it provides a higher level of protection. However, password-based authentication is still commonly used in many scenarios because it is easier to manage and implement.
Creating an Azure Service Principal is an easy and important step for managing Azure resources programmatically. By following the above steps and choosing the appropriate authentication method, you can create a secure and scalable identity that provides fine-grained access to your resources.
Assigning Roles to an Azure Service Principal
Azure Service Principals are a powerful tool for managing Azure resources, allowing you to automate the management of your resources without having to manually configure each resource individually. To properly manage your resources with a Service Principal, you need to assign it the appropriate roles. In this section, we’ll take a look at how roles work in Azure and how you can assign them to an Azure Service Principal.
How Roles Work in Azure
In Azure, roles are used to determine what actions users (or identities like service principals) can perform on specific resources. There are several built-in roles that come with different levels of access, ranging from read-only access to full control over the resource.
You can also create custom roles if none of the built-in ones meet your needs. When assigning a role to an identity such as a Service Principal, you will need to specify the scope at which the role should be assigned.
This scope determines which resources the identity has permission for. For example, if you assign a role at the subscription level, then that identity will have that role for all resources within that subscription.
Why Roles Are Important for Managing Resources
Roles are important for managing resources because they provide a way to control who has access and what level of access they have. By assigning appropriate roles to identities like service principals, you can ensure that only authorized individuals or applications have access and can perform actions on those resources.
Without proper role-based access control (RBAC), it becomes difficult and time-consuming to manage permissions for multiple users and identities across multiple resources. Additionally, RBAC helps with compliance requirements by ensuring only authorized personnel have access.
Guide on How to Assign Roles
Assigning roles is relatively simple once you understand how they work and why they are important. To assign a role:
1. Navigate to the Azure portal and open the resource group or resource you want to assign a role to.
2. Click on the “Access control (IAM)” tab on the left-hand side.
3. Click on the “+ Add” button and select “Add role assignment.”
4. Select the role you want to assign from the list of built-in roles or create a custom one. 5. Select your identity, in this case, your Azure Service Principal, and click “Save.”
That’s it! Your Azure Service Principal now has the appropriate role assigned to it for that resource.
Assigning roles is crucial for managing resources in Azure effectively and securely. Understanding how roles work, why they are important, and how to assign them is key to properly using Azure Service Principals for automation and management of resources.
Using an Azure Service Principal with APIs and Applications
The Role of Azure Service Principals in API and Application Authentication
Azure Service Principals provide a secure way to authenticate applications and APIs with Azure resources. By leveraging the OAuth 2.0 protocol for authentication, applications can be authorized to access specific resources in Azure without the need for user credentials or manual intervention.
To use an Azure Service Principal for authentication, you’ll need to create it first. Once created, you can obtain the necessary credentials (client ID, secret, and tenant ID) and use them in your application code to securely access your resources.
Scenarios where Using an Azure Service Principal is Useful
Using an Azure Service Principal with APIs and applications is ideal when you have a multi-tier architecture that requires secure communication between different tiers. For example, consider a web application that needs to communicate with a backend API hosted on Azure Functions or App Service. In this scenario, using an Azure Service Principal allows the web application to securely authenticate with the backend API without exposing any user credentials or relying on manual authentication.
Another common scenario where using an Azure Service Principal is useful is when you’re building automation scripts that need access to different resources in your subscription. By creating a service principal with specific role assignments (e.g., Contributor), your script can automatically access those resources without requiring any human intervention.
Implementing Authentication Using an Azure Service Principal
Implementing authentication using an Azure Service Principal involves obtaining the necessary credentials (client ID, secret, and tenant ID) from your service principal record in the portal or through PowerShell/CLI commands. Once you have these credentials, you can use them in your application code by passing them as parameters during runtime.
Here’s some sample C# code that demonstrates how this works:
var credential = new ClientCredential(clientId, clientSecret); var context = new AuthenticationContext(“https://login.windows.net/” + tenantId);
var result = await context.AcquireTokenAsync(“https://management.azure.com/”, credential); string accessToken = result.AccessToken;
This code obtains an access token using the acquired credentials and the Azure AD OAuth 2.0 authentication endpoint. The acquired access token can then be used to communicate with Azure resources that require authentication.
Best Practices for Using an Azure Service Principal with APIs and Applications
Here are some best practices to follow when using an Azure Service Principal for application and API authentication:
– Avoid hardcoding service principal credentials in your code. Instead, use environment variables or a secure configuration store to manage your secrets.
– Limit the scope of each service principal by assigning only the necessary role assignments based on the required permissions.
– Use RBAC auditing to monitor role assignments on your resources and identify any unauthorized changes.
– Rotate service principal secrets regularly to improve security posture and reduce risk of compromise. By following these best practices, you can ensure that your applications and APIs are securely communicating with Azure resources without exposing any unnecessary risks or vulnerabilities.
Best Practices for Managing Azure Service Principals
Tips on how to secure and manage your service principals effectively
When it comes to managing Azure Service Principals, there are several best practices that you can follow to ensure that they are secure and managed effectively. First and foremost, it’s important to limit the number of service principals that you create. Each service principal represents a potential entry point into your system, so creating too many can be risky.
Make sure you only create the ones you really need and delete any unused ones. Secondly, it’s important to keep track of who has access to your service principals.
This means keeping a log of all the users who have access to each one, as well as regularly reviewing the list of users with access to make sure it is up-to-date. You should also revoke access for anyone who no longer needs it.
Be sure to use strong passwords or keys for your service principals and change them regularly. This will help prevent unauthorized access and keep your system secure.
Discussion on common mistakes to avoid
There are several common mistakes that people make when managing Azure Service Principals. One is creating too many service principals, as mentioned earlier.
Another mistake is granting too many permissions to a single service principal. When this happens, if someone gains unauthorized access they will have broad control over the resources associated with that principal.
Another common mistake is not monitoring activity associated with a particular service principal closely enough. This can lead to security issues going unnoticed until it’s too late.
Failing to revoke unnecessary permissions or deleting unused service principals can also create security vulnerabilities in your system. It’s important for those who manage Azure Service Principals to be aware of these common mistakes so they can avoid them and keep their systems secure.
Conclusion
Azure Service Principals are a powerful tool for managing and securing your Azure resources. They allow you to grant specific permissions to applications and APIs without having to rely on user accounts, which can be a security risk. Creating an Azure Service Principal is straightforward, but it’s important to follow best practices for managing them.
Assigning roles to service principals is critical for ensuring that they have access only to the resources they need. When using service principals with APIs and applications, it’s essential that you choose the appropriate authentication method.
While client secrets are the most common method, they can pose a security risk if not managed properly. To ensure the security of your Azure resources, it’s important to follow best practices when managing your service principals.
For example, make sure that you keep client secrets secure and rotate them regularly. Additionally, monitor your applications and APIs closely for any unusual activity.
Overall, Azure Service Principals are an essential component of any organization’s cloud security strategy. By following best practices when creating and managing them, you can ensure that your Azure resources remain secure while still allowing your applications and APIs to access them as needed.
by Mark | May 16, 2023 | Azure, Azure Blobs, Cloud Storage, Cloud Storage Manager, Storage Accounts
A Comprehensive Guide to Faster, Scalable, and Reliable Storage
Introduction
Are you tired of sluggish load times when uploading or downloading large files? Do you need a reliable and scalable storage solution for your business or personal use?
Look no further than Premium Block Blob Accounts! In this article, we’ll explore what these accounts are and why they’re essential for anyone dealing with large amounts of data.
Definition of Premium Block Blob Accounts
Before diving into the benefits of a Premium Block Blob Account, let’s define what it is. Essentially, it’s a type of storage account offered by Microsoft Azure that allows users to store and manage large unstructured data such as videos, images, audio files, backups, and static websites through block blobs.
Block blobs are used to store massive chunks of data in individual blocks that can be managed independently. When a file is uploaded to a block blob container, the file is split into blocks and uploaded in parallel to maximize upload speeds.
Importance of Using Premium Block Blob Accounts
Now that we’ve defined what Premium Block Blob Accounts are let’s dive into why they’re important. First and foremost, they offer faster upload and download speeds than regular block blob accounts because they use Solid-State Drives (SSDs) instead of Hard Disk Drives (HDDs). This results in improved performance when accessing frequently accessed files or hosting high traffic websites.
Additionally, premium block blob accounts offer higher scalability limits than standard block blob accounts which means more space for your data as needed. Premium block blob accounts offer improved reliability and availability making them ideal for storing critical data such as backups or media files.
With built-in redundancy features like geo-replication across regions and automatic failover options within the same region if one server goes down makes sure there’s never any downtime for your business. Premium Block Blob Accounts are an essential type of storage account that every business or individual dealing with large amounts of data should consider.
With faster speeds, higher scalability and performance, improved reliability and availability – what more could you ask for? Stay tuned to learn more about the benefits, use cases, and how to set up a Premium Block Blob Account.
Benefits of Using Premium Block Blob Accounts
Faster Upload and Download Speeds
When it comes to storing large files such as high-definition videos or large datasets, every second counts. Traditional storage options can be painfully slow when uploading or downloading large amounts of data.
However, with Premium Block Blob Accounts, you can expect lightning-fast speeds that will save you time and frustration. For example, with a Premium Block Blob Account, you can upload and download terabytes of data in a matter of hours rather than days.
Higher Scalability and Performance
One of the most significant benefits of using a Premium Block Blob Account is the ability to scale storage quickly without sacrificing performance. With traditional storage methods, scaling up often leads to reduced performance, which can cause delays and other issues. However, with Premium Block Blob Accounts, you can add or remove capacity as needed while maintaining fast access times.
In addition, as your storage needs grow over time, the system automatically adjusts to meet your demands without any manual intervention required on your end. This means you won’t have to worry about downtime or other disruptions when scaling up your storage capacity.
Improved Reliability and Availability
Another significant benefit of using Premium Block Blob Accounts is increased reliability and availability. With traditional storage methods such as hard drives or external drives, there is always a risk that something could go wrong – whether due to hardware failure or human error.
However, with a Premium Block Blob Account hosted on Microsoft Azure’s global network infrastructure backed by SLAs (service level agreements), you can be confident that your data will always be available when you need it most. Azure provides 99.9% availability for all services including block blob accounts which means even during an outage somewhere else in the world; your content remains globally available via caching points located around the world.
Cost-Effectiveness And Flexible Pricing
Using a Premium Block Blob Account is also cost-effective. You only pay for the storage you use, so there’s no need to worry about overprovisioning or wasting money on unused storage. Additionally, If you are storing less than 100TB of data and can tolerate slightly longer access times, you may opt for a premium tier such as Hot or Cool which offers up to 64TB of storage and other benefits.
Premium Block Blob Accounts offer faster upload and download speeds, higher scalability and performance, improved reliability and availability compared to traditional storage options. With flexible pricing options that only require payment for what you use, it is easy to see why businesses big and small are adopting this cloud-based technology.
Use Cases for Premium Block Blob Accounts
Storing Large Media Files such as Videos, Images, and Audio Files
When it comes to storing media files such as videos, images, and audio files, a Premium Block Blob Account is an excellent choice. Traditional storage solutions often have restrictions on file size or limit the amount of data that can be transferred at once.
With Premium Block Blob Accounts, there are no such limitations. You can upload and download large media files quickly and effortlessly.
Another advantage of storing large media files in a Premium Block Blob Account is the ability to access them from anywhere in the world. This means you can easily share your media with others without having to physically transfer bulky files.
Backing up Critical Data for Disaster Recovery Purposes
Disasters can strike at any time, which is why it’s essential to have backups of your critical data. A Premium Block Blob Account is a reliable option for backing up important information because it provides excellent durability and availability. The process of backing up data in a Premium Block Blob Account is straightforward and secure.
You can automate backups using Azure’s built-in tools or use third-party backup solutions that integrate seamlessly with Azure. In the event of a disaster or system failure, you can restore your data quickly from your Premium Block Blob Account without worrying about losing valuable information.
Hosting Static Websites with High Traffic Volume
If you’re looking for an affordable way to host a static website with high traffic volume, then a Premium Block Blob Account should be at the top of your list. Unlike traditional web hosting solutions that require expensive servers and ongoing maintenance costs, hosting your site on Azure’s cloud-based infrastructure provides scalable performance without breaking the bank. With features like automatic load balancing and content delivery networks (CDNs), static websites hosted on Premium Block Blob Accounts load quickly from anywhere in the world.
You can also take advantage of Azure’s built-in security features such as SSL certificates and role-based access control to keep your website secure. Overall, hosting a static website on a Premium Block Blob Account is an excellent choice for small businesses or individuals who want to create a strong online presence without spending a fortune.
Conclusion
Premium Block Blob Accounts are an excellent option for anyone looking for reliable and scalable storage solutions. Whether you’re storing large media files, backing up critical data, or hosting a static website with high traffic volume, Premium Block Blob Accounts offer numerous benefits that traditional storage solutions cannot match.
Remember to monitor your usage and performance metrics regularly and implement security measures such as encryption at rest and in transit to keep your data safe. With best practices in place, you can enjoy all the advantages of this powerful storage solution while keeping your data secure.
Monitor your Azure Storage Consumption

Use Cloud Storage Manager to monitor and see how much Azure Storage you are consuming, whether its across one subscription or multiple.
With Cloud Storage Manager you can;
- 🔍 Cloud Storage Manager is a tool for Azure users to gain insights into their storage consumption.
- 🗺️ It provides a world map of Azure locations and an overview of storage consumption.
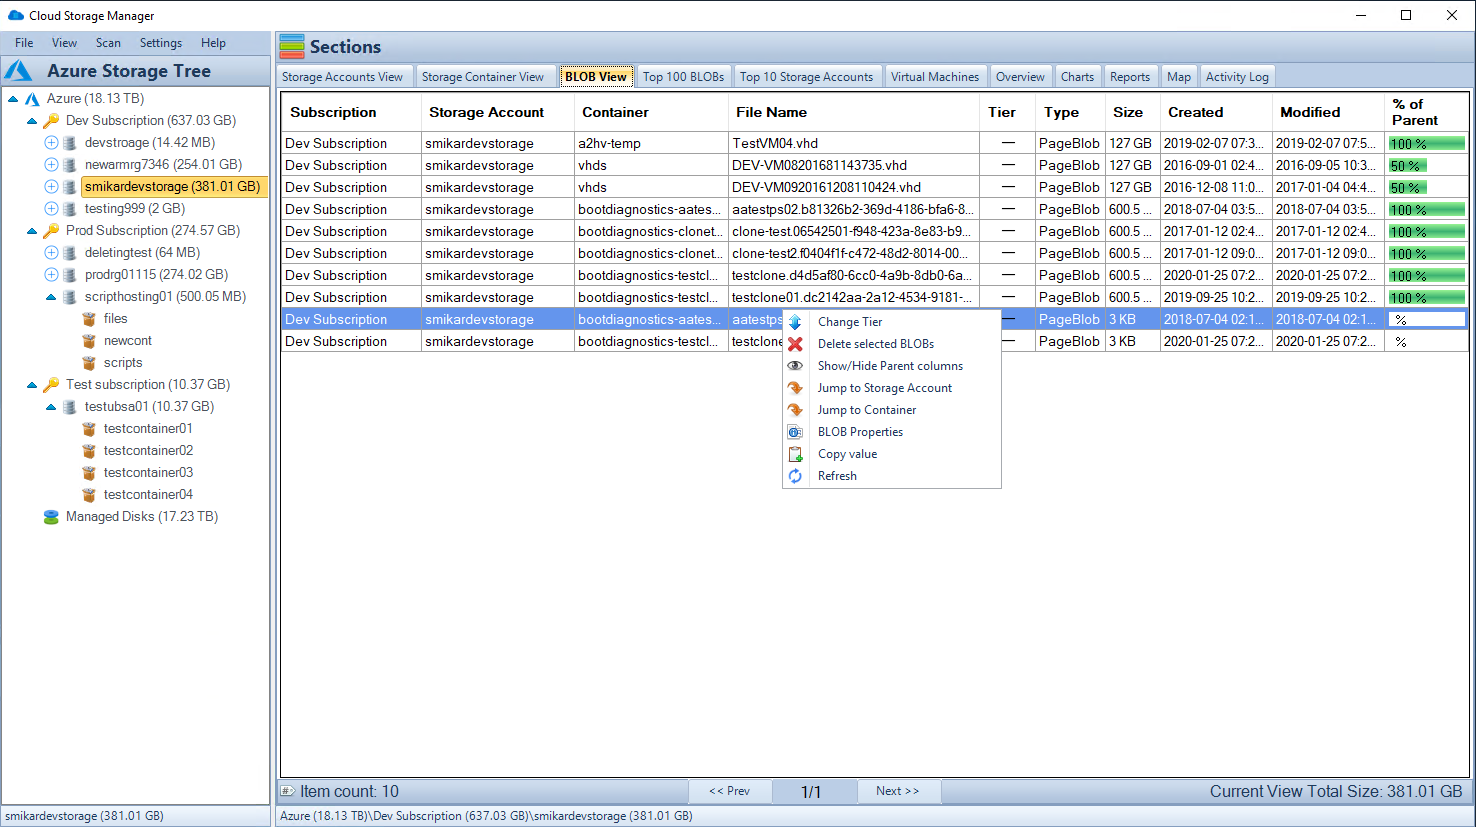
- 📁 The tool allows users to view and manage storage accounts, containers, and blobs.
- 📋 The File Menu enables search, viewing log files, compressing the database, and exiting the manager.
- 👀 The View Menu allows expanding and collapsing details in the Azure Storage Tree, refreshing the view, and rebuilding the tree.
- 🔄 The Scan Menu enables scanning the entire Azure environment or selected subscriptions, storage accounts, containers, or virtual machines.
- ⚙️ The Settings Menu allows configuring Azure credentials and scheduling automatic scans.
- ❓ The Help Menu provides options for registration, information about the version, and purchasing different editions.
- 🌳 The Azure Storage Tree allows browsing Azure subscriptions, storage accounts, and containers, with right-click options for scanning, refreshing, and creating new storage containers.
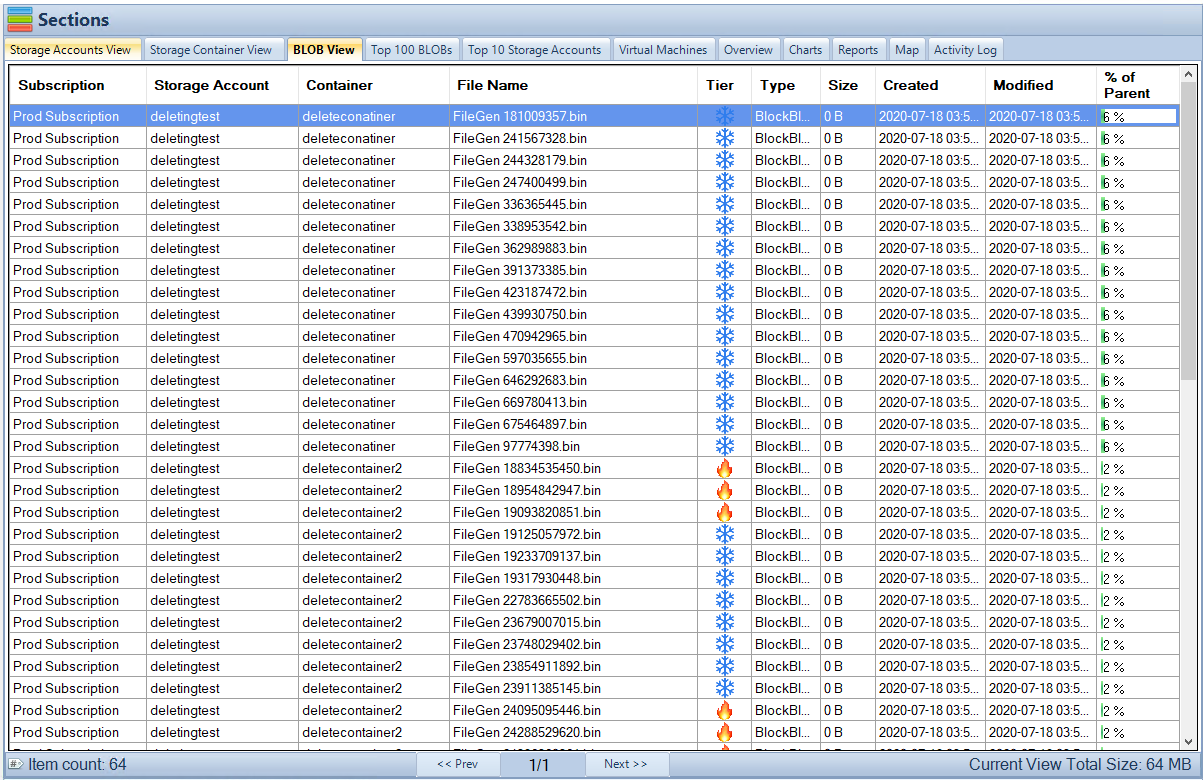
- 📊 Different tabs provide detailed information about storage accounts, containers, blobs, and virtual machines, including their attributes, sizes, and creation/modification dates.
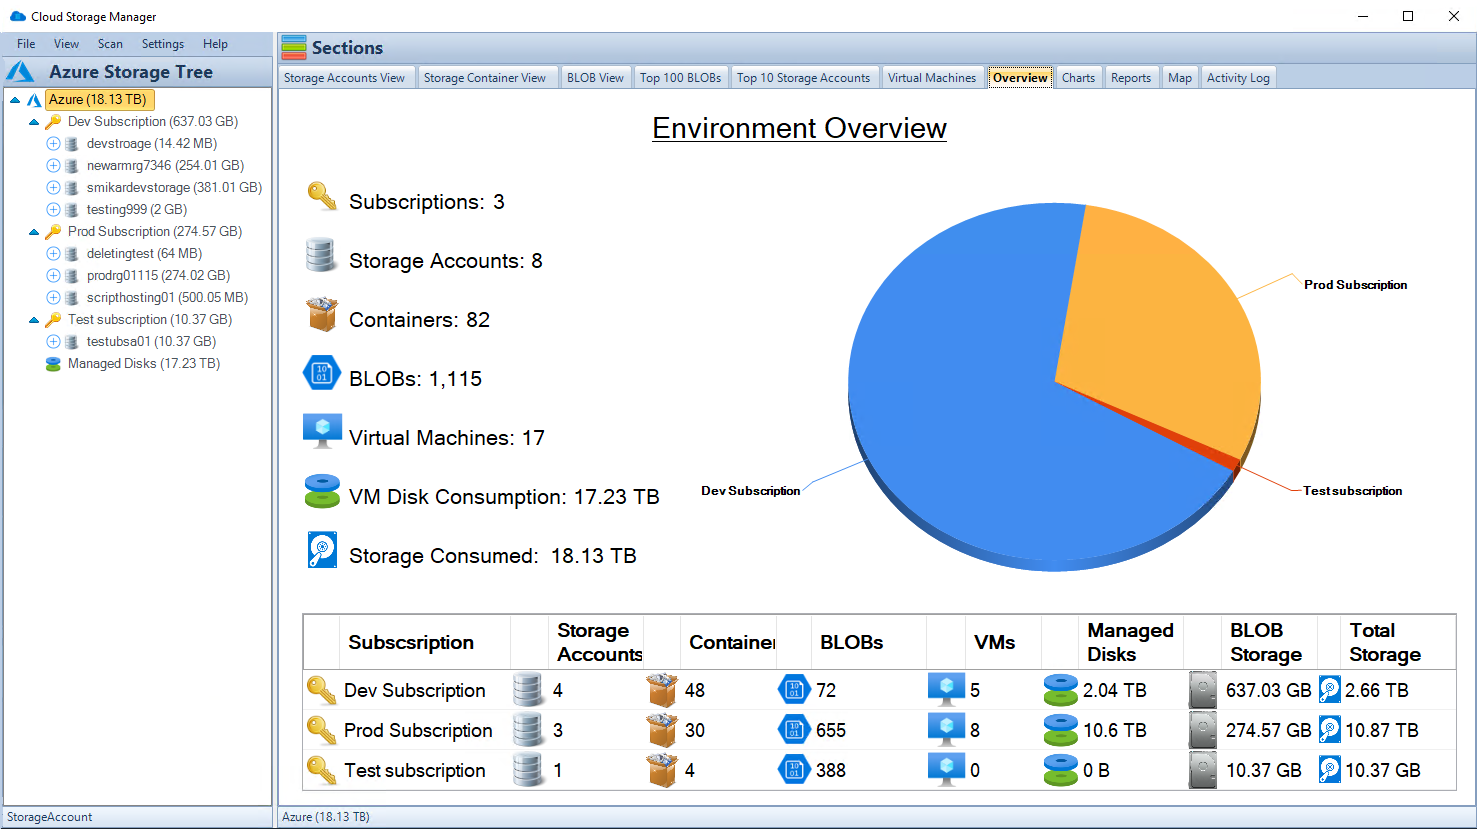
- 📈 The Overview tab shows a summary of Azure storage usage, broken down by subscription.
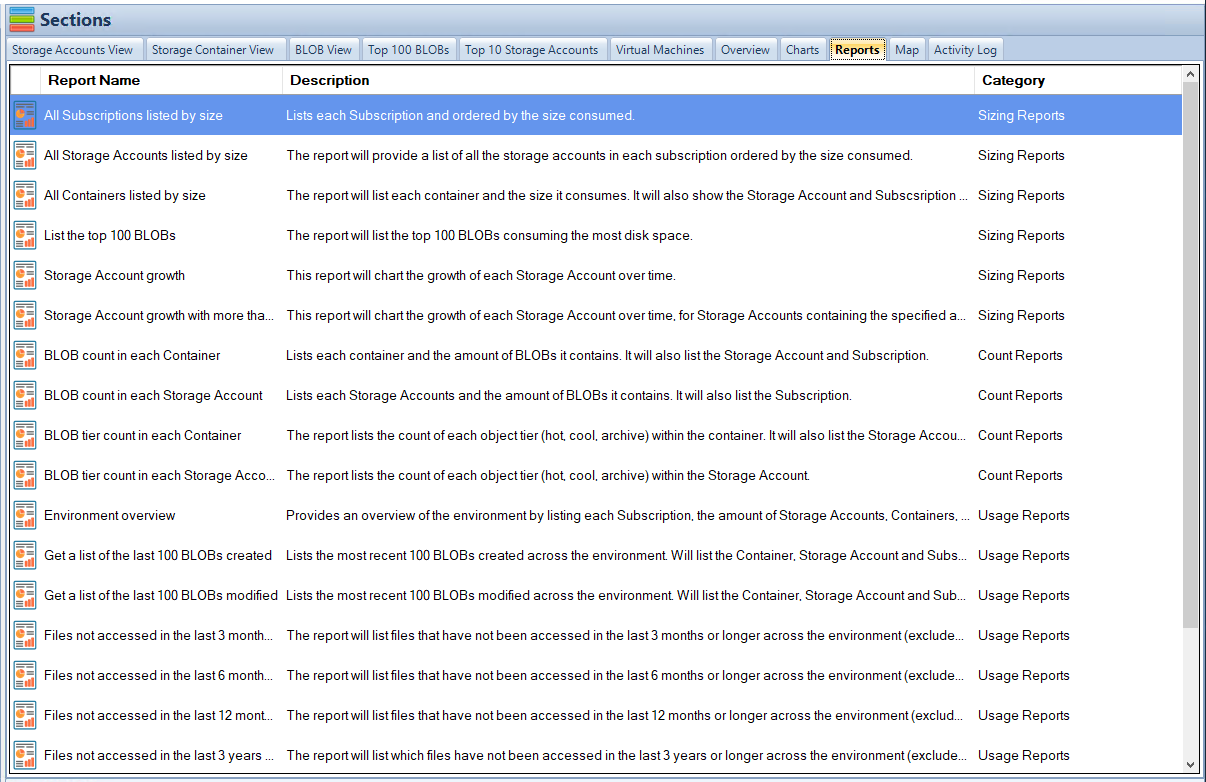
- 📊 Charts and reports offer graphical representations and detailed information about storage consumption, top blobs, storage account growth, blob counts, file access, virtual machines, and more.
- 🗺️ The Azure Location Storage Map visualizes the worldwide distribution of storage accounts and their consumption.
- 💡 Cloud Storage Manager comes in three editions: Lite, Advanced, and Enterprise, with varying limits on Azure storage size and pricing tiers.
How to Set Up a Premium Block Blob Account
Setting up a Premium Block Blob account is relatively straightforward, but it does require some knowledge of Microsoft Azure and storage concepts. Here are the steps you need to follow to set up your account:
Creating a Microsoft Azure Account
Before you can create a Premium Block Blob account, you will need to create a Microsoft Azure account if you don’t have one already. You can sign up for an account on the Azure website. Once you have an account, you will need to log in to the Azure portal.
Choosing the Appropriate Storage Tier
After logging in, navigate to the storage accounts section of the portal and select “Create.” You will be prompted to choose a storage account tier from among four options: Standard HDD, Standard SSD, Premium SSD, and Blob Storage. If you plan on using your Premium Block Blob account for storing large media files or other data-intensive applications that require high performance and low latency access times, then selecting “Premium SSD” may be suitable for your needs.
Configuring Access Keys and Permissions
Once you have chosen the appropriate storage tier for your needs, click on “Review + Create” at the bottom of the page. This will take you through several configuration options such as choosing between locally redundant storage (LRS) or geo-redundant storage (GRS), setting up virtual networks or firewalls around it etc.
Complete setup by clicking “Create,” which will provide access keys that allow access from apps that use them. These keys should be kept secure since they allow full control over data stored in your Premium Block Blob accounts.
It’s important to also configure permissions so that only authorized individuals or applications can access your data. You can do this by setting up role-based access control (RBAC) policies or configuring Azure Active Directory (AAD) integration.
Setting up a Premium Block Blob account can be an excellent investment for your business or personal storage needs. By following these guidelines, you will be able to create an account that meets your specific requirements and provides fast, reliable access to your data.
Best practices for managing Premium Block Blob Accounts
As with any type of storage solution, managing your Premium Block Blob Account effectively is crucial to its success. Here are some best practices to consider:
Monitoring usage and performance metrics
One of the key advantages of Premium Block Blob Accounts is their scalability and performance. However, in order to ensure that your account is meeting your needs, it’s important to regularly monitor its usage and performance metrics.
This can be done through Azure’s built-in monitoring tools, which provide real-time data on things like storage capacity, IOPS (input/output operations per second), and bandwidth usage. By keeping a close eye on these metrics, you can quickly identify any issues or potential bottlenecks and take proactive steps to address them.
Implementing security measures such as encryption at rest and in transit
Data security is always a top concern when it comes to storing sensitive information in the cloud. Thankfully, there are several ways to enhance the security of your Premium Block Blob Account.
One key measure is implementing encryption for both data at rest (i.e., stored within the account) and data in transit (i.e., being transferred between the account and other services). Azure offers multiple options for encrypting your data using industry-standard protocols like AES-256, making it easy to secure your files no matter how they’re being used.
Optimizing storage costs by leveraging features such as tiered storage
Another important aspect of managing a successful Premium Block Blob Account is optimizing storage costs. While these accounts offer excellent performance and scalability benefits, they can also be more expensive than other types of cloud storage solutions. To mitigate this cost factor, it’s important to leverage features like tiered storage.
This allows you to move less frequently accessed data into lower-cost tiers without sacrificing performance or reliability. Additionally, regularly reviewing your usage patterns and adjusting your storage allocation as needed can help ensure that you’re only paying for what you actually need.
Common Misconceptions About Premium Block Blob Accounts
It’s Only Necessary for Large Enterprises with Massive Amounts of Data
One of the biggest misconceptions about Premium Block Blob Accounts is that they are only necessary for large enterprises that deal with massive amounts of data. While it is true that these types of accounts are beneficial for large companies, they can also be useful for small to medium-sized businesses and even individuals who have a need for fast, reliable, and scalable storage. For example, if you have a small business that deals with video production or graphic design, you may find yourself needing to store and access large media files frequently.
Using a Premium Block Blob Account would provide faster upload and download speeds as well as higher scalability and performance than traditional storage options. Don’t let the misconception that only big companies need Premium Block Blob Accounts prevent you from considering this type of storage for your business or personal use.
It’s Too Expensive Compared to Other Storage Options
Another common misconception about Premium Block Blob Accounts is that they are too expensive compared to other storage options. While it is true that the cost per gigabyte may be higher than traditional hard drives or other cloud storage options, there are several factors to consider when evaluating the cost of using a Premium Block Blob Account. Firstly, the improved performance and reliability offered by these types of accounts can lead to increased productivity and reduced downtime.
This can result in significant cost savings over time. Additionally, Premium Block Blob Accounts offer features such as tiered storage which allow users to optimize their costs based on usage patterns.
By storing less frequently accessed data in lower-cost tiers, users can achieve significant cost savings without compromising performance or reliability. Ultimately, while there may be cheaper options available initially, it’s important to consider the long-term benefits and potential cost savings offered by using a Premium Block Blob Account.
Conclusion:
Recap of the benefits of using a Premium Block Blob Account
To recap, Premium Block Blob Accounts offer high scalability, faster upload and download speeds, improved reliability and availability. They are an excellent solution for businesses or individuals that need to store large amounts of data securely and efficiently. These accounts also provide several features like tiered storage to optimize costs and encryption for data protection.
One significant advantage of using Premium Block Blob Accounts is their flexibility in use cases. Whether you’re storing media files, backups or hosting static websites with high traffic volume, these accounts will provide the necessary resources.
Encouragement to consider using this type of storage for businesses or personal use
If you haven’t considered using a Premium Block Blob Account yet, we encourage you to give it a try. The benefits of this type of storage are undeniable, and they can be used by businesses or individuals alike.
For businesses looking for reliable storage solutions with fast upload and download speeds at an affordable price point, Premium Block Blob Accounts are an excellent choice. They offer better performance than standard block blob accounts while remaining cost-effective.
For individuals who have large amounts of data they want to store securely in the cloud without breaking the bank on storage fees, these accounts are ideal as well. Prices start at just pennies per gigabyte per month, making them one of the most affordable cloud storage solutions available today.
Whether you’re looking for reliable enterprise-level storage or secure personal file backup solutions – Premium Block Blob Accounts have got you covered! Try them out today and see how they can benefit your business or personal life!
by Mark | May 15, 2023 | Azure Blobs, Blob Storage, Cloud Storage, Cloud Storage Manager
Unveiling the Locked Secrets:
Exploring Azure Storage Data Encryption
Introduction
Data is the new oil, and it’s crucial to protect it from prying eyes. With the increase in cyber attacks, encryption is more important now than ever before. Azure Storage Data Encryption offers robust security features that help safeguard data stored on Microsoft Azure Platform.
A Brief Overview of Azure Storage Data Encryption
Azure Storage Data Encryption is a feature of Microsoft’s cloud computing service, Azure platform. It provides a secure way to store and access data by encrypting data at rest and in transit. This feature enables users to protect sensitive information such as passwords, financial records and other confidential data from unauthorized access.
Whether you are storing your data in blobs (Binary Large Objects), files or tables, Azure Storage Data Encryption offers encryption capabilities at no additional cost. It uses Advanced Encryption Standard (AES) 256-bit encryption algorithm to protect the data stored on Azure platform.
The Importance of Data Encryption
Data breaches can have serious consequences for individuals or businesses that store sensitive information online. Identity theft, financial loss and reputational damage are just some examples of what can happen when data falls into wrong hands.
Encryption provides an extra layer of protection that makes it difficult for unauthorized parties to read or access sensitive information even if they manage to get their hands on it. In short, encrypting your data keeps it safe from hackers who might try to steal your important information.
It also protects you against any accidental exposure or leakage due to human errors such as misconfigured settings or insider threats from malicious employees. So whether you’re an individual with personal files that contain confidential information or a business owner who stores customer credit card details online, implementing encryption is essential for keeping their respective assets safe and secure.
Types of Azure Storage Data Encryption
Azure Storage Data Encryption provides two ways to encrypt data: client-side encryption and server-side encryption. Both techniques have their advantages and disadvantages, and the choice of which to use depends on the specific requirements of your application.
Client-Side Encryption
Client-side encryption, as the name suggests, involves encrypting data on the client side before sending it to Azure Storage. With client-side encryption, data is encrypted at rest in Azure Storage. It is an effective way to protect sensitive information from attackers who may gain access to your storage account keys.
With client-side encryption, you generate your own encryption keys and manage them outside of Azure Storage. You are responsible for managing and securing these keys properly; otherwise, you risk losing access to your data permanently.
A disadvantage of client-side encryption is that it can be more complex to implement than server-side encryption. It also requires more development effort because you must handle key management yourself.
Server-Side Encryption
Server-Side Encryption involves letting Azure Storage encrypt your data before writing it to disk. It is an automatic process that happens transparently in the background when you store or retrieve blobs using Azure SDKs.
With server-side encryption, Azure handles key management tasks such as key rotation automatically so that you don’t have to worry about it manually. The disadvantage with this method is that if a hacker gains access to your storage account keys or secrets, they will have unencrypted access to your files stored in server side encrypted form.
Server-Side Encryption offers simplicity since there are no extra steps or processes required for developers during implementation. It’s worth noting that Server-Side Encryption has two modes: Microsoft-managed keys and Customer-managed keys.
In Microsoft-managed mode (also known as “Azure managed”), Microsoft manages all aspects of key management in order for data protection. Whereas, in Customer-managed mode, you manage your own encryption keys outside of Azure and provide them to Azure when necessary.
The Magic of Client-Side Encryption
When it comes to data encryption in Azure Storage, there are two options available: client-side encryption and server-side encryption. Client-side encryption involves encrypting the data on the user’s device before uploading it to Azure Storage.
This means that the user holds the keys and is responsible for managing them. In contrast, server-side encryption involves encrypting the data on the server after it has been uploaded, with Azure Storage managing the keys.
Client-side encryption is a powerful security measure because it ensures that even if someone gains access to your data in transit or at rest in Azure Storage, they won’t be able to read it without access to your keys. This makes client-side encryption ideal for organizations that need an extra layer of security or are dealing with highly sensitive data.
In Azure Storage Data Encryption, client-side encryption works by using a client library provided by Microsoft. The library can encrypt or decrypt data on your behalf, ensuring that only you have access to your unencrypted data.
The library provides different modes of operations such as AES_CBC_256_PKCS7 and AES_CBC_128_HMAC_SHA256 which can be used according to your use case. One of the main benefits of client-side encryption is that you retain complete control over your keys, which means you have full control over who can decrypt and access your unencrypted data.
With server-side encryption, you are effectively entrusting Microsoft with key management and therefore relinquishing some control over who can access your unencrypted data. However, there are also some drawbacks associated with client-side encryption.
One issue is that if you lose your key or forget your password, you could potentially lose access to all of your encrypted data forever since nobody else has a copy of this information apart from yourself. Another drawback is that implementing client-side encryption requires more setup than server side-encryption because it requires additional steps such as generating and managing keys.
Client-side encryption is a powerful security measure that can provide an extra layer of protection for highly sensitive data. While there are some drawbacks to using client-side encryption, the benefits of complete key ownership and control make it a worthwhile investment for many organizations.
Server-Side Encryption
Definition and Explanation of Server-Side Encryption
When it comes to data encryption, server-side encryption is an option that encrypts data before it’s stored on the cloud. Azure Storage Data Encryption offers two types of server-side encryption: SSE with Microsoft-managed keys and SSE with customer-managed keys. The former stores the encryption keys in Azure Key Vault, while the latter requires customers to manage their own keys.
SSE with Microsoft-managed keys is easy to implement and doesn’t require any additional infrastructure or maintenance from customers. Meanwhile, SSE with customer-managed keys is suitable for customers who want more control over their encryption process.
How It Works in Azure Storage Data Encryption
With server-side encryption, data is encrypted before it’s saved to the storage service, but after it leaves the client machine. When using Azure Storage Data Encryption, this process takes place by default on Microsoft servers. SSE encrypts data using Advanced Encryption Standard (AES) 256-bit encryption.
This means that your data is secured by a strong algorithm that doesn’t have any known weaknesses. Azure Storage Data Encryption also provides support for secure transfer protocols like HTTPS and SSL/TLS for added security during transmission of encrypted data.
Benefits and Drawbacks
Server-side encryption offers a range of benefits when used on cloud storage services like Azure: 1. It reduces risks associated with unencrypted data being accidentally exposed.
2. It ensures compliance with industry regulations. 3. Customers don’t need to worry about managing their own infrastructure or key management.
4. It’s cost-effective since no hardware purchases are necessary. However, there are also some drawbacks:
1. Users relinquish a certain amount of control over their key management process. 2. There may be some performance impact due to the additional processing overhead required by encryption.
3. It’s still possible for encrypted data to be compromised if someone gains access to the keys or infrastructure used in the encryption process. All in all, server-side encryption is a powerful feature that can help businesses stay secure and compliant while making use of cloud-based storage solutions like Azure Storage Data Encryption.
Key Management
The Importance of Key Management in Data Encryption
When it comes to data encryption, key management is an essential part of the process. Key management refers to the procedures and policies involved in generating, storing, distributing, and revoking encryption keys. The importance of key management lies in its ability to ensure the security and integrity of your encrypted data.
Without proper key management, your encrypted data is vulnerable to attacks and breaches. Encryption keys are used to lock and unlock your data, giving you complete control over who can access it.
If an encryption key falls into the wrong hands or is compromised in any way, your data becomes vulnerable to unauthorized access. This is why it’s critical that you have strong key management policies and procedures in place.
How Key Management Works in Azure Storage Data Encryption
Azure Storage Data Encryption offers a fully managed solution for encrypting your data at rest. Part of this solution includes built-in key management capabilities that allow you to manage your encryption keys with ease.
When you create a storage account in Azure Storage Data Encryption, two types of encryption keys are generated: one for client-side encryption and another for server-side encryption. These keys are managed automatically by Azure Key Vault, which is a cloud-based service that provides secure storage for cryptographic keys.
Azure Key Vault offers several features that make key management easier for developers and IT professionals alike. For example, it allows you to rotate your encryption keys on a regular basis without having to change any code or configurations manually.
Additionally, it provides granular access controls that let you restrict who can view or modify specific keys. Overall, Azure Storage Data Encryption offers robust key management capabilities out-of-the-box so that you can focus on securing your data rather than worrying about managing encryption keys manually.
Key management plays a critical role in ensuring the security and integrity of your encrypted data. In Azure Storage Data Encryption, you can take advantage of built-in key management capabilities that make it easy to manage your encryption keys securely. By leveraging these features, you can ensure that your encrypted data is protected from unauthorized access and breaches.

How much Azure Storage are you using?
With Cloud Storage Manager see how much Azure Storage you are using, and where it could be costing you more than it should be. Azure storage consumption is increasing rapidly, leading to rising costs. Cloud Storage Manager provides a World Wide Map and graphs to visualize Azure storage growth and consumption. Azure Storage Tree view allows you to explore Azure Blobs and their details, including size and storage tiering. Cloud Storage Manager’s Overview tab provides information on Azure Subscriptions, Storage Accounts, Containers, and Blobs. Reports in Cloud Storage Manager offer insights into storage account growth, blob tiering, and access history. You can search across all Azure Storage accounts to find specific Blobs or Files. Cloud Storage Manager helps reduce Azure storage costs by identifying areas where savings can be made, such as moving Blobs to lower storage tiers. Cloud Storage Manager offers an Explorer-like view of Azure Storage, allowing actions like changing tiering and deleting Blobs. Cloud Storage Manager requires read-only access to your Azure account through Azure’s Role-Based Access Control (RBAC) feature. Cloud Storage Manager offers a free 14-day trial, with different editions available for different storage needs (Lite, Advanced, Enterprise).

Compliance and Regulations
Overview of Compliance Standards Related to Data Encryption
Ensuring compliance with data protection regulations is a critical aspect of any organization’s data management strategy. Data encryption plays a crucial role in ensuring compliance with various government regulations and industry standards, such as HIPAA, GDPR, PCI-DSS, FERPA, etc. These regulations have strict guidelines on how sensitive data should be stored and secured. Organizations that handle sensitive data are required by law to protect it from unauthorized access and disclosure.
Data encryption is one of the most effective ways to ensure compliance with these regulations as it provides a secure method for storing and transmitting sensitive information. Azure Storage Data Encryption provides a robust security framework that adheres to industry best practices and regulatory requirements.
How Azure Storage Data Encryption Complies with These Standards
Azure Storage Data Encryption helps organizations comply with different regulatory standards by providing robust security controls for data encryption, key management, access control, monitoring, auditing, and reporting. It offers the following features to ensure compliance:
Data At Rest Encryption: Azure Storage encrypts all data at rest using strong encryption algorithms like AES-256. This ensures that all stored data remains protected from unauthorized access.
Data In Transit Encryption: Azure Storage supports transport layer security (TLS) for encrypting data in transit between client applications and storage services. Key Management: With Azure Key Vault service integration within the platform users can easily manage keys used for client-side encryption of their Azure storage account or server-side encryption used by Microsoft over your account without additional complexity.
Audit Trail: The audit trail feature in Azure Storage tracks activities related to the creation, deletion or modification of resources from storage accounts via logs which help maintain accountability for any action taken on these accounts’ resources. Azure Storage Data Encryption assists organizations to meet regulatory compliance requirements by providing a secure and robust framework that adheres to industry best practices.
Azure Storage Data Encryption enables you to encrypt data at rest and in transit, provides key management, auditing, and reporting capabilities that comply with industry standards. By implementing Azure Storage Data Encryption within your organization, you can ensure that your sensitive data is protected from unauthorized access or disclosure while remaining compliant with various regulatory frameworks.
Best Practices for Implementing Azure Storage Data Encryption
Tips for implementing data encryption effectively on the platform
When it comes to implementing Azure Storage Data Encryption, there are some best practices to follow to ensure that your data is secure. Here are some tips to keep in mind:
1. Choose the Right Encryption TypeBefore you start encrypting your data, you need to choose the right encryption type. As we discussed earlier, there are two types of encryption available in Azure: client-side and server-side encryption. The right choice will depend on your specific needs and requirements. If you want more control over your encryption keys and want to manage them yourself, then client-side encryption is the way to go. However, if you want a simpler solution that still provides good security, then server-side encryption may be a better option.
2. Secure Your KeysEncryption keys are like the keys to a safe – if someone gets their hands on them, they can access all of your encrypted data. Therefore it’s important to secure and manage your keys properly. One best practice is to use Azure Key Vault for managing your encryption keys. This provides a centralized location for storing and managing all of your keys securely.
3. Use HTTPS for Transit EncryptionAnother important best practice is ensuring that any traffic between your application and Azure Storage is encrypted in transit using HTTPS (SSL/TLS). This will prevent anyone from intercepting or tampering with the traffic as it travels over the network. Azure Storage uses SSL/TLS by default but you should still configure your application or service code to use HTTPS when communicating with Azure Storage endpoints.
4. Regularly Review Your Security PoliciesIt’s important that you regularly review and update your security policies related to Azure Storage Data Encryption. This includes reviewing your key management policies, access controls, and auditing policies. By staying up-to-date with the latest security best practices and keeping your policies current, you can help keep your data secure.
Conclusion
Implementing Azure Storage Data Encryption is an important step in keeping your data safe in the cloud. By choosing the right encryption type, securing your keys properly, using HTTPS for transit encryption, and regularly reviewing your security policies – you can help prevent unauthorized access to your data.
Remember that implementing good security practices is an ongoing process and requires continuous attention. Stay vigilant and stay educated on the latest threats and best practices to keep your data safe.
Azure Storage Data Encryption is a necessary tool for protecting your data from unwanted access or examination. Whether you opt for client-side encryption or server-side encryption, you can be sure that your data is secure and out of reach from third parties. The key management feature ensures that only authorized personnel can access the encrypted data.
It’s essential to comply with the industry standards and regulations related to data encryption, such as GDPR and HIPAA. Azure Storage Data Encryption guarantees compliance with these standards, making it a trustworthy platform for securing your sensitive information.
Implementing Azure Storage Data Encryption doesn’t have to be complicated. With proper planning and execution of best practices, you can ensure that all your files are safe from prying eyes.
This includes choosing the right level of encryption based on the sensitivity of your data, rotating keys regularly, employing multi-factor authentication for accessing keys, and monitoring usage logs regularly. Overall, Azure Storage Data Encryption offers complete protection of your critical information through different levels of encryption that meet compliance standards.
With its user-friendly interface and straightforward implementation process, it’s an effective solution for businesses looking to safeguard their sensitive data without having to invest in expensive security solutions. If secured correctly using best practices discussed in this article and checked against regular audits – it provides peace of mind knowing that confidential business files are protected by high-end security measures.
by Mark | May 12, 2023 | Azure, Azure Blobs, Cloud Storage
Best Practices and Use Cases
Introduction
Are you storing your data in the cloud? If yes, then you must be aware of the various security challenges that come with it.
One of the biggest concerns in cloud computing is securing data from unauthorized access. However, with Azure Storage Private Endpoints, Microsoft has introduced a solution that can help organizations secure their data in the cloud.
Brief overview of Azure Storage Private Endpoints
So what exactly are Azure Storage Private Endpoints? Simply put, private endpoints provide secure access to a specific service over a virtual network. With private endpoints, you can connect to your Azure Storage account from within your virtual network without needing to expose your data over the public internet.
Azure Storage Private Endpoints allows customers to create a private IP address for their storage accounts and map it directly to their virtual networks. This helps customers keep their sensitive data within their network perimeter and enables them to restrict access only to necessary resources.
Importance of securing data in the cloud
Securing data has always been a top priority for any organization. The rise of cloud computing has only increased this concern, as more and more sensitive information is being stored in the cloud.
A single security breach can cause irreparable damage not only to an organization’s reputation but also financially. With traditional methods of securing information proving inadequate for cloud-based environments, new solutions like Azure Storage Private Endpoints have become essential for businesses seeking comprehensive security measures against cyber threats.
We will explore how Azure Storage Private Endpoints offer organizations much-needed protection when storing sensitive information in the public cloud environment. Now let’s dive deeper into what makes these endpoints so valuable and how they work together with Azure Storage accounts.
What are Azure Storage Private Endpoints?
Azure Storage is one of the most popular cloud storage services. However, the public endpoint of Azure Storage is accessible over the internet. Any user who has the connection string can connect to your storage account.
This makes it difficult to secure your data from unauthorized access. To solve this problem, Microsoft introduced a feature called “Private Endpoints” for Azure Storage.
Private endpoints enable you to securely access your storage account over an Azure Virtual Network (VNet). Essentially, you can now create an endpoint for your storage account that is accessible only within a specific VNet.
Definition and explanation of private endpoints
Private endpoints are a type of network interface that enables secure communication between resources within a VNet and Azure services such as Azure Storage. The endpoint provides a private IP address within the specified subnet in your VNet.
When you create a private endpoint for your storage account, it creates a secure tunnel between the VNets where the private endpoint is created and where the storage account resides. This tunnel enables traffic to flow securely between these two locations without exposing any traffic to the public internet.
How they work with Azure Storage
When you create a private endpoint for Azure Storage, requests from resources in the same VNet as the private endpoint automatically route through this new interface instead of using the public internet-facing endpoints. In other words, once you’ve established a connection via Private Endpoint, all traffic between resources on that VNet and your Azure Storage Accounts will stay entirely within that virtual network. One benefit of this approach is increased security because it removes any exposure to attacks on an otherwise publicly available service like accessing data stored in an open container or blob; all connections go directly through an encrypted tunnel maintained by Microsoft itself with no chance for exposure or exploitation by malicious third parties outside or inside customer environments (as long as those environments are properly secured).
Additionally, working with Azure Storage accounts using Private Endpoints is incredibly straightforward and transparent. The process is essentially the same as if you’re connecting to the public endpoints, except your traffic stays on your private network entirely.
Benefits of using Azure Storage Private Endpoints
Improved security and compliance
One of the most significant benefits of using Azure Storage Private Endpoints is improved security and compliance. Traditional storage accounts often rely on access keys or shared access signatures to control access to data, which can be vulnerable to attacks such as phishing or insecure connections. Private endpoints, on the other hand, use a private IP address within a virtual network to establish a secure connection between the storage account and clients.
Additionally, private endpoints allow for granular control over network traffic by allowing only authorized traffic from specific virtual networks or subnets. This level of control significantly reduces the risk of unauthorized access and ensures compliance with industry regulations such as HIPAA or PCI-DSS.
Reduced exposure to public internet
Another major advantage of using Azure Storage Private Endpoints is reduced exposure to the public internet. With traditional storage accounts, data is accessed through a public endpoint that exposes it to potential threats such as DDoS attacks or brute-force attacks on authentication credentials.
By using private endpoints, you can ensure that your data remains within your virtual network and never leaves your organization’s infrastructure. This approach significantly reduces the risks associated with exposing sensitive data to unknown entities on the internet.
Simplified network architecture
Azure Storage Private Endpoints also simplify your organization’s overall network architecture by reducing the need for complex firewall rules or VPN configurations. By allowing you to connect directly from your virtual network, private endpoints provide a more streamlined approach that eliminates many of the complexities associated with traditional networking solutions.
This simplification allows organizations to reduce overhead costs in managing their networking infrastructure while providing enhanced security measures designed specifically for Azure Storage accounts. Additionally, since private endpoints can be deployed across multiple regions around the world without requiring any additional infrastructure configuration, they are an ideal solution for global organizations looking for an efficient and secure way to access their data.
Setting up Azure Storage Private Endpoints
Step-by-step guide on how to create a private endpoint for Azure Storage account
Setting up Azure Storage Private Endpoints is easy and straightforward. To create a private endpoint, you need to have an Azure subscription and an existing virtual network that the private endpoint will be attached to.
To create a private endpoint for an Azure Storage account, follow these steps:
1. Go to the Azure portal and select your storage account
2. Click on “Private endpoints” under settings
3. Click “Add” to create a new private endpoint
4. Select your virtual network and subnet
5. Choose the service you want to connect to (in this case, it would be Blob, File or Queue)
6. Select the storage account you want to connect to
7. Configure the DNS name label
8. Review and click “Create” Once completed, your private endpoint will be created.
Configuring virtual network rules and DNS settings
After creating your private endpoint, you need to configure virtual network rules and DNS settings. To configure virtual network rules:
1. Go back to your storage account in the Azure portal
2. Click on “Firewalls and virtual networks” under security + networking
3. Add or edit existing virtual network rules as needed
Virtual network rules allow traffic from specific IP addresses or ranges of IP addresses within your Virtual Network (VNet) to access the storage service over a specified set of ports.
To configure DNS settings:
1. Navigate back to the Private Endpoint blade in the portal.
2. Find your new storage account endpoint.
3. Copy its FQDN (fully qualified domain name). This will be used in place of traditional endpoints when accessing blobs/files/queues in this particular storage account.
4. Create CNAME records pointing from that FQDN to your actual storage account domain name. DNS settings allow clients within your Virtual Network to resolve the private endpoint’s FQDN to its corresponding private IP address.
Configuring virtual network rules and DNS settings is a crucial part of setting up Azure Storage Private Endpoints. By doing so, you are ensuring that only the necessary traffic can access your storage account privately.
Best practices for managing Azure Storage Private Endpoints
Limiting Access to Only Necessary Resources
When it comes to managing Azure Storage Private Endpoints, the first and most important step is to limit access only to necessary resources. This approach helps reduce the risk of unauthorized access, which can jeopardize the security of your data. As a best practice, you should only grant access permissions to users who need them for their specific tasks.
One effective way to limit access is by using role-based access control (RBAC). RBAC allows you to define roles and assign them specific permissions based on a user’s responsibilities within your organization.
With this approach, you can ensure that users have only the permissions they need and nothing more. Another way to limit access is by implementing network security groups (NSGs) within your virtual network.
NSGs are essentially firewall rules that allow or deny traffic based on IP addresses or port numbers. By creating firewall rules for your Azure Storage Private Endpoint, you can restrict traffic coming in and out of your network.
Monitoring and Logging Activities
The second best practice for managing Azure Storage Private Endpoints is monitoring and logging activities. Monitoring activities includes collecting metrics about resource usage, analyzing logs for suspicious behavior, and setting up alerts when certain conditions are met.
Azure provides several tools that help monitor activities within your storage account, including Azure Monitor and Log Analytics. These tools allow you to track network traffic patterns, monitor system performance in real-time, view logs related storage operations such as reads or writes performed against storage accounts.
Logging activities involves storing detailed information about events within the environment being monitored. Logging is essential in identifying potential security breaches or anomalies in system behavior patterns over time which may go unnoticed otherwise
Regularly Reviewing and Updating Configurations
reviewing configurations regularly will ensure that changes made do not expose the environment to vulnerabilities or noncompliance. Regularly reviewing and updating configurations is crucial for maintaining a secure environment and ensuring compliance with regulations.
It’s important to regularly review all configurations related to your storage account and endpoints, including virtual network rules, DNS settings, firewall rules, and permissions. By doing so, you can identify any misconfigurations that may be putting your organization at risk.
Additionally, it is important to keep up-to-date with the latest security best practices and changes in regulatory requirements which may impact how you configure Azure Storage Private Endpoints. limiting access rights while setting up Azure Storage Private Endpoints as well as monitoring all activities are key steps in keeping data safe from unauthorized users.
Regularly reviewing configurations is also essential for maintaining a secure environment over time. By following these best practices, you can take full advantage of Azure Storage’s powerful capabilities while keeping your data secure in the cloud.
Use Cases for Azure Storage Private Endpoints
Healthcare Industry: Securing Patient Data
The healthcare industry is one of the most heavily regulated industries in the world, with strict guidelines on how patient data can be stored and transmitted. Azure Storage Private Endpoints provide a secure way to store and access this sensitive data.
By creating a private endpoint for their Azure Storage account, healthcare providers can ensure that patient data remains protected from prying eyes. With the use of virtual network rules and DNS settings, healthcare organizations can limit access to only necessary resources, ensuring that patient data is kept confidential.
Additionally, with Azure Security Center, healthcare providers can be alerted to any suspicious activity or potential security threats. By monitoring and logging activities related to their Azure Storage Private Endpoint, healthcare providers can quickly identify and respond to any security issues that may arise.
Financial Industry: Protecting Sensitive Financial Information
The financial industry also deals with highly sensitive information such as financial transactions and personal identification information (PII). With the use of Azure Storage Private Endpoints, financial institutions can ensure that this data is secure while still being easily accessible by authorized personnel. By setting up a private endpoint for their Azure Storage account, financial institutions can reduce their exposure to the public internet and limit access only to those who need it.
This helps prevent unauthorized access or breaches of sensitive information. Azure Security Center also provides advanced threat protection capabilities that help detect, assess, and remediate potential security threats before they become major issues.
Government Agencies: Ensuring Compliance with Regulations
Government agencies also deal with sensitive information such as classified documents or personally identifiable information (PII). These agencies must comply with strict regulations regarding how this information is stored and accessed. With Azure Storage Private Endpoints, government agencies can ensure compliance with these regulations while still having easy access to their data.
By setting up private endpoints for their Azure Storage accounts, agencies can limit access to only authorized personnel and ensure that data remains secure. Azure Security Center also provides compliance assessments and recommendations based on industry standards such as HIPAA and PCI DSS, helping government agencies stay compliant with regulations.
Conclusion
Azure Storage Private Endpoints provide a secure way to access data stored in the cloud. By limiting public internet exposure and implementing private connectivity within your virtual network, you can reduce the risk of unauthorized access to your data.
Additionally, by using private endpoints, you can improve compliance with industry regulations and simplify network architecture. By following best practices for managing Azure Storage Private Endpoints such as regularly monitoring and reviewing configurations, limiting access to only necessary resources, and logging activities, you can ensure that your data remains secure.
Azure Storage Private Endpoints are especially useful in industries such as healthcare, finance and government where security and compliance are paramount. They enable these industries to securely store their sensitive information in the cloud while ensuring that it is only accessible by authorized personnel.
Overall, with Azure Storage Private Endpoints you can rest assured that your data is secure in the cloud. So go ahead and take advantage of this powerful feature to improve security and compliance for your organization!
Azure Storage Unlocked
Please fill out the form below to get our free Ebook "Azure Storage Unlocked" emailed to you
FREE DOWNLOAD
by Mark | May 11, 2023 | Azure Blobs, Azure FIles, Blob Storage, Storage Accounts
A brief overview of Azure Storage and its importance in cloud computing
Azure Storage is a cloud-based storage solution offered by Microsoft as part of the Azure suite of services. It is used for storing data objects such as blobs, files, tables, and queues.
Azure Storage offers high scalability and availability with an accessible pay-as-you-go model that makes it an ideal choice for businesses of all sizes. In today’s digital age, data has become the most valuable asset for any business.
With the exponential growth in data being generated every day, it has become imperative to have a robust storage solution that can handle large amounts of data while maintaining high levels of security and reliability. This is where Azure Storage comes in – it offers a highly scalable and secure storage solution that can be accessed from anywhere in the world with an internet connection.
Explanation of Shared Access Signatures (SAS) and their role in securing access to Azure Storage
Shared Access Signatures (SAS) are a powerful feature provided by Azure Storage that allows users to securely delegate access to specific resources stored within their storage account. SAS provides granular control over what actions can be performed on resources within the account, including read, write, delete operations on individual containers or even individual blobs. SAS tokens are cryptographically signed URLs that grant temporary access to specific resources within an account.
They provide secure access to resources without requiring users’ login credentials or exposing account keys directly. SAS can be used to delegate temporary access for different scenarios like sharing file downloads with customers or partners without giving them full control over an entire container or database table.
One important thing to note is that SAS tokens are time-limited – they have start times and expiry times associated with them. Once expired they cannot be reused again which helps prevent unauthorized access after their purpose has been served.
What are Shared Access Signatures?
Shared Access Signatures (SAS) is a mechanism provided by Azure Storage that enables users to grant limited and temporary access rights to a resource in their storage account. SAS is essentially a string of characters that contains information about the resource’s permissions, as well as other constraints such as the access start time and end time, and IP address restrictions.
The purpose of SAS is to enable secure sharing of data stored in your Azure Storage account without exposing your account keys or requiring you to create multiple sets of shared access keys. With SAS, you can give others controlled access to specific resources for a limited period with specific permissions, thereby reducing the risk of accidental or intentional data leaks.
Types of SAS: Service-level SAS and Container-level SAS
There are two types of Shared Access Signatures: service-level SAS and container-level SAS. A service-level SAS grants access to one or more storage services (e.g., Blob, Queue, Table) within a storage account while limiting which operations can be performed on those services. On the other hand, container-level SAS grants access only to specific containers within a single service (usually Blob) while also restricting what can be done with those containers.
A service-level SAS may be used for situations where you need to provide an external application with controlled read-only privileges on all blobs within an entire storage account or write privileges on blobs contained in specific storage containers. A container-level Shared Access Signature may be useful when you want users with different permissions over different containers inside one Blob Service.
Benefits of using Shared Access Signatures
Using Shared Access Signatures provides several benefits for accessing Azure Storage resources securely:
-
- Reduced Risk: with limited permissions enabled by shared access signatures, there’s less risk exposure from spreading around unsecured resources.
-
- Authorization Control: access to the resources is strictly controlled with sas since it can be assigned only to specific accounts or clients, with set time limits and other conditions.
-
- Flexibility: sas provides a flexible method of granting temporary permissions that can be set from one hour up to several years.
-
- No Need for Shared Keys: with sas, you don’t need to share your account keys with external clients and applications, thereby reducing the risk of unauthorized access to your storage account.
Overall, using Shared Access Signatures is a best practice for securing access to Azure Storage resources. It saves you time and effort as it’s much easier than generating multiple access keys.
How to Create a Shared Access Signature
Creating a Shared Access Signature (SAS) is a simple and straightforward process. With just a few clicks, you can create an SAS that grants specific access permissions to your Azure Storage resources for a limited period of time. This section provides you with step-by-step instructions on creating an SAS for Azure Storage.
Step-by-step guide on creating an SAS for Azure Storage
1. Open the Azure Portal and navigate to your storage account.
2. Select the specific container or blob that you want to grant access to.
3. Click on the “Shared access signature” button located in the toolbar at the top of the page.
4. Choose the desired options for your SAS, such as permissions, start time, expiry time, IP address restrictions, and more.
5. Click “Generate SAS and connection string”. 6. Copy the generated SAS token and use it in your application code.
Explanation of different parameters that can be set when creating an SAS
When creating an SAS, there are several parameters that can be configured based on your specific needs: – Permissions: You can specify read-only or read-write access for blob containers or individual blobs.
– Start Time: You can set a specific start time for when the SAS becomes effective.
– Expiry Time: You can set an expiration date and time after which the SAS will no longer be valid.
– IP Address Restrictions: You can limit access by specifying one or more IP addresses or ranges from which requests will be accepted. In addition to these basic parameters, there are also advanced options available such as specifying HTTP headers or setting up stored access policies.
Overall, creating an SAS is a powerful tool in securing your data stored in Azure Storage by providing temporary and limited access without compromising security standards. By following these simple steps and configuring relevant parameters based on your specific use-case, you can easily and securely grant access to your Azure Storage resources.
Best Practices for Using Shared Access Signatures
Tips on how to securely use SAS to protect your data in Azure Storage
Shared Access Signatures (SAS) are a powerful tool for securing access to your Azure Storage resources, but they must be used with care to avoid exposing sensitive data. One important tip is to always use HTTPS when creating or using SAS, as this protocol encrypts all communication between the client and the server.
It is also recommended that you do not store SAS tokens in unencrypted files or transmit them over insecure channels such as email. Another best practice when using SAS is to limit the scope of permissions granted by each token.
When creating a SAS, you can specify which specific actions (such as read, write, or delete) are allowed and which resources (such as containers or blobs) can be accessed. By carefully controlling these settings, you can ensure that only authorized users have access to your Azure Storage resources.
Recommendations on how to manage and revoke access when necessary
One of the main benefits of using SAS tokens is that they provide fine-grained control over who has access to your Azure Storage resources. However, this level of control also means that it is essential to have a clear management strategy in place for handling SAS tokens. One recommendation is to keep track of all active SAS tokens in use and regularly review them for any potential security risks.
This may involve periodically auditing token usage logs or reviewing alerts triggered by unusual activity patterns. Another best practice is to have procedures in place for revoking access when necessary.
For example, if an employee leaves your organization or a contractor’s project ends, their associated SAS tokens should be revoked immediately. This can be done either manually through the Azure portal or programmatically using APIs provided by Microsoft.
Discussion on the importance of monitoring access logs for security purposes
It is important to monitor access logs for any suspicious activity that may indicate a security breach. Azure Storage provides detailed logs that can be used to track all SAS token usage, including the time of access, the resource accessed, and the IP address of the client making the request. By reviewing these logs regularly, you can quickly identify any unauthorized access attempts or unusual activity patterns that may indicate a security threat.
You can also use advanced analytics tools like Azure Monitor and Azure Sentinel to detect and respond to security incidents in real-time. By following these best practices for using Shared Access Signatures in Azure Storage, you can help ensure the security and integrity of your data while still providing authorized users with flexible and controlled access.
Advanced Topics in Shared Access Signatures
Shared Access Policies
When managing large teams who require access to Azure Storage, maintaining the required security level can get complicated. Fortunately, Azure Storage has a feature that simplifies this process called shared access policies.
Shared access policies allow you to create sets of constraints that can be applied to a group of users or applications. When you assign a shared access policy, it applies the same set of permissions and constraints across all entities at once.
This helps you reduce administration overheads by avoiding the need to manage each individual entity separately. Using shared access policies in your Azure Storage environment improves security by granting specific types of permissions on specific items or containers so that users only have the necessary level of access needed for their role.
For example, read-only permission for analysts who need data but don’t require write-access is possible with shared access policies. The options available include creating read-only SAS tokens, which are valid for a specified period and cannot modify data.
Stored Access Policies
Stored Access Policies in Azure Storage are similar to shared access policies but function differently by attaching them directly to the container instead of assigning them individually. This makes it easier to manage and maintain SAS tokens over time since they’re now attached directly to containers rather than created through code.
Stored Access Policies grant permissions on objects within containers and provide further control over how users interact with your storage resources. You can use these stored policies when calling an API method like Get Blob or Get Container service operations providing more granular control over who has what kind of permission where.
Versioning Support
With versioning support enabled on your storage accounts, you can ensure your data is protected from accidental deletion or modification by retaining all previous versions. Each time a new version is created in response to an update request; the previous version remains available until you explicitly delete it.
Versioning support can be useful in case someone accidentally overwrites your data. You can restore a previous version of the object and avoid loss or corruption.
Versioning also prevents accidental deletion, which might occur because of errors made by users or malicious activity like hacking or ransomware attacks. Utilizing advanced features like shared access policies and stored access policies in Azure Storage can significantly enhance the security, performance, and usability of your applications.
Incorporating these features into your storage solutions provides a greater level of control over user permissions while reducing administrative overheads. Additionally, enabling versioning support ensures you never lose valuable data inadvertently overwritten or deleted.
Conclusion
Shared Access Signatures are an essential feature of Azure Storage that provides a secure and flexible way to grant access to your Azure Storage resources. With SAS, you can create fine-grained access control policies for your data and applications, without having to expose your account credentials or keys.
By using SAS, you can improve the security posture of your cloud applications while maintaining the scalability and performance benefits of distributed storage in the cloud. Throughout this article, we have explored the basics of Shared Access Signatures in Azure Storage.
We have learned about the different types of SAS available in Azure Storage, how to create them with various options and parameters, and best practices for using them securely. Furthermore, we have covered several advanced topics such as shared access policies, stored access policies, versioning support, and more.
As cloud computing continues to evolve rapidly over time, it is likely that new features and capabilities will be added to Azure Storage Shared Access Signatures. However, by understanding the fundamental concepts covered in this article – such as how to create a service-level or container-level SAS with specific permissions or restrictions – you should be well equipped to use SAS effectively in securing access to your valuable data stored in the cloud.
So go ahead and try out Shared Access Signatures in Azure Storage today! With their ability to provide granular control over resource access while reducing security risks associated with handling account keys or credentials directly within an application’s codebase; they are surely worth considering for any organization seeking improved security measures without sacrificing performance or simplicity.
by Mark | May 9, 2023 | Azure, Azure Blobs, Blob Storage, Storage Accounts
Brief Overview of Azure Storage Account Failover
Azure Storage Account Failover is a critical feature offered by Microsoft Azure that provides users with the ability to switch to an alternative instance of their storage account in case of a disaster or an outage. In simple terms, it is the act of transferring control of Azure storage account operations from one region to another, ensuring business continuity and disaster recovery. This means that if a user’s primary storage account becomes unavailable due to a natural disaster, human error, or any other reason, they can quickly failover to their secondary storage account without experiencing any disruption in services.
One advantage of Azure Storage Account failover is that it is fast and automated. With automatic failover configured for a user’s primary storage account, Microsoft can detect and respond to service disruptions automatically.
This feature ensures minimal downtime for your applications and data access. It is essential for businesses running mission-critical applications on Microsoft Azure that require high availability.
Importance of Failover in Ensuring Business Continuity and Disaster Recovery
The importance of failover in ensuring business continuity and disaster recovery cannot be overstated. A well-architected architecture should provide the highest level of uptime possible while still being able to recover promptly from unexpected failures/disasters. The goal should be maximum availability with minimal downtime.
A failure can occur at any time without warning – ranging from hardware failures to natural disasters like floods or fires. Businesses must have contingency plans in place because they are dependent on their IT systems’ availability at all times.
By having an Azure Storage Account Failover strategy in place, companies can mitigate the risk associated with sudden outages that could lead to significant data loss or prolonged downtime. Furthermore, regulatory compliance requires businesses operating within certain industries — such as finance and healthcare –to implement robust business continuity plans (BCPs) that include backup and disaster recovery procedures.
An Azure Storage Account Failover strategy can help businesses meet these requirements. In the next section, we will discuss what an Azure Storage Account Failover is and how it works to ensure business continuity and disaster recovery.
Understanding Azure Storage Account Failover
What is a Storage Account Failover?
Azure Storage Account Failover is a feature that allows you to switch your storage account from one data center to another in case of an outage or maintenance event. The failover process involves redirecting all requests and operations from the primary data center to the secondary data center, ensuring minimal disruption of service. Azure Storage Account Failover is critical for maintaining business continuity and disaster recovery in the cloud.
How does it work?
Azure Storage Account Failover works by creating a secondary copy of your storage account in an alternate region. This copy is kept in sync with the primary copy using asynchronous replication.
In case of an outage or maintenance event, Azure will automatically initiate failover by promoting the secondary copy as the new primary and redirecting all traffic to it. Once the primary region is back online, Azure will synchronize any changes made during the failover period and promote it back as the primary.
Types of failovers (automatic and manual)
There are two types of failovers supported by Azure Storage Account: automatic and manual. Automatic failovers are initiated automatically by Azure when there is an unplanned outage or disaster impacting your storage account’s availability. During automatic failover, all requests are redirected from the primary region to the secondary region within minutes, ensuring no data loss occurs.
Manual failovers are initiated manually by you when you need to perform planned maintenance or updates on your storage account’s primary region. During a manual failover, you can specify whether to wait for confirmation before initiating or immediately perform a forced takeover.
Factors to consider before initiating a failover
Before initiating a failover for your storage account, there are several factors you should consider. First, ensure that your secondary region is at least 400 miles away from your primary region to minimize the risk of both regions being impacted by the same disaster.
Additionally, consider the availability of your storage account’s services during failover and how it may impact your customers. Ensure you have adequate bandwidth and resources to support a failover event without impacting other critical operations.
Configuring Azure Storage Account Failover
Step-by-step guide on how to configure failover for your storage account
Configuring Azure Storage Account Failover is a crucial step in ensuring business continuity and disaster recovery. Here is a step-by-step guide on how to configure failover for your storage account:
1. Navigate to the resource group containing the storage account you want to configure for failover.
2. Open the storage account’s overview page by selecting it from the list of resources.
3. In the left-hand menu, select “Failover”.
4. Select “Enable” to enable failover for that storage account.
5. Select target region(s) where you want data replication. 6. Review and confirm the settings
Best practices for configuring failover
To ensure successful failover, here are some best practices that should be followed when configuring Azure Storage Account Failovers:
1. Ensure that your primary region is designated as “Primary”.
2. Choose secondary regions that are geographically separated from your primary region.
3. Use identical configurations in all regions, including network configurations, access keys, and firewall rules.
4. Configure monitoring services such as Azure Monitor or Log Analytics to receive alerts during an outage or when a failover event occurs.
Common mistakes to avoid when setting up failover
There are several common mistakes that can occur when setting up Azure Storage Account Failovers which could lead to ineffective disaster recovery solutions or further damage during outages:
1. Not having enough available secondary regions – it’s important not only to designate adequate secondary regions but also check their availability before committing them in case they’re already experiencing some problems themselves
2. Failing to keep configurations identical across all regions – failing to do this could cause unexpected behavior during a fail-over event which could lead into further complications
3. Not testing failover – test your storage account’s failover capabilities before an actual disaster occurs to ensure it works effectively. By following these best practices and avoiding common mistakes when configuring Azure Storage Account Failovers, you can ensure that your business stays operational even during a disaster.

Testing Azure Storage Account Failover
The Importance of Testing Failover Before an Actual Disaster Occurs
Testing the failover capabilities of your Azure Storage Account is a crucial step in ensuring that your business operations will continue to run smoothly in the event of a disaster. By testing your failover plan, you can identify any potential issues or gaps in your plan and take steps to address them before they become a real problem. Testing also allows you to measure the time it takes for your system to recover, and gives you confidence that your systems will work as expected.
Additionally, testing can help you ensure that all key personnel and stakeholders are aware of their roles and responsibilities during a failover event. This includes not only technical teams who are responsible for executing the failover process, but also business teams who may need to communicate with customers or other stakeholders during a disruption.
How To Test Your Storage Account’s Failover Capabilities
To test your storage account’s failover capabilities, there are several steps you can follow:
1. Create a test environment: Set up a separate environment that simulates what might happen during an actual disaster. This could include creating mock data or running tests on separate virtual machines.
2. Initiate Failover: Once the test environment is set up, initiate the failover process manually or automatically depending on what type of failover you have configured.
3. Monitor Performance: During the failover event, monitor key performance metrics such as recovery time and network connectivity to identify any problems or bottlenecks.
4. Perform Post-Failover Tests: Once the system has been restored, perform post-failover tests on critical applications to ensure that everything is functioning as expected. 5. Analyze Results: Analyze the results of your tests and use them to improve your overall disaster recovery plan
Tips for Successful Testing
To ensure that your testing is successful, consider the following tips:
1. Test Regularly: Regularly test your failover plan to identify and address issues before they become a problem.
2. Involve All Stakeholders: Involve all key stakeholders in the testing process, including business teams and technical teams.
3. Document Results: Document the results of your tests and use them to continuously improve your disaster recovery plan.
4. Don’t Rely on Testing Alone: While testing is crucial, it’s important to remember that it’s just one part of an overall disaster recovery strategy. Make sure you have a comprehensive plan in place that includes other elements such as data backups and redundant systems.
Monitoring Azure Storage Account Failovers
Monitoring your Azure Storage Account Failover is critical to ensure that you can take the proper actions in case of an outage. Monitoring allows you to detect issues as they arise and track the performance of your failover solution. There are several tools available in Azure for monitoring your storage account failovers, including:
Tools available for monitoring storage account failovers
Azure Monitor: This tool provides a unified view of the performance and health of all your Azure resources, including your storage accounts. You can configure alerts to notify you when specific metrics cross thresholds or when certain events occur, such as a failover event. Log Analytics: This tool enables you to collect and analyze data from multiple sources in real-time.
You can use it to monitor the status of your storage accounts, including their availability and performance during a failover event. Other tools that you might consider include Application Insights, which helps you monitor the availability and performance of web applications hosted on Azure; and Network Watcher, which provides network diagnostic and visualization tools for detecting issues that could impact a storage account’s failover capability. Additionally, use Cloud Storage Manager to monitor your Azure consumption.
Key metrics to monitor during a failover event
When it comes to monitoring your storage account’s failover capability, there are several key metrics that you should keep an eye on. These include:
Fault Domain: This metric indicates whether the primary or secondary location is currently active (i.e., which fault domain is currently serving requests).
Data Latency: this metric measures how long it takes for data to replicate from primary location to secondary location.
RPO (Recovery Point Objective): this metric indicates the point in time to which you can recover data in case of a failover event.
RTO (Recovery Time Objective): this metric indicates the amount of time it takes for your storage account to become available again after a failover event has occurred.
By monitoring these metrics, you can quickly detect issues and take appropriate actions to ensure that your storage account remains available and performs optimally during a failover event.
Troubleshooting Azure Storage Account Failovers
Common issues that can occur during a storage account failover
Common issues that can occur during a storage account failover
During a storage account failover, there are several issues that may arise. One common issue is data loss or corruption. This can happen if the replication between primary and secondary regions has not been properly configured or if there is a delay in replication before the failover occurs.
Another issue that may occur is an inability to access the storage account. This could be due to network connectivity issues or if there are incorrect settings in the DNS records.
Another common issue that can arise during a storage account failover is performance degradation. This can occur due to an increase in latency when accessing data from the secondary region, which may cause slower read/write speeds and longer response times.
How to troubleshoot these issues
To troubleshoot data loss or corruption issues during a storage account failover, it’s important to ensure that replication settings are properly configured and up-to-date before initiating a failover. Additionally, it’s important to monitor replication status throughout the process of failing over and afterwards.
To troubleshoot connectivity issues, first check your DNS records to ensure they are correctly configured for both regions. Also, check network connectivity between regions using tools like ping or traceroute.
If you’re experiencing performance degradation during a storage account failover, consider scaling up your secondary region resources temporarily until the primary region is fully restored. Ensure your resources have been optimized for optimal performance by monitoring metrics like CPU usage and IOPS.
While Azure Storage Account Failovers are designed to provide business continuity and disaster recovery capabilities, they do come with their own set of potential issues. By proactively monitoring and troubleshooting any potential problems before initiating a failover event you’ll be better prepared should any complications arise.
Recap on Azure Storage Account Failovers
In today’s digital age, data is an essential asset for businesses. With cloud computing becoming the norm, businesses need to ensure that their data is secure and accessible at all times to ensure business continuity.
Azure Storage Account Failover provides an automatic and manual option for protecting your data in the event of a disaster. Proper configuration, testing, monitoring, and troubleshooting provide confident assurance that your business will continue running smoothly even in the face of disaster.
This comprehensive guide has covered all aspects of Azure Storage Account Failover. By understanding what it is and how it works, configuring it properly, testing its capabilities regularly, monitoring for any issues during failover events and troubleshooting problems that may arise during those events, you can rest assured that your critical data will be protected.
Creating this guide on Azure Storage Account Failovers was necessary as this feature has become increasingly important to businesses given the amount of critical data being stored in cloud repositories. While it may seem daunting at first with proper planning and execution Azure Storage Account Failover provides a seamless way to protect your organization’s critical information from disasters or outages ensuring minimal downtime thus meeting the needs of today’s fast-paced digital world.