How to find the largest Azure Blobs

How to find the largest Azure Blobs

If you are looking to optimize their storage costs on Azure Blob storage. With the increasing amount of data being stored in the cloud, it’s important to keep track of the size of each Blob and identify which ones are taking up the most storage. This is where the guide comes in – it provides a step-by-step process on how to use Cloud Storage Manager to find the largest Azure Blobs in your environment.

By identifying the largest Blobs, you can take steps to optimize your storage costs, such as deleting unnecessary data or moving data to a more cost-effective storage tier. Whether you’re new to Azure Blob storage or an experienced user, this guide is a helpful resource for optimizing your storage costs.

Recently we had one of our clients inform us that he used Cloud Storage Manager to find which were the largest Blobs in his Azure Storage Containers

Here is a quick run down to show one of the many reports on your Azure Blob consumption that you can run with Cloud Storage Manager.

Which are my largest Azure Blobs?

See all your Azure Blob Sizes

If you want to find out which BLOBs in your environment are the largest, or consuming the most storage, the easiest and simplest method by far is to use Cloud Storage Manager.

Once you’ve allowed Cloud Storage Manager to scan your environment, you have a few options to get this information.

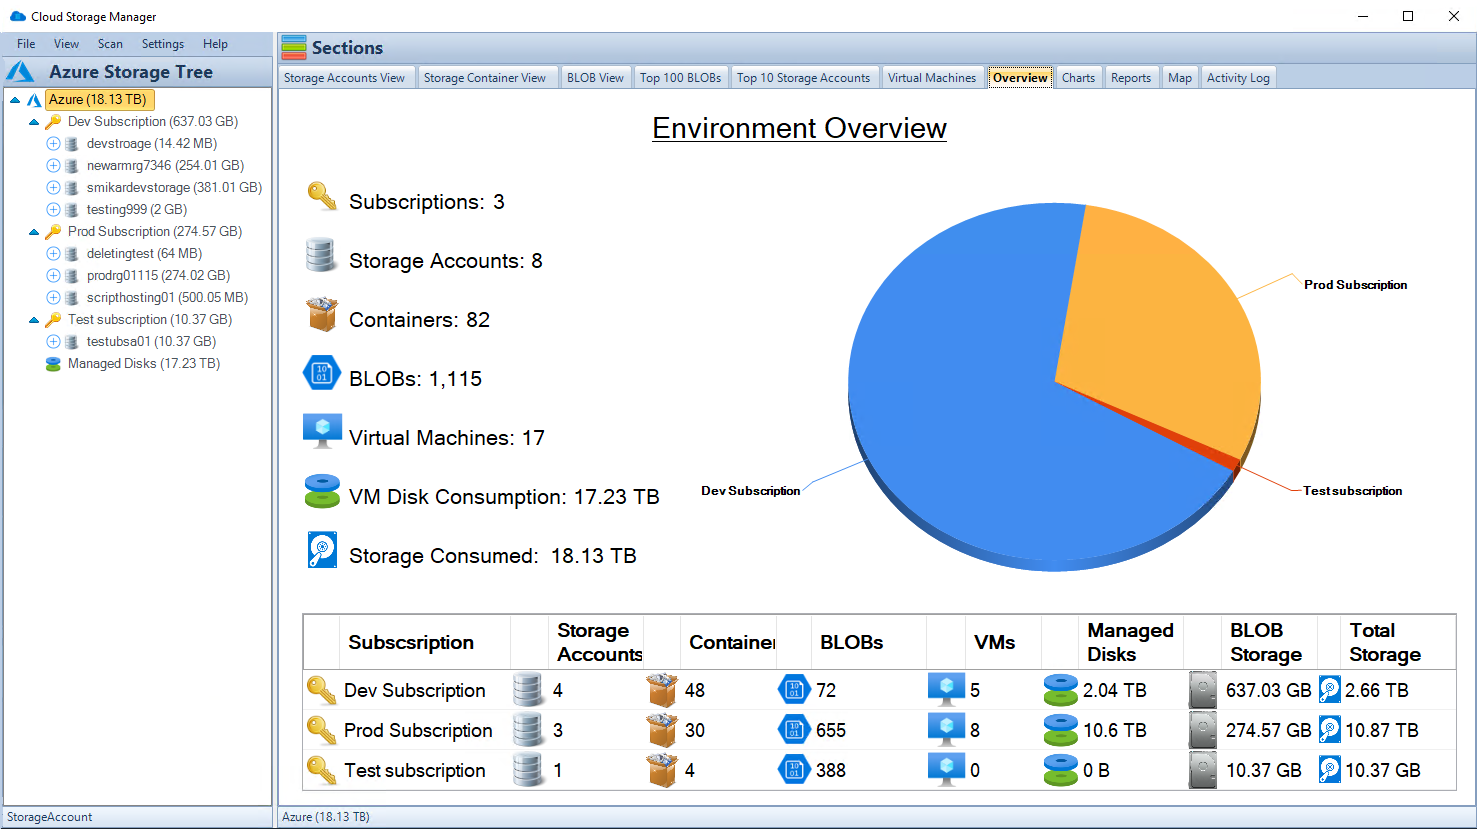
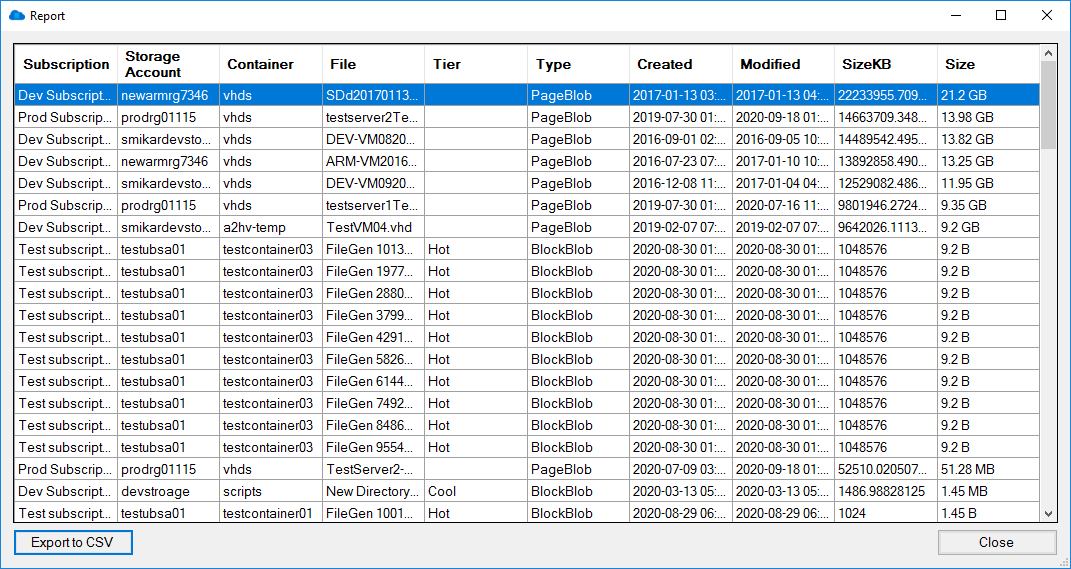
The Top 100 BLOBs tab will give you a list of the top 100 largest BLOBs in your environment. It will also show you which Subscription, Storage Account, Container the BLOB resides in and of course its name. Not only that but it will tell you the object tier, whether that is hot, cool or archive, the size of the Azure BLOB, when it was created and when it was last modified.

Have a look at the screenshot to get a clearer picture.


Azure Blobs Top 100

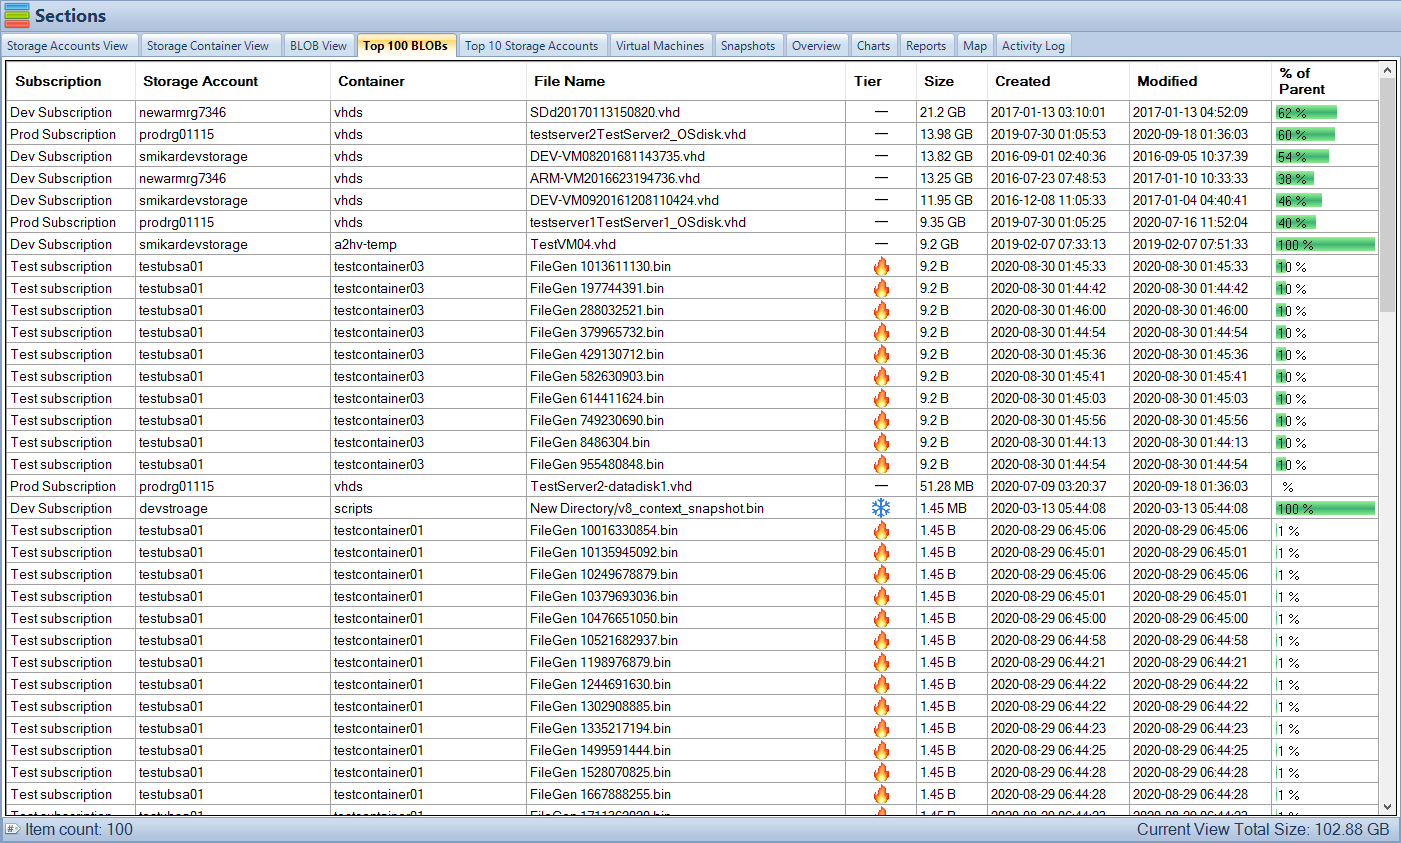
Your largest Azure Blob Sizes

In the bottom right corner you will also see how much overall storage your largest 100 BLOBs are consuming. In our example, we can see that our largest 100 BLOBs are consuming 102GB. Of course, this is just our lab environment so in a real production environment this could be hundreds of TB or PB!

You may also export this data into a spreadsheet by selecting the Reports tab and selecting the “List the top 100 BLOBs” report.


Azure Blob Report

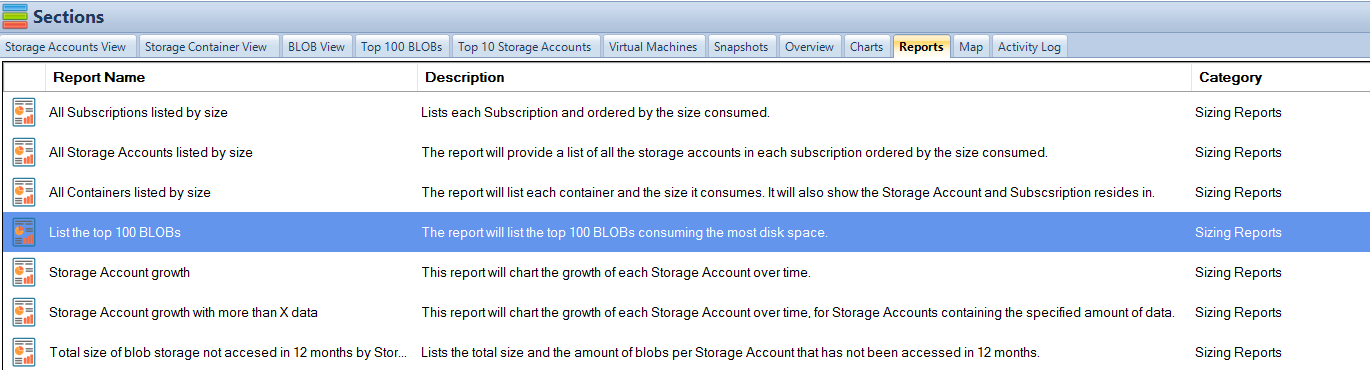
Azure Blob Storage Size Report

Right click on the report and select “Run Report” to view the data in an exportable table format that you can see in Microsoft Excel. 

The export includes all relevant information including the Azure Subscription, Azure Storage Account, the Container the Blob resides in, the name of the Azure Blob itself, what storage tiering the Blob is in, the date created, last modified and finally it’s size.


Azure Blob Report Export

Free

Cloud Storage Manager Icon

Maximum Azure Storage limited to 30TB.

Typically for small or personal environments usually consisting of 3 or less Azure Subscriptions and consuming under 30TB of Azure Blob Storage. 

Free Forever (until over 30TB)

Advanced

Cloud Storage Manager Icon

Maximum Azure Storage limited to 1PB

For medium sized environments typically consisting of less than 5 Azure Subscriptions.

12 Month License

Enterprise

Cloud Storage Manager Icon

Unlimited Azure Storage.

For use in large environments typically consisting of more than 10 Subscriptions and consuming more than 1PB of Azure Blob Storage.

12 Month License

Cloud Storage Manager is licensed based on the size  of your Azure Subscriptions, Azure Storage Accounts, Containers and finally each Blob. 

Each version has the same great functions including scheduled scans of your Azure Blob Storage and reporting.

FREE DOWNLOAD

Send download link to:

I confirm that I have read and agree to the End User License Agreement.

FAQs

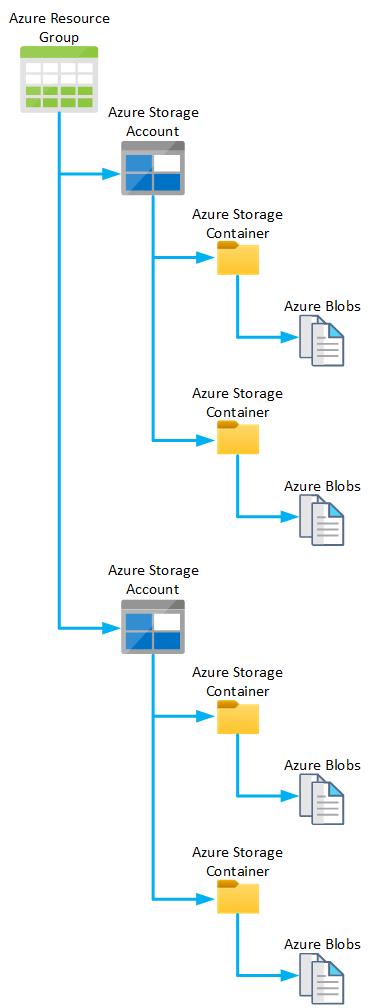
What is Azure Blob storage? 

Azure Blob storage is a cloud-based storage solution offered by Microsoft Azure. It allows users to store and access large amounts of unstructured data, such as text or binary data, through REST-based object storage.

Why is it important to find the largest Azure Blobs? 

Identifying the largest Azure Blobs is important for optimizing storage costs. By understanding which Blobs are taking up the most storage, users can take steps to delete unnecessary data or move data to a more cost-effective storage tier.

How can Cloud Storage Manager help me find the largest Azure Blobs? 

Cloud Storage Manager provides a step-by-step process to find the largest Azure Blobs in your environment. It offers a Top 100 BLOBs tab that gives users a list of the top 100 largest BLOBs in their environment, along with information on the Subscription, Storage Account, Container, object tier, size, and more. Users can also export this data into a spreadsheet.

How is Cloud Storage Manager licensed? 

Cloud Storage Manager is licensed based on the size of your Azure Subscription. There are three versions of Cloud Storage Manager: Free, Advanced, and Enterprise, each with different limits on database size. All versions offer scheduled scans of Azure Blob Storage and reporting.

Who can benefit from using Cloud Storage Manager? 

Cloud Storage Manager is useful for anyone who uses Azure Blob storage and wants to optimize their storage costs. It can be helpful for both new and experienced users of Azure Blob storage.

What is Azure Blob Storage?

What is Azure Blob Storage?

Azure Blob Storage

Blobs, Blobs and more Blobs.

If you have ever had the need to store large amounts of files and data, then Azure’s Blob Storage is made for you.

Microsoft’s Azure Cloud provides huge benefits with not only their fantastic services, locations, availability and support, but also in their almost seemingly infinite capacity.

Azure Blob Storage is not only scalable, durable and almost always available it also provides flexibility to scale as your business requirements need.

A huge benefit to using Azure services is the pay as you go service model, that allows you to only pay for the services you consume. No more need to over provision local file servers hard drives for expected capacity, with Azure Blob Storage you upload your files to Azure and only pay for the space you need.

Azure Blob Storage

What is Azure Blob Storage?

Azure Blob Storage Overview

Azure Blob Storage (Blob stands for Binary Large Object) is storage provided by Microsoft’s Azure for unstructured data. Perfect for massive amounts of data. Example use cases are as a target for your log or analytics data, or Blob Storage can be used as a backup and archival location, and even things like files, pictures and music files. Basically Azure Blob Storage is a great dumping ground for huge amounts of your dataA Blob is actually a file which is stored in a directory like structure called a Container, then within an Azure Storage Account, and an Azure Resource Group and finally an Azure Subscription.

Access to each Azure Blob is provided by a HTTPS link directly to the Blob itself, meaning you can access the file from anywhere in the world with an internet connection. Obviously if you dont want the data exposed to the whole world, you can lock this down to meet your security needs.

Azure Blob Storage Hierachy


Azure Storage Account Structure

Concept Description
Azure Resource Group
Used to contain related resources together for a solution. Logical collection of configuration items within Azure. Can contain Virtual Machines, Virtual Networks, and other items.
Azure Storage Accounts
Top level of Storage Services within Azure. Contains Blobs, Queue Tables, File Shares and Virtual Machine disks. Can be accessed from anywhere in the world with an internet connection. Default limit of 250 Storage Accounts per region and per subscription, with no limits on the number of Azure Storage Containers or Blobs contained within.
Azure Storage Containers
Used like a folder that contains all your blobs. Unlimited amount of Storage Containers per Storage Account.
Azure Blobs

Any type of file that is unstructured and stored within an Azure Storage Container. Can store large amounts of Blobs within each container, and these could be things like document files, images, and other multimedia.


Azure Blob Storage Availability

Additionally when creating your Azure Storage Account you can choose how much redundancy / availability for your Azure Blob Storage. While Microsoft provides an SLA on the uptime of your storage, choosing the correct availability of your Azure Storage Account will ensure your Azure Blobs are accessible in the event of failure.

  • LRS – Locally Redundant Storage – Keeps a synchronous copy of your Azure Blobs three times within the same Azure Datacentre. This is the least cost option
  • ZRS – Zone Redundant Storage – Replicates your Azure Blobs synchronous across three Azure Availability Zones in the primary region.
  • GRS – Geo-Redundant Storage– Copies your Azure Blobs synchronous three times within the same Azure Datacentre, then copies the same Azure Blobs asynchronously across to  one other single location in another secondary Azure Region.
  • GZRS – Geo-Zone-Redundant Storage– Copies your Azure Blobs synchronous across three Azure Availability Zones in the primary region, then copies the same Azure Blobs asynchronously across to  one other single location in another secondary Azure Region.

Azure Blob Storage Tiering

Microsoft provides different storage tiering models for the storing of your data.

Each one has a different storage pricing model in Azure (per GB) and access requirements.

  • Hot – Best for data that  is accessed frequently. (most expensive per GB)
  • Cool – Great for data that is accessed infrequently. (not as expensive as Hot, but no where as cheap as the Archive Tier)
  • Archive – Perfect for data that is very rarely accessed. (cheapest per GB)

Azure Blob Storage Types

Azure Blob Storage has three different types

These are;

  • Block Blobs Perfect for storing documents, text files or even your media files
  • Append Blobs – cannot be modified and requires you to upload a new blob.
  • Page Blobs – are used for storing Azure Virtual Machine disks.

Azure Blob Storage Limitations

Although Azure Blob Storage seems limitless, there are always some technical limitations that you should be aware of.

Some of these limitations are;

  • Service Level Agreement – Microsoft provides an uptime 99.99% on Azure Blob Storage
  • Maximum size of Storage Account – 500TB
  • Maximum size of a Single Blob – 5TB
  • Number of Blocks in a Blob – 50,000 blocks
  • Maximum size of a block – 100MB
  • Minimum size of a block – 64KB
  • Maximum Storage Account Capacity – 5PB
  • Number of Storage Accounts per Subscription – 200
  • Tiering – Only the Hot and Cool Access Tiers can be set at the root of the Storage Container. Archive Tier is per individual Blob. (you can select multiple files using Cloud Storage Manager to change to the Archive Tier. This isnt possible using the Azure Portal)
  • Archive Tier stores the data offline. This requires time to retrieve the Blob from the offline storage. There is additional cost to retrieve this data and the retrieval time can take several hours.
  • Archive Tier Rehydration – When a Blob is in the Archive Tier the data cannot be modified as it is actually offline. To modify a Blob in this Tier you would first need to rehydrate the Blob to an Online Tier (Hot or Cool)

Azure Blob Storage Unstructured Data

Azure Blob Storage Configurations and Options


Azure Blob Storage Pricing


As with anything cloud-based, be careful which options you select as there will be cost impacts. As an example, Locally Redundant Storage is the cheapest availability option for Microsoft’s Azure Blob Storage, whereas Geo Zone Redundant Storage provides the highest Availability, but costs significantly more.

For Azure Blob Tiering, the Archive Tier is the cheapest at almost a tenth of the cost of Cool and Hot Tiers..

Tiering LRS – Locally Redundant Storage ZRS – Zone Redundant Storage GRS – Geo-Redundant Storage RA-GRS – Read Access Geo-Redundant Storage GZRS – Geo Zone Redundant Storage RA-GZRS – Read Access Geo Zone Redundant Storage
Blob Storage – Archive Tier 0.03 cents for 10GB Option not available for Archive Tier 0.07 cents for 10GB 0.07 cents for 10GB Option not available for Archive Tier Option not available for Archive Tier
Blob Storage – Cool Tier 0.21 cents for 10GB 0.26 cents for 10GB 0.41 cents for 10GB 0.53 cents for 10GB 0.48 cents for 10GB 0.60 cents for 10GB
Blob Storage – Hot Tier 0.28 cents for 10GB 0.35 cents for 10GB 0.56 cents for 10GB 0.70 cents for 10GB 0.66 cents for 10GB 0.82 cents for 10GB

Now while the price does fluctutate at times, and even differentiates between the different Microsoft Azure Datacentres, the pricing table above has been given as a reference to the differences in costs and options on your Azure Storage.

To work out how much the cost differences, you can use the Microsoft Azure Pricing Calculator to work out the cost impacts to your solution

Azure Blob Storage Best Practices

Azure Blob Storage is a highly scalable, durable, and cost-effective object storage solution from Microsoft Azure. It is a great option for storing unstructured data, such as text and binary data, in the cloud. To get the most out of Azure Blob Storage, it’s important to follow some best practices. In this article, we will discuss the key best practices for Azure Blob Storage.

Use appropriate storage tiers:

Azure Blob Storage offers three storage tiers: Hot, Cool, and Archive. Hot storage is optimized for frequent access to data, Cool storage is optimized for infrequent access, and Archive storage is optimized for long-term data retention. Choose the right storage tier based on your data access patterns and the costs associated with each tier.

Enable versioning:

Versioning allows you to keep multiple versions of the same blob, so you can easily recover from accidental deletions or updates. To enable versioning, you can use the Azure portal, Azure CLI, or Azure Storage REST API.

Use a content delivery network (CDN):

A CDN can help distribute your blobs globally and improve the performance and responsiveness of your applications. You can configure a CDN for your Blob Storage account by using the Azure portal or Azure CLI.

Use shared access signatures (SAS) wisely:

SAS is a secure way to grant access to your blobs without exposing your storage account key. However, it’s important to limit the scope of access granted by the SAS and to set an appropriate expiration time.

Enable encryption:

Azure Blob Storage supports encryption of data at rest using Azure Storage Service Encryption. This feature encrypts your data before it is written to disk and automatically decrypts it when you access it.

Use Azure Blob Storage events:

Azure Blob Storage events allow you to trigger serverless functions or logic apps when specific events occur in your storage account. You can use events to implement complex workflows or integrate with other Azure services.

Monitor and manage your storage account:

Regularly monitor the usage and performance of your storage account using Azure Monitor. You can set up alerts to receive notifications when certain thresholds are met, and you can also use Azure Policy to enforce policies and control access to your storage account.

Monitor usage and storage consumption:

Reduce cost by using Cloud Storage Manager to gain insights in to your cloud storage consumption.

Use the right tools for the job:

Azure Blob Storage provides a number of tools and SDKs for working with your blobs, including Azure Portal, Azure CLI, and Azure Storage REST API as well as our own Cloud Storage Manager. Choose the tool that best fits your needs and make sure to follow the best practices for each tool.

In conclusion, following these best practices can help you get the most out of Azure Blob Storage and ensure that your data is secure, scalable, and accessible. Whether you’re storing unstructured data or building applications that rely on Blob Storage, following these best practices can help you maximize your investment and minimize risks.

Do you want information on all your Blobs in Azure?

Azure Blob Storage Insights

Now that you have some background in to what Azure Blob Storage can do for you and are ready to take the jump and start uploading huge amounts of data to your Azure Storage Containers.

Cloud Storage Manager provides you with further insights in to your Azure consumption. Providing you with quick to see capacity information, searching through all your Blob Storage, as well as historical reporting of your Azure Storage Accounts consumption.

If you want to see exactly what is in your Azure Storage Accounts, download Cloud Storage Manager and test it for yourself for free.


Cloud Storage Manager Main Window

Azure Blob Storage Architecture

Azure Blob Storage is designed with a distributed architecture that provides high availability, durability, and scalability. The architecture comprises three layers:

Front-End Layer

The front-end layer handles incoming requests from clients and routes them to the appropriate back-end nodes.

Back-End Layer

The back-end layer consists of multiple storage nodes that store the data in a distributed manner. The data is stored in a redundant manner to ensure high availability and durability.

Blob Service Layer

The Blob Service Layer provides the APIs and SDKs for accessing the Blob Storage service. It also provides features such as authentication and authorization, metadata, and access control for Blob Storage.

How to create an Azure storage lifecycle management policy

How to create an Azure storage lifecycle management policy

How to create an Azure storage lifecycle management policy​

Whether you are using our Cloud Storage Management software to gain insights into your Azure storage environment, or are just trying to work out how to save costs within Azure, creating a lifecycle management policy is a great idea to help you save in your Azure storage costs.

Why is an Azure Lifecycle Management Policy important?

Azure Storage Lifecycle Management is a feature provided by Microsoft Azure that helps users manage the lifecycle of their data stored in Azure Blob storage. It allows users to transition their data to different storage tiers (Hot, Cool, Archive) based on their data access patterns and save costs in their Azure storage environment. The storage tiers have different costs per gigabyte of data, with the Hot tier being the most expensive and the Archive tier having the most cost savings. It is important because it enables users to save costs on their storage and manage their data effectively based on their business needs. Additionally, it helps ensure that the data is stored in the appropriate tier for its intended usage, improving performance and reducing costs.

Azure Storage Tiering Overview

Azure has three different tiers for your blob storage. These storage tiers are;

Hot – Used for frequently accessed data. Best suited for data that your user base accesses daily, think files and photos etc

Cool – Used for infrequently accessed data. Well suited for data that maybe accessed, but not that often.

Archive – Used for rarely accessed data, like backups or data that you need to keep for historical reasons.

Each of these Storage Tiers has a cost associated that Microsoft will charge you per gigabyte of data. The Hot Tier obviously being the most expensive, the Cool Tier is a little cheaper and the Archive Tier having considerable cost savings.

As an example at the time of writing this page, the cost per gigabyte in US dollars for each Tier is as below. (this may vary depending on your agreement with Microsoft)

Azure Blob Storage Costs

PREMIUM HOT COOL ARCHIVE
First 50 terabyte (TB) / month $0.15 per GB $0.0184 per GB $0.01 per GB $0.00099 per GB
Next 450 TB/month $0.15 per GB $0.0177 per GB $0.01 per GB $0.00099 per GB
Over 500 TB/month $0.15 per GB $0.0170 per GB $0.01 per GB $0.00099 per GB

As the table above shows, there are considerable savings when you move your blobs down to the lower tiers and creating an Azure Storage Lifecycle Management Policy.

Azure Blob Storage Tiering

Change your Storage Tier

Microsoft Azure provides tiering for your blob data, that you can set as the default level. (either upon creation of the storage account or at a later date). To check the default storage tiering of your storage account go to the Azure Portal, choose configuration, and then the access tier that the blobs default to in that storage account is shown.

It must be noted that only the Hot and Cool tiers can be set as the default and not the Archive tier.


Azure Storage Tiering

What are some of the benefits of creating an Azure Storage Lifecycle Management Policy?

OK, so now that you see there are some real benefits in changing the tiering of your blob storage, how do I create one you ask?

Well first off let’s look at what you will need to make sure is in place first.

Tiering of blob object storage is only available in Blob Storage and General Purpose v2 (or GPv2) accounts. If you have GPv1 storage you will need to convert that first to GPv2.

Premium storage does not provide any tiering, as this tier is for fast access using SSD based drives. (this maybe coming at a later date)

Changing tiers of storage may incur increased costs. Be very careful when applying the change to your data, as rehydrating blobs from the archive tier can be costly.

How to create your first Azure Storage Lifecycle Management Policy.

Open the Azure Portal

In your Azure portal, go to your storage account that you want the lifecycle policy to apply to and then choose Lifecycle Management.


Azure Lifecycle Management

Create a Azure Storage Lifecycle Policy Rule

 Once the right hand side of your browser has populated, choose Add Rule to start the wizard


Azure Lifecycle Management Rule

Add Lifecycle Policy Rule

Now that the new rule has shown up we need to fill in a few details. You will need to give the rule a Name and then choose what you want to happen with your object data.

As an example I have shown in the below rule that the blobs will move to cool storage after not being accessed in 90 days, then to archive storage in 180 days, then finally being deleted in 365 days.

If you are happy with what you have set, just click Review + add and Azure will go on to apply those settings to your storage accountor if you want to be granular and exclude some containers / paths then click on Next: Filter Set.


Azure Lifecycle Management New Rule

Azure Storage Lifecycle Policy Exclusions

On this page you can now exclude any containers or paths that you do not want this policy to apply to. Click Next: Review + add. 

Azure Lifecycle Management Filter

Azure Storage Lifecycle Validation

 If all goes well you should be presented with a screen as below, saying that your Validation Passed. 

Click on Add and Azure will now apply those settings to your storage account.

Azure will now go through all your Blobs and set them to the tiering and settings you have specified. 

You have successfully created an Azure Storage Lifecycle Management Policy

Azure Lifecycle Management Validation

Reduce your Azure Blob Storage Costs

Now you may ask, how do I know how much storage I’ve consumed or when were my blob files last accessed?

Easy. First run and install our Cloud Storage Manager software, then let it run a scan against your Azure Storage environments. Once the Scan has completed you can then run one of the many reports to understand and optimise your Azure Blob Storage.

Download a Free Trial and test it for yourself.

Free

Cloud Storage Manager Icon

Maximum Azure Storage limited to 30TB.

Typically for small or personal environments usually consisting of 3 or less Azure Subscriptions and consuming under 30TB of Azure Blob Storage.

Free Forever (until your Azure storage goes over 30TB).

Advanced

Cloud Storage Manager Icon

Maximum Azure Storage limited to 1PB

For medium sized environments typically consisting of less than 5 Azure Subscriptions.

Yearly license subscription of $500 USD per year which includes updates and support.

Enterprise

Cloud Storage Manager Icon

Unlimited Azure Storage.

For use in large environments typically consisting of more than 10 Subscriptions and consuming more than 1PB of Azure Blob Storage.

Yearly license subscription of $1000 USD per year which includes updates and support.

Cloud Storage Manager is licensed based on the size of your Azure Subscriptions, Azure Storage Accounts, Containers and finally each Blob.

Each version has the same great functions including scheduled scans of your Azure Blob Storage and reporting.

FREE DOWNLOAD

Send download link to:

I confirm that I have read and agree to the End User License Agreement.

FAQ for Azure Lifecycle Management

What is Azure Storage Lifecycle Management?

Azure Storage Lifecycle Management is a feature that allows users to automate the transition of their data to different storage tiers or classes based on the data’s age or access patterns.

How does Azure Storage Lifecycle Management help in reducing costs?

By automatically moving data to the appropriate storage tier based on its age or access patterns, Azure Storage Lifecycle Management helps to reduce storage costs by ensuring that you are only paying for the most expensive storage tier that you actually need.

Can I still access my data after it has been transitioned to a different storage tier?

Yes, you can still access your data even after it has been transitioned to a different storage tier. The only difference is the retrieval time, which may be slower for data stored in the Archive tier compared to the Hot and Cool tiers.

Can I revert a transition made by Azure Storage Lifecycle Management?

Yes, you can revert a transition made by Azure Storage Lifecycle Management, but you may incur additional charges for moving the data back to a more expensive storage tier.

Is Azure Storage Lifecycle Management available for all Azure storage services?

Currently, Azure Storage Lifecycle Management is available for Azure Blob storage.

What are the different storage tiers that can be managed by Azure Storage Lifecycle Management?

Azure Storage Lifecycle Management allows you to manage data across four storage tiers: hot, cool, archive, and deleted. The hot tier is for frequently accessed data, the cool tier is for infrequently accessed data, the archive tier is for rarely accessed data, and the deleted tier is for data that has been marked for deletion.

How does Azure Storage Lifecycle Management work with data protection?

Azure Storage Lifecycle Management integrates with Azure data protection features such as Azure Backup and Azure Site Recovery, to ensure that your data is protected even as it transitions between storage tiers.

Can I customize the transition policies for my data in Azure Storage Lifecycle Management?

Yes, you can create custom transition policies in Azure Storage Lifecycle Management that are specific to your data and your business requirements. You can specify the time-based or usage-based triggers for data transitions, and you can also set rules for data retention.

Can I track the data movement and monitor the performance of my storage infrastructure with Azure Storage Lifecycle Management?

Yes, you can use Azure Storage Lifecycle Management to monitor and track the data movement in your storage infrastructure, as well as to measure the performance of your storage tiers. You can also use Azure Monitor to set up alerts and notifications for specific events, such as data movement or storage tier changes.

Is Azure Storage Lifecycle Management supported for all types of data in Azure Storage?

Azure Storage Lifecycle Management is supported for all types of data in Azure Blob Storage, including block blobs, append blobs, and page blobs. It is not currently supported for other types of data in Azure Storage, such as files and queues.

Which storage account or storage accounts can you use lifecycle management?

The Storage Accounts that support Lifecycle Management Policies are Blob Storage Accounts that have block blobs and append blobs in general-purpose v2 and premium block blobs.