How do you connect an Azure Storage Account to Active Directory?

How do you connect an Azure Storage Account to Active Directory?

Azure Storage Authentication Options

Azure Storage Authentication is the process of verifying the identity of a client that is requesting access to an Azure storage account. Azure Storage supports several authentication options that can be used to secure access to storage accounts, such as:

  1. Shared Key Authentication: This method of authentication uses a shared key that is known to both the client and the storage account to sign request headers.
  2. Shared Access Signature (SAS) Authentication: This method of authentication uses a shared access signature (SAS) token to provide restricted access to a storage account. A SAS token can be generated for a specific resource or set of resources within a storage account and can be used to grant read, write, or delete access to that resource.
  3. Azure Active Directory (AAD) Authentication: This method of authentication allows you to secure access to a storage account using Azure AD. By connecting a storage account to Azure AD, you can use Azure AD authentication to grant access to specific users or applications that are already authenticated with Azure AD.
  4. OAuth Authentication: This method of authentication allows you to authenticate with Azure Storage using an OAuth 2.0 Bearer Token. The token is passed in the Authorization header and is verified by Azure Storage.
  5. Token-based Authentication: This method of authentication is an advanced authentication method and includes authentication with SAS, OAuth 2.0 bearer tokens and JSON Web Tokens (JWT)

Choosing the best authentication option depends on your requirements such as security, ease of use and ease of integration with existing systems or platforms. For example, for testing or development purposes, Shared Key authentication can be sufficient and easier to implement, but for production environments that requires high level of security or integration with enterprise environments you may prefer to use Azure AD or OAuth.

How to connect your Azure Storage Accounts to your On-Premise Active Directory

Connecting a storage account to an on-premises Active Directory (AD) allows you to secure access to the storage account using on-premises AD authentication. This can be useful in scenarios where you want to provide access to the storage account to a specific group of users or applications that are already authenticated with your on-premises AD.

Here’s an overview of the process for connecting a storage account to an on-premises AD:

  1. Create a Domain Name System (DNS) alias: To connect to the on-premises AD, you will need to create a DNS alias that points to the on-premises AD. This can be done by creating a CNAME record in your DNS server.
  2. Configure the storage account to use AD authentication: In the Azure portal, go to the storage account settings and enable AD authentication for the storage account. You will need to provide the DNS alias that you created earlier and specify the domain name of your on-premises AD.
  3. Create a group in the on-premises AD: To grant access to the storage account, you will need to create a group in your on-premises AD. This group will be used to manage access to the storage account.
  4. Assign the storage Blob Data Contributor role to the group: To grant access to the storage account, you will need to assign the storage Blob Data Contributor role to the group. This role allows the members of the group to manage blobs in the storage account
  5. Add users or computer to the group: To grant access to storage account you should add users or computer to the group you created in step 3

It’s worth to mention that this process requires that you have your own domain controller and DNS server, and that your azure storage account and your on-premise network should be connected through a VPN or ExpressRoute.

Also, it would require an ADFS or other third party solution to facilitate the integration and trust relationship between on-premises AD and Azure AD.

 
How to setup and use Azure SFTP Service with Azure Storage.

How to setup and use Azure SFTP Service with Azure Storage.

Azure SFTP Service with Azure Storage overview

Azure SFTP (Secure File Transfer Protocol) is a service provided by Microsoft Azure that enables you to transfer files securely to and from Azure storage. The service is built on the SFTP protocol, which provides a secure way to transfer files over the internet by encrypting both the data in transit and the data at rest. Azure SFTP allows you to easily automate the transfer of large amounts of data such as backups and log files, to and from your Azure storage account. Additionally, it allows to set permissions and access control to limit access to specific users or groups.

Azure SFTP Service limitations and guidance

To use Azure SFTP, you will first need to create an Azure storage account. Once you have a storage account set up, you can create an SFTP server by going to the Azure portal and selecting the storage account you want to use. In the settings of the storage account, there is an option to create a new SFTP server.

Once the SFTP server is created, you will be provided with a unique hostname and port to connect to the server. To connect to the server, you will need to use an SFTP client, such as WinSCP or FileZilla. You will also need to provide your SFTP server credentials, which consist of a username and password.

Once you are connected to the SFTP server, you will be able to transfer files to and from your Azure storage account. The SFTP server will automatically create a new container within your storage account to store the files. You can also create new folders within the container to organize your files.

One of the benefits of using Azure SFTP is that it allows you to easily automate the transfer of files. You can use a tool like Azure Data Factory to schedule file transfers on a regular basis. Additionally, you can use Azure Automation to automate the creation of SFTP servers, which can save time and reduce the chances of human error.

Another benefit of using Azure SFTP is that it allows you to access your files securely from anywhere. The SFTP server uses industry standard encryption to protect your data in transit and at rest. Additionally, you can use Azure Role-Based Access Control (RBAC) to limit access to your SFTP server and storage account to specific users or groups.

There are some limitations to Azure SFTP that you should be aware of before using it. One limitation is that the SFTP server only supports a single concurrent connection per user. This means that if multiple people need to access the SFTP server at the same time, they will need to use different credentials. Additionally, Azure SFTP currently does not support SFTP version 6 or later, and it will not support it in near future.

Another limitation of Azure SFTP is that it does not currently support customization of SFTP server settings, such as the ability to change the default port or configure SSH options. Additionally, It does not support integration with other Azure services, such as Azure Monitor or Azure Security Center, for monitoring or logging of SFTP activity.

In conclusion, Azure SFTP is a powerful service that allows you to securely transfer files to and from Azure storage. It is easy to use, and can be automated to save time and reduce the chances of human error. It allows you to access your files securely from anywhere, and it uses industry standard encryption to protect your data in transit and at rest. However, it does have some limitations, such as not supporting multiple concurrent connections per user and not supporting customization of SFTP server settings.

How do you connect to Azure SFTP Service?

To connect to Azure SFTP Service, you will need to perform the following steps:

  1. Create an Azure storage account: You will need a storage account to create an SFTP server. You can create a storage account in the Azure portal or using Azure CLI or Azure PowerShell.
  2. Create an SFTP server: Go to the Azure portal, select your storage account, and then select the option to create a new SFTP server. Once the SFTP server is created, you will be provided with a unique hostname and port to connect to the server.
  3. Install an SFTP client: To connect to the SFTP server, you will need to use an SFTP client such as WinSCP, FileZilla, or Cyberduck.
  4. Connect to the SFTP server: Use the hostname and port provided in step 2, along with the SFTP server credentials (username and password) to connect to the SFTP server via the SFTP client.
  5. Transfer files: Once you are connected to the SFTP server, you can transfer files to and from your Azure storage account. By default, the SFTP server will create a new container within your storage account to store the files.

It is also worth mentioning that once you connect to the SFTP server you will have an access to all the capabilities of the SFTP protocol, including creation, deletion, editing, copying and moving of files, as well as folder structure management.

What is Azure Files and what are they used for?

What is Azure Files and what are they used for?

What are Azure Files?

Azure Files is a fully managed, cloud-based file storage service provided by Microsoft Azure that allows you to share files across multiple servers and platforms. One of the key features of Azure Files is the ability to create and organize files in folders, similar to how you would on a traditional file server. In this blog post, we’ll take a closer look at how folders work in Azure Files and how you can use them to share files with others.

Azure Files Overview.

First, it’s important to understand the difference between a file share and a folder in Azure Files. A file share is the top-level object in Azure Files and acts as a logical grouping of file data. Each file share can have an unlimited number of files and folders, but cannot have sub-shares. On the other hand, a folder is a virtual directory within a file share, and can contain both other folders and files.

Folders in Azure Files are not actual directories, but rather a virtual way of organizing your files. When you upload a file to a share, you can specify the path of the file within the share using a forward slash (/) as a delimiter. This creates the appearance of a hierarchical file system, where the forward slashes indicate the level of nesting. For example, if you upload a file to the share “myshare” with the path “documents/finance/budget.xlsx,” this creates the appearance of a folder “documents” within the share “myshare” containing a subfolder “finance” which in turn contains the file “budget.xlsx”.

How do you use Azure Files?

Folders in Azure Files can be created, deleted and listed in the same way as files, but the main difference is that folders do not have any properties and do not consume any storage. Instead, the size of a folder is determined by the size of the files within it.

One of the main benefits of using folders in Azure Files is the ability to share files with others. Azure Files allows you to create a shared access signature (SAS) for a specific folder, which can be used to grant read or write access to the files within that folder. This can be useful in scenarios where you need to share a group of files with a specific set of users, without giving them access to the entire file share.

Another benefit of using folders in Azure Files is that it allows for better organization and management of your files. By using folders, you can easily group files by project, department, or date, making it easier to find and manage your data, especially if you have a large amount of files in your share.

Folders in Azure Files also integrate well with other Azure services like Azure Data Factory, Azure Logic Apps and Azure Functions, with the ability to mount the file share as a network drive and access the data with the standard file system operations, you can easily automate data movement, workflows and integration with other services that need access to the files in the share.

In conclusion, folders in Azure Files are a powerful feature that can help you share and organize files more effectively. They can help you create a hierarchical file system, grant access to specific groups of users, and integrate with other Azure services. If you’re working with large amounts of files and need to share them with others, it’s worth taking the time to consider how you can use folders in Azure Files to make it more manageable and organized.

Now that you know a little about Azure Files, be sure to download a Trial of Cloud Storage Manager, which provides you further insights not only in to your Azure Files storage, but also Azure Blob Storage

Real-World Use Cases for Azure Files

Azure Files has a wide range of practical use cases. For businesses looking to transition from traditional on-premises file servers, Azure Files provides a scalable, cloud-based alternative that enables file sharing across departments, regions, and devices. An example use case is replacing on-prem file servers for businesses with multiple locations, enabling real-time collaboration and access to shared company documents. Azure Files can also support application data storage, allowing distributed applications to share data seamlessly. For development environments, it provides a consistent storage solution across Windows and Linux-based applications, facilitating easy file sharing between virtual machines.

Additionally, Azure File Sync allows businesses to keep critical files available locally while syncing data to the cloud, giving the benefits of cloud scalability while maintaining high-performance access for frequently used files.

Security Features of Azure Files

Azure Files implements enterprise-grade security features to ensure that your data is both protected and compliant. It supports integration with Azure Active Directory (Azure AD), providing centralized identity and access management for users across your organization. With Azure AD, administrators can define Role-Based Access Control (RBAC), granting different levels of access to users or groups, making it easy to ensure sensitive files are only accessible by authorized personnel.

Furthermore, encryption at rest and in transit is a standard feature with Azure Files. This means that data is protected when stored in the cloud and when being accessed or transferred over the network. Microsoft’s encryption complies with various regulatory standards, such as HIPAA, ISO 27001, and SOC 1/2, ensuring that organizations in heavily regulated industries can use Azure Files with confidence. For additional protection, you can also implement shared access signatures (SAS), which allows you to provide temporary, limited access to specific files without sharing your full storage account credentials.

Integration with Hybrid Environments and Cloud Services

One of the significant benefits of Azure Files is its ability to integrate with both cloud-based and on-premises systems. Through Azure File Sync, businesses can synchronize their on-prem file shares with Azure Files, enabling hybrid cloud scenarios. This is particularly useful for companies that need high-performance local access to certain files while taking advantage of the cloud’s scalability and redundancy for archiving or less frequently accessed data.

Azure Files is fully compatible with Azure Virtual Machines (VMs) and Azure Kubernetes Service (AKS). This makes it a valuable storage solution for companies running cloud-based applications. For example, applications running in Kubernetes clusters can use Azure Files as a persistent volume to store stateful data, ensuring data persists across container restarts. Similarly, Windows and Linux VMs can mount Azure Files shares, making it easy to share data between applications hosted on different VMs or platforms. This flexibility allows businesses to streamline their operations, reducing infrastructure complexity and enhancing the efficiency of hybrid environments.

Comparison to Alternatives: Azure Blob Storage and On-Premises Solutions

Azure Files and Azure Blob Storage both offer scalable cloud storage, but they cater to different needs. Azure Blob Storage is optimized for storing unstructured data like backups, logs, and media files, making it ideal for archiving large amounts of data that don’t need frequent access. On the other hand, Azure Files shines in scenarios that require traditional file sharing with consistent, platform-agnostic access. It offers SMB and NFS protocols, allowing integration with legacy systems and applications that rely on traditional file shares, something Blob Storage cannot do.

Compared to on-premises file servers, Azure Files significantly reduces the overhead of managing physical infrastructure. Traditional servers require ongoing hardware maintenance, periodic upgrades, and manual scaling as storage needs grow. In contrast, Azure Files offers automated scaling, high availability, and built-in redundancy without the need for manual intervention. Disaster recovery and business continuity are also simplified with Azure Files since all data is replicated across multiple regions for resilience. Moreover, Azure Files eliminates the capital expense associated with maintaining on-premises file servers, offering a more flexible, pay-as-you-go model.

Overview of Folders in Azure Blob Storage

Overview of Folders in Azure Blob Storage

Azure Blob Storage is a popular and powerful object storage service provided by Microsoft Azure. It offers a wide range of features, including the ability to create and manage data in containers called “folders.” In this content audit, we will evaluate the quality of the overview of folders in Azure Blob Storage provided on a web page, and provide actionable suggestions for improvement. We will also discuss the use cases and potential risks and limitations associated with using folders in Azure Blob Storage.

What are Folders in Azure Blob Storage?

Azure Blob Storage is a fully managed, scalable, and reliable object storage service provided by Microsoft Azure. One of the key features of Azure Blob Storage is the ability to create and organize data in containers called “folders.” In this blog post, we’ll take a closer look at how folders work in Azure Blob Storage and how you can use them to organize and manage your data.

First, it’s important to understand the difference between a container and a folder in Azure Blob Storage. A container is the top-level object in Azure Blob Storage and acts as a logical grouping of blob data. Each container can have an unlimited number of blobs, but cannot have sub-containers or sub-folders. On the other hand, a folder is a virtual directory within a container, and can contain both other folders and blobs.

Whats the difference between Folders and Containers in Azure?

Folders in Azure Blob Storage are not actual directories, but rather a virtual way of organizing your blobs. When you upload a blob to a container, you can specify the path of the blob within the container using a forward slash (/) as a delimiter. This creates the appearance of a hierarchical file system, where the forward slashes indicate the level of nesting. For example, if you upload a blob to the container “mycontainer” with the path “images/summer/beach.jpg,” this creates the appearance of a folder “images” within the container “mycontainer” containing a subfolder “summer” which in turn contains the blob “beach.jpg”.

Use Cases of Folders in Azure Blob Storage:

Use Case Description
Organizing Data Folders allow users to organize their data in a hierarchical file system, making it easier to locate and manage data, especially in scenarios with a large amount of data. Users can organize data by date, project, customer, or other criteria.
Granular Permissions Folders can be used to apply permissions at a more granular level, allowing users to give access to a specific folder within a container rather than the entire container. This enhances security by limiting the access of users to sensitive data.
Hierarchical Namespace Folders can be used with Azure Data Lake Storage Gen2 to create a hierarchical file system on top of the blob data, allowing users to take advantage of features such as hierarchical storage, hierarchical namespace, and hierarchical access controls. This helps to enhance performance and scalability.

Risks and Limitations of Folders in Azure Blob Storage:

Risk/Limitation Description
Limited Support for Folders Azure Blob Storage provides limited support for folders, which are virtual directories and do not have any properties or consume any storage. Users may encounter challenges in creating, deleting, and listing folders in Azure Blob Storage.
Performance Overhead Using folders in Azure Blob Storage may result in a performance overhead, especially in scenarios with a large amount of data. Users need to be aware of this and optimize the performance accordingly.
Complexity The use of folders in Azure Blob Storage may add complexity to the system, especially when using hierarchical namespaces. This may increase the learning curve for users and the maintenance efforts for administrators.

Overall, the use of folders in Azure Blob Storage is beneficial for organizing data, applying granular permissions, and leveraging hierarchical namespaces. However, users need to be aware of the potential risks and limitations, such as limited support for folders, performance overhead, and complexity, when using folders in Azure Blob Storage. To improve the content of the web page, we recommend providing more detailed information on the use cases and potential risks and limitations of folders in Azure Blob Storage, and offering actionable tips on how to optimize the performance and reduce the complexity.


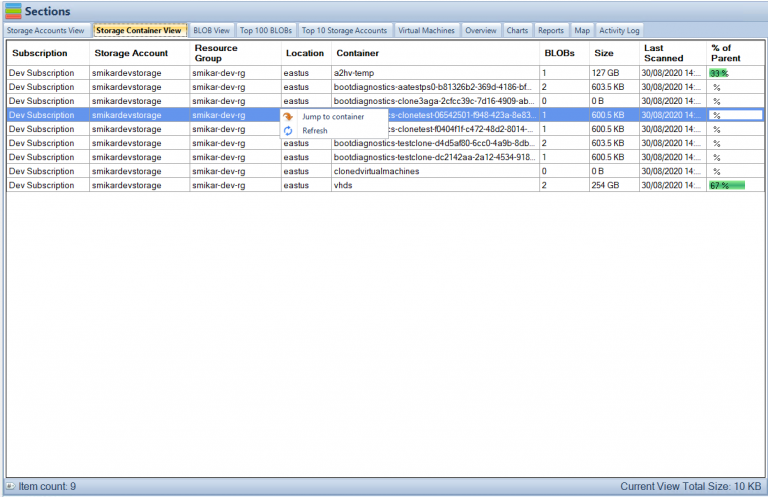
Cloud Storage Manager Storage Container Tab

Folders in Azure Blob Storage FAQs

What is the hierarchy structure in blob storage?

Azure Blob Storage uses a hierarchical structure that helps organize and manage data efficiently. The top-level object in Blob Storage is a container, which acts as a logical grouping of blob data. Within each container, you can create virtual directories called folders. These folders are a way of organizing blobs and other folders in a hierarchical file system, making it easier to find and manage data.

Is a blob just a file?

A blob in Azure Blob Storage is not just a file, but rather a collection of data that can include files, images, audio, video, and other types of unstructured data. Blobs are stored as a single entity, and each blob is identified by a unique address or URL. Blobs can be accessed and manipulated as a whole, but they can also be broken down into smaller chunks for efficient processing and streaming.

What data is stored in Azure blob storage?

Azure Blob Storage is designed to store unstructured data such as text and binary data, media files, documents, and backups. The data can be of any type, size, or format, and is stored in blobs. Blobs can be accessed and managed using various programming languages and tools, making it easy to integrate Blob Storage into your applications and workflows.

How files are stored in blob storage?

Files are stored in Azure Blob Storage as blobs, which are essentially a collection of binary data. When a file is uploaded to Blob Storage, it is broken down into smaller chunks and stored as a single blob. Each blob is identified by a unique URL, which can be used to access and manipulate the data. Blobs can be organized using virtual directories called folders, which create a hierarchical structure for managing data. Blob Storage also provides features such as redundancy, scalability, and security to ensure that your files are safe and easily accessible.

What are folders in Azure Blob Storage?

Folders in Azure Blob Storage are a virtual way of organizing your blobs. They do not actually exist as directories, but they create the appearance of a hierarchical file system within a container.

How are folders different from containers in Azure Blob Storage?

A container is the top-level object in Azure Blob Storage and acts as a logical grouping of blob data. Each container can have an unlimited number of blobs, but cannot have sub-containers or sub-folders. On the other hand, a folder is a virtual directory within a container, and can contain both other folders and blobs.

Can I apply permissions to a folder in Azure Blob Storage?

Yes, you can apply permissions to a folder in Azure Blob Storage at a more granular level than you can with a container. For example, you can give a user access to only a specific folder within a container, rather than giving them access to the entire container.

How can I use folders to organize my data in Azure Blob Storage?

You can use folders in Azure Blob Storage to organize your data in a number of ways, such as by date, project, or customer. This can make it easier to find and manage your data, especially if you have a large amount of data in your container.

Are there any limitations to using folders in Azure Blob Storage?

Folders in Azure Blob Storage do not have any properties and do not consume any storage. However, there are some limitations to using folders, such as the fact that they are not actual directories and cannot be nested more than one level deep.

How can I access folders in Azure Blob Storage?

You can access folders in Azure Blob Storage through the Azure portal, Azure Storage Explorer, or by using one of the Azure Blob Storage APIs or SDKs or using Cloud Storage Manager.


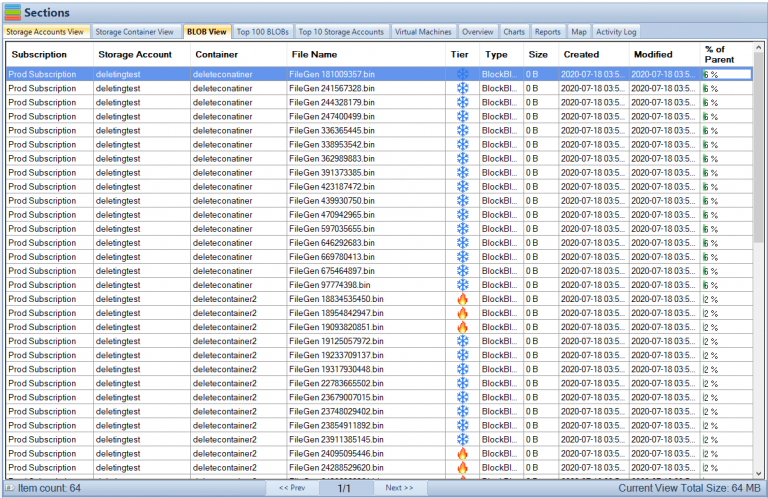
Cloud Storage Manager Blobs Tab

Folders in Azure Blob Storage Conclusion

Folders in Azure Blob Storage can be created, deleted and list in the same way as blobs, but the main difference is that folders do not have any properties and do not consume any storage.

Folders in Azure Blob Storage can be useful in a number of different scenarios. For example, you can use folders to organize your data by date, by project, or by customer. This can make it easier to find and manage your data, especially if you have a large amount of data in your container. You can also use folders to apply permissions at a more granular level. For example, you can give a user access to only a specific folder within a container, rather than giving them access to the entire container.

Another great feature of folders in Azure Blob Storage is that you can use them with Azure Data Lake Storage Gen2. Azure Data Lake Storage Gen2 allows you to use the hierarchical namespace feature of Azure Blob Storage with the file system semantics of Azure Data Lake Storage, like access controls and other features. This allows you to create a hierarchical file system on top of your blob data, and take advantage of features like hierarchical storage, hierarchical namespace, and hierarchical access controls

In conclusion, folders in Azure Blob Storage are a powerful feature that can help you organize and manage your data more effectively. They can help you create a hierarchical file system, apply permissions at a more granular level, and use Azure Data Lake Storage Gen2 feature on top of it. If you’re working with large amounts of data in Azure Blob Storage, it’s worth taking the time to consider how you can use folders to organize your data and make it more manageable.

If you need analysis of your Azure Blob Storage, trial our Software, Cloud Storage Manager that provides insights in to your Azure Storage Consumption.

Achieving PCI DSS Compliance in the Cloud

Achieving PCI DSS Compliance in the Cloud

Achieving PCI DSS Compliance for Your Cloud Operations

If you store, process, or transmit cardholder data or sensitive information, you must comply with the Payment Card Industry Data Security Standards (PCI DSS) set by major credit card companies. These security controls, released in 2018, are designed to help prevent, detect, and respond to security issues affecting payment card data. Failure to comply can lead to heavy fines, financial losses, damaged reputation, and lawsuits. But how do you ensure compliance for your cloud operations?

In this article, we’ll discuss the 12 PCI DSS requirements and six goals encapsulated in these standards. However, only seven requirements and four goals are relevant to cloud PCI DSS compliance.

What is PCI DSS Compliance?

PCI DSS is a set of security standards developed by the payment card industry to ensure that all companies that accept, process, store, or transmit credit card information maintain a secure environment. The standards are designed to protect cardholder data from theft and fraud and apply to all organizations that accept payment cards, regardless of size or volume.

Why is PCI DSS Compliance Important?

PCI DSS compliance is critical for any organization that handles credit card information because it helps to prevent data breaches and protects against financial losses, legal liabilities, and damage to the company’s reputation. Additionally, failure to comply with PCI DSS standards can result in costly fines and penalties.

The Challenges of Achieving PCI DSS Compliance in the Cloud

Achieving PCI DSS compliance in the cloud can be challenging due to several factors, including the shared responsibility model between the cloud service provider and the customer, the complexity of the cloud environment, and the lack of visibility and control over the infrastructure.

Understanding Cloud Service Provider Responsibility

In a cloud computing environment, the cloud service provider is responsible for securing the underlying infrastructure, including the physical data centers, servers, and networking components. The customer is responsible for securing their applications, data, and operating systems running on top of the cloud infrastructure. To achieve PCI DSS compliance in the cloud, it is important to understand the respective responsibilities of the cloud service provider and the customer and ensure that each party fulfills their obligations.

Best Practices for Achieving PCI DSS Compliance in the Cloud

To achieve PCI DSS compliance in the cloud, organizations should follow best practices that include:

Implementing a Risk Assessment Process

A risk assessment process should be implemented to identify, assess, and mitigate the risks associated with storing and processing cardholder data in the cloud.

Developing a Cloud Security Policy

A comprehensive cloud security policy should be developed that outlines the roles and responsibilities of all parties involved in the cloud environment and defines the security controls required to achieve PCI DSS compliance.

Securing Cloud Infrastructure

The cloud infrastructure should be secured by implementing security controls such as firewalls, intrusion detection and prevention systems, and access controls.

Protecting Data in the Cloud

Sensitive cardholder data should be protected by implementing encryption, tokenization, and other security measures.

Conducting Regular Audits and Assessments

Regular audits and assessments should be conducted to ensure that the cloud environment remains compliant with PCI DSS standards.

Ensuring Continuous Compliance in the Cloud

Achieving PCI DSS compliance is not a one-time event. It requires continuous monitoring and testing to ensure that the cloud environment remains secure and compliant. Organizations should implement a continuous compliance program that includes regular vulnerability scans, penetration testing, and security audits.

Educating Employees on Cloud Security Best Practices

One of the most significant vulnerabilities in any security system is the human factor. Employees must be trained on cloud security best practices to ensure that they understand their roles and responsibilities in maintaining a secure cloud environment. Training should cover topics such as password management, data protection, and incident response.

Goal: Build and Maintain a Secure Network

Malicious individuals can easily access and steal customer data from payment systems that don’t have secure networks. To achieve this goal, businesses must install and maintain firewall configurations that protect cardholder data. Firewalls are essential to protecting cardholder data, and businesses must ensure that their firewalls can protect all network systems from access by malicious players.

Another requirement under this goal is that businesses should not use vendor-supplied passwords, usernames, and other security parameters as default. Instead, you should change vendor-supplied security parameters immediately after deployment.

Goal: Adopt Strong Access Restriction Measures

Limiting access to cardholder data is critical to protecting sensitive payment details. Such information should only be granted to authorized personnel on a need-to-know basis. All your employees with computer access should use separate, unique IDs, and employees should also be encouraged to observe a secure password policy.

Goal: Regularly Monitor and Test Networks

Malicious hackers constantly test network systems for holes and vulnerabilities. As such, organizations should monitor and test their cloud networks regularly to identify and mitigate vulnerabilities before malicious actors exploit them. The PCI DSS requirement for this goal is to track and monitor access to network and cardholder data. Cyber experts agree that identifying the cause of a data breach is almost impossible without activity logs of a network system. Network logging mechanisms are vital to effective management of vulnerabilities because they allow your IT teams to track and analyze any occurring incidences.

It’s worth noting that while PCI DSS provides guidelines that should be adhered to, it’s your responsibility to ensure that your cloud service provider complies with these regulations. Therefore, before employing their services, ensure that you ascertain your CSP’s proof of compliance and certification. Ask them what their cloud services entail and how the services are delivered, the status of the cloud service provider in terms of data security, PCI DSS compliance, and other important data security regulations, what your business will be responsible for, and if they will provide ongoing evidence of compliance to all security controls. You should also ask if there are other parties involved in service delivery, support, or data security, and if the service provider can commit to everything in writing.

In conclusion, achieving PCI DSS compliance for your cloud operations is critical to protecting your business from heavy fines, financial losses, damaged reputation, and lawsuits. By following the above guidelines, you can ensure that your cloud operations comply with these regulations and prevent malicious actors from accessing and stealing your customer data.

Conclusion

Achieving PCI DSS compliance in the cloud requires a comprehensive approach that includes risk assessment, policy development, infrastructure security, data protection, regular audits and assessments, and employee education. By following best practices and working closely with their cloud service provider, organizations can maintain a secure and compliant cloud environment that protects against data breaches, financial losses, and legal liabilities.

PCI Compliance FAQs

What is PCI DSS Compliance?

PCI DSS compliance is a set of security standards developed by the payment card industry to ensure that all companies that accept, process, store, or transmit credit card information maintain a secure environment.

Who is responsible for PCI DSS Compliance in the cloud?

In a cloud computing environment, the cloud service provider is responsible for securing the underlying infrastructure, including the physical data centers, servers, and networking components. The customer is responsible for securing their applications, data, and operating systems running on top of the cloud infrastructure.

What are the challenges of achieving PCI DSS Compliance in the cloud?

The challenges of achieving PCI DSS compliance in the cloud include the shared responsibility model between the cloud service provider and the customer, the complexity of the cloud environment, and the lack of visibility and control over the infrastructure.

What are some best practices for achieving PCI DSS Compliance in the cloud?

Best practices for achieving PCI DSS compliance in the cloud include implementing a risk assessment process, developing a cloud security policy, securing cloud infrastructure, protecting data in the cloud, conducting regular audits and assessments, and educating employees on cloud security best practices.

Why is PCI DSS Compliance important?

PCI DSS compliance is important because it helps to prevent data breaches and protects against financial losses, legal liabilities, and damage to the company’s reputation. Failure to comply with PCI DSS standards can result in costly fines and penalties.

How to download an Azure VM

How to download an Azure VM

Migrate an Azure VM to VMware or Hyper-V

If you’re looking to download an Azure Virtual Machine to either VMware or Hyper-V for cost savings or compliance reasons, our software Carbon automates the process with just a few clicks. With Carbon, you won’t need to use PowerShell or download the VHD from the Azure portal.

To download your Azure VM to your preferred hypervisor, simply follow the steps outlined below for VMware.

First, download and install Carbon. Then, select your Azure VM and specify your VMware environment as the target. Carbon will handle the rest, downloading and converting your Azure VM to VMware.

In addition to VMware, Carbon also supports Hyper-V as a target environment. So whether you need to export your Azure VM to VMware or Hyper-V, Carbon can help.

To get started, download a free trial of Carbon and try it out for yourself. Don’t waste time with manual downloads or complicated PowerShell scripts – let Carbon simplify the process for you.

The Easiest way to convert your Azure VM to VMWare or Hyper-V

Launch Carbon

Once you have Carbon installed, the first task is to launch Carbon.

Carbon Azure Migration Tool Loading Screen

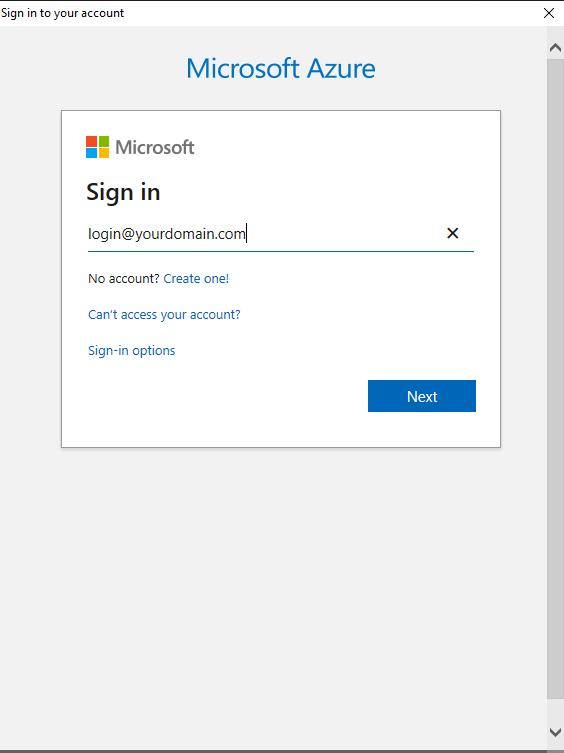
Sign in to the Azure Portal

You will now be prompted to login to Azure, so enter your credentials with access to your Azure Portal.

Carbon Azure VM Download Login

Scan your Azure Portal for all of your Azure Virtual Machines

Find all your Azure VMs

Once you have authenticated against your Azure Tenant, Carbon will now start scanning your Azure environment for all your Azure Virtual Machines.

This could obviously take some time if you have a large Azure Environment.

Once the scan of your Azure VMs has completed, you will see the list of all the Azure VMs in your Azure Tenancy.

Carbon Azure VM Download Scanning

List all your Azure VMs

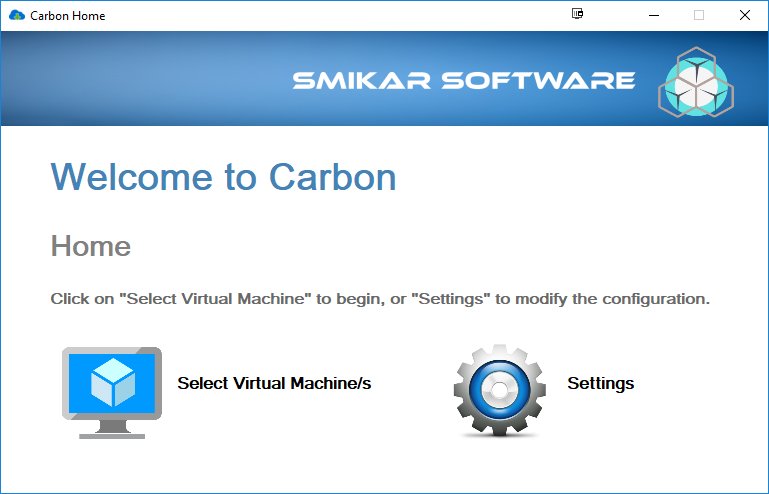
Now that your scan of all your Azure VMs is complete, choose Select Virtual Machine/s to list all your Azure VMs in your Tenancy and start the migration process.

Carbon Home Screen

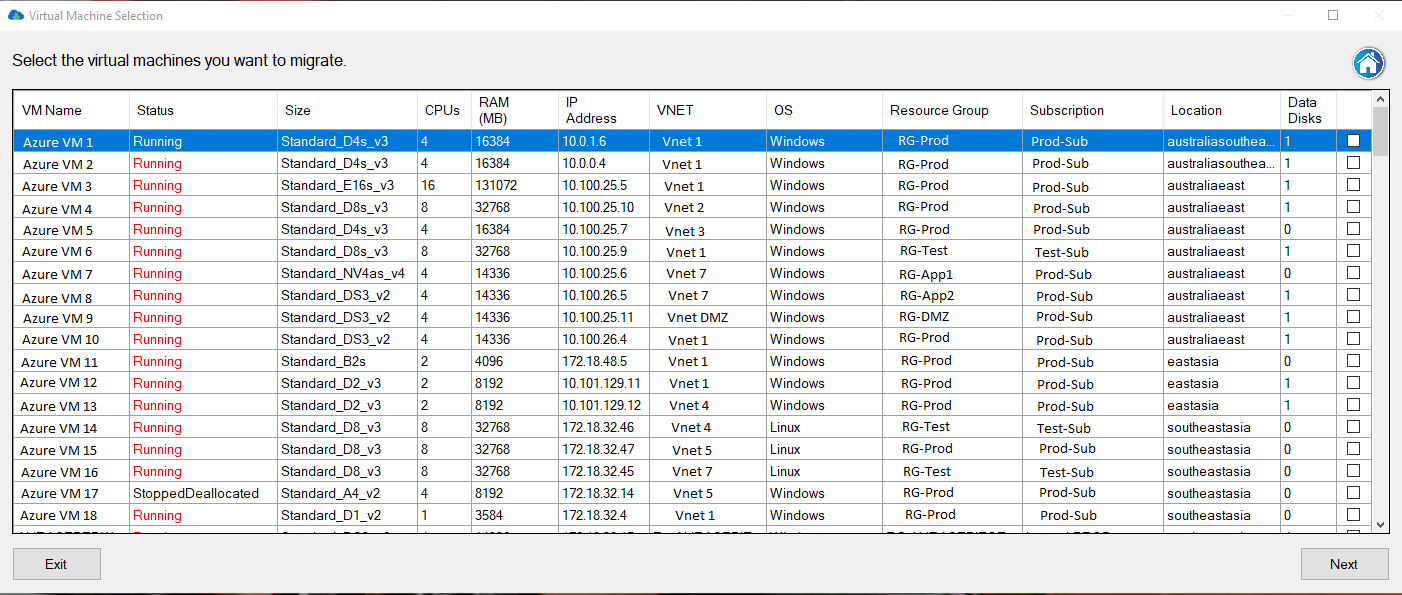
Select your Azure VM for Migration

Which Azure VMs do you want to migrate back to your Hypervisor

Now you should see a list of all your virtual machines in your Azure Environment.

Details displayed include:

  • The Azure VM Name
  • The status of the Azure VM
  • The Azure VM size
  • The number of CPUs your Azure VM has
  • The amount of Ram
  • The Azure VM’s IP Address
  • The Azure vNet it resides in
  • The Operating System of your Azure Virtual Machine
  • The Azure Resource Group
  • The Azure Subscription
  • The Azure location
  • and finally, the number of disks attached to your virtual machine

You simply select (by using the checkbox on the very right of the screen) the Azure VMs you want to download to VMware, then click Next.
The VMs you want to migrate will need to be powered off, so make sure you do this prior to attempting the migration.


Carbon Azure VM Details

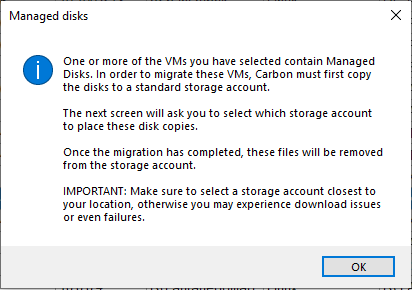
Managed or Unmanaged Disks

Azure VM Disk Configuration

Now if the Azure VMs you are going to convert to VMware are using Azure Managed Disks, you will get this prompt.

Click OK to proceed.

What Carbon will do next is copy this Azure VM disks to a storage account that you specify in the next screen.

Please take note of the location of your Azure VM, as you want to use an Azure Storage Account in the same region.

Azure Managed Disk Prompt

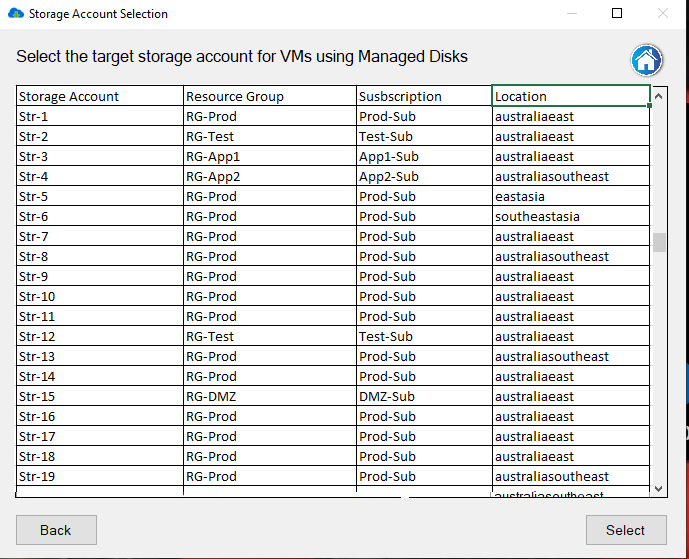
Azure Storage Account for Conversion

Choose a destination Azure Storage Account

Next we select the appropriate Azure Storage Account that the Azure VM will be copied and converted to.

Choose the storage account you want and then choose Select.

Carbon will now read your Azure VM disk configuration. This can take a few minutes.

Azure Storage Account Details

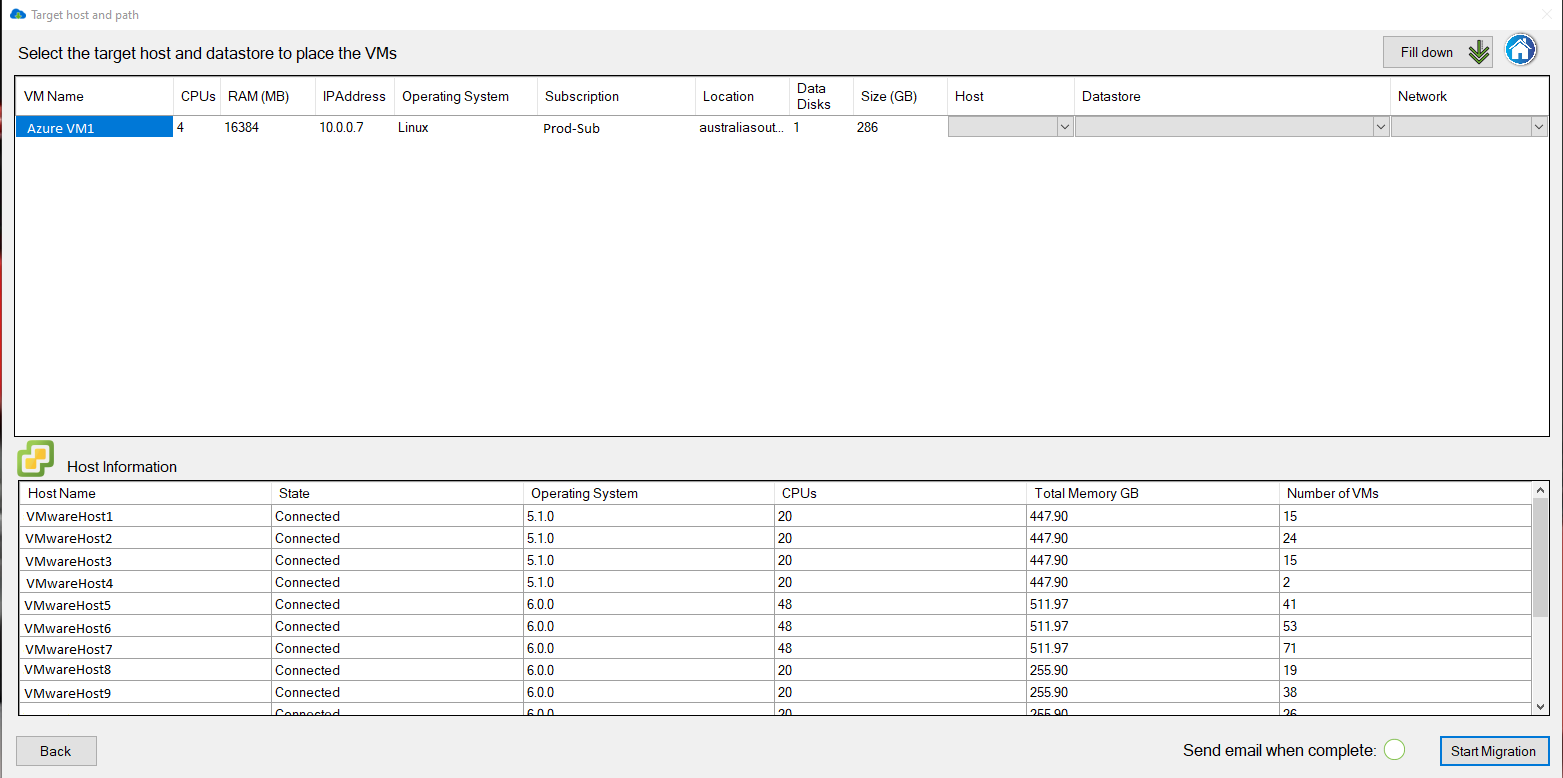
Choose your VMWare or Hyper-V Environment for Azure VM Migration

Connect to you Hypervisor

Now we are presented with your virtual environment (in this case our VMware vCentre environment)

Choose from the dropdown lists the VMware Host, the datastore and virtual network you want your Azure VM to download to.

You have the option here to send you an email once the migration has completed.

Click Start Migration to proceed to the final step


Azure VM Download VMware

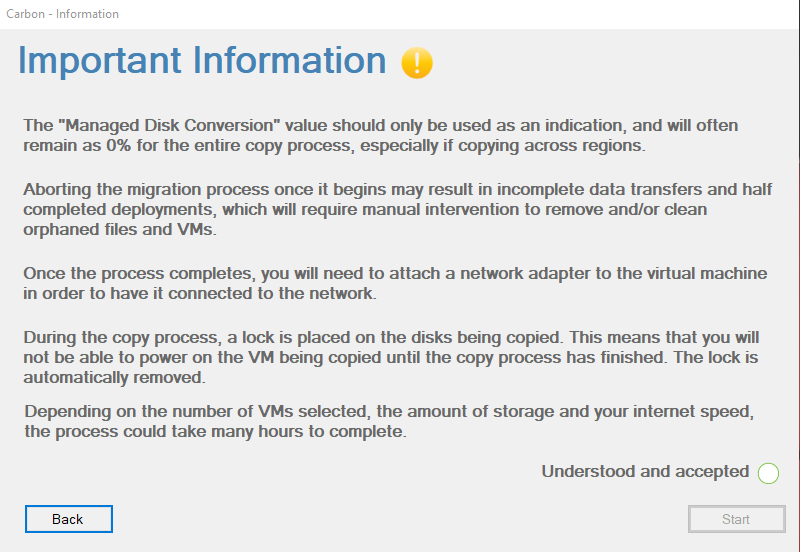
Ready to start the Migration of your Azure VM

Start the Migration Process

Finally we are prepared to start the conversion of your Azure VM to VMware.

Review the information here, when you are ready, click the circle next to Understood and Accepted, then click Start.  

Azure VM Migration to VMware

Azure VM Migration Process

Converting your Azure VM

Now, the conversion process is underway. Your Azure VM will be downloaded and converted to the appropriate format for either VMware or Hyper-V before finally being deployed to your on-premise virtual infrastructure.

Please Note: This may take some time, dependent on the size of your Azure VM disks, so please be patient. 

If you have email alerting setup and turned on, you will receive an email once the process has completed.

Azure VM Conversion Process

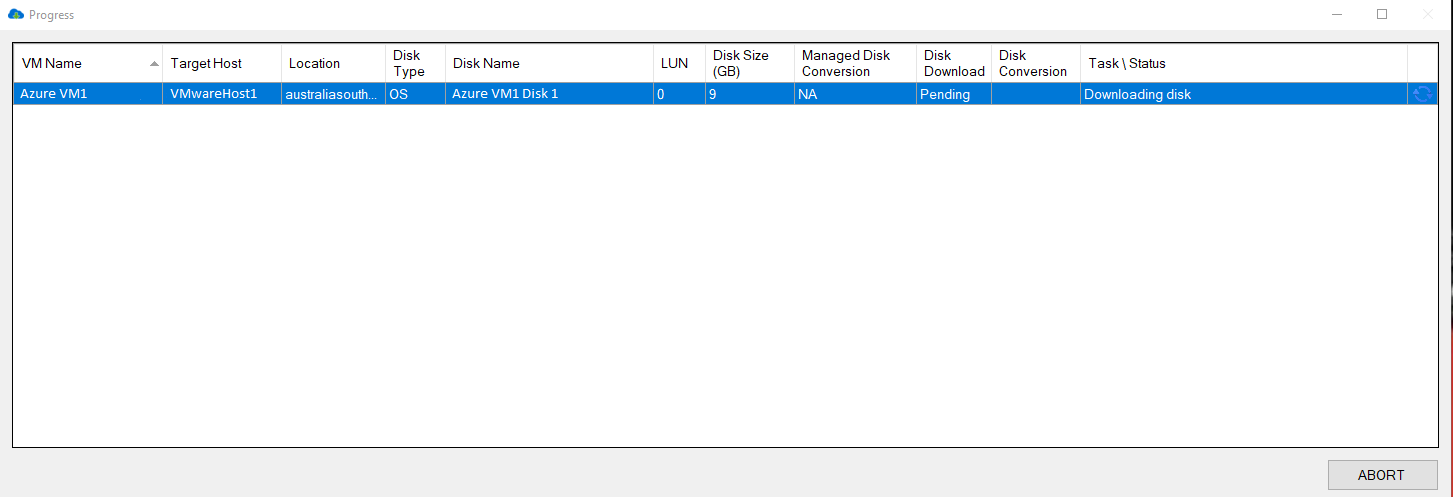
Azure VM Conversion Progress

Converting your Azure VM for your selected Hypervisor

Watching the Progress window you can see the status of your download and conversion of your Azure VM.

In this picture you can see that the disk download has completed as well as the conversion and its currently being uploaded to our VMware environment.

Azure VM Conversion Status

Azure VM Converted

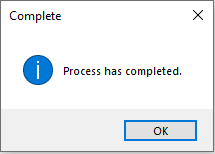
Azure VM Conversion is now Complete

After some time your Azure VM should now have downloaded, converted to VMware and be available within your vCentre server.

Azure VM download to VMware Complete

Azure VM Migration Alerts

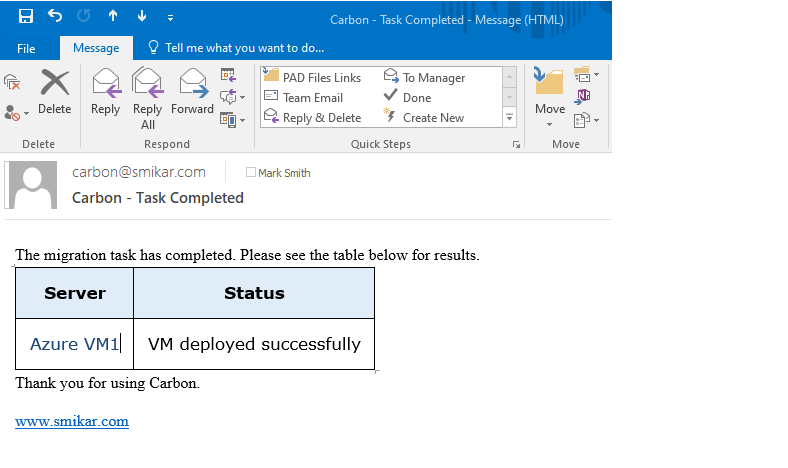
If you requested an email alert, you should have received one in your inbox stating that the Azure VM has now deployed to your VMware environment.

Azure VM Download Email

Azure VM Conversion Completed

View the migrated VM in your Hypervisor

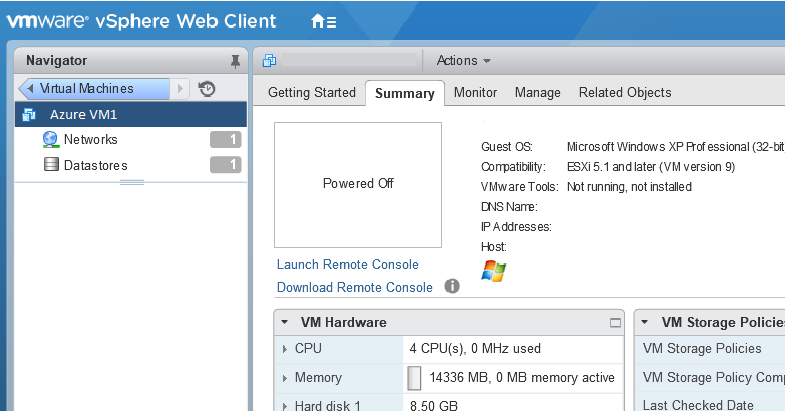
If you go to your vCentre now you should be able to find the Azure VM you had migrated to your VMware environment.

All left for you to do now, is power it on then log on to the VM and update the IP address if needed.


Azure VM on VMware

Azure VM Conversion Completed

Find the migrated VM in your Hypervisor

If you go to your vCentre now you should be able to find the Azure VM you had migrated to your VMware environment.

All left for you to do now, is power it on then log on to the VM and update the IP address if needed.


Azure VM on VMware

Your Azure VM has been converted and then migrated to your Hyper-v or VMware environment.

And that’s all there is to it. You have downloaded an Azure VM and converted it to VMware or Hyper-V. (Obviously in this example we converted the Azure VM to VMWare. For HyperV the last few steps are replaced with VCentre with SCVMM)

You can download a fully functioning trial of Carbon here to test it for yourself.

Carbon: Moving You Forward by Bringing You Back.