How to find the largest Azure Blobs

How to find the largest Azure Blobs

If you are looking to optimize their storage costs on Azure Blob storage. With the increasing amount of data being stored in the cloud, it’s important to keep track of the size of each Blob and identify which ones are taking up the most storage. This is where the guide comes in – it provides a step-by-step process on how to use Cloud Storage Manager to find the largest Azure Blobs in your environment.

By identifying the largest Blobs, you can take steps to optimize your storage costs, such as deleting unnecessary data or moving data to a more cost-effective storage tier. Whether you’re new to Azure Blob storage or an experienced user, this guide is a helpful resource for optimizing your storage costs.

Recently we had one of our clients inform us that he used Cloud Storage Manager to find which were the largest Blobs in his Azure Storage Containers

Here is a quick run down to show one of the many reports on your Azure Blob consumption that you can run with Cloud Storage Manager.

Which are my largest Azure Blobs?

See all your Azure Blob Sizes

If you want to find out which BLOBs in your environment are the largest, or consuming the most storage, the easiest and simplest method by far is to use Cloud Storage Manager.

Once you’ve allowed Cloud Storage Manager to scan your environment, you have a few options to get this information.

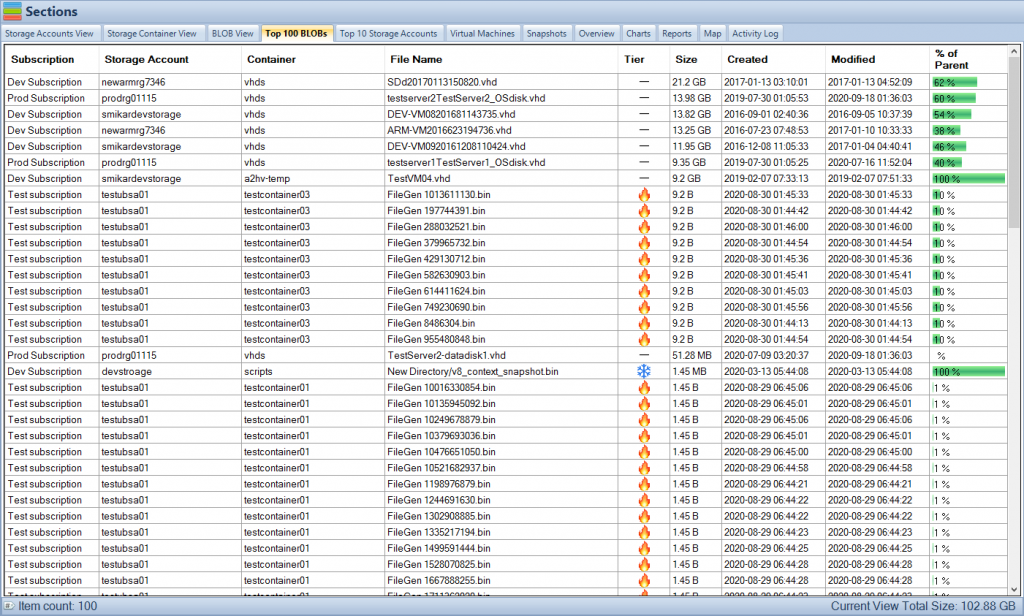
The Top 100 BLOBs tab will give you a list of the top 100 largest BLOBs in your environment. It will also show you which Subscription, Storage Account, Container the BLOB resides in and of course its name. Not only that but it will tell you the object tier, whether that is hot, cool or archive, the size of the Azure BLOB, when it was created and when it was last modified.

Have a look at the screenshot to get a clearer picture.


Azure Blobs Top 100

Your largest Azure Blob Sizes

In the bottom right corner you will also see how much overall storage your largest 100 BLOBs are consuming. In our example, we can see that our largest 100 BLOBs are consuming 102GB. Of course, this is just our lab environment so in a real production environment this could be hundreds of TB or PB!

You may also export this data into a spreadsheet by selecting the Reports tab and selecting the “List the top 100 BLOBs” report.


Azure Blob Report

Azure Blob Storage Size Report

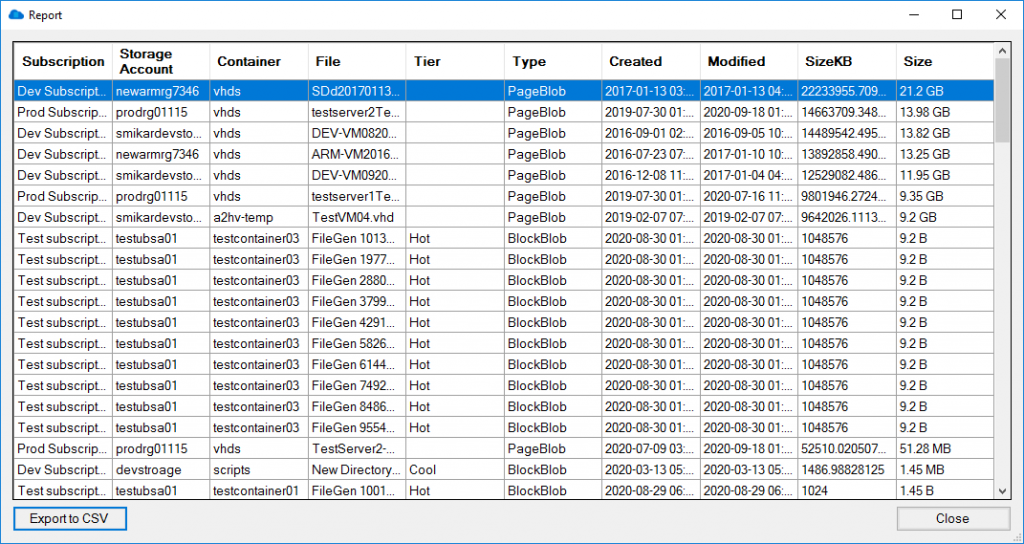
Right click on the report and select “Run Report” to view the data in an exportable table format that you can see in Microsoft Excel. 

The export includes all relevant information including the Azure Subscription, Azure Storage Account, the Container the Blob resides in, the name of the Azure Blob itself, what storage tiering the Blob is in, the date created, last modified and finally it’s size.


Azure Blob Report Export

Free

Cloud Storage Manager Icon

Maximum Azure Storage limited to 30TB.

Typically for small or personal environments usually consisting of 3 or less Azure Subscriptions and consuming under 30TB of Azure Blob Storage. 

Free Forever (until over 30TB)

Advanced

Cloud Storage Manager Icon

Maximum Azure Storage limited to 1PB

For medium sized environments typically consisting of less than 5 Azure Subscriptions.

12 Month License

Enterprise

Cloud Storage Manager Icon

Unlimited Azure Storage.

For use in large environments typically consisting of more than 10 Subscriptions and consuming more than 1PB of Azure Blob Storage.

12 Month License

Cloud Storage Manager is licensed based on the size  of your Azure Subscriptions, Azure Storage Accounts, Containers and finally each Blob. 

Each version has the same great functions including scheduled scans of your Azure Blob Storage and reporting.

FREE DOWNLOAD

Send download link to:

I confirm that I have read and agree to the End User License Agreement.

FAQs

What is Azure Blob storage? 

Azure Blob storage is a cloud-based storage solution offered by Microsoft Azure. It allows users to store and access large amounts of unstructured data, such as text or binary data, through REST-based object storage.

Why is it important to find the largest Azure Blobs? 

Identifying the largest Azure Blobs is important for optimizing storage costs. By understanding which Blobs are taking up the most storage, users can take steps to delete unnecessary data or move data to a more cost-effective storage tier.

How can Cloud Storage Manager help me find the largest Azure Blobs? 

Cloud Storage Manager provides a step-by-step process to find the largest Azure Blobs in your environment. It offers a Top 100 BLOBs tab that gives users a list of the top 100 largest BLOBs in their environment, along with information on the Subscription, Storage Account, Container, object tier, size, and more. Users can also export this data into a spreadsheet.

How is Cloud Storage Manager licensed? 

Cloud Storage Manager is licensed based on the size of your Azure Subscription. There are three versions of Cloud Storage Manager: Free, Advanced, and Enterprise, each with different limits on database size. All versions offer scheduled scans of Azure Blob Storage and reporting.

Who can benefit from using Cloud Storage Manager? 

Cloud Storage Manager is useful for anyone who uses Azure Blob storage and wants to optimize their storage costs. It can be helpful for both new and experienced users of Azure Blob storage.

How to sync users from a second domain using AD Connect

How to sync users from a second domain using AD Connect

Overview

Are you looking to integrate a new company into your existing Azure AD tenant? Or perhaps you need to share your tenancy and Office 365 services with more than one company? If you find yourself in a position where you need to sync users from another domain and have already configured AD Connect, then there is a way to add the second domain to your current Azure tenancy, so you can sync those users from the second domain.

Before proceeding, make sure you review the supported topology when it comes to AD Connect and multiple domains/tenants. You can find the information in this Microsoft article: https://docs.microsoft.com/en-us/azure/active-directory/hybrid/plan-connect-topologies

However, there is one limitation that will most likely cause you the most grief, and is probably why you landed here in the first place. You can only have one AD Connect instance per tenant. So, if you need to sync users from a second domain, you will have to follow the process outlined below.

Establish Domain Trust Before proceeding, you need to establish an AD trust between the two domains. If you have not done this yet, you will need to perform this step first. If you are not sure how to do this, you can refer to this guide: https://www.azure365pro.com/how-to-create-two-way-transitive-trust-windows-server-2008-r2/

OK, now that we have our domain trust established, let’s step into the process.

Step by step guide how to synchronise users from a second domain in to Azure Active Directory.

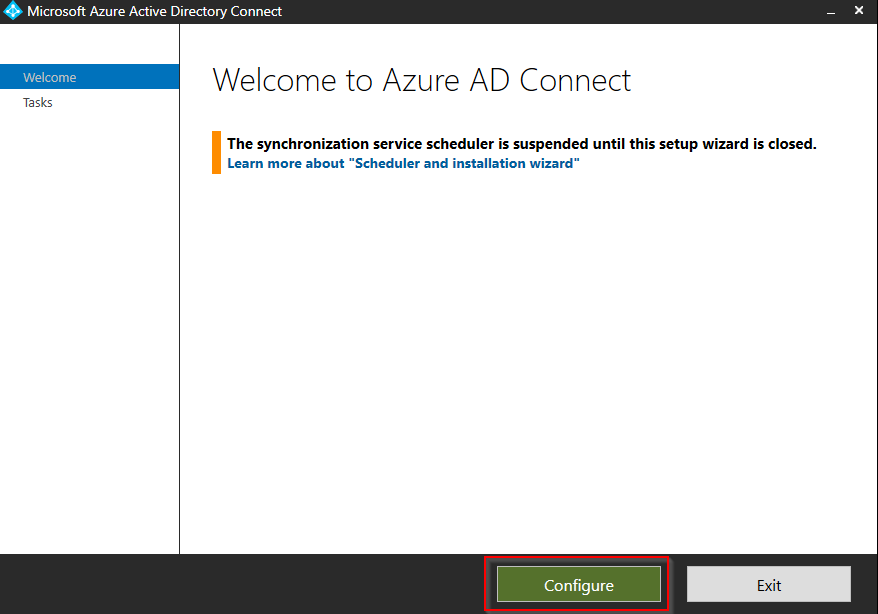
Launch AD Connect and click on Configure


Welcome to AD Connect

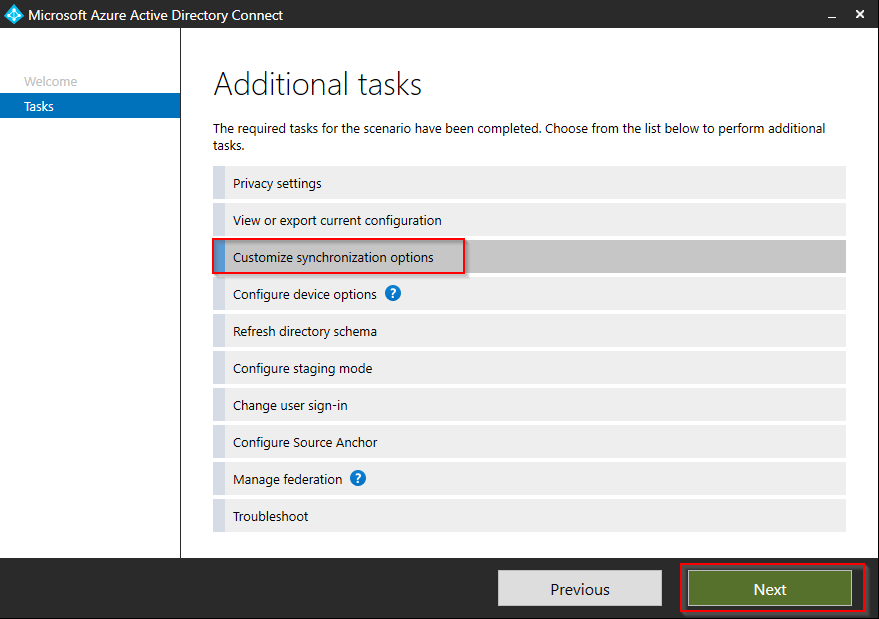
Click on Customize synchronization options and click Next


AD Connect Additional Tasks

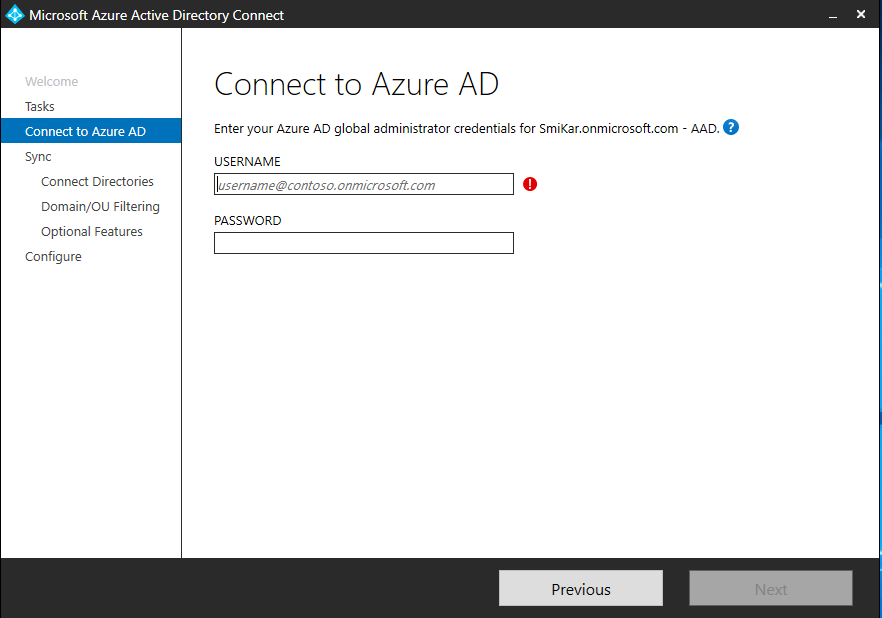
Enter the credentials to connect to Azure AD and ensure the account is a global administrator.


Connect to Azure AD

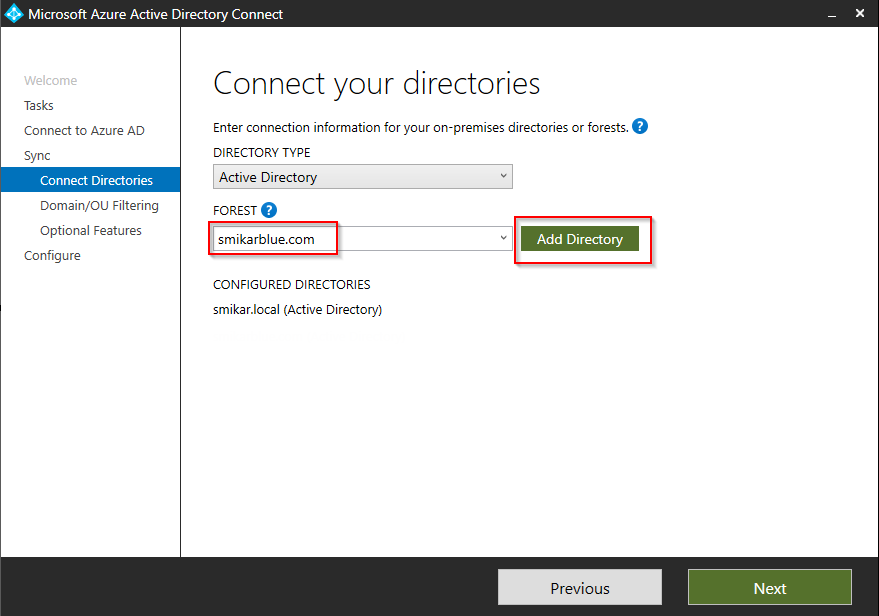
Enter the name of the second domain and click Add Directory


Connect your directories

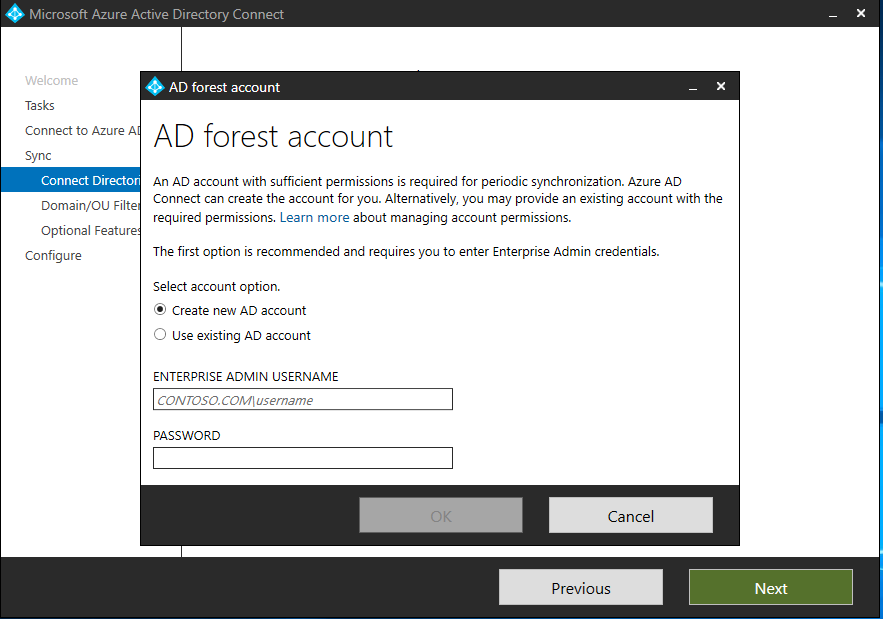
Enter the details of a user account in the domain that is a member of the enterprise administrators group.


AD Forest account

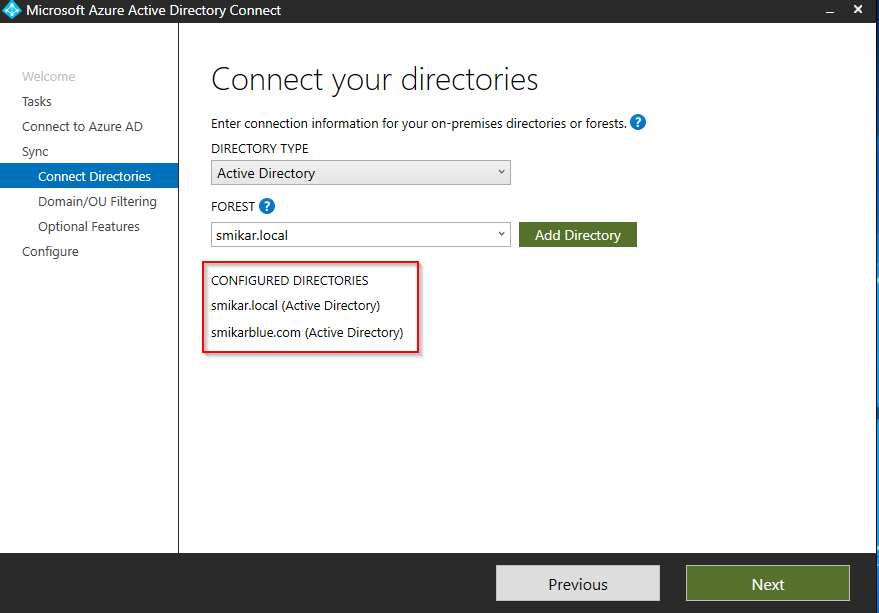
You will now see the second domain added to the configured directories list.


Second Domain

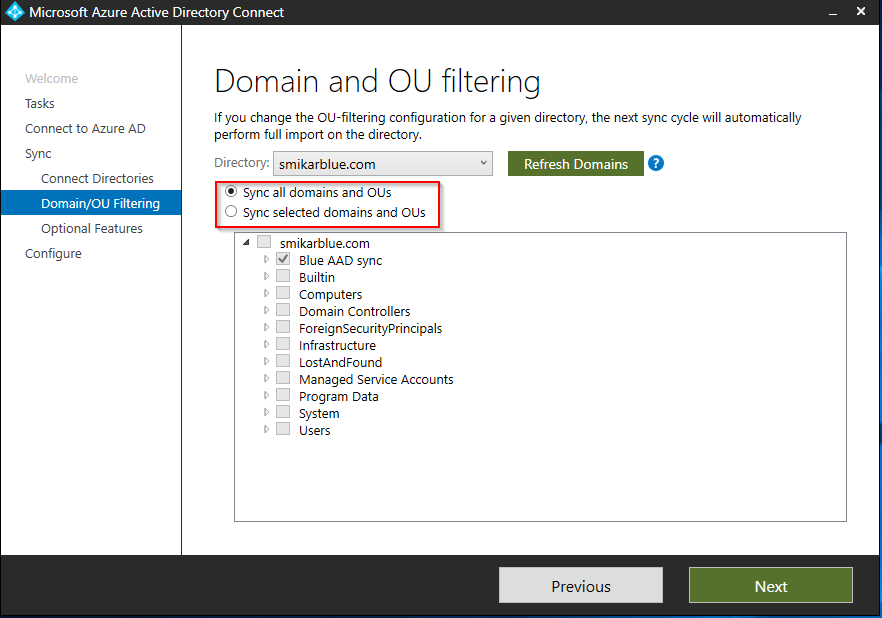
Select whether to sync all the objects in the domain, or to sync only objects in specific OUs.


Domain and OU Filtering

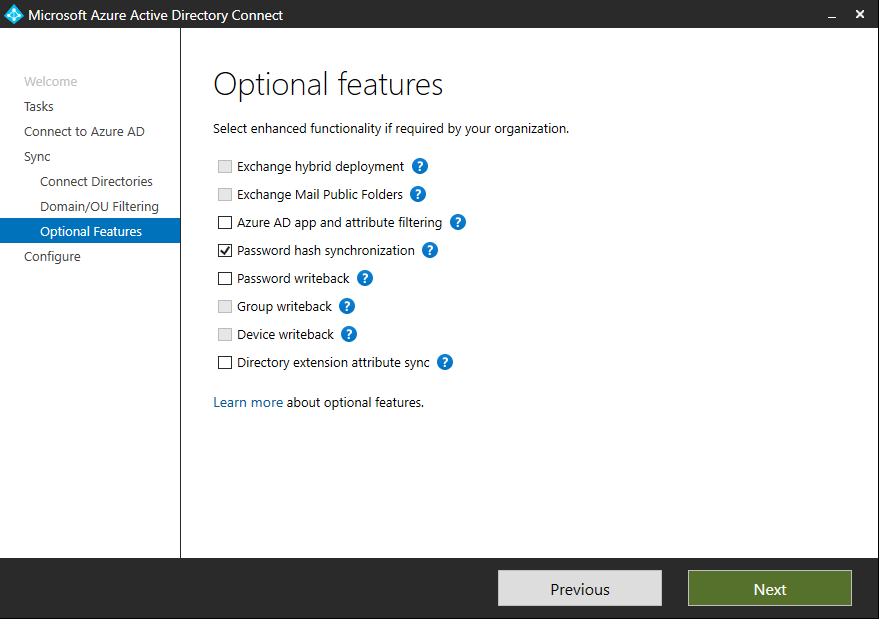
Select any optional feature you require and click Next


Optional Features

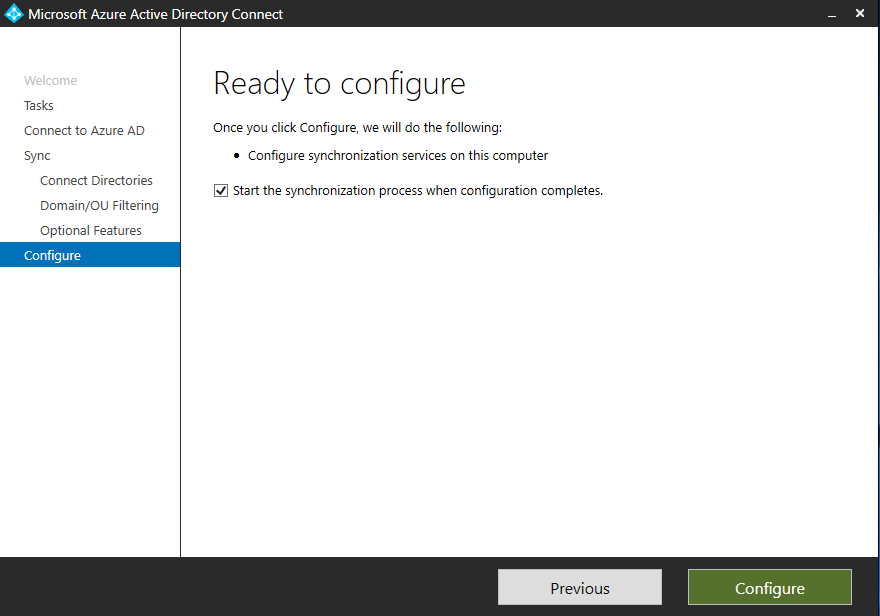
Tick the box if you want to start the synchronisation process once the configuration completes, or you may untick it and place AD Connect into a “disabled” mode (will require PowerShell commands to activate it).


Ready to configure Azure AD

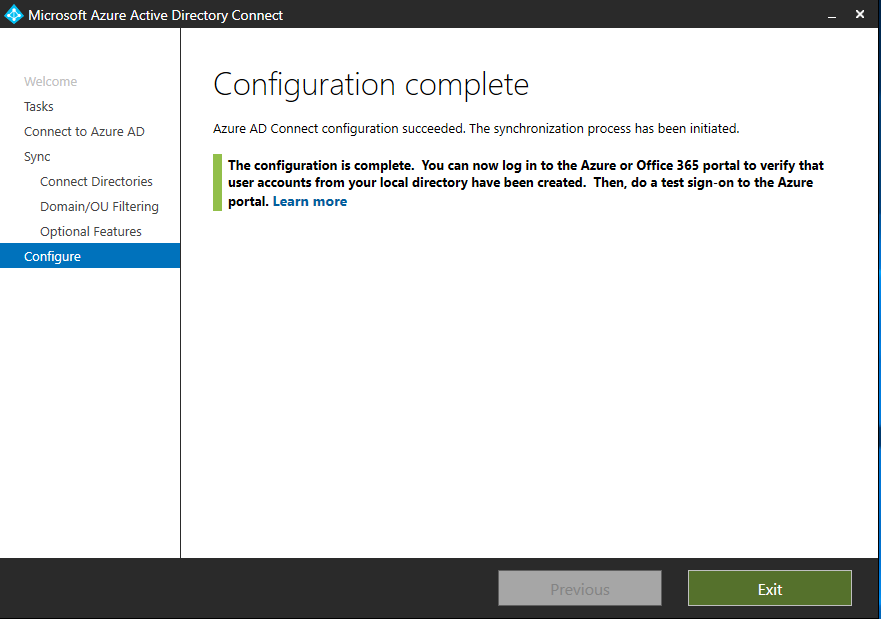
Click Configure when ready to finish the process.


Azure AD Configuration Complete

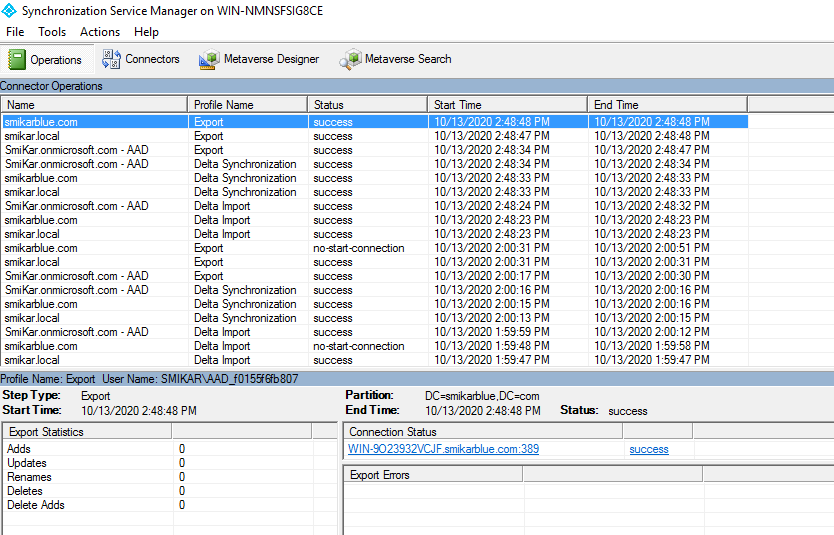
AD Connect will now synchronise objects from both domains into your Azure AD tenant.

You can monitor the process by launching the AD Connect Synchronization Service Manager.


Azure AD synchronisation

How to view the size of all your Azure Storage Accounts

How to view the size of all your Azure Storage Accounts

Why you should monitor your Azure Storage

Monitoring Azure storage usage is important for businesses because of the cost implications and the impact it can have on operations.

  1. Cost implications: Azure storage is a pay-as-you-go service, meaning businesses are charged based on their usage of storage, data transfer, and the number of storage transactions. Unmonitored storage usage can quickly lead to unexpected and unnecessarily high charges. Monitoring Azure storage usage helps businesses stay aware of their storage consumption and avoid overspending on storage costs.
  2. Impact on operations: Azure storage is a critical component of many business operations and applications. If storage usage is not properly monitored, it can result in a shortage of storage capacity, slow performance, and disruptions to operations. Monitoring storage usage can help prevent these issues by alerting businesses when their storage capacity is reaching its limit and allowing them to take action to prevent outages.

In summary, monitoring Azure storage usage is important for businesses to control costs, ensure adequate storage capacity, and avoid disruptions to operations. By monitoring storage usage, businesses can make informed decisions about their storage requirements and take proactive steps to manage costs and maintain optimal performance.

Do you really know how much Azure Storage you are using?

As more and more organisations dive into Azure, storage consumption continues to grow and so does the cost to businesses. Azure offers almost a limitless supply of storage, but this comes at a cost so it’s important to know exactly where that storage is going.

There are a few ways to get this information, either via the Azure portal, Azure Storage Explorer or even PowerShell. However, all these tools have limitations and to be honest, rather lacking and not that straightforward.

So first I’ll show you how to get this information using the Azure portal and Azure Storage Explorer and then show you how you can get a better picture and experience using our FREE TOOLCloud Storage Manager.

How to get the size of all Storage Accounts using the Azure portal

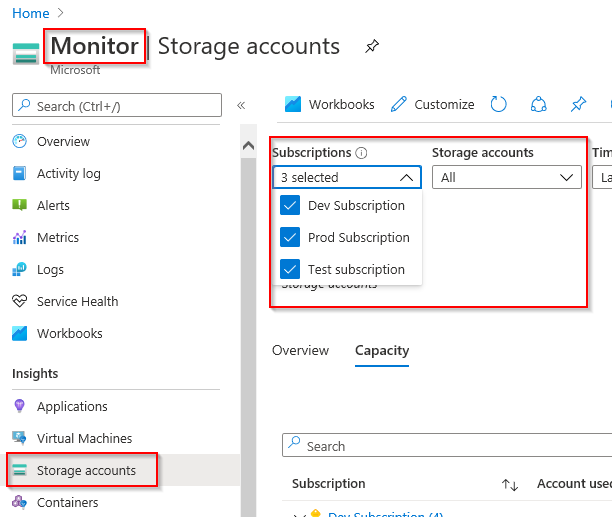
  1. Log into the Azure portal
  2. Select Monitor from the left hand panel or use the search bar at the top
  3. Select Storage Accounts from the left hand pane under the Insights section
  4. Use the Subscriptions drop down list and select which Subscriptions you want to view
  5. Select Capacity on the right pane next to Overview
  6. Use the Storage Accounts drop down list to select which storage accounts you are interested in viewing, or select All.

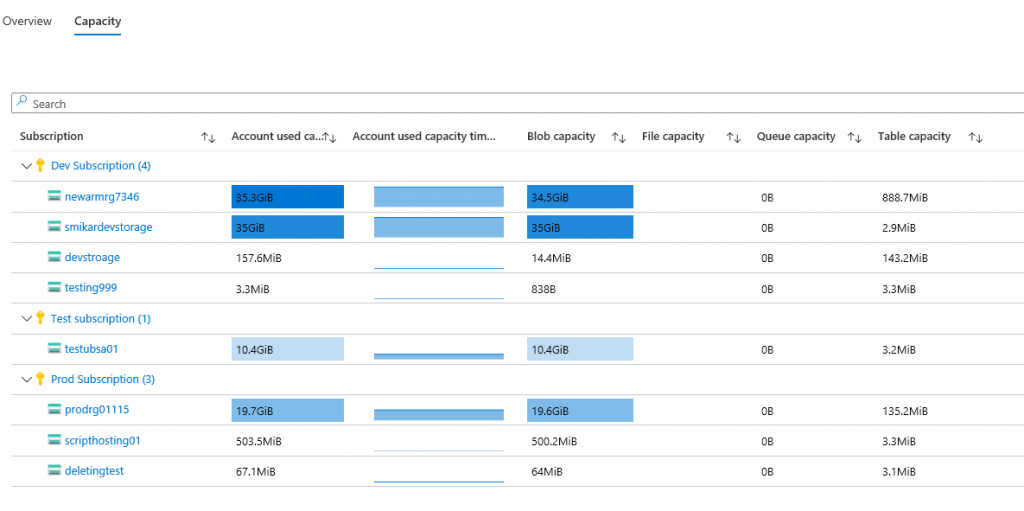
Here you will see the consumed storage for each of your selected subscriptions and storage accounts.


Azure Storage Accounts

Azure Storage Capacity View

This view will provide you with a quick overview of the capacity used for each storage account. Although this will tell you how much storage is being consumed, you cannot drill down to see what is consuming the storage. To go any further you need to jump into the Storage Account view, select Containers and then blindly browse each container looking for blobs and in particular the size of each blob to find out where this storage is actually going.


Browsing your Azure Blobs using Azure Storage Explorer.

Another option is to use Azure Storage Explorer which is now built into the Azure portal (preview).

  1. Log into the Azure portal
  2. Select or search for Storage Accounts
  3. Select the Storage Account you are interested in
  4. Select Storage Explorer on the blade on the right

From with the Azure Storage Explorer Application,  you can browse the containers of that storage account and view the size of each blob inside each container.


Azure Storage Explorer

Finding more indepth information on your Azure Blob Usage

However, you are in the same boat as before, blindly searching through Containers looking for the size of blobs not knowing where they are. This may not be an issue if you only have 2 or 3 containers with 10 or less blobs in each. But what if you have 10, 50 or more Containers and hundreds or thousands of blobs?

How would you know which Container or blob is consuming the space? In short, you can’t, at least not easily.

Even with the full blown Azure Storage Explorer, the task is quite tedious because you have to browse each individual Container in each Storage Account and get the statistics to calculate the storage consumed. That is not a fun job.

Azure Storage Consumption Overview

This is where Cloud Storage Manager gives you the easiest, quickest and best experience by far.

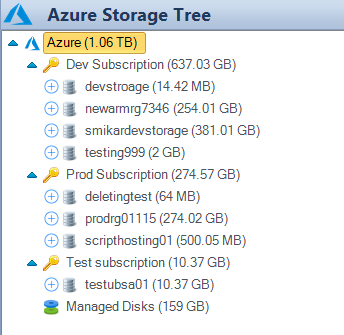
With Cloud Storage Manager you can instantly see how much storage each Subscription, Azure Storage Account, Container and blob is consuming. It provides you with a simple explorer like view to browse through each level.

Here you can immediately see how much storage is being consumed at every level.


Azure Storage Tree View

Azure Container Sizes

And by selecting the Container View tab on the right hand pane also gives you an instant view to see how much storage each Container in Azure is consuming.

A percentage column outlines the overall size of that container relative to its parent Storage Account.


Azure Container Contents

You can also right click on the Container you are interested in and select Jump to Container to expand and select that Azure Container on the tree pane.


Azure Blob Sizes

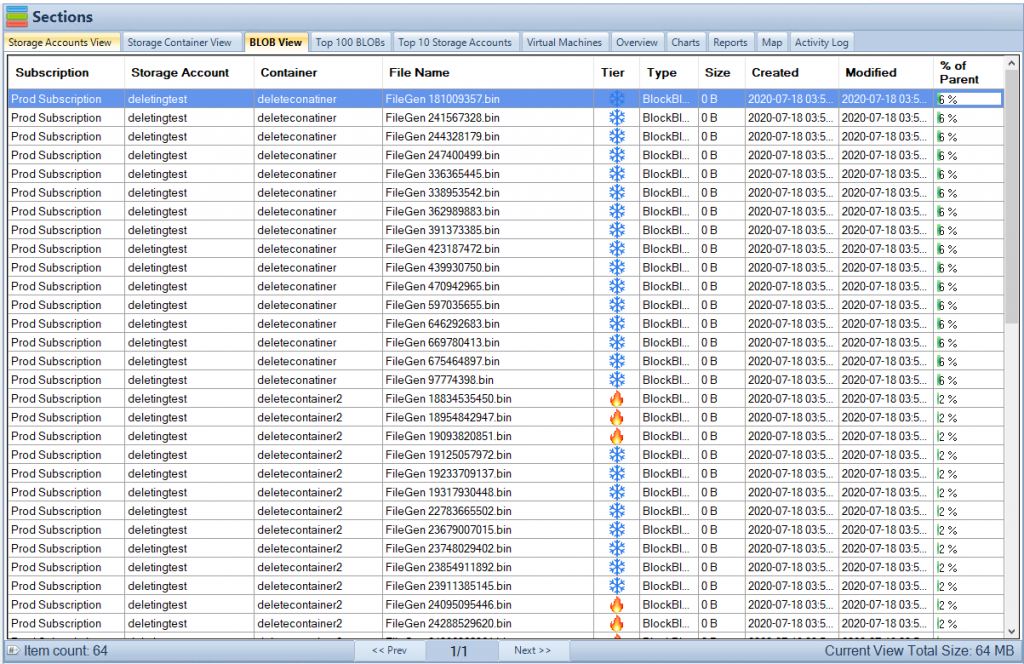
As you can see, the Container has been selected on the Storage Tree pane on the left. And on the right you can select the BLOB view tab to see the blobs in that container and of course the size of each blob. The Blob view is sorted based on size, so if even if you have hundreds or thousands of blobs, you will see which ones are taking up the most space first.


Cloud Storage Manager Blobs Tab

Azure Blob Information

You can also right click on the Blob to get additional options, such as delete the blob, change the object tier or view the blob properties.


Cloud Storage Manager Azure Storage Blobs Tab

As you can see, Cloud Storage Manager is easily the quickest and simplest way to know where your Azure storage is being consumed, and its all for FREE.

Cloud Storage Manager

Gain insights into your Azure Storage with our FREE to use Tool.
FREE DOWNLOAD

Send download link to:

I confirm that I have read and agree to the End User License Agreement.

Download the FREE TOOL and test it for yourself.

Conclusion. Which tool is right for you?

Azure portal is a web-based interface provided by Microsoft Azure to manage cloud resources and services. Although it provides a user-friendly interface for managing storage accounts, it has some limitations. The Azure portal may not provide an intuitive way to manage large amounts of data, as it requires multiple clicks and navigation to access information, and can be slow when working with a large amount of data. Additionally, the Azure portal does not provide the ability to compare data across storage accounts or view data usage trends over time.

Azure Storage Explorer is a standalone app that enables users to manage their Azure storage accounts. While it provides a more comprehensive view of storage accounts compared to the Azure portal, it still has limitations. For example, it does not provide the ability to monitor data usage in real-time, or set alerts for when storage thresholds are reached. Additionally, it does not provide the ability to automate data management tasks such as moving data to lower-cost storage tiers, which can result in higher storage costs for users.

Cloud Storage Manager is a FREE tool that provides a unified view of all cloud storage resources and enables users to manage, monitor, and optimize their cloud storage usage. It provides monitoring of data usage, and also provides a cost-optimization reports that allows users to identify and eliminate unnecessary data, reducing overall storage costs. Additionally, it provides a unified view of data across multiple storage accounts, enabling users to make informed decisions about storage utilization and cost optimization.

In conclusion, while both the Azure portal and Azure Storage Explorer have their uses, Cloud Storage Manager provides a more comprehensive and cost-effective solution for managing cloud storage resources. With its real-time monitoring, alerts, and automation features, it can help users reduce storage costs and improve the overall efficiency of their cloud storage operations.

How to create an Azure storage lifecycle management policy

How to create an Azure storage lifecycle management policy

How to create an Azure storage lifecycle management policy​

Whether you are using our Cloud Storage Management software to gain insights into your Azure storage environment, or are just trying to work out how to save costs within Azure, creating a lifecycle management policy is a great idea to help you save in your Azure storage costs.

Why is an Azure Lifecycle Management Policy important?

Azure Storage Lifecycle Management is a feature provided by Microsoft Azure that helps users manage the lifecycle of their data stored in Azure Blob storage. It allows users to transition their data to different storage tiers (Hot, Cool, Archive) based on their data access patterns and save costs in their Azure storage environment. The storage tiers have different costs per gigabyte of data, with the Hot tier being the most expensive and the Archive tier having the most cost savings. It is important because it enables users to save costs on their storage and manage their data effectively based on their business needs. Additionally, it helps ensure that the data is stored in the appropriate tier for its intended usage, improving performance and reducing costs.

Azure Storage Tiering Overview

Azure has three different tiers for your blob storage. These storage tiers are;

Hot – Used for frequently accessed data. Best suited for data that your user base accesses daily, think files and photos etc

Cool – Used for infrequently accessed data. Well suited for data that maybe accessed, but not that often.

Archive – Used for rarely accessed data, like backups or data that you need to keep for historical reasons.

Each of these Storage Tiers has a cost associated that Microsoft will charge you per gigabyte of data. The Hot Tier obviously being the most expensive, the Cool Tier is a little cheaper and the Archive Tier having considerable cost savings.

As an example at the time of writing this page, the cost per gigabyte in US dollars for each Tier is as below. (this may vary depending on your agreement with Microsoft)

Azure Blob Storage Costs

PREMIUM HOT COOL ARCHIVE
First 50 terabyte (TB) / month $0.15 per GB $0.0184 per GB $0.01 per GB $0.00099 per GB
Next 450 TB/month $0.15 per GB $0.0177 per GB $0.01 per GB $0.00099 per GB
Over 500 TB/month $0.15 per GB $0.0170 per GB $0.01 per GB $0.00099 per GB

As the table above shows, there are considerable savings when you move your blobs down to the lower tiers and creating an Azure Storage Lifecycle Management Policy.

Azure Blob Storage Tiering

Change your Storage Tier

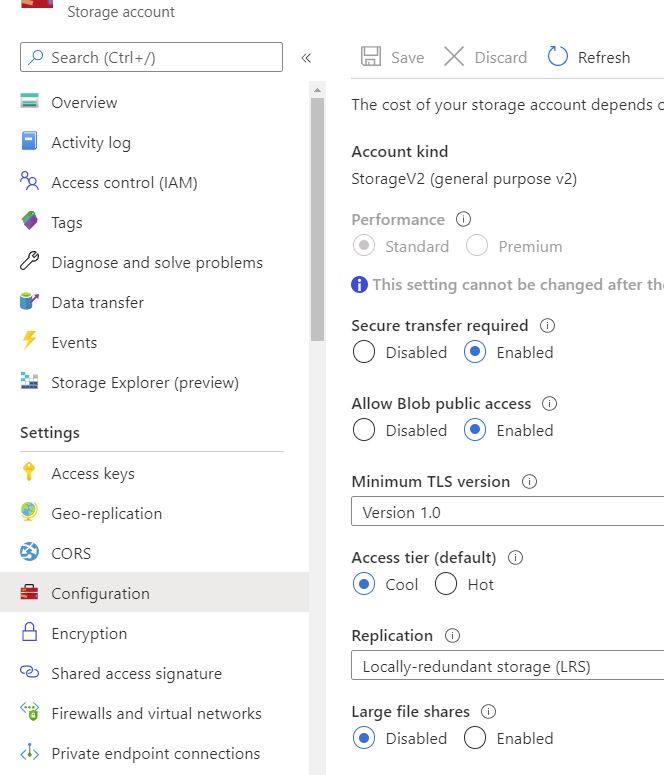
Microsoft Azure provides tiering for your blob data, that you can set as the default level. (either upon creation of the storage account or at a later date). To check the default storage tiering of your storage account go to the Azure Portal, choose configuration, and then the access tier that the blobs default to in that storage account is shown.

It must be noted that only the Hot and Cool tiers can be set as the default and not the Archive tier.


Azure Storage Tiering

What are some of the benefits of creating an Azure Storage Lifecycle Management Policy?

OK, so now that you see there are some real benefits in changing the tiering of your blob storage, how do I create one you ask?

Well first off let’s look at what you will need to make sure is in place first.

Tiering of blob object storage is only available in Blob Storage and General Purpose v2 (or GPv2) accounts. If you have GPv1 storage you will need to convert that first to GPv2.

Premium storage does not provide any tiering, as this tier is for fast access using SSD based drives. (this maybe coming at a later date)

Changing tiers of storage may incur increased costs. Be very careful when applying the change to your data, as rehydrating blobs from the archive tier can be costly.

How to create your first Azure Storage Lifecycle Management Policy.

Open the Azure Portal

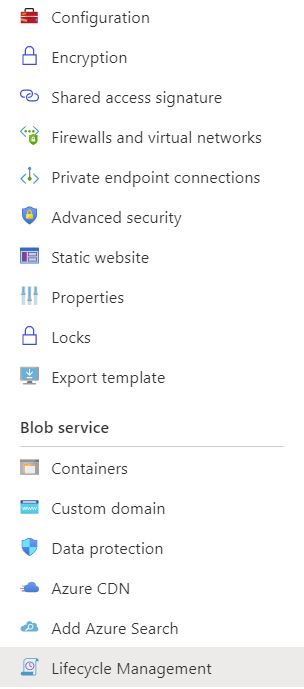
In your Azure portal, go to your storage account that you want the lifecycle policy to apply to and then choose Lifecycle Management.


Azure Lifecycle Management

Create a Azure Storage Lifecycle Policy Rule

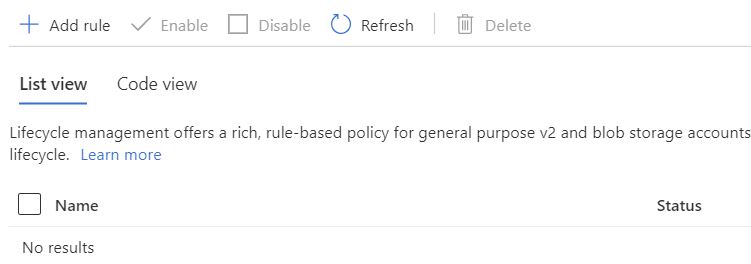
 Once the right hand side of your browser has populated, choose Add Rule to start the wizard


Azure Lifecycle Management Rule

Add Lifecycle Policy Rule

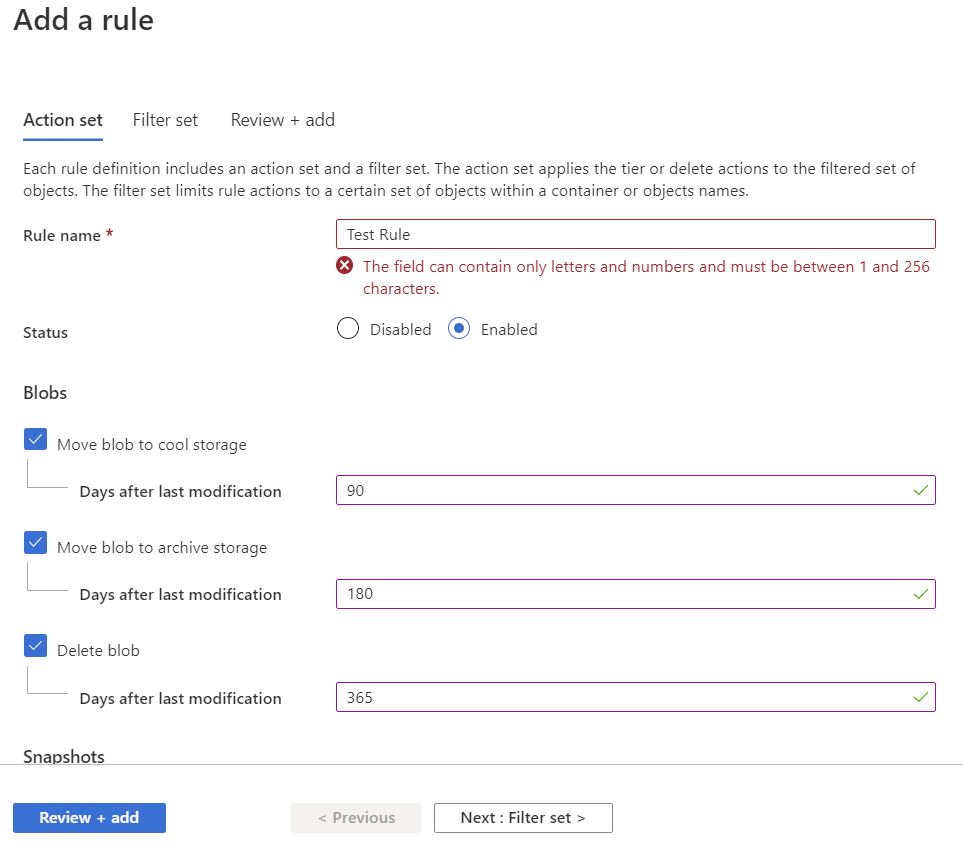
Now that the new rule has shown up we need to fill in a few details. You will need to give the rule a Name and then choose what you want to happen with your object data.

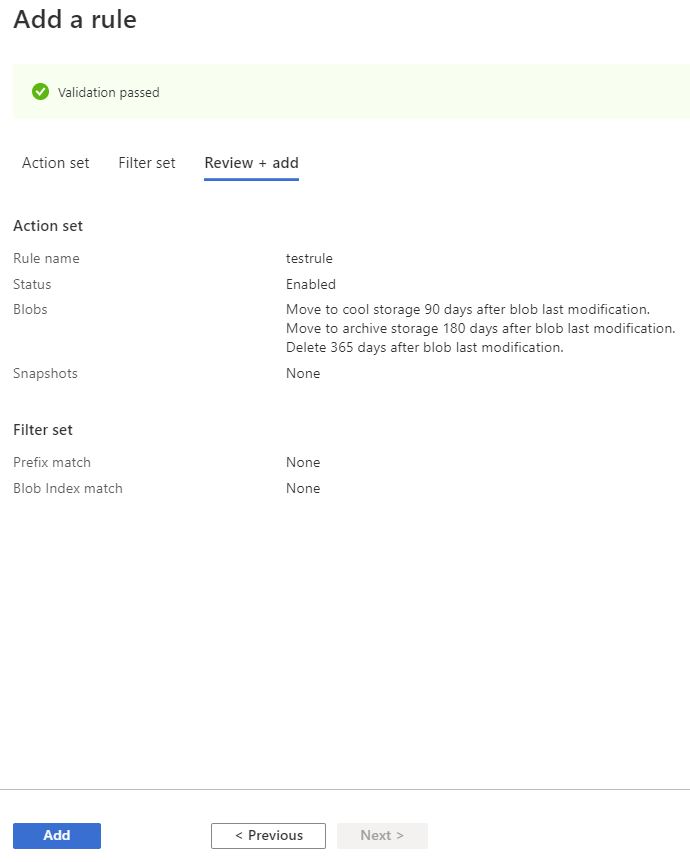
As an example I have shown in the below rule that the blobs will move to cool storage after not being accessed in 90 days, then to archive storage in 180 days, then finally being deleted in 365 days.

If you are happy with what you have set, just click Review + add and Azure will go on to apply those settings to your storage accountor if you want to be granular and exclude some containers / paths then click on Next: Filter Set.


Azure Lifecycle Management New Rule

Azure Storage Lifecycle Policy Exclusions

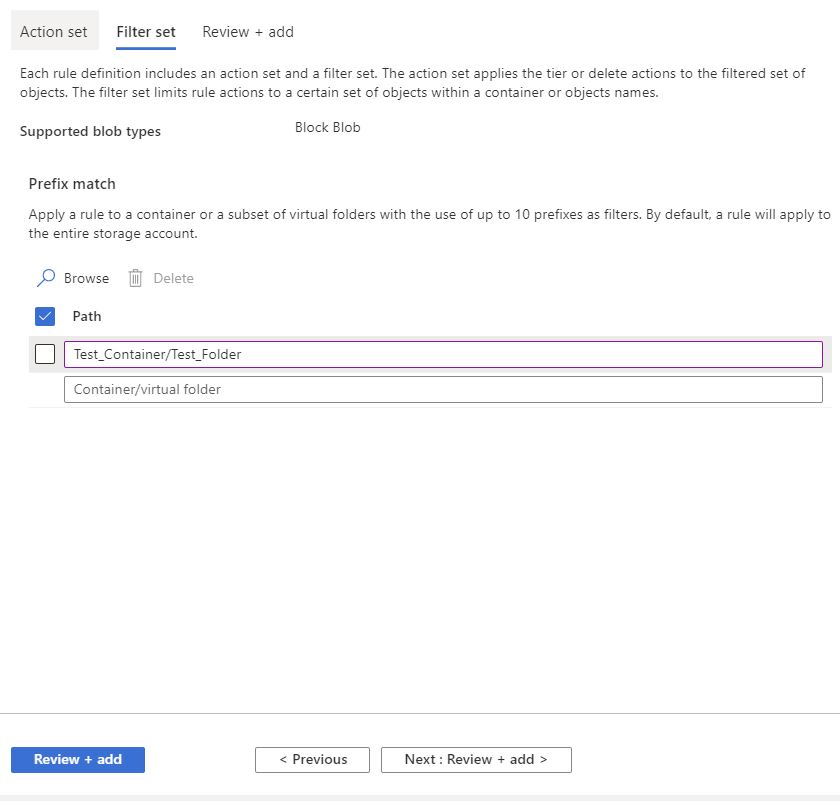
On this page you can now exclude any containers or paths that you do not want this policy to apply to. Click Next: Review + add. 

Azure Lifecycle Management Filter

Azure Storage Lifecycle Validation

 If all goes well you should be presented with a screen as below, saying that your Validation Passed. 

Click on Add and Azure will now apply those settings to your storage account.

Azure will now go through all your Blobs and set them to the tiering and settings you have specified. 

You have successfully created an Azure Storage Lifecycle Management Policy

Azure Lifecycle Management Validation

Reduce your Azure Blob Storage Costs

Now you may ask, how do I know how much storage I’ve consumed or when were my blob files last accessed?

Easy. First run and install our Cloud Storage Manager software, then let it run a scan against your Azure Storage environments. Once the Scan has completed you can then run one of the many reports to understand and optimise your Azure Blob Storage.

Download a Free Trial and test it for yourself.

Free

Cloud Storage Manager Icon

Maximum Azure Storage limited to 30TB.

Typically for small or personal environments usually consisting of 3 or less Azure Subscriptions and consuming under 30TB of Azure Blob Storage.

Free Forever (until your Azure storage goes over 30TB).

Advanced

Cloud Storage Manager Icon

Maximum Azure Storage limited to 1PB

For medium sized environments typically consisting of less than 5 Azure Subscriptions.

Yearly license subscription of $500 USD per year which includes updates and support.

Enterprise

Cloud Storage Manager Icon

Unlimited Azure Storage.

For use in large environments typically consisting of more than 10 Subscriptions and consuming more than 1PB of Azure Blob Storage.

Yearly license subscription of $1000 USD per year which includes updates and support.

Cloud Storage Manager is licensed based on the size of your Azure Subscriptions, Azure Storage Accounts, Containers and finally each Blob.

Each version has the same great functions including scheduled scans of your Azure Blob Storage and reporting.

FREE DOWNLOAD

Send download link to:

I confirm that I have read and agree to the End User License Agreement.

FAQ for Azure Lifecycle Management

What is Azure Storage Lifecycle Management?

Azure Storage Lifecycle Management is a feature that allows users to automate the transition of their data to different storage tiers or classes based on the data’s age or access patterns.

How does Azure Storage Lifecycle Management help in reducing costs?

By automatically moving data to the appropriate storage tier based on its age or access patterns, Azure Storage Lifecycle Management helps to reduce storage costs by ensuring that you are only paying for the most expensive storage tier that you actually need.

Can I still access my data after it has been transitioned to a different storage tier?

Yes, you can still access your data even after it has been transitioned to a different storage tier. The only difference is the retrieval time, which may be slower for data stored in the Archive tier compared to the Hot and Cool tiers.

Can I revert a transition made by Azure Storage Lifecycle Management?

Yes, you can revert a transition made by Azure Storage Lifecycle Management, but you may incur additional charges for moving the data back to a more expensive storage tier.

Is Azure Storage Lifecycle Management available for all Azure storage services?

Currently, Azure Storage Lifecycle Management is available for Azure Blob storage.
What are the different storage tiers that can be managed by Azure Storage Lifecycle Management?

Azure Storage Lifecycle Management allows you to manage data across four storage tiers: hot, cool, archive, and deleted. The hot tier is for frequently accessed data, the cool tier is for infrequently accessed data, the archive tier is for rarely accessed data, and the deleted tier is for data that has been marked for deletion.

How does Azure Storage Lifecycle Management work with data protection?

Azure Storage Lifecycle Management integrates with Azure data protection features such as Azure Backup and Azure Site Recovery, to ensure that your data is protected even as it transitions between storage tiers.

Can I customize the transition policies for my data in Azure Storage Lifecycle Management?

Yes, you can create custom transition policies in Azure Storage Lifecycle Management that are specific to your data and your business requirements. You can specify the time-based or usage-based triggers for data transitions, and you can also set rules for data retention.

Can I track the data movement and monitor the performance of my storage infrastructure with Azure Storage Lifecycle Management?

Yes, you can use Azure Storage Lifecycle Management to monitor and track the data movement in your storage infrastructure, as well as to measure the performance of your storage tiers. You can also use Azure Monitor to set up alerts and notifications for specific events, such as data movement or storage tier changes.

Is Azure Storage Lifecycle Management supported for all types of data in Azure Storage?

Azure Storage Lifecycle Management is supported for all types of data in Azure Blob Storage, including block blobs, append blobs, and page blobs. It is not currently supported for other types of data in Azure Storage, such as files and queues.

Which storage account or storage accounts can you use lifecycle management?

The Storage Accounts that support Lifecycle Management Policies are Blob Storage Accounts that have block blobs and append blobs in general-purpose v2 and premium block blobs.

Is Disaster Recovery Really Worth The Trouble (Part 1)

Is Disaster Recovery Really Worth The Trouble (Part 1)

Is Disaster Recovery Really Worth The Trouble

(Part 1 of a 4 part series)

Guest Post by Tommy Tang – Cloud Evangelist 

Disaster Recovery

Often when you talk to your IT colleagues or business owners about protecting their precious system with adequate Disaster Recovery capability (aka DR), you will get the typical response like ‘I have no money for Disaster Recovery’ or ‘We don’t need Disaster Recovery because our system is highly available’. Before you blow your fuse and try to serve them a comprehensive lecture on why Disaster Recovery is important, you should understand the rationale behind their thinking.

People would normally associate the word ‘disaster’ to insurance policy. So it is about natural disaster event such as flooding, thunderstorm, earthquake or man made disaster like fire, loss of power or terrorist attack. These special events are ‘meant’ to happen infrequently that the inertia of human behaviour will try to brush that off, and in particularly when you are asking for money to improve Disaster Recovery capability!

You may ask how do you overcome such deep rooted prejudice towards DR in your organisation? The first thing you must do is DO NOT talk about Disaster Recovery alone. DR should be one of the subjects covered by the wider discussion regarding system resilience and availability. Before your IT manager or business sponsor going to cough up some hard fought budget for your disposal you’ll need to articulate the benefit in clear, precise and easily understood layman’s terms. Do not overplay the technology benefit such as ‘it’s highly modularised and flexible to change’ or ‘it’s loosely coupled micro-service design that is good for business growth’, or ‘it’s well-aligned to the hybrid Cloud architecture roadmap for the enterprise’. Quite frankly they don’t give a toss about technology as they only care about operations impact or business return.

 For IT manager it’s your job to paint the rosy picture on how a well designed and implemented DR system can help meet the expected Recovery Time Objective (RTO), minimise human error brought on by the pressure cooker like DR exercise, and save the manager from humiliation amongst the peers and superiors in the WAR room during a real DR event. As for the business sponsor it’s only natural not to spend money unless there is material benefit or consequence. You’ll need to apply the shock tactics that will scare the ‘G’ out of them. For certain system it’s not difficult to get the message across. For example, the Internet Banking system that requires urgent funding to improve DR capability and resilience. The consequences of not having the banking system available to customers during business hours will have severe material and reputation impact. The bad publicity generated in today’s omnipresent digital media is both brutal and scathing and will leave no place to hide.

So now you have done the hard sell and secured funding to work on the DR project, how would you go about delivering maximum value with limited resource? This could be the very golden ticket for you to ascend to the senior or executive position. Here is my simple 3 phase approach outlined below and I’m sure there are many ways to achieve the similar outcome.

Architecture

  • This is the foundation of a resilient and highly available design that can be applied to different systems and not just a gold plated one-size-fit-all solution. The design must be prescriptive but yet pragmatic with well defined cost and benefits.

Implementation

  • It has to be agile with risk mitigation strategy incorporated in all delivery phases. I believe automation is the key enabler to quality assurance, operational efficiency and manageability.

On-Premises and Cloud

  • The proliferation and adoption of Cloud has certainly changed the DR game. Many different conversations taking place today is about “To Cloud” or “Not To Cloud”, and if it is Cloud then HOW? Disaster Recovery must be, along with system resilience, included into such critical decision, and it’s ought to be adaptive to whatever path the business has chosen.

Understanding what DR really means in the organisation is utterly important and it can often lead to the change of prejudicial thinking with well articulated benefits and consequences. In the coming weeks I’m going to share my insights for the aforementioned phase approach.

This article is a guest post by Tommy Tang (https://www.linkedin.com/in/tangtommy/). Tommy is a well rounded and knowledgeable Cloud Evangelist with over 25+ years IT experience covering many industries like Telco, Finance, Banking and Government agencies in Australia. He is currently focusing on the Cloud phenomena and ways to best advise customers on their often confused and thorny Cloud journey. 

Multi-Cloud Deployment – Are you Ready?

Multi-Cloud Deployment – Are you Ready?

Are you ready for Multi-Cloud?

MultiCloud

Guest Post by Tommy Tang – Cloud Evangelist 

Lately I have heard colleagues earnestly discussing (or perhaps debating) the prospect of adopting Multi-Cloud strategy; and how it could effectively mitigate risks and protect the business as it was a prized trophy everyone should be striving for. For those uninitiated Multi-Cloud strategy in a nutshell is a set of architecture principles that would facilitate and promote the absolute freedom to select any cloud vendor for any desired service at time of your choosing; and there is no material impact to move from one cloud service provider to another.

Before you get too excited about Multi-Cloud I’d like to mention the much publicised US Department of Defence’s Joint Enterprise Defence Infrastructure cloud contract (aka JEDI). Amongst the usual objectives and strategies stated in the JEDI strategy document, the most contentious issue revolves around the explicit requirement for choosing a single cloud service provider who can help modernise and transform their IT systems for the next 10 years. Not Multi-Cloud. The reaction to the single cloud approach has certainly brought on some fierce debate in the IT world, of which both IBM and Oracle tried to register their displeasure through legal avenues. Both companies have been dismissed and out of the running of the JEDI contract now.

While you are pondering the reason why Department of Defence would seemingly go against the conventional wisdom of Multi-Cloud, let’s briefly examine some of the advantages and disadvantages of Multi-Cloud strategy.

Advantages

  • Mitigate both service and commercial risks by procuring from multiple cloud vendors (i.e. not putting all eggs in one basket)
  • Select the best-in-bred service from a wide range of cloud providers (E.g. AWS for DevOps, Azure for Business Intelligence and Google for Artificial Intelligence)
  • Strive for favourable commercial outcome by encouraging competition between different players
  • Leverage fast emerging new technologies and services offered by the incumbents or new cloud entrants
  • Promote innovation and continuous improvement without artificial cloud boundaries

Disadvantages

  • Multi-Cloud architecture design can be more complex (I.e. integration, replication and backup solution that would need to work across different cloud vendors)
  • Unable to take advantage of vendor specific feature or service (E.g. Lambda is an unique AWS service)
  • Difficult to track and consolidate finance with different contracts and rates
  • No single pane-of-glass view for monitoring and managing cloud services
  • Need extensive and continuous training for different and never-ending cloud technologies

After learning the good and bad of pursuing the Multi-Cloud dream do you think the JEDI approach is wrong? Well the answer in my humble opinion is it depends. For example if you’re managing an online holiday booking service then you’re probably already using cloud services and thus it’s unlikely you’d face any impediments for deploying your Java applications to a different cloud vendor. On the other hand if you’re running the traditional supermarket and warehouse business using predominately on-premises IT systems then it is much more difficult moving them to the cloud; let alone running in different cloud vendors without massive overhaul.

If you’re still keen to explore the Multi-Cloud strategy then I’d consider the following guidelines. These are not prerequisites but certainly help achieve the ultimate cloud-agnostic goal.

Modernise IT Infrastructure

Modernise the on-premises IT systems to align with the common cloud infrastructure so they are Cloud Ready, This is the most important step regardless whether you are aiming for single cloud or Multi-Cloud deployment. During the modernisation phase you’d soon find out certain IT systems are difficult (and insanely expensive) to move to the cloud. This is the reality check you ought to have. It is perfectly ok to retain some on-premises system because quite frankly not every system is suitable for cloud. For instance large and complex application that requires specialised hardware or highly latency sensitive application is probably not for the cloud. Quarantine your cloud disenchanted applications quickly while consolidating cloud friendly applications into Intel-based virtualised platform. (E.g. VMWare or Hyper-V) Modernised on-premises virtualised platform provides the cloud foundation with added benefits of running virtual infrastructure. It is a good strategy for either Multi-Cloud or hybrid cloud. You should take full advantage of the existing data centre while you are embarking on the 3-5 year cloud journey.

Modular Application Design

Application development cost typically outweighs the infrastructure cost by a factor of 3x-5x. Given AppDev is quite expensive it is absolutely paramount to get it right from the start. The key design objective is to create an application that is highly modularised, loosely-coupled and platform agnostic. Hence the application can run on different cloud services without incurring massive redevelopment cost. The latest trendy term that everyone has been using is Microservice. Microservice is not bound to a specific framework or programming language. Any mainstream language like Java, C# or Python is suitable depending on one’s own preference. Apart from the programming language I’d also like to touch on application integration. I understand many people would prefer developing their own APIs because it is highly customisable and flexible. However in today’s cloud era it’d require lots of effort and resources to develop and maintain APIs for different cloud vendors as well as on-premises IT systems. Unless there is a compelling reason I’d consider using specialised API vendor like MuleSoft to speed up and simplify development. Last but not least I’d also embrace Container technology for managing application deployment. (E.g. Kubernetes) Containerised application capsule can significantly enhance portability when moving between clouds.

Data Mobility

It is about your prerogative over your own data. When you are considering Multi-Cloud strategy one of the burning issues is how to maintain data mobility. Data that is stored in the cloud can be extracted and moved to on-premises IT systems or another cloud service providers as desired without restrictions. Any impediment to data mobility would seriously diminish the benefits of using cloud in the first place. In the new digital world data should be treated as capital with intrinsic monetary value and therefore it is unacceptable for data to be placed with restrictive movement. So how do you overcome data mobility challenges? Here are some basic principles you should consider. First one is data replication. For instance is it acceptable to the business if the application would take 5 days to move from AWS to Azure? How about 4 weeks? The technology that underpins the Multi-Cloud strategy must meet the business needs otherwise it becomes totally irrelevant. Data replication between different cloud platforms can be implemented to ensure data is always available in multiple destinations of your choice. Native database replication tool is a relatively straightforward solution for maintaining 2 independent data sources. (E.g. SQL Always-OnOracle Data Guard) The second principle is to leverage specialised cloud storage provider. Imagine you can deploy applications to many different cloud vendors while retaining data in a constant readily accessible location. The boundaries of Multi-Cloud would simply dissipated. For example NetApp Data ONTAP is one of the leading contestants in the cloud storage area. The third principle is the humble long standing offsite backup practice. Maintaining a secondary data backup at alternate site is an absolute requirement for both cloud or non-cloud system. It is a very cost effective way of retaining full data control and avoiding vendor lock-in.

Multi-Cloud is a prudent, agile and commercially sound strategy with many benefits but I believe it is not suitable for everyone. Blindly in pursuit of Multi-Cloud strategy without compelling reason is fraught with danger. The decision made by US Department of Defence to partner with only one cloud vendor, which is yet to be determined at the time of writing this article, is one of the high profile exception. Time will tell.

Check out this link where we dive deeper in to the difference of IAAS resilience on AWS and Azure.

This article is a guest post by Tommy Tang (https://www.linkedin.com/in/tangtommy/). Tommy is a well rounded and knowledgeable Cloud Evangelist with over 25+ years IT experience covering many industries like Telco, Finance, Banking and Government agencies in Australia. He is currently focusing on the Cloud phenomena and ways to best advise customers on their often confused and thorny Cloud journey.