In today’s digital world, where data is considered the new oil, organizations are consistently looking for efficient ways to store and manage their invaluable information assets. Microsoft’s Azure Files and Windows Server are two technologies at the forefront of this technological evolution. Azure Files offers a simple, secure, and fully-managed cloud-native file-sharing service, whereas Windows Server plays a pivotal role in many enterprise environments, hosting services, applications, and much more. Integrating Azure Files with Windows Server opens up a world of possibilities, enhancing scalability, reliability, and performance. This guide will provide a comprehensive walk-through of this integration, helping IT professionals and decision-makers leverage these tools effectively.
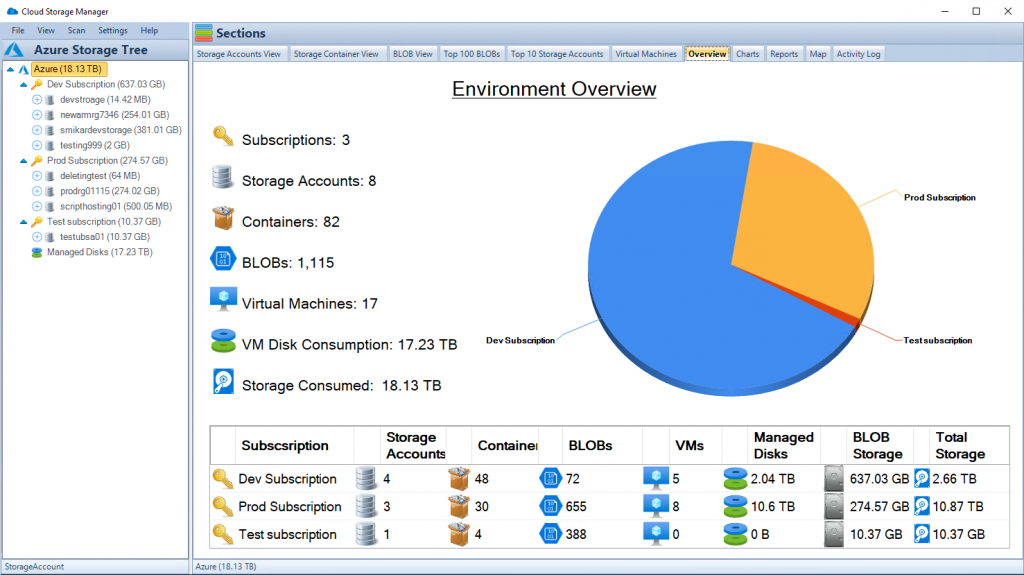
Cloud Storage Manager Main Window
Why Integrate Azure Files with Windows Server?
The integration of Azure Files with Windows Server is not just a technological advancement but a strategic alignment that delivers several key benefits:
Cost-Efficiency: Traditional on-premises storage solutions can be expensive and challenging to maintain. Azure Files allows for flexible pricing, meaning you only pay for what you use. By migrating file shares to the cloud, organizations can reduce costs related to hardware, maintenance, and energy consumption.
Scalability: Azure Files offers seamless scalability, enabling businesses to grow their storage solutions in tandem with their needs. Whether expanding a small file share or handling massive datasets, Azure can accommodate without the need for significant hardware investments.
Security: Azure is renowned for its robust security features, including encryption, identity management, and compliance certifications. Integrating with Windows Server ensures that the same security measures that protect your local resources are extended to your cloud-based file shares.
Performance: Through caching and optimized networking, the integration ensures fast access to files. Performance tuning tools and practices enable customization to suit specific organizational needs.
Prerequisites for Integration
Before you begin integrating Azure Files with Windows Server, it’s essential to have a few critical components in place:
Azure Subscription: An active Azure subscription is required to create and manage Azure File Shares. If you don’t have a subscription, you can create one through the Azure portal.
Windows Server Requirements: Ensure that your Windows Server meets the necessary compatibility requirements, including supported OS versions and network configurations.
Network Considerations: Azure Files requires specific networking configurations, including firewall rules and VPN connections, if necessary. Understanding and implementing these requirements is crucial for a successful integration.
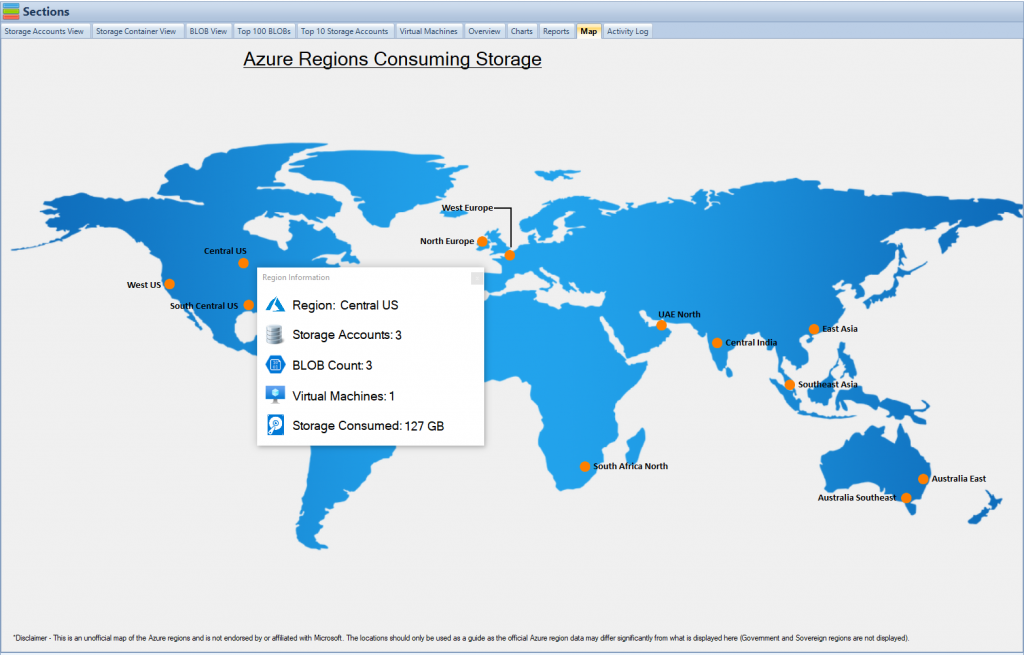
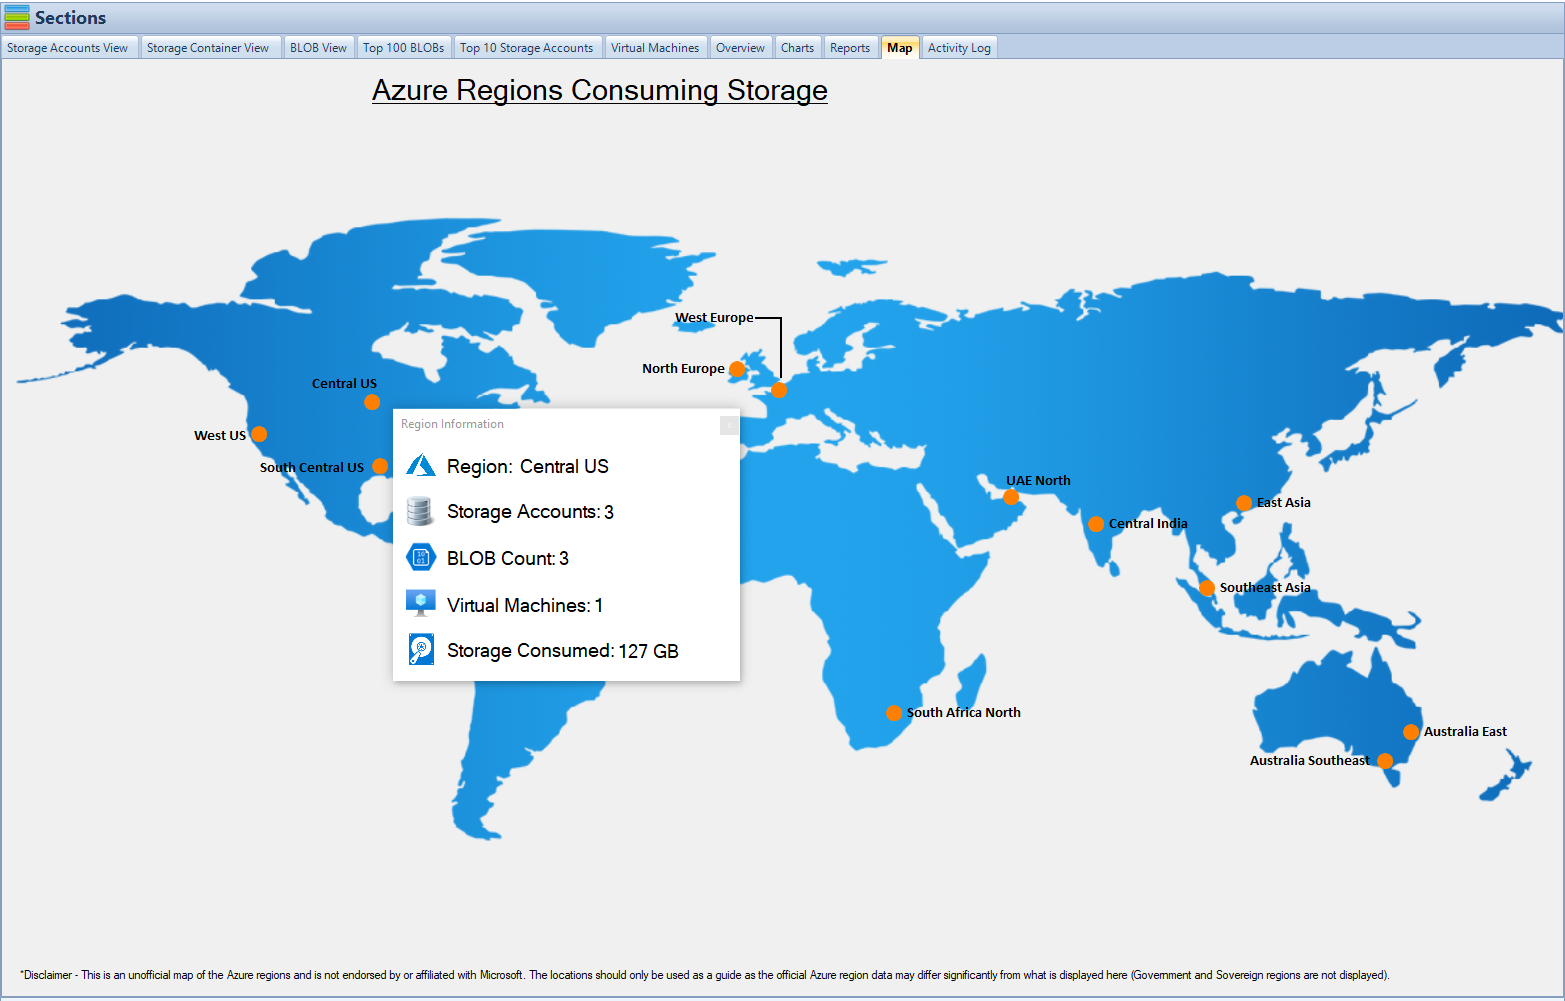
Cloud Storage Manager Map View
Step-by-Step Guide to Integrating Azure Files with Windows Server
Select compatible performance and account kind options.
Review the advanced settings to configure additional features like secure transfer.
Click “Review + create” and then “Create” to provision the storage account.
3. Create a File Share
Once the storage account is created, navigate to it and select “File shares” under “File service.”
Click “+ File share.”
Enter a name for your file share.
Specify the quota, defining the size of the file share.
Click “Create.”
Configuring Windows Server
4. Install Azure PowerShell Module (If not installed)
Open PowerShell as an administrator.
Run the following command to install the Azure PowerShell module: Install-Module -Name Az -AllowClobber -Scope CurrentUser
If prompted to install from the PSGallery, type ‘Y’ to proceed.
5. Connect to Your Azure Account
Run the following command to sign in:powershellCopy codeConnect-AzAccount
Enter your Azure credentials.
6. Mount the Azure File Share
You can mount the file share by running the following PowerShell command. Replace the placeholders with your storage account name and file share name: $connectTestResult = Test-AzStorageAccount -ResourceGroupName "ResourceGroupName" -Name "StorageAccountName" $connectTestResult.Context | New-AzStorageDrive -Name Z -Root "\\StorageAccountName.file.core.windows.net\FileShareName"
This will map the Azure File Share as the Z: drive.
7. Verify the Mapped Drive
You can check if the file share is mapped correctly by running: Get-PSDrive -PSProvider FileSystem
Look for the drive with the name ‘Z’ or the name you specified in the previous step.
8. Managing Permissions
Azure File Share permissions can be managed through the Azure portal.
Navigate to the file share and click on “Access Control (IAM).”
Here, you can add or remove role assignments to control who has access to the file share.
Performance Tuning (Optional)
You may want to adjust the caching policy or network configuration for performance optimization.
Azure File Shares supports an on-premises caching feature that can be configured to your needs.
Consider consulting Azure’s official documentation on performance tuning for specific guidelines tailored to your scenario.
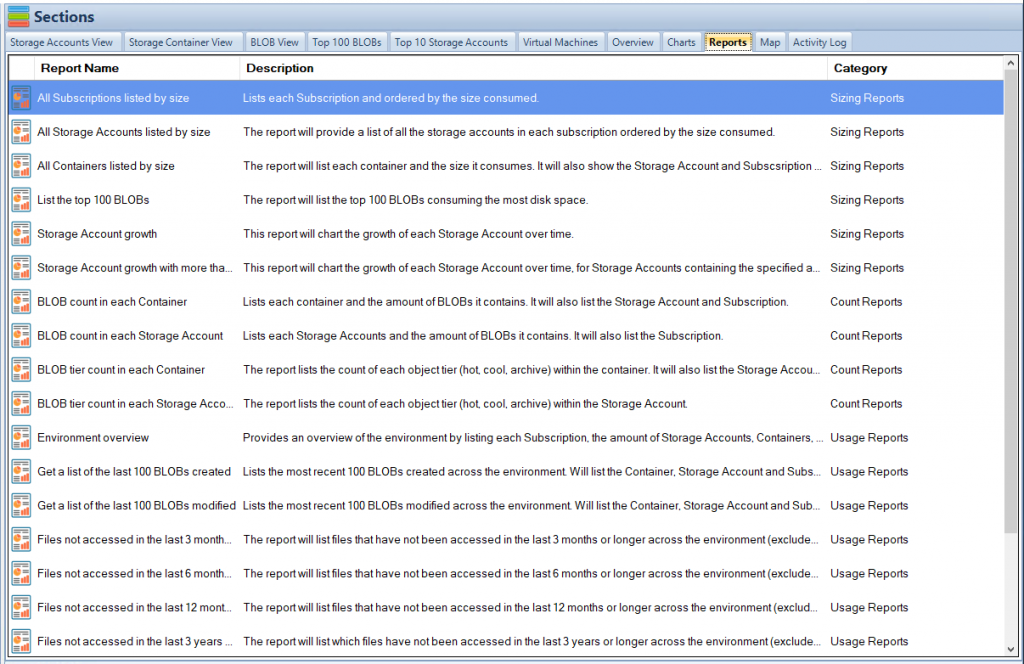
Cloud Storage Manager Reports Tab
Conclusion
Integrating Azure Files with Windows Server is a multi-faceted process that reaps significant benefits. Through this guide, we’ve explored how to create, mount, and manage Azure File Shares with Windows Server. The steps detailed are geared to foster efficiency, collaboration, and robust data management within organizations.
For those keen to delve deeper into various aspects of Azure Files, the following resources offer valuable insights:
To understand the vital feature of geographical redundancy in Azure Files, you can explore Azure Files Geo-Redundancy.
These resources extend the understanding of Azure Files, catering to different levels of expertise and unique organizational needs. Whether you’re looking for technical know-how, cost-saving strategies, or comparative insights, the integration of Azure Files with Windows Server and the linked resources provide a solid foundation for advancing your organization’s data management capabilities.
AzCopy, a command-line utility designed by Microsoft, is the bridge that links data transfer and data management within Azure. Targeting seasoned professionals, it offers a granular level of control, especially when it comes to permissions. Managing permissions is not just about controlling access; it’s about maintaining the integrity of data, ensuring compliance, and optimizing operational efficiency. The precision that AzCopy offers in handling permissions allows administrators to sculpt data accessibility according to organizational needs. This guide is for those who already have a solid foundation in AzCopy and are looking to deepen their understanding of permission management within this tool. It will cover the core concepts of permissions, detail a comprehensive step-by-step guide, uncover best practices, and reveal common mistakes to avoid, all while maintaining a technical rigor appropriate for experts.
Cloud Storage Manager Main Window
Understanding Permissions in AzCopy
The arena of permissions in AzCopy is vast and nuanced. Permissions are not merely binary gates; they are fine-grained controls that dictate the very interaction between users and resources. In AzCopy, this is articulated through specific permissions like read (R), write (W), delete (D), and list (L), all of which serve precise functions. Permissions work in concert with Azure Blob, File, and Table storage, with specific strategies to manage each. For example, Blob permissions are governed through Shared Access Signatures (SAS), creating time-bound access control. File Share Permissions echo the characteristics of NTFS permissions, while Table Permissions manifest at the table level, allowing granular control over entities within the tables. This multifaceted nature of permissions within AzCopy necessitates a comprehensive understanding of their dynamics, their interplay with different Azure storages, and the tools and techniques to manipulate them effectively.
Cloud Storage Manager Map View
Step-by-Step Guide to Managing Permissions
In the AzCopy command-line tool, switches (also known as flags or options) are used to modify the behavior of a command. Here’s a breakdown of the switches used in the provided examples:
cp: This command is used to copy data between a source and a destination. It could be from one Azure storage to another or between Azure storage and the local file system.
--recursive=true: This switch is used to specify that the copy operation should include all subdirectories recursively. If this switch is omitted or set to false, only the files in the specified directory will be copied.
SAS Token Parameters: The Shared Access Signature (SAS) token within the URLs has specific parameters that control permissions and other aspects of access:
sv: Storage Service Version, specifies the version of the storage service to use.
ss: Storage Services, can be blob (b), file (f), table (t), or queue (q) to specify the type of storage service.
srt: Signed Resource Types, specifies the resource type that the SAS token can access, such as service (s), container (c), or object (o).
sp: Signed Permissions, defines what permissions the SAS grants, such as read (r), write (w), delete (d), list (l), etc.
se: Signed Expiry, sets the expiration time for the SAS token.
st: Signed Start, sets the start time for the SAS token’s validity period.
spr: Signed Protocol, specifies the allowed protocol for the request, such as HTTPS.
sig: Signature, contains the cryptographic signature for the SAS token.
Switches in AzCopy offer granular control over the copy operations, allowing users to define permissions, choose resources, set time limits, and more. This makes AzCopy a highly versatile tool for managing data within Azure, catering to various organizational needs and security requirements.
Setting Up AzCopy
Starting with the fundamental step, the installation of AzCopy requires an accurate understanding of the system requirements and dependencies. While AzCopy is available for Windows, Linux, and macOS, this guide focuses on the Linux installation. The command
not only downloads the executable but sets the necessary permissions to run it. An essential part of setting up AzCopy is authenticating it with Azure. It can be achieved through Managed Service Identity (MSI) or by manually entering the access credentials. The latter requires careful management as improper handling can expose sensitive information. This setup process, though simple on the surface, lays the groundwork for the entire permission management operation.
Configuring Permissions
In the world of AzCopy, configuring permissions is akin to tuning an intricate piece of machinery. It’s where the expertise of an Azure administrator truly shines. Let’s take the example of Blob permissions. These permissions are typically set using Shared Access Signatures (SAS), which allow you to specify the time frame and permissions for accessing Blob data. A SAS token can be generated from the Azure portal or programmatically using Azure Storage client libraries. For example, using the command
, you can grant read access to a blob. The SAS token embedded in the URL dictates the extent and duration of the access. Configuring permissions with AzCopy goes far beyond the basics, allowing for the setup of multilayered, nested permissions that control access at various levels, from containers to individual blobs. Such granularity can be instrumental in implementing organization-wide data governance policies.
Example: Granting and Revoking Permissions
AzCopy’s strength in permission management isn’t just about setting permissions; it’s also about modifying them in a controlled manner. Let’s dive into an example that looks at both granting and revoking permissions. Granting read and write access to a blob might be done using the following command:
Here, the SAS token is crafted to grant both read and write permissions. Now, let’s say that access needs to be revoked. Unlike many other tools, AzCopy doesn’t leave you stranded. You can either modify the SAS token, rendering the previous one invalid or use Azure Portal’s sophisticated interface to control permissions. The underpinning architecture of AzCopy ensures that changes in permissions are propagated consistently, minimizing the risk of unauthorized access.
Cloud Storage Manager Reports Tab
Best Practices
Navigating the complex pathways of AzCopy’s permissions requires not only skill but also adherence to best practices. The concept of the Least Privilege Principle resonates strongly here. AzCopy enables you to grant exactly the level of access that a user needs and no more. Such granularity minimizes security risks. Time-bound access, another facet, ensures that permissions do not linger beyond their necessity. By using SAS tokens with specific expiry times, you encapsulate the access, rendering it void after the required period. Additionally, monitoring and logging play a crucial role. AzCopy, when coupled with Azure Monitor and Azure Activity Log, becomes a potent combination, enabling real-time monitoring and alerts. These best practices are not mere recommendations; they are the embodiment of efficient, secure, and responsible permission management in AzCopy.
. Copying a Blob with Read Permissions
You can copy a blob and set read permissions using a SAS token like this:
These examples demonstrate the flexibility and precision of AzCopy in managing permissions for various Azure storage services. The permissions are defined by the sp parameter in the SAS token, where you can specify different combinations like read (r), write (w), delete (d), list (l), etc.
Remember to replace the example URLs, paths, and SAS tokens with your specific details, and note that these tokens should be handled securely, as they grant access to the resources.
Common Mistakes and How to Avoid Them
The road to mastery in managing permissions with AzCopy is fraught with potential mistakes. Understanding these common pitfalls and learning how to avoid them is a hallmark of expertise.
Overly Broad Permissions
A common mistake is to assign permissions that are too broad. AzCopy allows for finely grained control, and it should be utilized. For example, providing write access when only read access is needed can lead to unintentional data modifications. The use of specific roles, along with clear understanding and planning of the required permissions, can alleviate this risk. By aligning permissions with the exact needs of each user or process, you not only minimize security risks but also align with the principle of least privilege, which is central to robust security design.
Lack of Monitoring and Not Revoking Temporary Permissions
Another common mistake in permission management with AzCopy is the lack of ongoing monitoring and failing to revoke temporary permissions. Even the most meticulously crafted permissions can become a liability if they are not regularly reviewed and adjusted as needs change. AzCopy, when integrated with monitoring tools like Azure Security Center, can provide real-time insights into how permissions are being used. Such insights enable prompt action if suspicious activity is detected. Furthermore, temporary permissions should be time-bound, and AzCopy’s support for SAS tokens with expiry dates facilitates this. It’s not just about setting permissions correctly at the outset; it’s about maintaining them accurately over time, and AzCopy provides the tools needed to do this effectively.
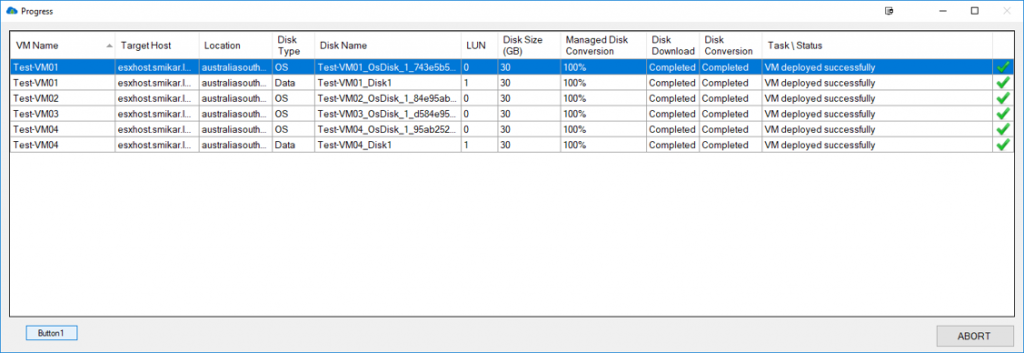
Carbon Azure Migration Progress Screen
Advanced Techniques and Tools
Expertise in AzCopy’s permission management is not only about understanding the basic and intermediate concepts; it also involves leveraging advanced techniques and integrating with other Azure services.
Automation with Azure Functions
AzCopy can be combined with Azure Functions to create automated data movement workflows that respond to specific triggers. Such automation can include the dynamic creation and revocation of permissions based on pre-defined rules. For example, an Azure Function could be set up to automatically grant read access to a blob when a new user is added to a specific Azure AD group and revoke that access when the user is removed. The combination of AzCopy’s robust permission management capabilities with Azure Functions’ flexible automation creates a powerful tool for dynamic, responsive data access management.
Utilizing AzCopy with Azure Policy
AzCopy can also be used in conjunction with Azure Policy to enforce organizational rules and compliance requirements. By defining custom policies that align with your organization’s specific needs, you can ensure that AzCopy is used in a manner that meets regulatory and internal governance requirements. This might include rules regarding the types of permissions that can be granted, the duration for which they can be granted, and the conditions under which they must be revoked. The ability to define and enforce such rules programmatically adds another layer of control and efficiency to AzCopy’s permission management capabilities.
Conclusion
Managing permissions with AzCopy is a complex and rewarding endeavor. This guide, crafted for those with an expert understanding, has delved into the intricacies of permissions within AzCopy, unraveling step-by-step procedures, best practices, common mistakes, and advanced techniques. Whether it’s the granular control offered by Shared Access Signatures, the dynamism of integrating with Azure Functions, or the governance provided by Azure Policy, AzCopy stands as a versatile tool in the hands of seasoned administrators. Embracing AzCopy’s capabilities is not just about efficient data management; it’s about crafting a secure, responsive, and optimized data ecosystem that aligns with the evolving needs of a modern organization.
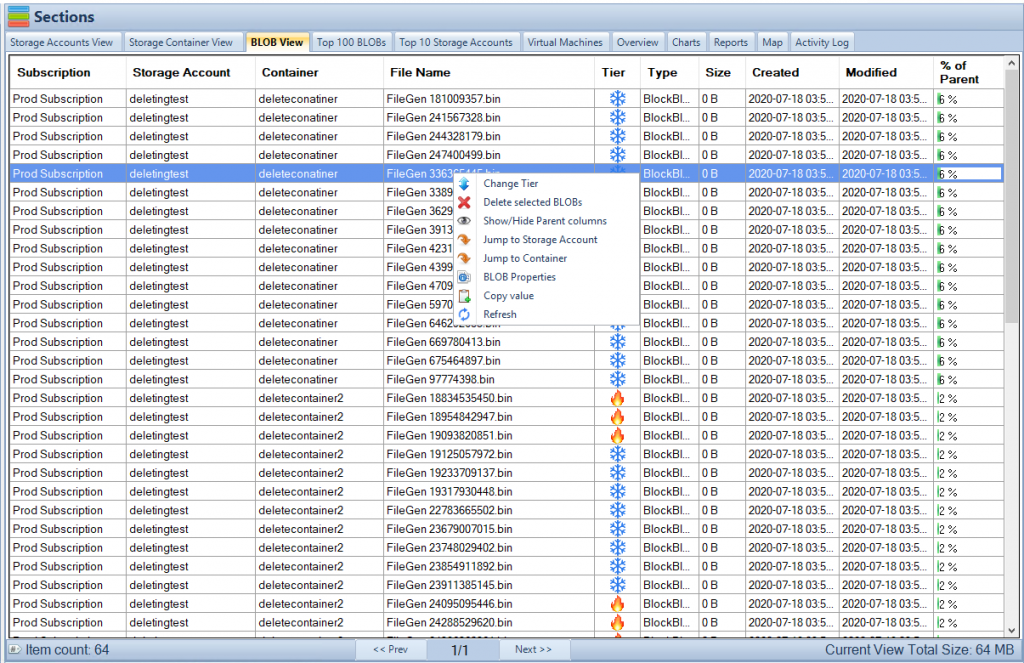
Cloud Storage Manager Blobs Tab
AZCopy FAQs
What is AzCopy and why is it used for permission management? AzCopy is a command-line utility tool designed by Microsoft to facilitate efficient data transfer within Azure. It allows fine-grained control over permissions, making it essential for secure data access and compliance.
How do I install and authenticate AzCopy on my system? AzCopy can be installed on Windows, macOS, or Linux, and authentication can be done through Managed Service Identity (MSI) or manual access credentials. Follow the installation guide for your specific OS.
Can I set time-bound permissions with AzCopy? Yes, AzCopy allows setting time-bound permissions using Shared Access Signatures (SAS), enabling control over the duration of access to specific resources.
What are some best practices for managing permissions in AzCopy? Adhering to the principle of least privilege, using time-bound access, and regularly monitoring with tools like Azure Security Center are key best practices.
How can I avoid common mistakes in permission management with AzCopy? Avoid overly broad permissions, ensure ongoing monitoring, and revoke temporary permissions as needed to minimize risks.
Is it possible to automate permission management with AzCopy? Yes, AzCopy can be combined with Azure Functions to create automated, responsive data access management workflows.
Can I integrate AzCopy with Azure Policy for compliance? Absolutely! AzCopy can be used with Azure Policy to enforce organizational rules and align with regulatory requirements.
What are the types of permissions that can be managed with AzCopy? AzCopy allows managing various permissions like read (R), write (W), delete (D), and list (L) across Azure Blob, File, and Table storage.
How do I revoke permissions once granted through AzCopy? Permissions can be revoked by modifying the SAS token or using the Azure Portal’s interface to control access, ensuring a consistent propagation of changes.
Is there any real-time monitoring available with AzCopy? AzCopy can be coupled with Azure Monitor and Azure Activity Log for real-time monitoring, allowing for immediate alerts and insights into permission usage.
In the multifaceted world of cloud computing, managing and safeguarding data becomes paramount. Azure Blob Storage Versioning serves as a pivotal feature within the Microsoft Azure platform, providing the essential capacity to control and maintain various versions of data. Whether you’re a small business owner worried about accidental deletions or a large corporation dealing with regulatory compliance, understanding Azure Blob Storage Versioning is crucial. This comprehensive guide will equip you with an in-depth understanding of what it is, why it matters, how to use it, and much more.
Cloud Storage Manager Reports Tab
What is Azure Blob Storage?
Azure Blob Storage is a robust storage solution provided by Microsoft Azure. Its primary function is to handle unstructured data that doesn’t fit neatly into a database. This includes everything from documents and images to video files.
In a world where data is constantly growing and evolving, Azure Blob Storage offers scalability and flexibility unmatched by traditional storage solutions. Its ability to manage large volumes of unstructured data makes it a vital asset in diverse applications such as data analytics, machine learning, web content storage, and more.
But what truly sets Azure Blob Storage apart is its versioning capability. This critical feature allows users to store multiple versions of a blob (Binary Large Object), thus ensuring a safety net against accidental modifications or deletions.
Cloud Storage Manager Main Window
Understanding Versioning
Importance of Versioning
Data is dynamic. It’s continually created, modified, and sometimes deleted. In such a fluid environment, the need for a robust versioning system becomes evident. It’s akin to a digital library, where different versions of a document are stored, ready to be accessed when needed.
Azure Blob Storage Versioning serves this vital role. For companies, it ensures compliance with regulations that require maintaining multiple copies of data. For developers, it allows experimentation without the fear of losing the original data. And for everyday users, it offers a way to recover from accidental deletions or changes.
How Versioning Works in Azure
At its core, Azure Blob Storage Versioning is about keeping different states of a blob. Every time a change occurs – be it modification or deletion – Azure automatically stores the previous version.
Imagine having a continually updating photo album, where every change is stored, and nothing is ever truly erased. This ability to go back to prior versions ensures an added layer of security and flexibility. It acts as a historical record, providing a transparent look into data’s lifecycle.
Cloud Storage Manager Map View
Enabling Versioning
Steps to Enable Versioning
Enabling versioning in Azure Blob Storage follows a simple and intuitive process:
Access the Azure Portal: Log into your Azure account and open the portal.
Navigate to Blob Service: Select the desired storage account, and click on “Blob Service.”
Activate Versioning: Find the “Data protection” section and check the “Blob versioning” option.
Think of it as turning on a safety feature in your car. With a few clicks, you enable a mechanism that provides extra protection and control.
Necessary Permissions
Enabling versioning isn’t a task left open to everyone. Specific permissions are required, ensuring that only authorized individuals can activate this feature. Generally, you would need the ‘Storage Account Contributor’ role or similar rights. It’s like having a secure vault where only designated personnel have the key.
Managing Versions
Viewing Versions
Azure Blob Storage Versioning offers different ways to view blob versions. Here’s a step-by-step guide:
Azure Portal:
Step 1: Log into your Azure Portal.
Step 2: Navigate to your desired storage account.
Step 3: Select the container and then the blob you wish to view versions for.
Step 4: Click on the “Version history” tab to see the different versions.
Azure Storage Explorer:
Step 1: Open Azure Storage Explorer.
Step 2: Connect to your Azure subscription.
Step 3: Navigate to the blob whose versions you want to view.
Step 4: Right-click and choose “View Blob Versions” from the context menu.
Azure SDK:
Step 1: Utilize the Azure SDK in your preferred programming language.
Step 2: Use specific methods and properties designed to access blob versions.
Step 3: Code and run the program to view the versions.
Restoring Previous Versions
Restoring a previous version in Azure is a straightforward process. Follow these steps:
Step 1: Log into your Azure Portal.
Step 2: Navigate to your desired storage account.
Step 3: Select the blob whose version you want to restore.
Step 4: Click on the “Version history” tab.
Step 5: Choose the specific version you want to restore.
Step 6: Click the “Restore” button, and the selected version will be restored.
Think of it as a time machine for your data, where you can go back to a specific point and bring it back to life.
Deleting Versions
Managing storage efficiently might require you to delete certain versions. Here’s how to do it:
Manual Deletion:
Step 1: Log into your Azure Portal.
Step 2: Navigate to the storage account.
Step 3: Select the blob whose versions you want to delete.
Step 4: Click on the “Version history” tab.
Step 5: Select the versions you wish to delete.
Step 6: Click the “Delete” button to remove those versions.
Automated Deletion Using Lifecycle Management Policy:
Step 1: In the Azure Portal, navigate to your storage account.
Step 2: Click on the “Lifecycle Management” tab.
Step 3: Create a new policy or edit an existing one.
Step 4: Define rules for the deletion of blob versions based on age or other criteria.
Step 5: Save the policy, and Azure will automatically delete versions according to your specified rules.
These detailed guides ensure that managing versions within Azure Blob Storage remains an accessible and efficient process. Whether you’re an experienced Azure user or a novice, these step-by-step instructions provide the roadmap to successfully view, restore, or delete versions as needed. It puts the control of your data right at your fingertips!
Regularly monitoring the versions in your Azure Blob Storage is essential. It ensures that your system remains efficient, optimized, and secure. Consider it like regular health check-ups for your data, ensuring everything is functioning as it should.
Security Considerations
In addition to basic versioning, applying robust security measures is key. Implementing proper permissions, encryption, and access controls adds multiple layers of security to your data, akin to a state-of-the-art security system for your digital assets.
Integrating with Other Tools
Integration with Azure DevOps
Integration with Azure DevOps amplifies the benefits of Azure Blob Storage Versioning. Together, they enhance control over versions, promote collaboration, streamline the development process, and align with Agile methodologies.
Integration with Third-Party Tools
Azure’s ability to integrate with third-party tools, such as data management platforms or security applications, extends its functionality. Like fitting your car with advanced navigation and entertainment systems, these integrations add value and enhance the overall experience.
Pricing Considerations
Azure Blob Storage Versioning’s cost structure can be complex. It’s based on the storage size, access frequency, retrieval requirements, and selected storage tier. Understanding these factors is essential for managing costs effectively. It’s akin to planning a budget, where every detail matters.
Conclusion
Azure Blob Storage Versioning is a powerful tool in the modern data landscape. Its ability to manage, restore, and control different versions of data places it at the forefront of data security, compliance, and management. From enabling and managing versions to integrating with other tools and understanding pricing, this guide offers a comprehensive look into the world of Azure Blob Storage Versioning.
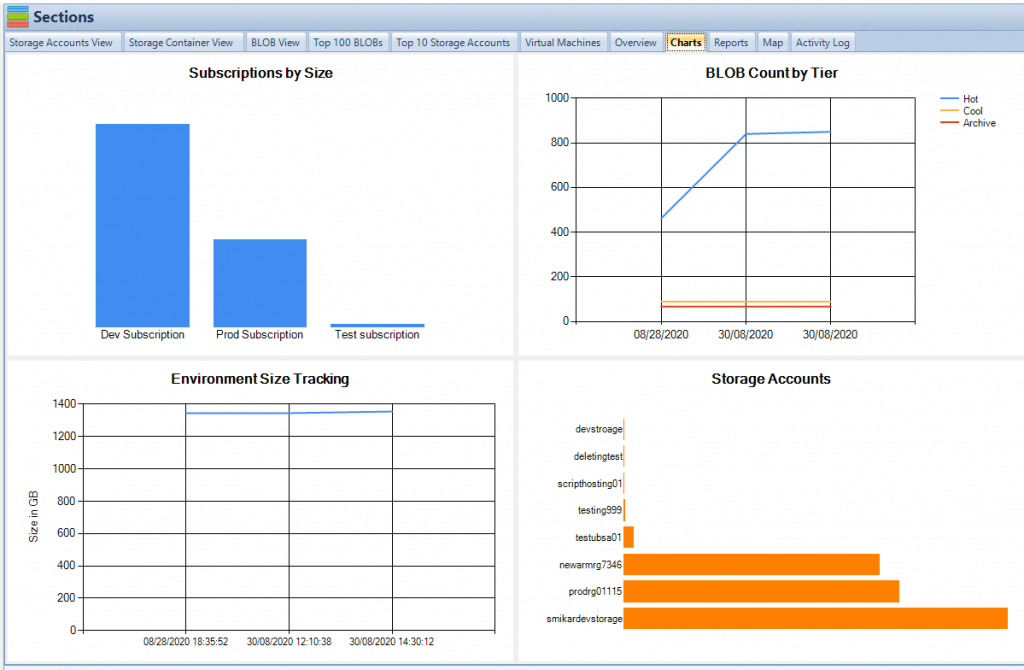
Cloud Storage Manager Charts Tab
FAQs
What is Azure Blob Storage Versioning?
Azure Blob Storage Versioning allows users to store and manage multiple versions of a blob, making it possible to revert to previous states if needed. It’s like having a complete history of your data at your fingertips.
How can I enable Versioning in Azure Blob Storage?
You can enable Versioning through the Azure Portal by accessing your storage account, navigating to “Blob Service,” and activating “Blob versioning.” It’s a straightforward process that adds a powerful feature to your data management toolkit.
Can I delete previous versions in Azure Blob Storage?
Yes, Azure Blob Storage allows you to delete older or unnecessary versions. You can do this manually or set up policies to automate the process, ensuring that your storage remains optimized and clutter-free.
How does Azure Versioning integrate with other tools?
Azure Versioning seamlessly integrates with tools like Azure DevOps and third-party platforms, enhancing collaboration, control, and functionality.
What are the cost considerations for Azure Blob Storage Versioning?
Costs for Azure Blob Storage Versioning depend on factors like storage size, access frequency, and chosen tier. Understanding these factors and planning accordingly can help you manage costs effectively.
AzCopy is a command-line tool provided by Microsoft to transfer data to and from Azure Storage services like Blob, File, and Table storage. It’s a vital tool for IT professionals who handle large-scale data operations, offering an efficient way to move data where it’s needed.
However, as with any robust tool, users might encounter errors or issues while working with AzCopy. In this article, we’ll explore some common AzCopy errors and provide solutions on how to fix them. Additionally, we’ll introduce the “Cloud Storage Manager,” a software that provides insights into Azure blob and file storage consumption, and helps users save money on their Azure Storage.
Overview of AzCopy
AzCopy is designed to copy data using simple commands with optimal performance. You can use it to migrate data to Azure, back up content to Azure, or keep your data synchronized across different Azure services. For a detailed guide on using AzCopy with Azure Storage, click here.
Cloud Storage Manager Map View
Common AzCopy Errors and Their Solutions
Authentication Error: Failed to authenticate with the resource. Make sure the URL is accessible.Explanation: This error often occurs when there is an issue with the credentials.Solution: Check the credentials and ensure that you are using the correct ones for the specific resource.
Syntax Error: Syntax error in 'from-to' option. Provide a valid option.Explanation: This typically means there’s a mistake in the command structure.Solution: Refer to the official syntax or use “Cloud Storage Manager” to manage your files easily. Read more about uploading files using AzCopy here.
Connectivity Issue: Cannot connect to Azure. Check your internet connection.Explanation: The error is self-explanatory and often occurs when there’s a network issue.Solution: Ensure that your internet connection is stable and that AzCopy has the necessary permissions to access the internet.
Transfer Failure Error: Failed to transfer: An unexpected error occurred.Explanation: This generic error might pop up for various reasons, such as network interruptions or file access permissions.Solution: Check the log details for more specific information. Make sure the files you’re trying to transfer are accessible and your network connection is stable.
Blob Type Mismatch Error: The transfer failed: Blob type of the blob reference doesn't match blob type of the blob.Explanation: This error occurs when you’re trying to upload a blob that doesn’t match the existing blob type.Solution: Ensure that the blob type you’re trying to upload matches the destination blob type. If necessary, delete the existing blob and re-upload.
Throttling Error: Server failed to authenticate the request. Please make sure the account name and key are valid.Explanation: This error might occur when too many requests are being sent in a short amount of time, leading to throttling.Solution: Adjust the number of concurrent operations or the number of retries in your AzCopy command. Consider using Cloud Storage Manager to gain insights into your storage and avoid these issues.
No Available Space Error: Disk is out of space or quota: Not enough space is available to complete the operation.Explanation: This error happens when the destination disk does not have enough space to accommodate the files being transferred.Solution: Free up space on the destination disk or choose a different destination with sufficient space.
File Path Too Long Error: The specified file or directory path is too long.Explanation: This error is due to the limitation on the length of file paths in the system.Solution: Shorten the file path or move the file to a directory closer to the root to reduce the overall path length.
403 Forbidden Error: This request is not authorized to perform this operation.Explanation: A 403 error often means that AzCopy doesn’t have the right permissions to perform the operation.Solution: Check the permissions associated with your Azure account and make sure they are correctly configured for the action you are trying to perform.
These are some of the more common errors that IT professionals might encounter when using AzCopy. Understanding these errors and their solutions, as well as utilizing tools like Cloud Storage Manager, can help in managing Azure Storage efficiently and effectively. Additionally, for a simplified way to transfer data to the cloud, consider reading about AzCopy installation.
By following best practices and utilizing the right tools, AzCopy becomes an even more powerful asset in your data management toolkit.
Cloud Storage Manager Settings Menu
Benefits of Using AzCopy
Understanding why AzCopy is a preferred tool can help you make the most of it. Here are some benefits:
Efficiency: AzCopy’s parallel data transfer and retry mechanisms ensure quick and reliable data movement.
Flexibility: It supports various data types and transfer scenarios, adapting to different needs.
Security: Data transfer is secured using HTTPS, maintaining the confidentiality and integrity of your data.
AzCopy Version Considerations
Different versions of AzCopy may lead to varying experiences and potential errors. Here’s what to keep in mind:
Upgrading to Latest Version: Newer versions often contain bug fixes and enhancements. Learn how to upgrade here.
Compatibility Issues: Be aware of compatibility between AzCopy and Azure Storage versions to avoid unexpected errors.
Best Practices When Using AzCopy
These guidelines will help in avoiding common pitfalls:
Proper Syntax: Always refer to the official documentation for the correct command syntax.
Monitor Logs: Regularly checking AzCopy logs helps in early error detection and troubleshooting.
Use Managed Identities: For Azure VMs, using managed identities can simplify authentication.
Cloud Storage Manager Reports Tab
How Cloud Storage Manager Can Help
Cloud Storage Manager offers a user-friendly solution that streamlines the management of Azure blob and file storage consumption. By providing insightful reports on storage usage and growth trends, it helps users make informed decisions, ultimately saving on Azure Storage costs. Here’s how Cloud Storage Manager can enhance your experience:
Insights into Storage Consumption: Cloud Storage Manager provides detailed reports that help you understand where your storage is being utilized. It allows you to optimize AzCopy usage by identifying which data is essential to transfer.
Monitoring Growth Trends: Understanding storage growth trends helps you plan future data transfers and allocate resources more efficiently when using AzCopy.
Cost Management: By giving insights into storage consumption and growth trends, Cloud Storage Manager empowers users to make informed decisions that ultimately save money on Azure Storage.
Finding and Managing Large Azure Blobs: Cloud Storage Manager helps you find the largest Azure blobs, making it easier to manage them with AzCopy. Learn how to do this here.
Comprehensive View of Azure Storage Accounts: By listing all Azure storage accounts by size, you can decide what to move with AzCopy and how to restructure your storage. Learn more here.
Cloud Storage Manager’s reporting and insights make it an invaluable tool for anyone using AzCopy. By providing a clear picture of storage consumption and trends, it helps to make more informed decisions regarding what to transfer and when, thereby aligning with AzCopy’s goal of efficient and effective data transfer.
Cloud Storage Manager Blobs Tab
Conclusion
AzCopy and Azure Storage, while powerful, can present challenges. However, understanding common errors and their solutions, along with utilizing tools like Cloud Storage Manager, can turn these challenges into manageable tasks.
By staying informed about the best practices and being equipped with tools that provide clear insights into storage usage, IT professionals can harness the full potential of Azure Storage and AzCopy. They not only streamline their data management but also achieve cost efficiency.
For further reading, you may refer to the following links:
In the dynamic world of cloud storage, staying agile and informed is the key to success. Utilize these tools and insights to ensure a smooth, efficient, and cost-effective experience with Azure Storage.
Data management and transfer are essential components of the digital era. Whether you are an IT professional, a developer, or simply someone looking to move large amounts of data to the cloud, the efficiency and reliability of the process are paramount. That’s where AzCopy comes into the picture.
Explanation of AzCopy
AzCopy is a free command-line tool provided by Microsoft that’s designed to copy data to and from Azure Storage services. Imagine being able to transfer gigabytes or even terabytes of data seamlessly between your computer, Azure Blob Storage, Azure Files, or other Azure data services. AzCopy makes this possible, offering a time-saving and dependable method to handle your data.
Importance of Efficient Data Transfer
In a world that never sleeps, where businesses are driven by constant innovation and speed, data transfer cannot be the bottleneck. Slow or unreliable data movement can lead to delays in analysis, increased costs, or even loss of crucial information. AzCopy’s powerful capabilities ensure that data is where you need it when you need it, regardless of the scale.
Target Audience and Prerequisites
Whether you are a seasoned Azure administrator or new to the cloud computing scene, this guide will help you get started with AzCopy. You don’t need to be an expert in cloud technology, but a basic understanding of command-line interfaces and Azure services can be helpful. This blog will walk you through everything else!
Are you ready to dive into the world of efficient data movement with AzCopy? In the sections that follow, we’ll explore everything from installation to basic usage, including examples, troubleshooting, and security considerations. By the end of this guide, you’ll be equipped with the knowledge and tools needed to make AzCopy a valuable asset in your data management toolkit.
Join us on this journey, and let’s make data transfer not just a necessity but an art form!
Prerequisites
Before we embark on this exciting adventure of installing and mastering AzCopy, it’s essential to ensure that our systems are well-prepared for the journey ahead. Setting the stage right can make all the difference between a smooth ride and unnecessary bumps along the way.
Supported Operating Systems
AzCopy is like a well-traveled explorer; it’s comfortable in various environments. Here’s a list of the terrains it can traverse:
Windows: Windows 7 or newer, including Windows Server.
macOS: AzCopy can be your digital companion on macOS 10.9 and later versions.
Linux: If you’re a Linux user, worry not! AzCopy supports most Linux distributions.
Necessary Permissions
Think of permissions as the passport to your AzCopy journey. You’ll need:
Read Permission: To copy data from a source.
Write Permission: To move data to a destination.
Azure Storage Account Permissions: If you’re accessing Azure Blob or File Storage, specific permissions may apply, like Storage Blob Data Reader or Storage Blob Data Contributor roles.
Azure Account Requirements
Planning to utilize AzCopy with Azure services? An Azure subscription is your ticket. If you don’t have one yet, you can sign up for a free Azure account to get started. It’s like getting a VIP pass to a world of cloud possibilities!
Setting Sail with Confidence
With the prerequisites in place, we’re ready to launch into the installation of AzCopy. It’s not just about getting a tool; it’s about unlocking a powerful ally in your data management quests. In the next section, we’ll take this exciting step together, knowing that our systems are ready, and so are we!
Get ready to turn the key and ignite the engine of efficient data transfer. The road to mastering AzCopy is open, and it promises to be an engaging ride!
Cloud Storage Manager Charts Tab
Installation of AzCopy
Now that we’ve prepared our systems, packed our bags with the necessary permissions, and embarked on this thrilling journey, it’s time to welcome AzCopy on board! Installing AzCopy is like getting the keys to a powerful vehicle, ready to navigate the complex highways of data transfer.
Downloading the AzCopy Executable
1. Windows: AzCopy feels right at home on Windows. Simply download the .zip file from the official page, and you’ll be on your way! 2. macOS: Mac users, AzCopy hasn’t forgotten you! Grab the macOS tar file, and let’s get rolling. 3. Linux: For Linux enthusiasts, AzCopy is a loyal companion. Download the tar file, and prepare for the journey.
Installation Process
1. Extracting the Downloaded File: Unzip the downloaded file, and you’ll find AzCopy waiting eagerly, ready to serve.
2. Adding to PATH Environment Variable (Optional): Want AzCopy at your fingertips? Adding it to your PATH is like storing it in your tool belt, always ready when needed. Here’s how:
Windows: Edit the system environment variables and add AzCopy’s path.
macOS/Linux: Use the command export PATH=$PATH:/path/to/azcopy.
Verifying Installation
Ready to test drive AzCopy? Open a command prompt and run azcopy --version. If AzCopy responds with a friendly version number, congratulations! You’ve successfully invited a powerful ally to your data management team.
Cloud Storage Manager Blobs Tab
Time to Hit the Road with AzCopy
Installing AzCopy wasn’t just a task; it was the initiation of a partnership with a tool designed to redefine how you manage data. The road ahead is filled with opportunities to discover how AzCopy can transform tedious data transfer tasks into efficient, reliable, and even enjoyable experiences.
So buckle up, grab the wheel, and let’s drive into the world of AzCopy together! In the next section, we’ll explore the controls, the dashboard, and the command-line magic that makes AzCopy a must-have in every data engineer’s toolkit.
Your digital highway is wide open, and AzCopy is ready to accelerate your journey!
Basic Usage of AzCopy
With AzCopy installed and ready, it’s time to put this powerful tool to work! Think of AzCopy as a high-tech, super-efficient cargo ship, ready to transport your data across oceans of information. Here’s how you can set sail with AzCopy:
Syntax Overview
Understanding AzCopy’s syntax is like learning the language of an expert navigator. Here’s the basic structure:
azcopy [command] [arguments] [flags]
Don’t worry; it’s simpler than it looks! Let’s break down the common commands.
Commonly Used Commands
1. Copy: Need to move data from port A to port B? The copy command is your go-to choice:
azcopy copy 'source' 'destination' [flags]
2. Move: Want to relocate data like a seasoned captain shifting cargo? Use the move command:
azcopy move 'source' 'destination' [flags]
3. Remove: Time to declutter the deck? The remove command will help you tidy up:
azcopy remove 'path' [flags]
Handling Authentication
Your data is precious cargo, and AzCopy ensures it’s well-guarded: 1. Managed Identity: Sail smoothly with Azure’s Managed Identity for seamless authentication. 2. Azure Active Directory (Azure AD): Utilize Azure AD for a fortified authentication process.
Your First Voyage with AzCopy
By now, you have the tools, the commands, and the know-how to navigate the seas of data transfer with AzCopy. Whether you’re embarking on a small trip across a lake or preparing for a cross-continental journey, AzCopy stands ready to make the process a breeze.
In the sections to come, we’ll explore real-life examples and scenarios, troubleshoot choppy waters, and even dive into the security depths.
So grab your captain’s hat and set your sights on new horizons. With AzCopy at the helm, you’re not just moving data; you’re exploring uncharted territories, unlocking new efficiencies, and charting your path in the endless ocean of information.
Ready to sail? AzCopy awaits your command!
Cloud Storage Manager Reports Tab
Examples and Scenarios
Ahoy, fellow data explorers! With AzCopy at the ready and the basic commands under our belts, it’s time to set sail on real-world adventures. Like any seasoned explorer, practice and experience lead to mastery, so let’s embark on some practical missions with AzCopy.
Copying Data to Azure Blob
Setting a course for Azure Blob? Here’s how you can fill its storage containers with your precious cargo:
Got a mountain of data to move? Fear not! AzCopy handles large-scale data like a fleet of unstoppable vessels. Utilize parallel transfers, retry policies, and logging to steer your data fleet with precision and reliability.
Setting a Course with Confidence
By journeying through these examples, you’ve become more than just a passenger; you’re now the captain of your AzCopy ship! From small voyages to grand expeditions, these scenarios have equipped you with the tools to navigate the vast oceans of data.
But wait, the adventure isn’t over yet! In the sections ahead, we’ll delve into the realms of troubleshooting, explore the fortifications of security, and even discover hidden treasures in AzCopy’s capabilities.
So raise the anchor, unfurl the sails, and keep a keen eye on the horizon. With AzCopy as your steadfast companion, there’s no telling what you’ll discover next!
Cloud Storage Manager Main Window
Troubleshooting: Navigating AzCopy’s Stormy Seas
Every voyage, no matter how well-prepared, encounters a storm or two. But fear not, brave data sailors! When sailing with AzCopy, having the right navigational tools to troubleshoot any storms you may encounter is key. Let’s dive into some common challenges and discover how to turn those stormy seas into smooth sailing.
“Failed to Authenticate” Error
Lost your way at sea with an authentication error? It could be a misaligned compass. Check:
Credentials: Are your Azure credentials correctly configured?
Permissions: Have you granted the right permissions? Make sure your AzCopy vessel has the proper clearance to sail!
Slow Transfer Speeds
Finding yourself stuck in the doldrums with slow transfer speeds? Here’s how to catch a favorable wind:
Network Configuration: Optimize your network settings. It’s like tuning your sails for the best wind!
Concurrency Options: Adjust parallel transfer settings to unleash AzCopy’s full power.
“Access Denied” Error
Encountered a barricade on your journey with an “Access Denied” error? Time to double-check the map:
Paths and URLs: Ensure the paths and URLs are correct. Even the most seasoned navigator can sometimes misread a map!
File Permissions: Verify that you have the required permissions to access the data treasures.
Issues with Large Transfers
Handling a massive cargo and facing difficulties? Large-scale transfers are AzCopy’s specialty. If issues arise:
Monitor Progress: Use the --progress flag to keep an eye on your fleet.
Log Files: Dive into the log files. They’re like a captain’s log, detailing the journey and helping you uncover hidden challenges.
Your Compass in Troubled Waters
With these troubleshooting tools at your side, no storm is too big, no wave too high. You’re not just a sailor; you’re a master navigator, capable of steering through any challenge with AzCopy.
And remember, every challenge is an opportunity to learn, to grow, and to become an even more skilled explorer of the digital seas.
In the upcoming sections, we’ll fortify our ship with security measures, ensuring that our precious cargo is safe and secure. The voyage continues, and with AzCopy at the helm, you’re in command.
So keep a steady hand on the wheel and a keen eye on the horizon. The world of AzCopy is vast, filled with opportunities and adventures, and it’s all waiting for you!
Cloud Storage Manager Map View
Security: Fortifying Your AzCopy Ship
Welcome to the fortress of AzCopy, where security reigns supreme! In a world filled with pirates, sea monsters, and unexpected storms, ensuring that your AzCopy ship is well-fortified is paramount. Let’s delve into the robust defenses that make AzCopy a trusted vessel on your data seascape.
Data Encryption
AzCopy’s armor against prying eyes, data encryption ensures that your cargo remains a mystery to unwanted onlookers:
Transport-Level Encryption: Think of this as an invisible shield, protecting your data as it sails through the internet waves.
Storage Service Encryption: Once your data reaches the Azure shores, this encryption guards it like a sentinel, ensuring it rests securely.
Managed Identities and Azure AD
A steadfast crew is vital for a secure voyage, and AzCopy’s integration with Azure AD and Managed Identities ensures that only the right hands are on deck:
Role-Based Access Control (RBAC): Define who’s the captain, the navigator, and the deckhand with precise role assignments.
Azure AD Integration: Forge alliances with Azure’s Active Directory, giving AzCopy the backing of a powerful fleet.
Private Endpoints
Private endpoints are like hidden harbors, accessible only to those who know the way:
Enhanced Security: By using Azure private endpoints, you keep your traffic within the Azure network, away from prying eyes.
Controlled Access: It’s like having a secret code to a hidden cove, granting access only to those you trust.
Logging and Monitoring
Keep a watchful eye on your ship with AzCopy’s logging and monitoring capabilities:
Detailed Logs: These logs are your ship’s diary, recording every move, every wave, and every wind.
Integration with Monitoring Tools: Sync AzCopy with Azure Monitor and other tools to have a bird’s-eye view of your data voyages.
A Fortified Ship, A Safe Voyage
With these security measures, your AzCopy ship is not just a vessel; it’s a fortress on the seas of data, ready to face any challenge, defy any threat, and guard your precious cargo with unyielding resolve.
As we continue our exploration of AzCopy, know that security is not an afterthought; it’s the bedrock, the foundation upon which every voyage is built.
In the sections ahead, we’ll explore more of AzCopy’s hidden treasures, and you’ll see why this tool is not just a means to an end but a trusted companion on your data adventures.
So raise the security flags, sharpen your swords, and set sail with confidence. The seas of AzCopy are waiting, and with a fortified ship, you’re ready for anything!
On September 1, 2023, Microsoft’s Defender for Azure Blob Storage is set to introduce a groundbreaking feature: Malware Scanning. This highly-anticipated addition to the Defender suite brings real-time protection against malicious content, making it a vital component in fortifying your data security and safeguarding against the ever-evolving threat landscape. In this article, we’ll delve into the power of Malware Scanning and its multifaceted benefits, revealing how it can help you stay ahead in the battle against malware.
Detect and Prevent Malware Distribution
Malware poses a significant risk to cloud storage resources, including Azure Blob Storage. To counter this threat, Malware Scanning in Defender uses state-of-the-art scanning engines to swiftly and effectively detect and prevent the distribution of malicious content. By continuously monitoring file uploads and exfiltration attempts, the scanning engine provides real-time protection, giving you peace of mind that your data remains secure at all times.
Simplified and Automated Process
Emphasizing ease of use, the process of enabling Malware Scanning is streamlined and automated. Implementing this robust security measure is hassle-free and can be accomplished with minimal effort. The Defender for Azure Blob Storage automatically scans incoming content, mitigating the need for manual intervention and freeing up valuable resources within your organization.
Scalability at Its Core
Whether you’re a small startup or a large enterprise, Defender’s Malware Scanning is designed with scalability in mind. The solution seamlessly adapts to your data storage needs, ensuring consistent protection as your storage requirements grow. From the smallest text files to massive multimedia assets, Malware Scanning effortlessly scales to accommodate your data volume without compromising on performance.
Data Privacy as a Priority
Data privacy is of utmost importance in the modern digital landscape. To maintain a high standard of privacy, the Malware Scanning engine operates without retaining any file content. This approach guarantees that your sensitive data remains confidential and inaccessible to any unauthorized parties, fostering trust and compliance within your organization and with external regulations.
Cost Control with Data Volume Limits
Managing costs is a crucial aspect of any cloud-based solution. To enable effective cost control, Malware Scanning allows you to set data volume limits for the scanning process. By fine-tuning these limits to suit your specific needs, you can optimize resource allocation, thereby maximizing your return on investment without compromising on security.
Diverse Use Cases
Malware Scanning proves invaluable across a range of scenarios. Web applications benefit from an added layer of protection, preventing the distribution of malware-laden files to users. For businesses dealing with sensitive content, this feature safeguards valuable intellectual property and customer data. Additionally, adhering to compliance regulations becomes easier with the implementation of robust malware protection. Moreover, for organizations utilizing machine learning, ensuring the integrity of training data is critical, and Malware Scanning effectively supports this aspect as well.
Seamless Deployment Options
Deploying Malware Scanning in Defender for Azure Blob Storage is a flexible process. You can choose from a variety of deployment options to suit your preferences and requirements. These options include:
Azure Policy: Incorporate Malware Scanning into your organization’s security policies, ensuring comprehensive coverage across your entire Azure ecosystem.
Infrastructure as Code (IaC) Templates: Leverage IaC templates for automated and repeatable deployment, reducing manual configuration efforts.
REST API: For developers seeking programmatic control, the REST API enables seamless integration of Malware Scanning capabilities into custom applications and workflows.
Azure Portal UI: Utilize the intuitive Azure Portal user interface for a straightforward setup process, empowering users of all levels to enable this robust security feature effortlessly.
Strengthening Data Protection
Data stored in Azure Blob Storage is often valuable, ranging from sensitive business documents to customer data and intellectual property. With Malware Scanning, organizations can reinforce their data protection measures significantly. The real-time detection and prevention of malware distribution ensure that malicious files cannot infiltrate the storage environment, safeguarding the integrity and confidentiality of critical information.
Furthermore, Malware Scanning plays a crucial role in preventing data breaches. By identifying and blocking potentially harmful files at the point of upload, organizations can avoid scenarios where malware-infected files may later compromise system integrity or lead to data leaks. This proactive approach reduces the chances of costly data breaches and minimizes the associated reputational risks.
Meeting Compliance Requirements
Compliance with industry regulations and data protection laws is a top priority for businesses operating in the digital landscape. Many sectors, including healthcare, finance, and government, are subject to stringent data security standards. Failure to comply with these requirements can result in severe penalties and legal consequences.
By integrating Malware Scanning in Defender for Azure Blob Storage, organizations can demonstrate their commitment to data security and regulatory compliance. The ability to prevent malware distribution aligns with various compliance frameworks, reinforcing data protection efforts and ensuring adherence to relevant industry standards.
Safeguarding Machine Learning (ML) Training Data
Machine learning models depend on high-quality training data to deliver accurate and reliable results. Ensuring the integrity and cleanliness of training datasets is paramount for successful ML initiatives. Malware-infected data can compromise the training process, leading to biased or erroneous model outputs.
Malware Scanning in Defender for Azure Blob Storage addresses this concern by preventing the ingestion of contaminated data into the ML training pipeline. By leveraging Malware Scanning, organizations can safeguard the accuracy and reliability of their ML models, thus maximizing the return on investment in AI and ML initiatives.
Enhancing Web Application Security
Web applications often rely on cloud storage resources to serve content to users. Malware distribution through web applications can lead to compromised user experiences, reputational damage, and even legal liabilities. Malware Scanning acts as a powerful line of defense, protecting web applications from delivering malicious content to unsuspecting users.
As web application threats continue to evolve, a robust malware protection mechanism becomes essential. Defender’s Malware Scanning enables organizations to fortify their web applications against emerging threats, bolstering their overall cybersecurity posture and instilling confidence in users who rely on their services.
A Unified Solution for Cloud Security
Defender for Azure Blob Storage’s Malware Scanning seamlessly integrates with other components of the Microsoft Defender suite. This unified approach to cloud security empowers organizations with a comprehensive, end-to-end solution for protecting their cloud-based resources.
With Malware Scanning working in tandem with other security features, such as threat detection, identity protection, and access controls, organizations can establish a multi-layered defense strategy against diverse cyber threats. This holistic approach ensures that potential vulnerabilities are detected and addressed from various angles, creating a robust security posture that leaves no room for compromise.
Azure Defender for Storage Flowchart
User Uploads File: The process begins when a user (A) uploads a file to the Azure Blob Storage (B). This could be any type of file, ranging from documents and images to videos and application files. The seamless integration of Azure Blob Storage into various applications and systems makes it an ideal choice for storing a wide range of data.
Triggering Malware Scanning: As the file reaches the Azure Blob Storage, the Malware Scanning Engine (C) is automatically triggered. This engine is equipped with advanced scanning algorithms and up-to-date threat intelligence, enabling it to swiftly analyze the uploaded content for any signs of malicious activity.
Detecting Malicious Content: The Malware Scanning Engine (C) diligently inspects the content of the uploaded file. Leveraging signature-based scanning, behavior analysis, and machine learning techniques, it identifies known malware signatures, suspicious patterns, and potential zero-day threats. If any malicious content is detected within the file, the system proceeds to take immediate action.
Blocking Upload for Security: When the Malware Scanning Engine (C) identifies malicious content, it promptly blocks the file upload (D). This rapid response prevents the harmful file from being stored in the Azure Blob Storage, mitigating the risk of it spreading further across the system or affecting other users.
Sending Alerts to the Security Team: Simultaneously, upon the detection of malicious content and blocking of the upload, the system triggers an alert (D). This alert is sent to the designated Security Team (F), providing them with real-time information about the attempted security breach. The security team can then initiate immediate investigation and implement appropriate measures to address the threat.
Allowing Safe Upload: On the other hand, if the Malware Scanning Engine (C) does not find any malicious content within the uploaded file, it allows the file to be stored in the Azure Blob Storage without any interruptions (E). This seamless process ensures that legitimate content can be efficiently stored and accessed without unnecessary delays or obstacles.
The Mermaid diagram and its accompanying explanation demonstrate the proactive and robust nature of Malware Scanning in Defender for Azure Blob Storage. This real-time protection mechanism ensures that your cloud storage remains secure and free from potential threats, safeguarding your valuable data and bolstering your overall cybersecurity posture.
By combining advanced scanning capabilities, automated processes, and a vigilant security team, organizations can confidently rely on Defender for Azure Blob Storage to protect their critical data and applications. This comprehensive approach to malware detection and prevention empowers businesses to stay ahead of emerging cyber threats, maintain regulatory compliance, and foster trust with customers and partners.
Abundant Resources and Documentation
Microsoft’s commitment to empowering its users is reflected in the abundance of resources and documentation available. Detailed guides, best practices, and use case examples ensure that users understand the full potential of Malware Scanning in Defender for Azure Blob Storage. Additionally, a responsive support network stands ready to assist in any deployment or operational queries, further enhancing the value of this cutting-edge security solution.
In summary, Malware Scanning in Defender for Azure Blob Storage presents an unprecedented level of security and protection for your cloud storage resources. Its real-time detection capabilities, automated processes, scalability, and commitment to data privacy make it an essential addition to any organization’s cybersecurity strategy. By leveraging this robust solution, you can confidently outperform potential threats, elevate your data protection standards, and establish a strong foothold in today’s dynamic digital landscape.