by Mark | Jul 5, 2016 | Deployment, How To, Patch Management, Patch Releases, Risk, SCCM, Security
Deploying a Zero Day Exploit Fix with Microsoft SCCM 2012
Zero Day exploits are vulnerabilities that are found and can be used by hackers to exploit and use for malicious or personal intent. These exploits have been known to affect both software and hardware, causing issues to programs, data, computers, and networks. Once a patch or fix is released by the vendor, the issue is no longer known as a Zero Day vulnerability. In this article, we will discuss how to remediate Zero Day attacks and how to deploy a Zero Day exploit fix using Microsoft SCCM
Remediating Zero Day Attacks
Unfortunately, there isn’t much that can be done until a fix or update is released that patches the security hole. Once a patch is released, it is best to deploy and apply the patch as soon as possible. To reduce the risk of unknown vulnerabilities, it is good practice to keep your hardware and software up to date. This will remove any previously found vulnerabilities from your environment as patches are applied. Having a patching process in place and suitable infrastructure to do so (e.g., Microsoft SCCM and SnaPatch) where you can deploy updates easily and often are also good practices.
Deploying a Zero Day Exploit Patch Using SCCM
Unfortunately, there isn’t much that can be done until a fix or update is released that patches the security hole. Once a patch is released, it is best to deploy and apply the patch as soon as possible. To reduce the risk of unknown vulnerabilities, it is good practice to keep your hardware and software up to date. This will remove any previously found vulnerabilities from your environment as patches are applied. Having a patching process in place and suitable infrastructure to do so (e.g., Microsoft SCCM and SnaPatch) where you can deploy updates easily and often are also good practices.
Zero Day Exploit Overview
So what exactly is a Zero Day Exploit you ask? To be exact, a Zero Day Exploit is a vulnerability that is found that a possible Hacker can use to exploit and use for malicious or personal intent. The Vendor (software or hardware) has Zero Days to plan, mitigate and fix the issue so that there is no further exploitation of the vulnerability. The exploits have been known to be for either software (Operating Systems and Software) and hardware. They have been known to cause issues to programs, data, computers and to the network.

Zero Day Attack Timeline
In the case of a breach being found in some software, a Zero Day Exploit normally follows this;
- A hacker finds a vulnerability with a product (software/hardware).
- The hacker writes an exploit and uses it either to be malicious or financial gain.
- Exploit is detected either by Users, Security Companies or the Vendor themselves.
- The Vendor studies the new exploit and develops a fix.
- The Vendor releases a new patch to fix the exploit
- Users install the Patch or Virus Definition update.
The biggest issue with a Zero Day Exploit is that they are generally unknown until they have been used to breach systems, leaving everyone vulnerable until the Vendor releases security advice on how to remediate the issue or a patch or update. This could be days, weeks, months or even years before the Vendor learns of the vulnerability. Once a Patch or Fix has been released by the Vendor, then the issue is no longer known as a Zero Day Vulnerability.
How to remediate Zero Day Attacks
Unfortunately there isnt much that can be done until there is a fix or update released that patches the security hole. Once a patch is released it is best to deploy and apply the patch as soon as is possible.
To also reduce the risk, it is good practice which will aid you in mitigation of vulnerabilities that are unknown to yourself if you keep your hardware and software patched up to date. This will remove from your environment any previously found vulnerabilities as patches are applied. Having a Patching Process in place and suitable infrastructure to do so (ie Microsoft SCCM and SnaPatch for instance) where you can deploy updates easily and often are also good practice.
Using SCCM to deploy a Zero Day Exploit Patch
If you are using Microsofts SCCM 2012, you can easily deploy an update that addresses a Zero Day Vulnerability by following these steps;
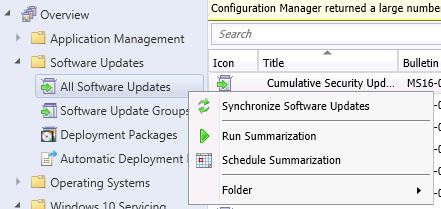
- Log on to your SCCM console, then go to Software Library, then expand Software Updates and highlight All Software Upates. Now Right Click and choose Synchronise Software Updates. This will synchronise your SCCM server with your WSUS updates server. Allow a few minutes for the new updates to populate the view. You can check the Wsyncmgr.log to view the update synchronisation.

- If you know the Bulletin ID number (the update number released by Microsoft in the format MSXX-XXX. In this example I am choosing MS16-082), you can now search for this within the console.

- Make sure that the update has downloaded and if not, right click the update and choose Download. You will obviously need to give the update sometime to download in to your environment and be ready for deployment. Click this link to see how to manually download updates if you dont know how.

- When the update is downloaded and ready for deployment, you are now ready to deploy the Update. (If you are using SnaPatch to deploy the updates, go straight to the SnaPatch Section below.)
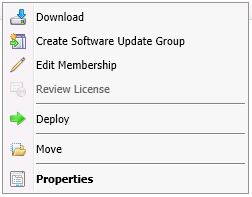
Right Click the update (or updates) and choose Deploy.
Enter in a Deployment Name, a Description, and choose the collection you wish the Zero Day exploit to deploy to. Once you have chosen the correct settings, click on Next.
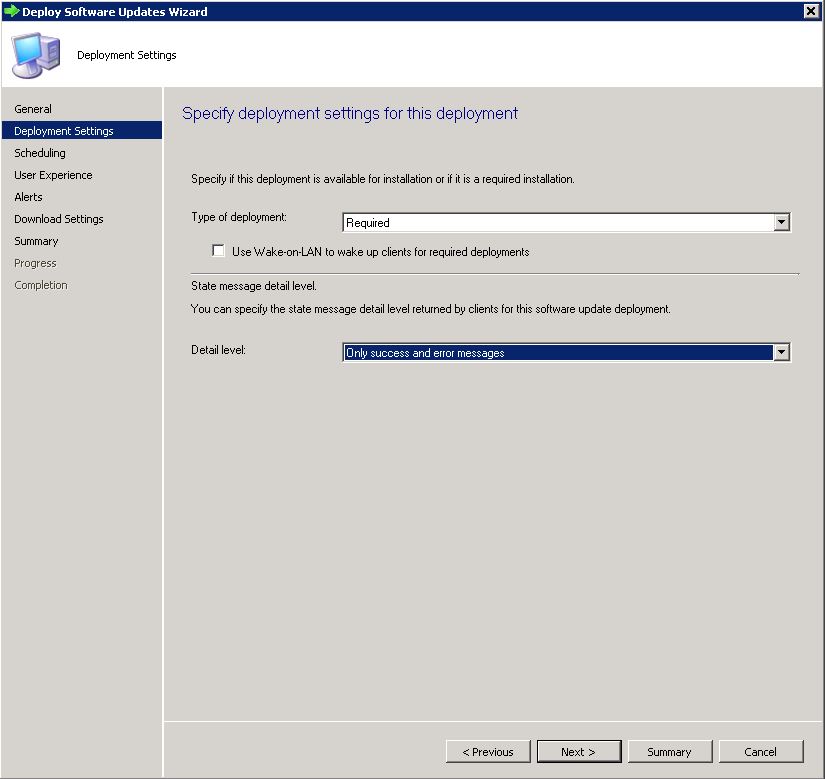
- On the Deployment Tab, leave the type of deployment as Required and choose the level of detail you want then click on Next.
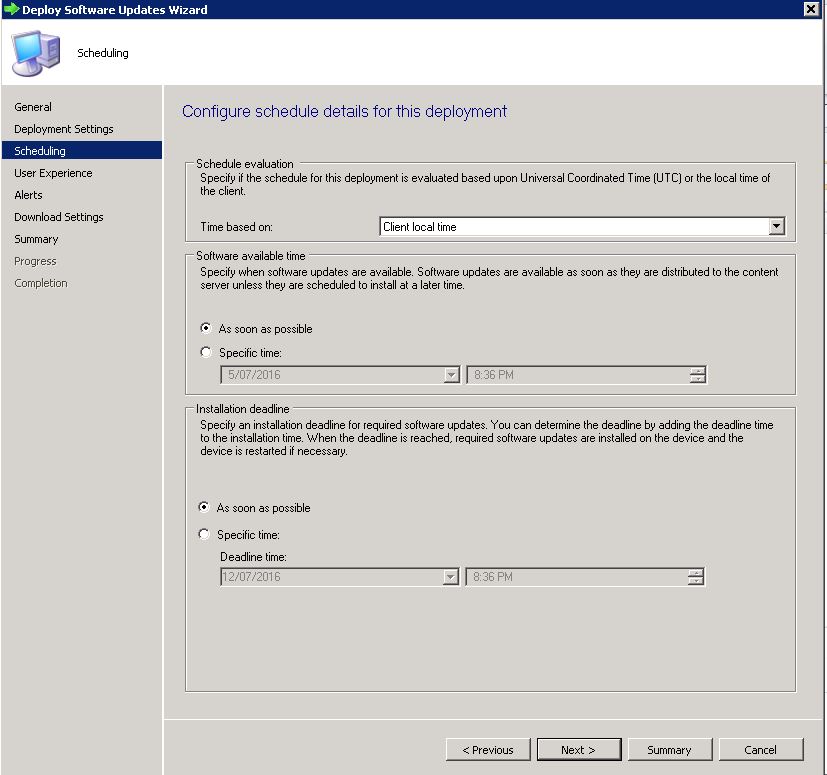
- Now to schedule when you want the update to deploy. As this is a Zero Day Exploit that you want patched quickly, schedule the patch to be available As Soon As Possible for both the Software Available Time and Installation Deadline. Please note, that more often than not, the installation of an update will cause systems to restart. Please make sure you have informed the appropriate people and that you have approval for deployment. Nothing worse than deploying an update and having to answer to Management as you caused unwarranted system outages.

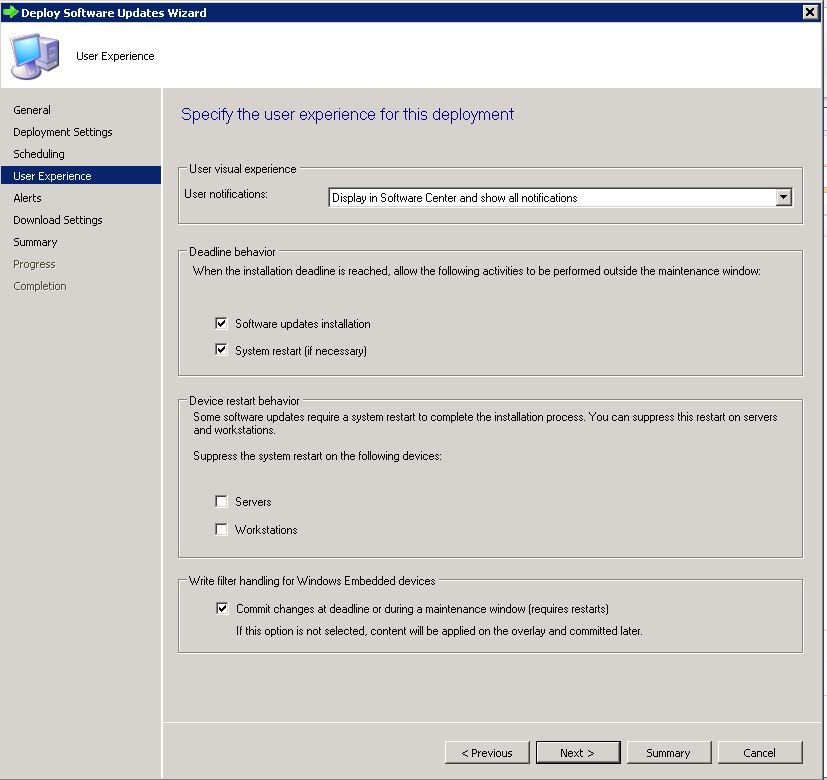
- The User Experience Tab is where you set how the deployment will interact with Users. You can set if the users are notified within the Software Centre that an update is available for installation, when the deployment deadline is reached whether the update can install and restart the system outside a maintenance window, and finally whether you wish to suppress a system restart. As this is an urgent deployment, I have chosen to allow installation and restart to be allowed outside any maintenance windows. Choose the settings you require and click on Next.
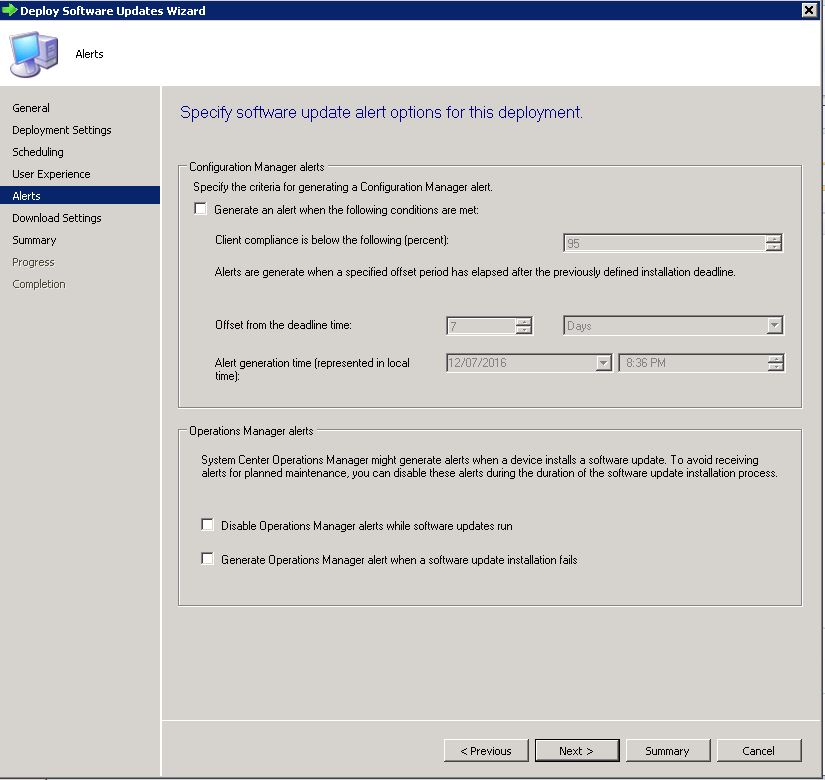
- If you have System Centre Operations Manager (Microsoft SCOM) in your environment you can choose to generate an alert with criteria you specify. In this example we are not going to specify any settings. Click on Next when you have made your selections.

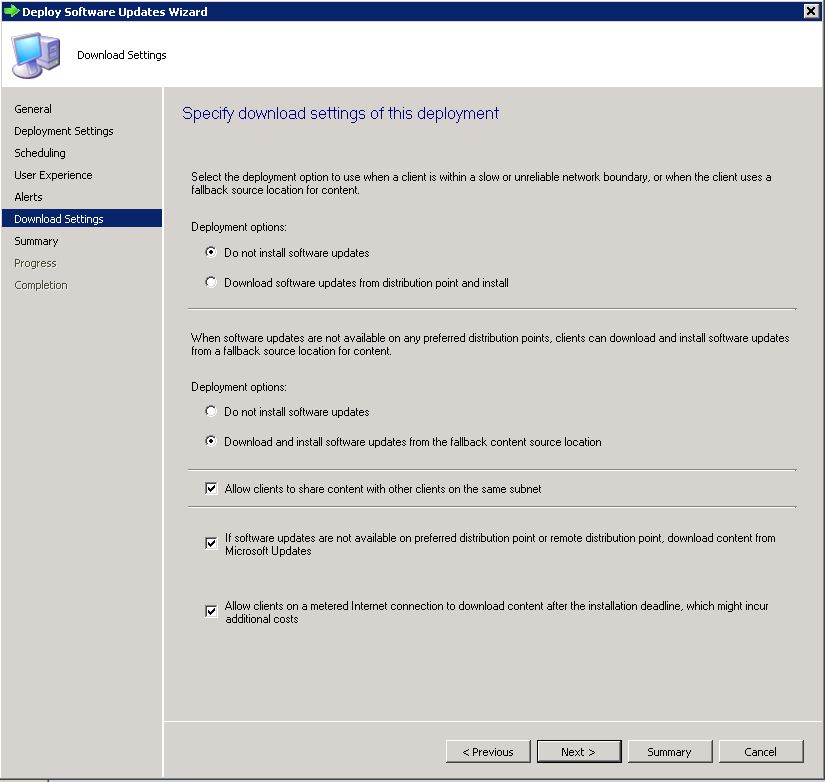
- The Download Settings tab allows you to choose client download settings. If a client is on a slow or unreliable network boundary you can choose if they dont install the update or from another distribution point. Allowing clients to share content between themselves is a great feature of SCCM as it will stop other client machines downloading the same updates and possibly flooding a network link. The clients will all share the update between themselves if they are on the same subnet. Also if they cannot download the update from a SCCM distribution point, allowing them to download from Microsoft Update is available as well.
Click on Next when ready to.
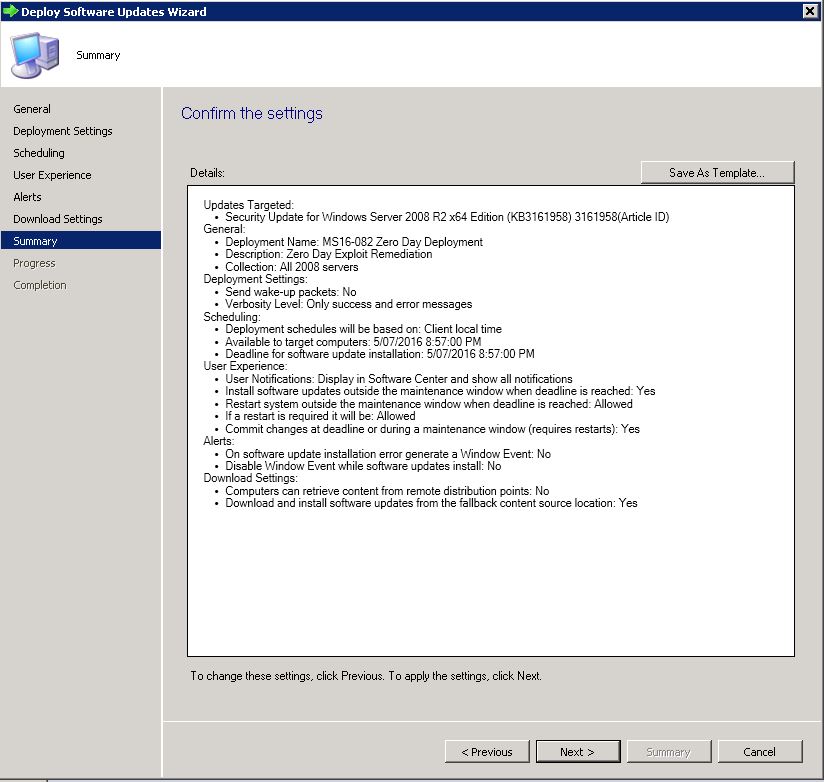
- Now you can review all the settings on the Summary Tab. Confirm you are happy with all the settings and then click Next.

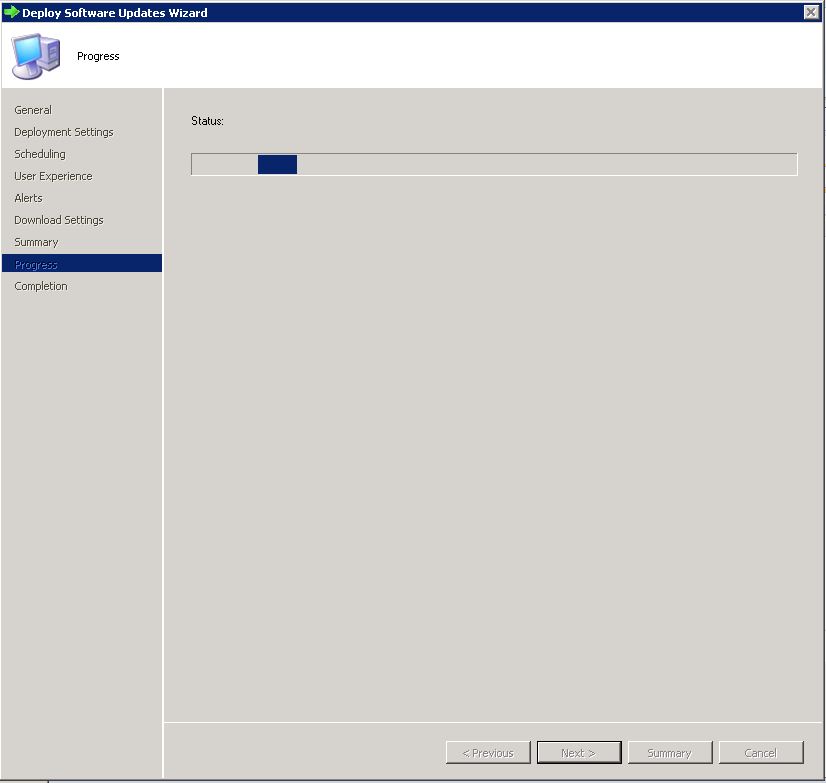
- The progress of the deployment will now be shown.
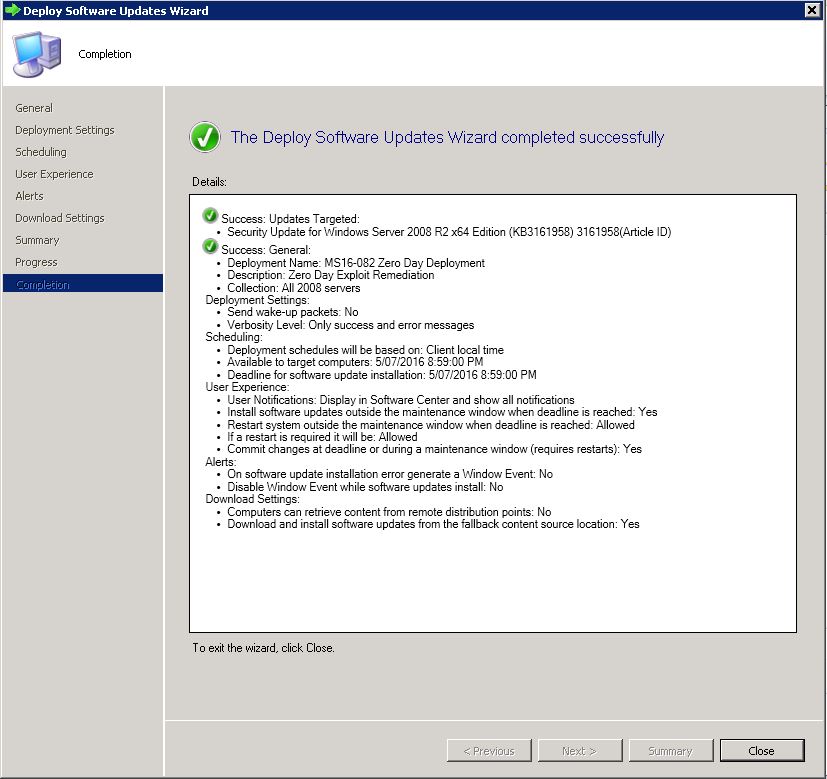
- Your Zero Day Exploit deployment should now be ready to be deployed to your SCCM clients as per the settings you have set.
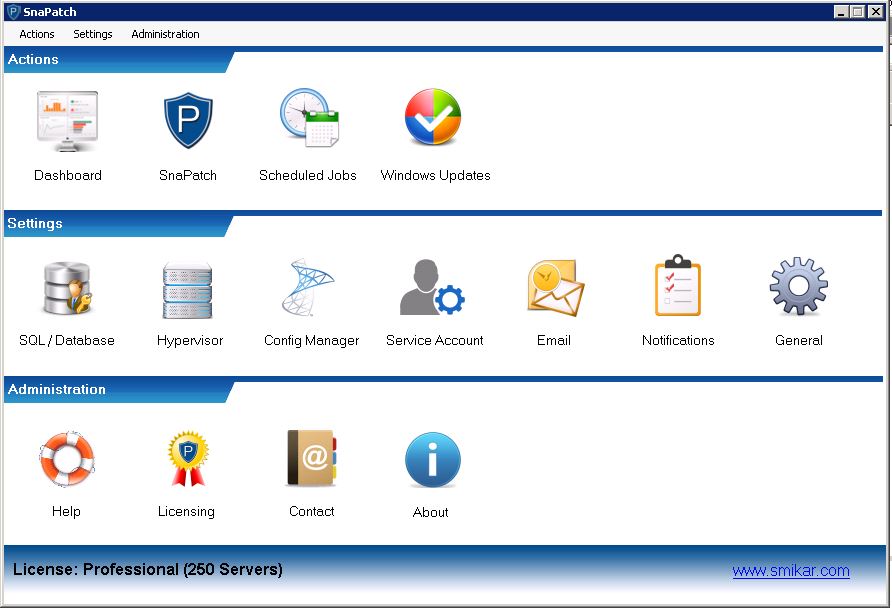
Using SnaPatch for Zero Day Exploit Deployment
If you are using SnaPatch to aid you with the deployment of Windows Updates with Microsoft’s SCCM, you can follow on from Steps 1 to 4 from above.
- Open the SnaPatch console and choose the SnaPatch Icon to start the snapshot and patch deployment process.

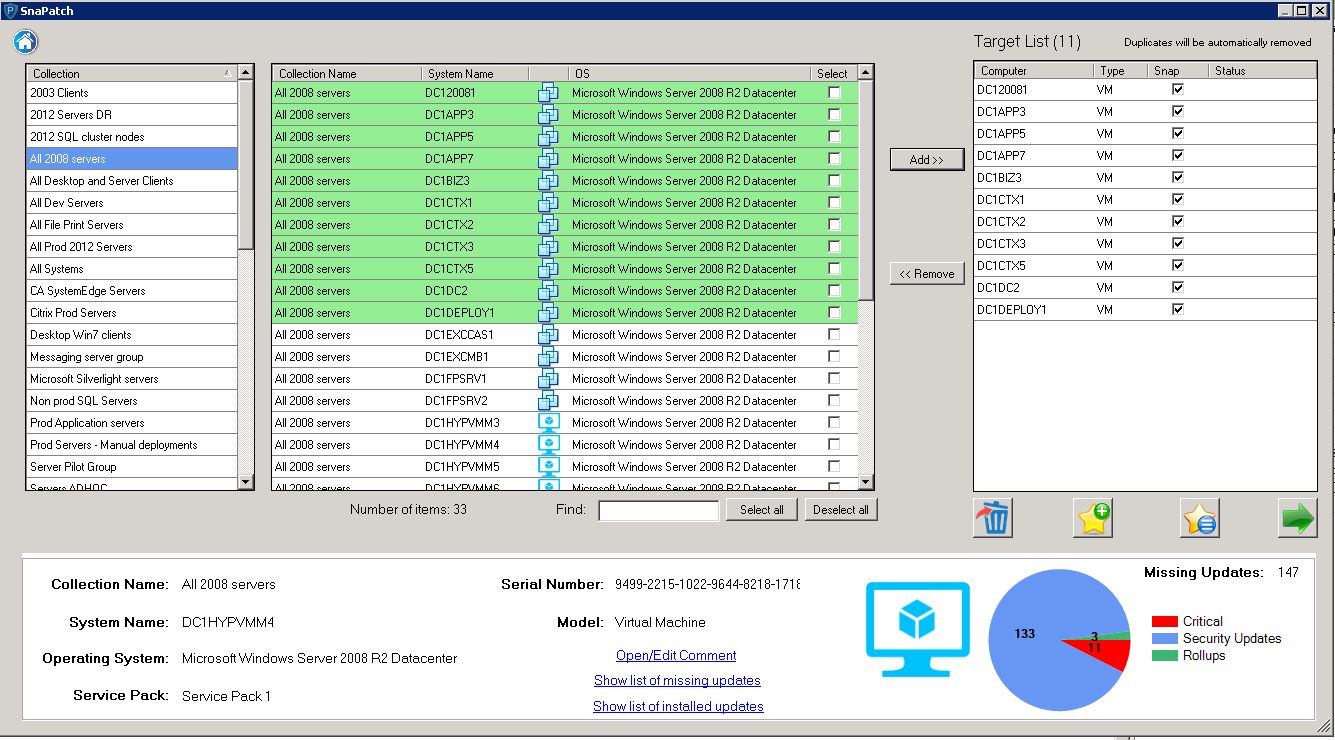
- Now you are presented with all the SCCM Collections and Systems available to deploy the Zero Day Exploit to. Choose the systems you want to receive the patch and click on Add.

If the machines are virtual (either a VMWare or HyperV virtual machine) you can choose whether to take a snapshot of the servers prior to deployment of the zero day patch. Should the servers not have a successfully snapshot completed, then they will not receive the update deployment. The snapshot of the virtual machines gives you a quick rollback position should the update cause an issue in your environment.
When you have chosen all the machines you wish and if you would like a snapshot, click on the green arrow to continue.
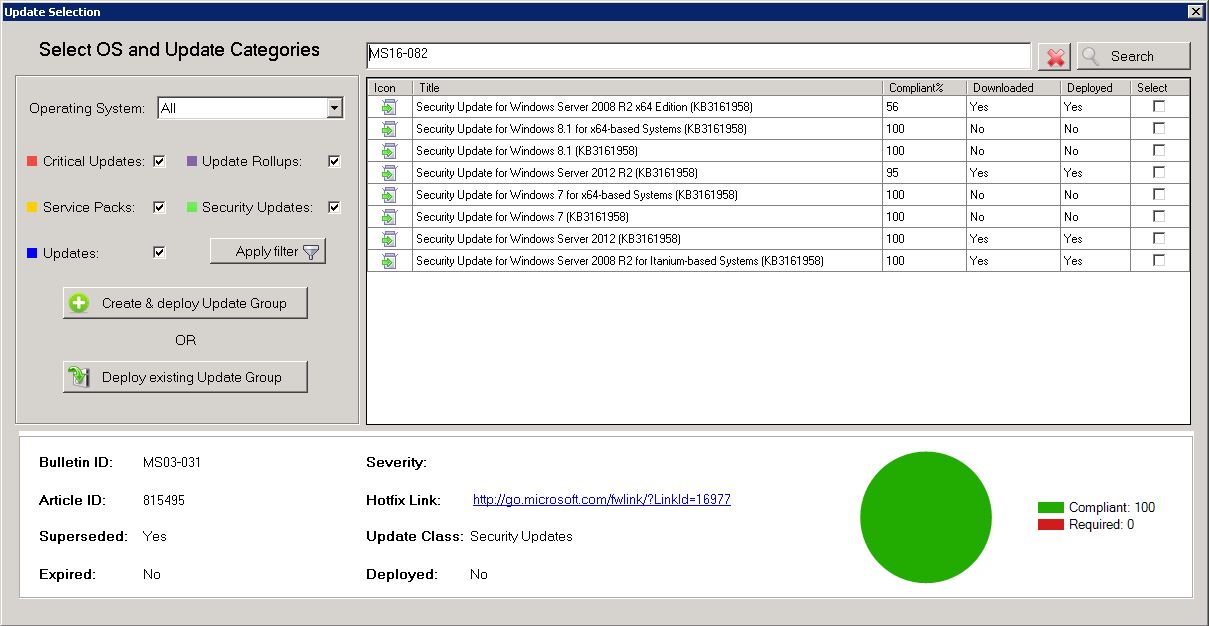
- The next window in the SnaPatch process, is to chose the update you wish to deploy. As this is a Zero Day patch and we know the Microsoft article number (which in this example is MS16-082), type in the KB or MS article number and choose search.
Select the update, confirm that it has been downloaded (as per step 3 above) and now choose if you want the update to deploy to an existing Update Group or to create a new one. 
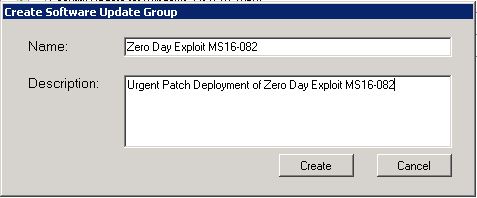
- As this is an urgent deployment, I am choosing Create & Deploy Update Group. Give the Software Update Group a Name and Description and click Create.

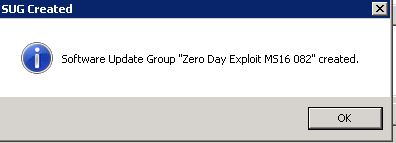
- Confirmation that the Software Update Group has been created. Click OK.

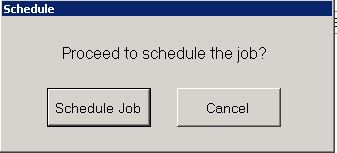
- Next we have to schedule deployment. Click Schedule Job.

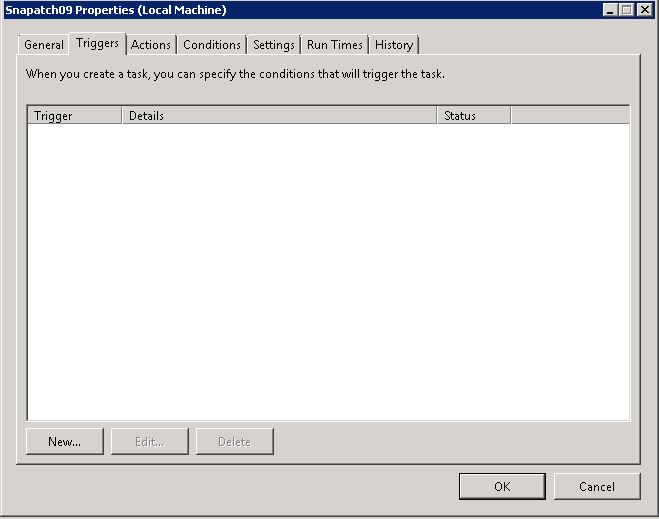
- Now on the scheduling window, click on New.

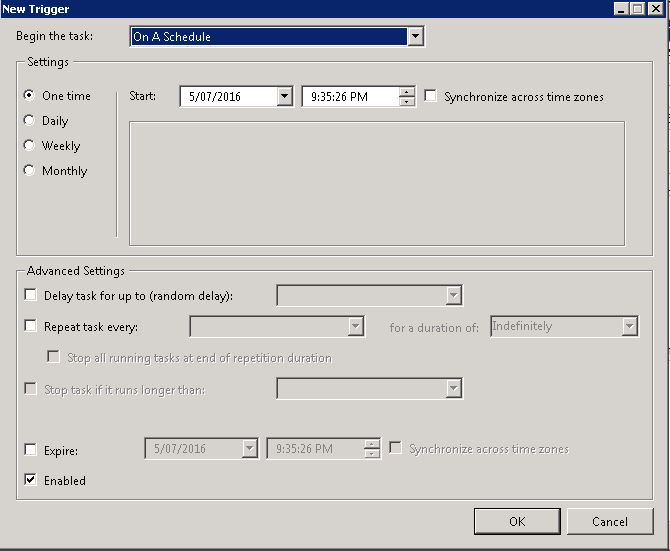
- Choose an appropriate schedule when you would like the deployment to happen. This will set up the update deployment for the time you specify. Click OK when you are ready to proceed, then close the scheduling Window.

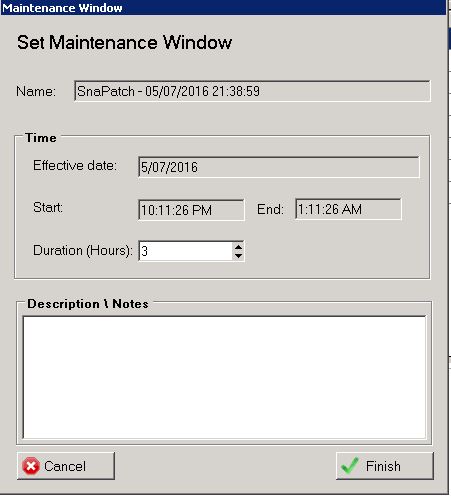
- On the Maintenance Window choose the duration you want the snapshots to be performed and the updates to be installed during. Click on Finish when complete.
 Thats all there is to it. SnaPatch will now create a deployment of the Zero Day Exploit Patch within Microsoft SCCM and set the Maintenance Window. When the maintenance window is reached, SnaPatch will interact with your Vmware or HyperV hosts and start a snapshot of the servers you have selected. Once the snapshot is complete SnaPatch then contacts SCCM and allows SCCM to deploy the patch to those servers. You will also receive email notifications throughout the snapshot and deployment process.
Click for further information on SnaPatch Patch Management.
Zero Day exploits can cause serious issues to programs, data, computers, and networks. It is essential to deploy patches and fixes as soon as possible to reduce the risk of exploitation. Using Microsoft SCCM 2012 to deploy a Zero Day exploit fix is an easy process that can be completed by following the steps outlined above. Keeping your hardware and software up to date and having a patching process in place are good practices to mitigate the risk of unknown vulnerabilities.
by Mark | Jun 30, 2016 | Deployment, Endpoint Protection, How To, SCCM
SCEP Definition Automatic Deployment Rule in SCCM 2012 R2
If you have setup your SCCM environment with the Microsoft product, System Centre Endpoint Protection (SCEP) and have deployed the SCEP agent to your client computers the next task you need to complete is the creation of an Automatic Deployment Rule for the antivirus updates. Automatic Deployment Rules as the name suggests, automate the deployment of updates and definitions to your environment. You can set deadlines when things should install, maintenance windows when reboots and installation should occur and also the download of Windows updates ( you can specify products you would like updates to download for and what severity ie critical, important and security) and SCEP definitions without any manual intervention.
Creating an Automatic Deployment Rule for System Centre Endpoint Protection (SCEP) definition updates in SCCM can help streamline the process of deploying and updating antivirus definitions across an organization. By automating the deployment of updates and definitions, IT administrators can save time and ensure that all client computers have the latest protection against known threats. With SCCM’s customization options, administrators can set deadlines for updates, specify maintenance windows, and even control the download of Windows updates. This ensures that updates are deployed efficiently and without any manual intervention, allowing administrators to focus on other important tasks.
Creating an Automatic Deployment Rule in SCCM 2012 R2 for SCEP Definition Deployment
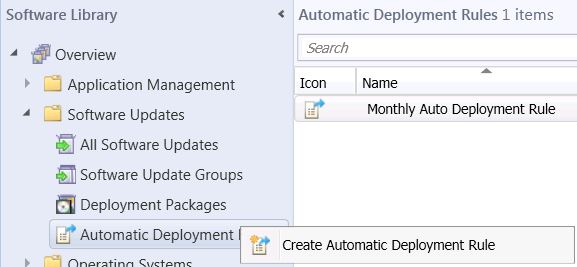
Create Automatic Deployment Rule
Open your SCCM 2012 console and navigate to Software Library – Overview – Software Updates – Automatic Deployment Rules.
Right click Automatic Deployment Rules and then choose Create Automatic Deployment Rule

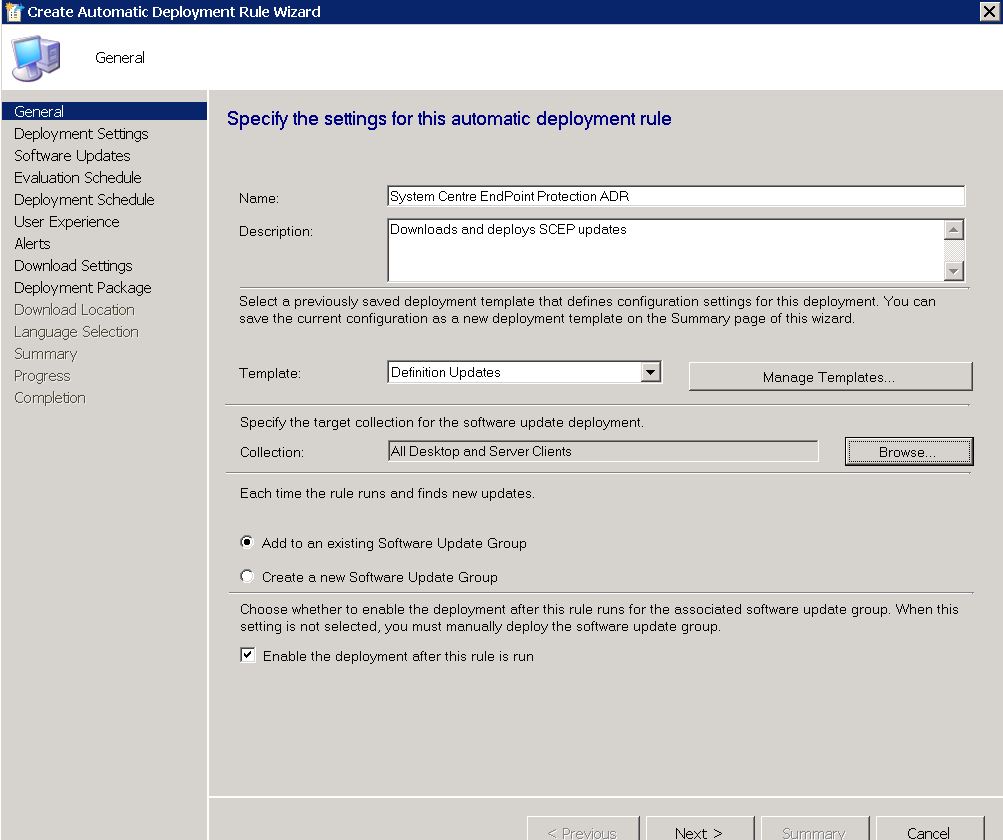
SCEP ADR – General Tab
Now specify a descriptive name for the Automatic Deployment Rule, a description that will easily identify what this ADR is for and then choose an appropriate template from the dropdown box (I have chosen the standard definitions updates). Then Click on Next

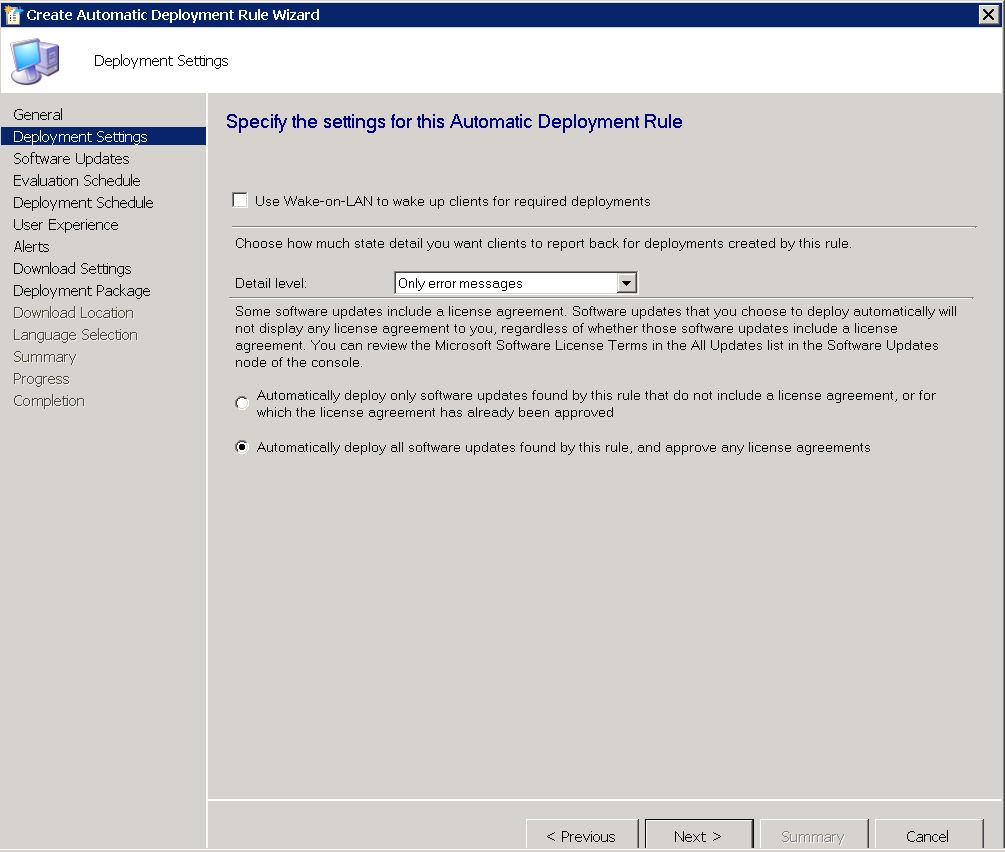
SCEP ADR – Deployment Settings Tab
I left the settings as default on this page as I want to automatically approve any license agreements and dont have a requirement to wake up client computers. If you want to deploy the SCEP updates after hours while your client computers are off and wish to wake them up for the client updates (this depends on if your environment has Wake On Lan capability) choose the Wake On Lan checkbox.

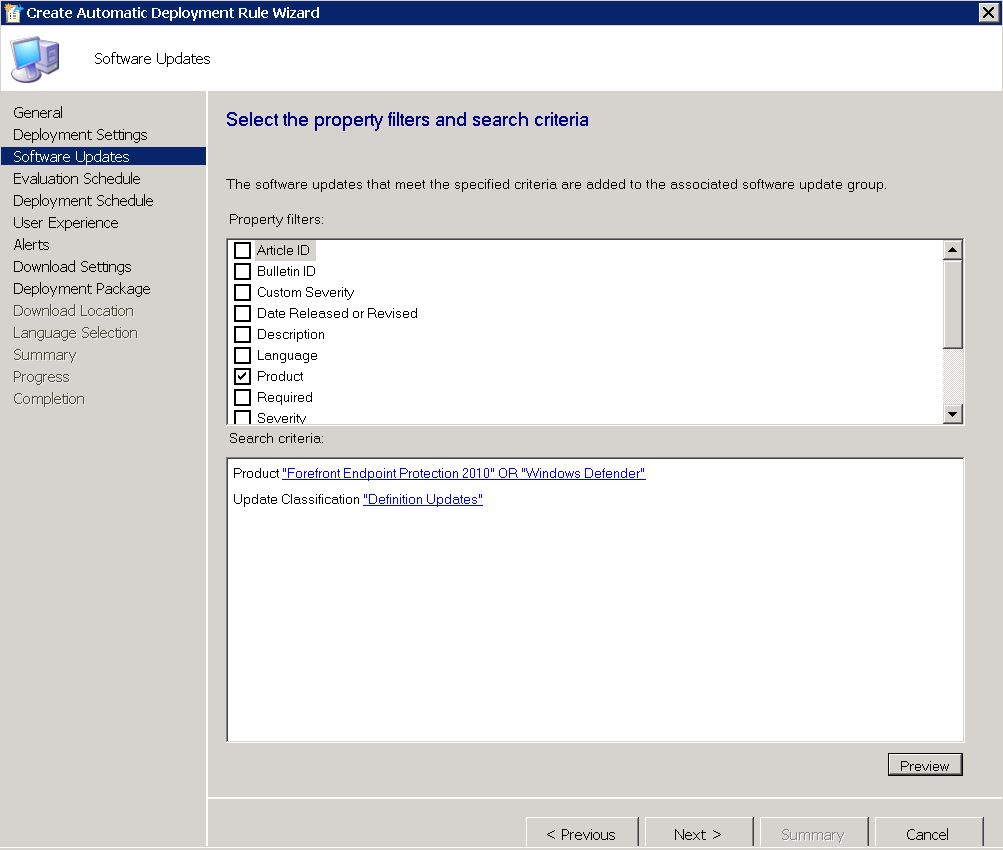
SCEP ADR – Software Updates Tab
Make sure that the search criteria is correct, that the Product says Forefront Endpoint Protection 2010 or Windows Defender and that the Update Classification shows Definition Updates and choose next.
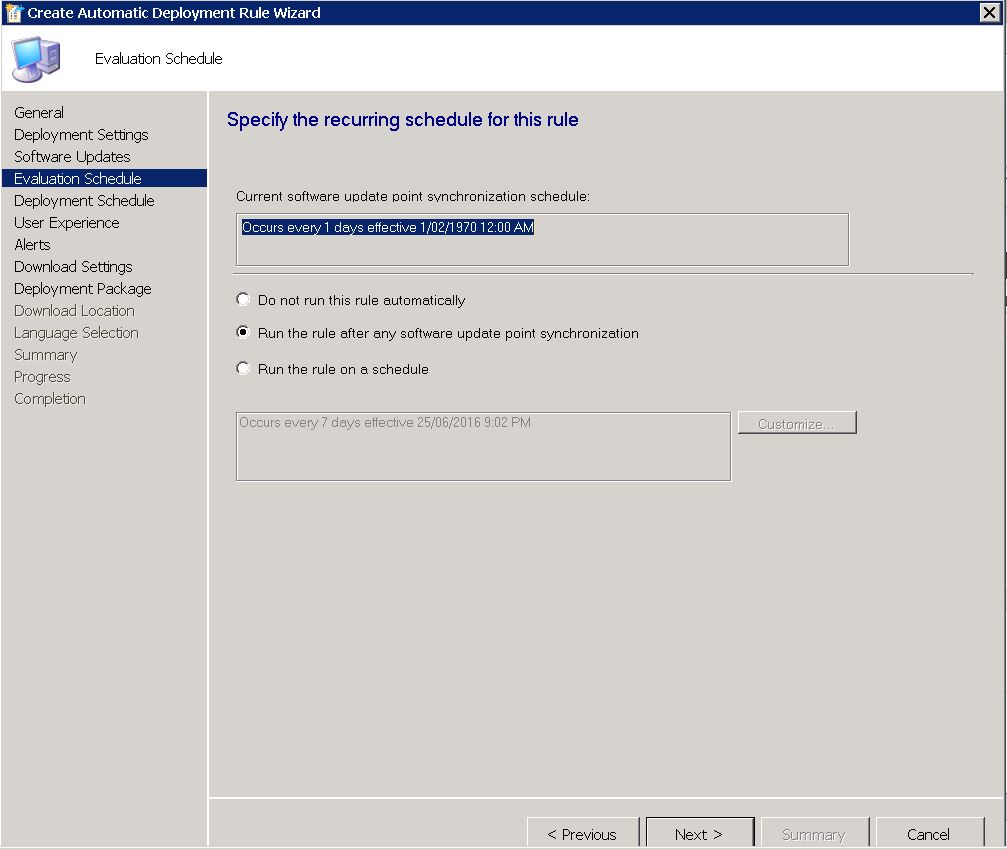
SCEP ADR – Evaluation Schedule Tab
Choose how often the Software Update Point synchronises.

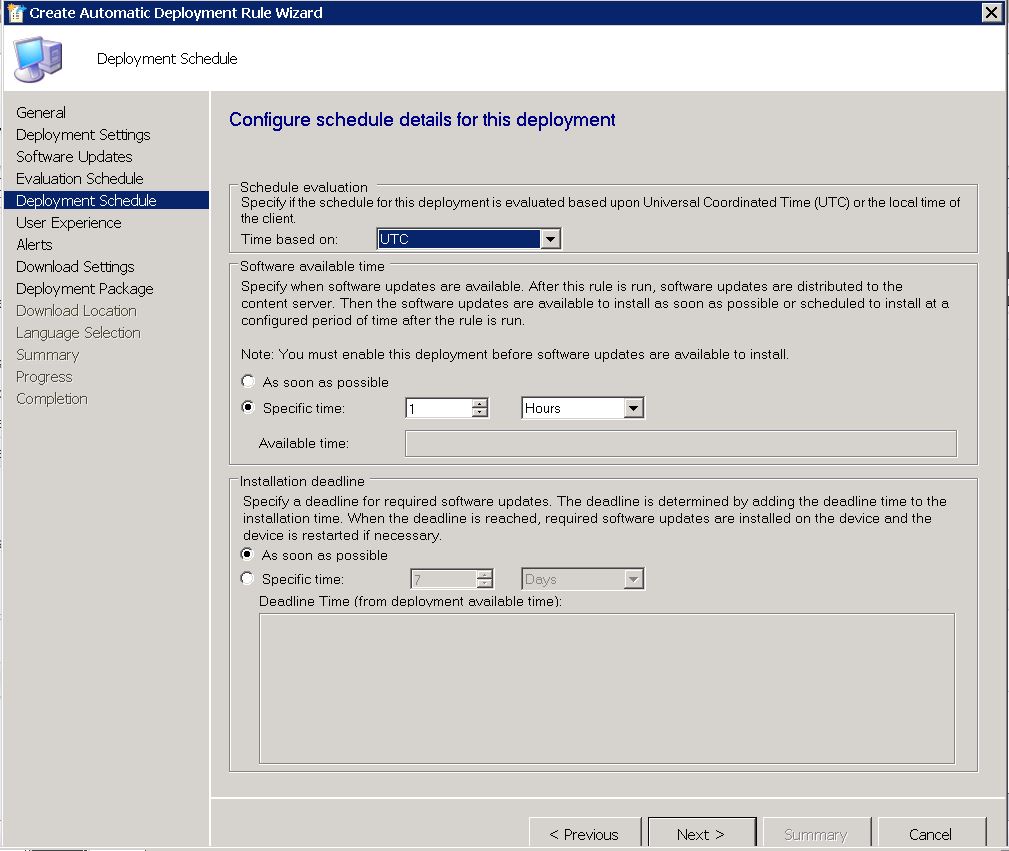
SCEP ADR – Deployment Schedule Tab
Now we can configure when the updates are available to be installed on client computers. In the example below, I left this as the default 1 Hour. You can choose what ever is suitable for your environment.
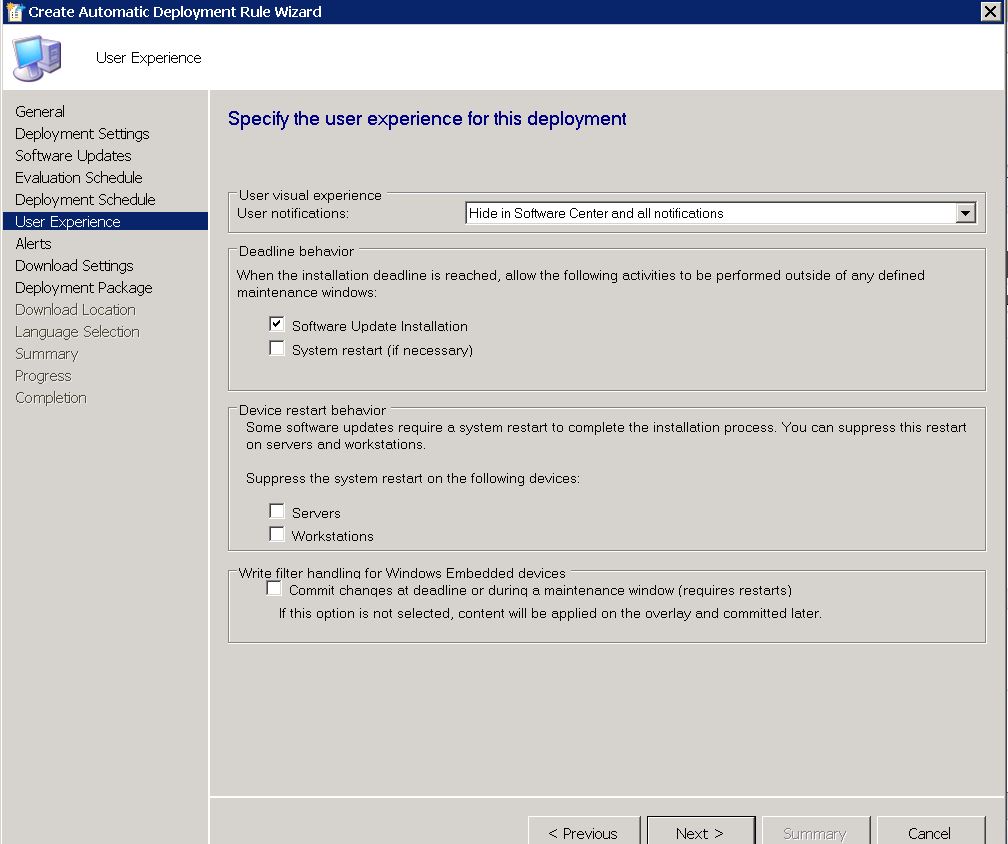
SCEP ADR – User Experience Tab
The following screen is where you set whether or not you will notify the users that there is a new SCEP definition update available for their machines. Most often than not, it is best to suppress these notifications from the end user as there could be multiple updates released daily. Notifying them every few hours would surely annoy them, which in turn they will annoy the Administrator.
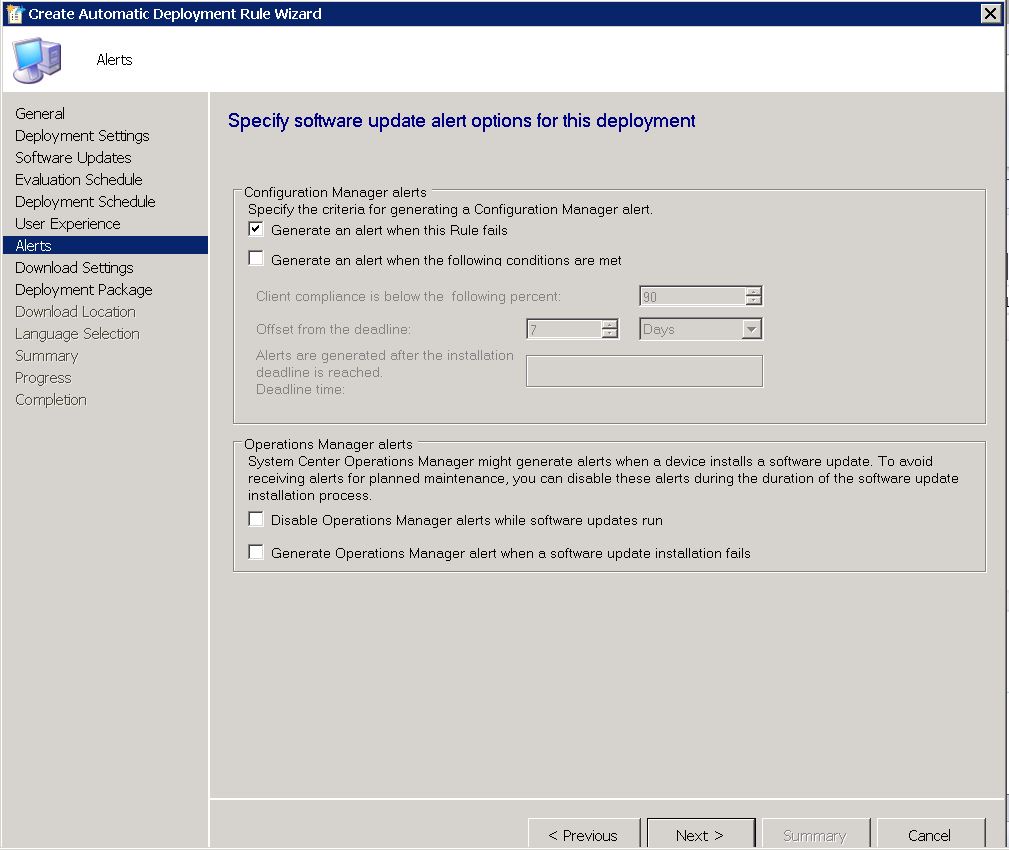
SCEP ADR – Alerts Tab
If you have System Centre Operations Manager (Microsoft’s SCOM) you can choose whether any alerts are enabled / disabled and if required, what conditions to generate an alert
SCEP ADR – Download Settings Tab
Now we are up to the Download Settings page. Choose the option that is suitable to your environment. It is always a good idea, if you have lots of remote sites without an SCCM distribution Point available, to allow the clients to share content with other clients on the same subnet.
SCEP ADR – Deployment Package Tab
On this page, we are creating a new deployment package for the Definitions Updates. Again, it is good practice to give a descriptive name and description that is easily identifiable to others. Also, choose a source location with enough storage to store the definitions.
SCEP ADR – Distribution Points Tab
Choose which distribution points you would like the update definitions to be shared to and from. I choose the All Distribution Points as I want the updates available from everywhere in the environment.

SCEP ADR – Download Location Tab
If you are downloading the definition updates manually, you can set the location for where SCCM should look for new definitions. If not, choose Download Software Updates from the Internet and click on Next.
SCEP ADR – Language Selection Tab
Specify which languages you wish the SCEP definition update to deploy as. You can choose multiple languages as required.
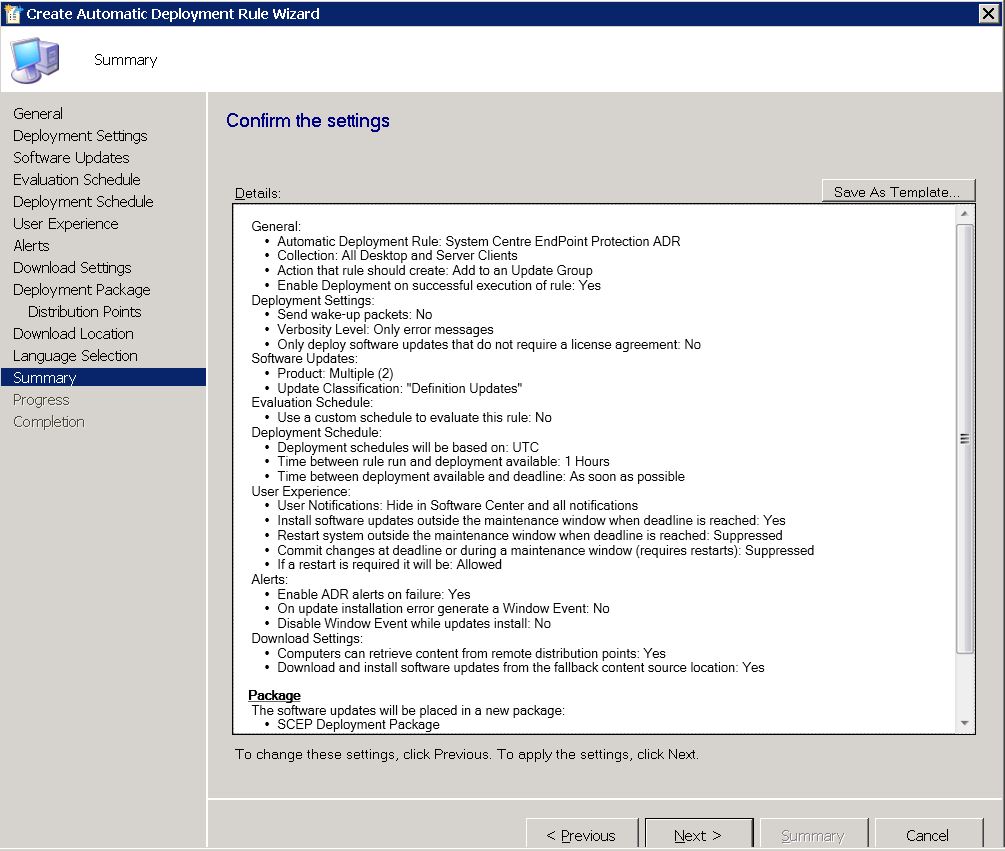
SCEP ADR – Summary Tab
Review the Summary page to confirm you are happy with the settings you have chosen. Once you are satisfied with your selection, click Next.
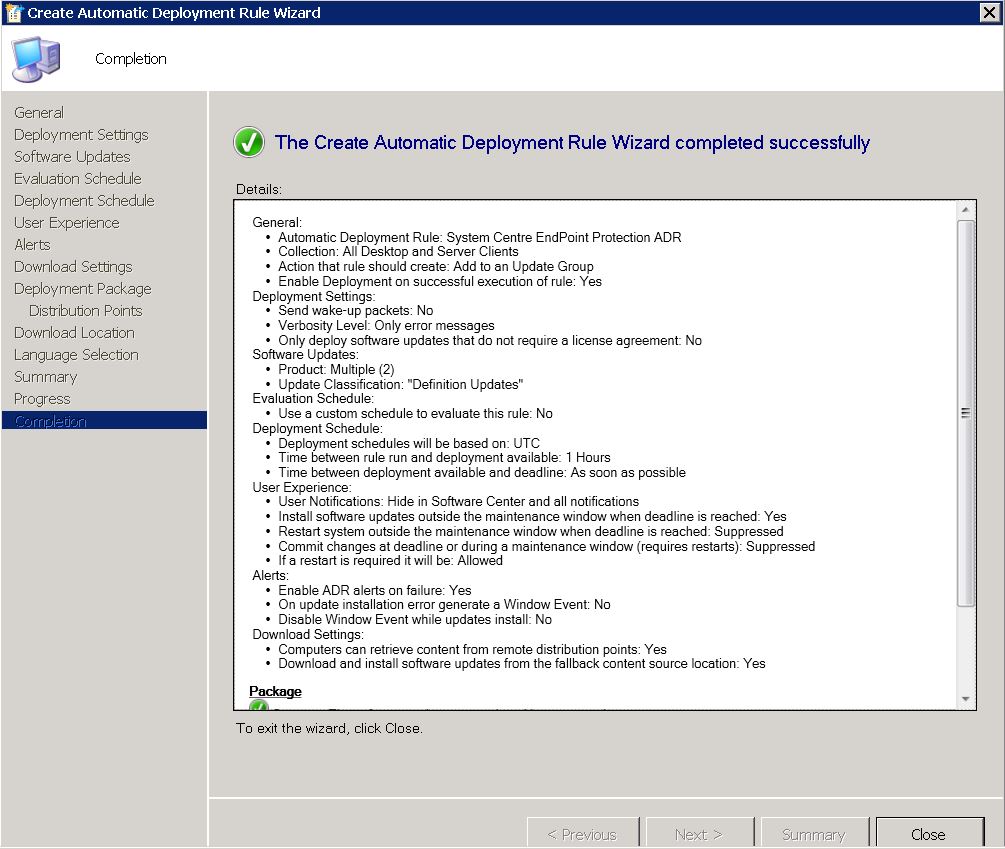
SCEP ADR – Progress Tab
The Automatic Deployment Rule will quickly run through some checks, and once completed, click on Close.
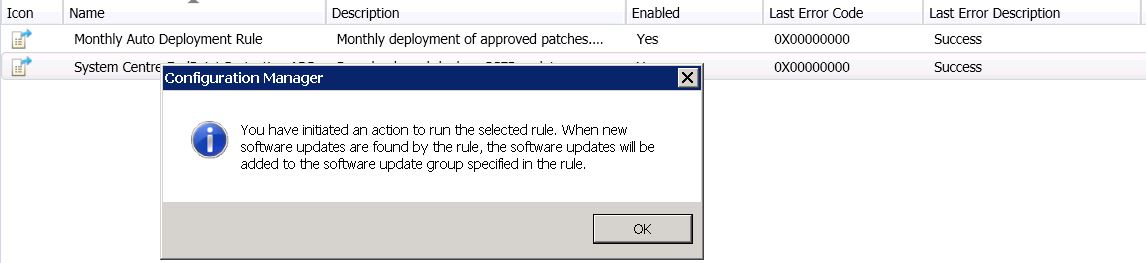
SCEP ADR – Manual Invocation
That is all there is too it. The Automatic Deployment Rule will run with all the settings you have selected. If you ever wish to manually run the rule, right click it and choose run now.

Click on the link to see how to create an SCCM Automatic Deployment Rule for Windows Updates.
SCCM ADR for SCEP Conclusion
Creating an Automatic Deployment Rule in SCCM 2012 R2 for SCEP Definition Deployment is a straightforward process that can save administrators valuable time. Once you set up the Automatic Deployment Rule, the updates will deploy to your client computers without any manual intervention.
by Mark | Jun 28, 2016 | Deployment, How To, Patch Management, SCCM
SCCM Automatic Deployment Rule
As a system administrator, managing updates for your organization’s desktops, laptops, and servers can be a challenging task. It requires a lot of time and effort to keep your machines up-to-date with the latest software updates and security patches. However, with the SCCM Automatic Deployment Rule (ADR) feature, you can automate the entire update management process and save valuable time.
An Automatic Deployment Rule (ADR) is a useful feature for organizations using System Center Configuration Manager (SCCM) to manage their IT environment. With an ADR, administrators can automate the process of downloading, approving, and deploying software updates to client machines, saving time and effort compared to manually managing updates. Additionally, an ADR ensures that machines are up-to-date with the latest software updates and security patches, reducing the risk of security vulnerabilities and software bugs. By creating an ADR, administrators can specify what products and severity of updates they want to download, approve, and deploy, giving them greater control over the update management process. Overall, an ADR is an effective tool for streamlining the software update management process and maintaining a secure and up-to-date IT environment.
In this article, we’ll explore the SCCM Automatic Deployment Rule feature and show you how to create an ADR for your organization’s update management.
SCCM Automatic Deployment Rule FAQs
What is an ADR in SCCM?
An ADR is a feature of SCCM that automates the process of downloading, approving, and deploying updates to client machines.
How does an ADR work?
An ADR downloads the latest updates as per the requirements set by the administrator, distributes them to distribution points, and then deploys them to the target collection during the maintenance and deployment windows specified.
What are the benefits of using an ADR in SCCM?
The benefits of using an ADR include automating the update management process, saving time and effort for system administrators, ensuring machines are up-to-date with the latest software updates and security patches, and enabling control over what products and severity of updates to download, approve, and deploy.
How do I create an ADR in SCCM?
To create an ADR in SCCM, you need to open the SCCM console, navigate to the Software Library, expand Software Updates, and select Automatic Deployment Rules. From there, you can follow the steps to create an ADR, including selecting the products and classifications to include, configuring the deployment settings, and specifying the collection to which the updates will be deployed.
What are some best practices for using an ADR in SCCM?
Best practices for using an ADR in SCCM include following guidelines for patch management, creating a patch management process, setting maintenance and deployment windows, and monitoring Microsoft’s monthly patch releases.
Can an ADR be scheduled to run at a specific time?
Yes, an ADR can be scheduled to run at a specific time, such as after Microsoft’s monthly patch release.
How to create a SCCM Automatic Deployment Rule
ADR Creation
Creating the ADR is fairly easy process. Open your SCCM console and navigate to SOFTWARE LIBRARY, then expand SOFTWARE UPDATES. Now right click AUTOMATIC DEPLOYMENT RULES and choose CREATE AUTOMATIC DEPLOYMENT RULE.

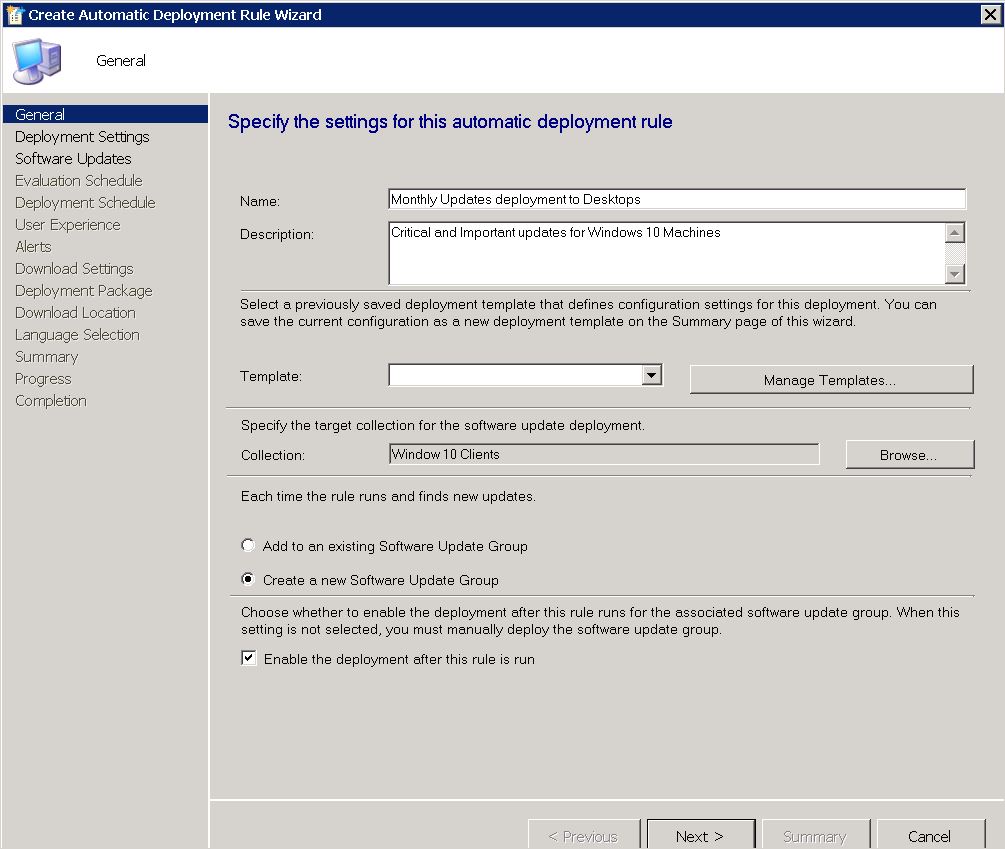
ADR General TAB
Now give the rule a descriptive NAME that will easily identify what this ADR is for (ie Monthly Update deployment to Desktops), a DESCRIPTION, choose a TEMPLATE (I choose Patch Tuesday) and then the TARGET COLLECTION. Now you will need to choose between CREATE A NEW SOFTWARE UPDATE GROUP or to ADD TO AN EXISTING SOFTWARE UPDATE GROUP. The differences between these two settings is, Add to an existing Software Update Group will create a new Software Update group the first time it runs, but then subsequent schedules of the ADR will utilise this update group, or creating a new software update group will create a new update group each time the ADR runs. Choose one of the options and then click on NEXT.
(Make sure you have the checkbox enabled, ENABLE THE DEPLOYMENT AFTER THIS RULE TO RUN).
ADR Deployment Settings TAB
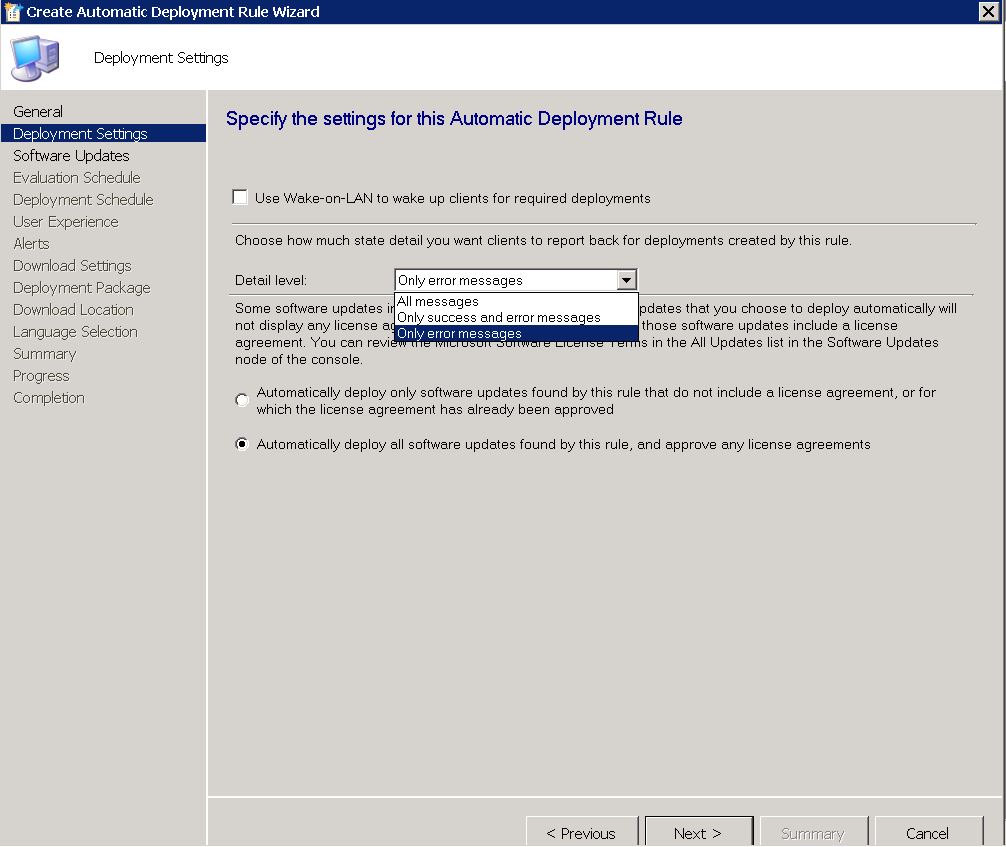
We are now presented with the Deployment Settings page next. You can choose to use Wake On Lan (if you have that enabled in your environment) and what level of detail we want regarding the Patch Deployment. You can also specify to Automatically deploy all software updates found by this rule and approve any license agreements. Obviously this will automatically approve and licenses agreements that may be required to deploy the updates, a very handy feature. Once you are happy to proceed, click on NEXT.
ADR Software Updates TAB
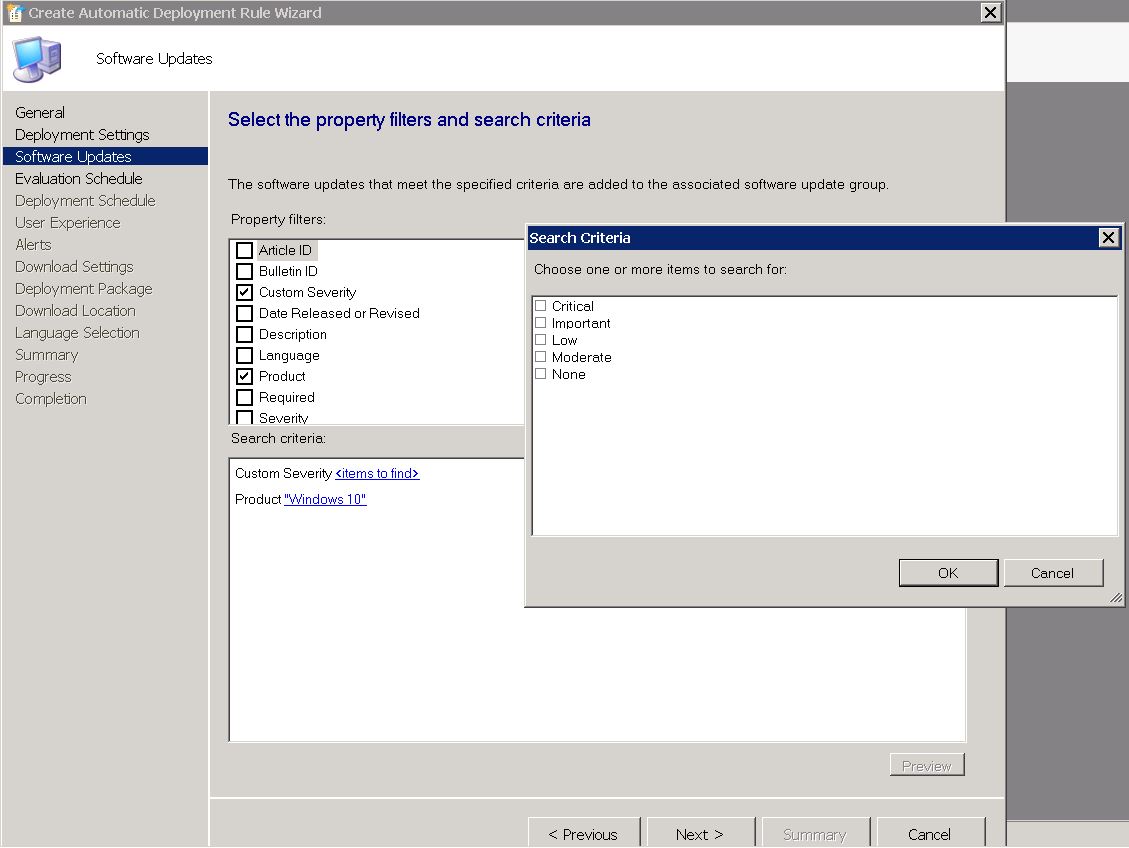
Next we get to choose the products and the severity among other things for the ADR. Choose the products you want (ie in this example Im choosing Windows 10) and the patch severity (Critical, Important, Low, Moderate or None) and date the patches were released (following on from my previous comments, I want the last months patch releases) . Click on NEXT when you have chosen the products you wish patches deploy to.

ADR Evaluation Schedule TAB
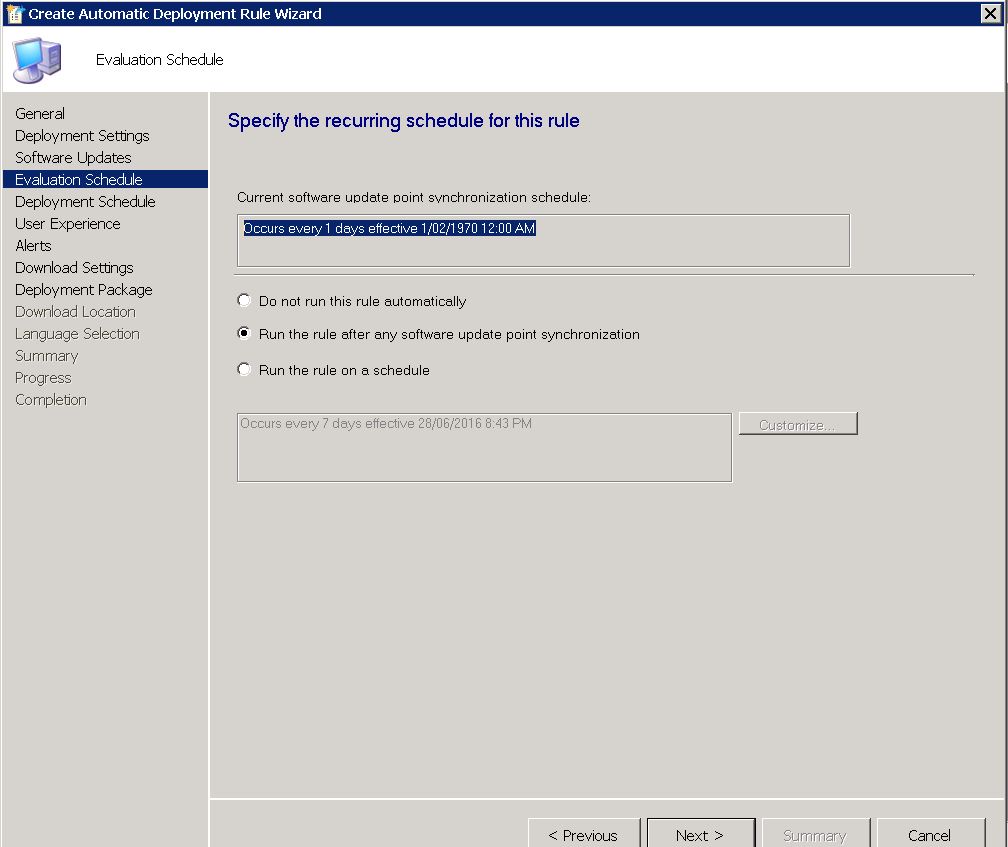
This tab allows you to configure the settings for when you would like the SCCM Automatic Deployment Rule to evaluate available software updates. You need to configure this schedule to run less frequently than your SUP synchronisation will run (highlighted in the example picture below). You can choose not to run this rule automatically (ie you will have to run this manually if required), after the SUP synchronisation happens (which is the default) or according to a schedule you specify.
ADR Deployment Schedule TAB
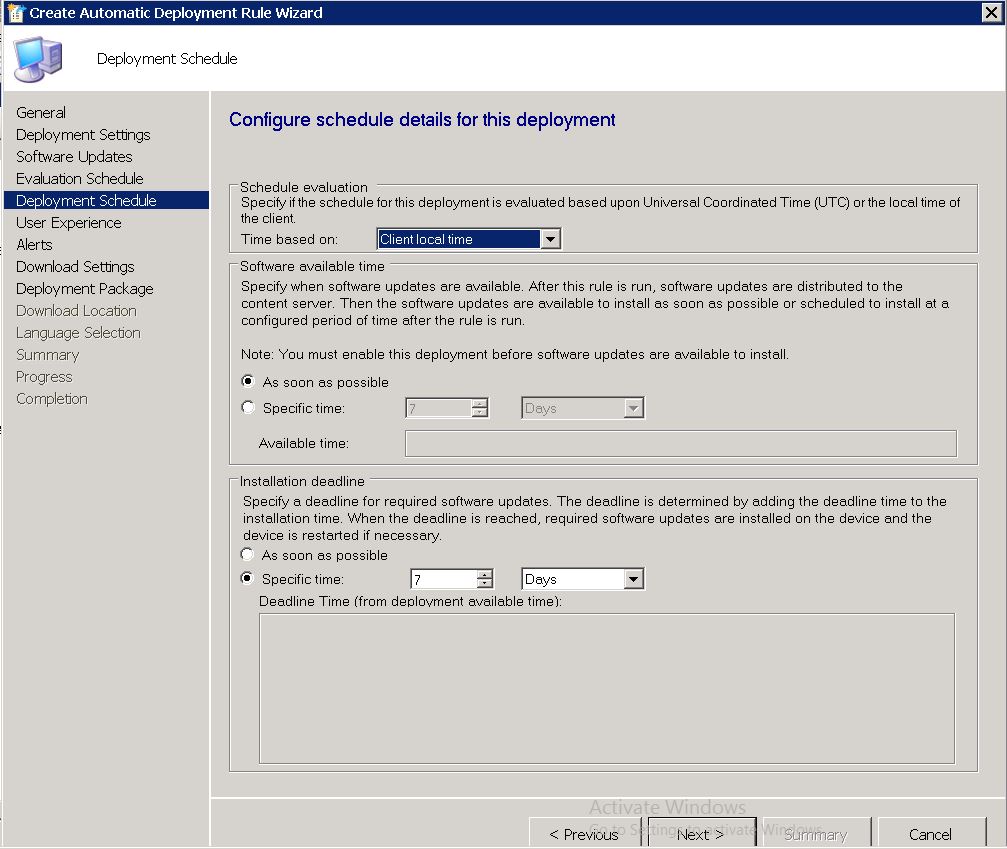
On the ADR deployment schedule TAB, we choose when we would like our updates to be deployed to our client machines. You can choose Universal Coordinated Time or Client machine local time, when you would like the updates to be available to clients, and the software installation deadline. Choose the last two settings carefully as the wrong choice will have a major impact on your environment and users if incorrect.
ADR User Experience TAB
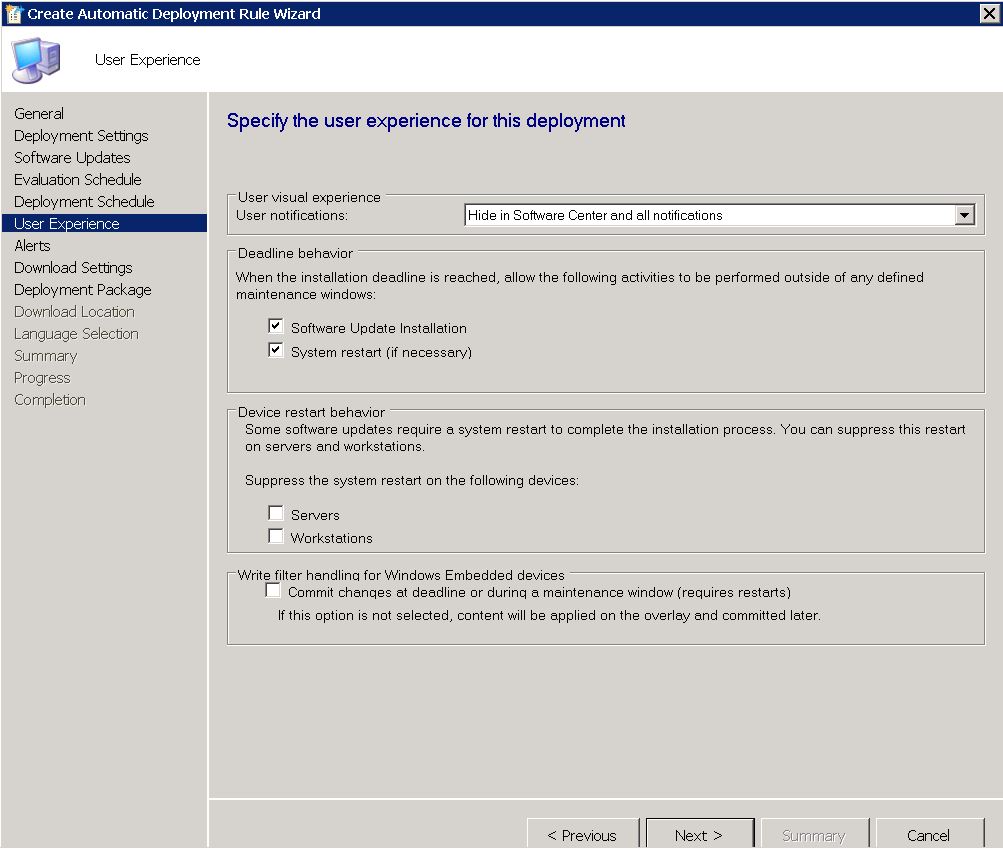
One of the most important TABS, is the User Experience TAB. Do you wish to notify the users that updates are available and have them install them prior to the deadline you have set? Would you like the machines to automatically install restart at the deadline? Do you want to suppress a restart on Desktops or Servers, or even both? Choose the required settings and then click NEXT.
ADR Alerts TAB
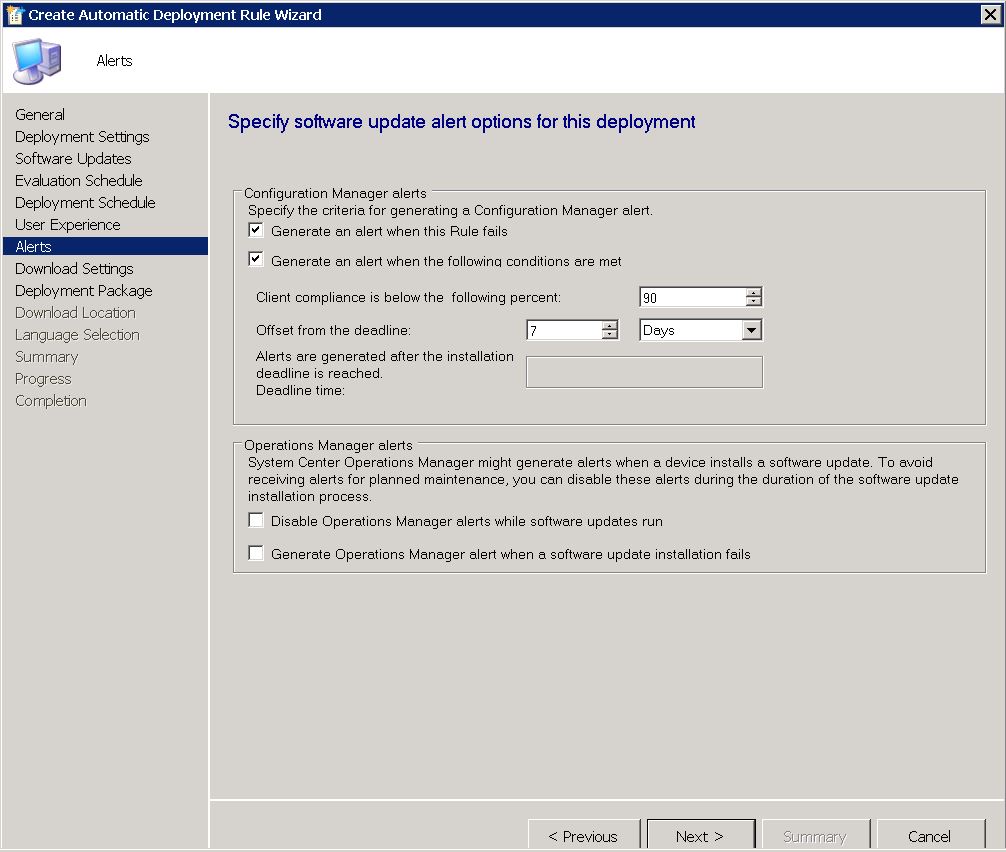
The SCCM Automatic Deployment Rule alerts TAB is next. Various settings are available of how you would like to be alerted. From when the rule fails, to compliance settings to alert you of the percentage of machines that are compliant. Additionally, you can generate alerts to System Centre Operations Manager (or SCOM) if you have this in your environment. Again, choose your required settings and click on NEXT.
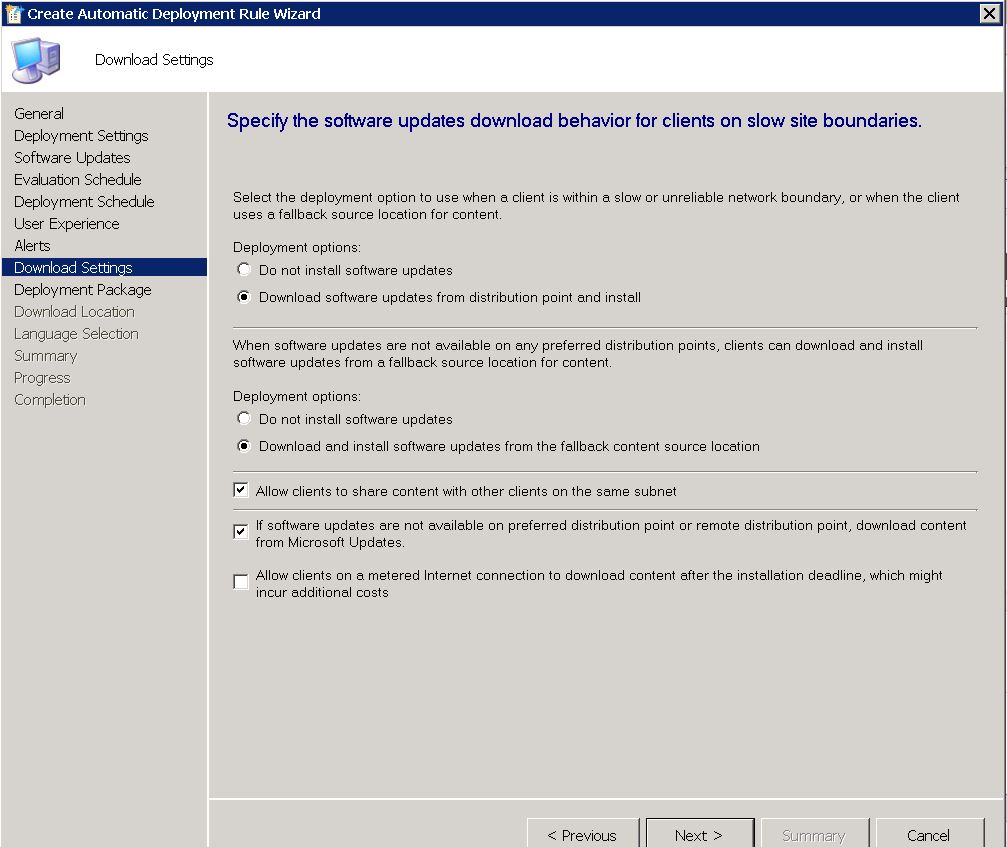
ADR Download Settings TAB
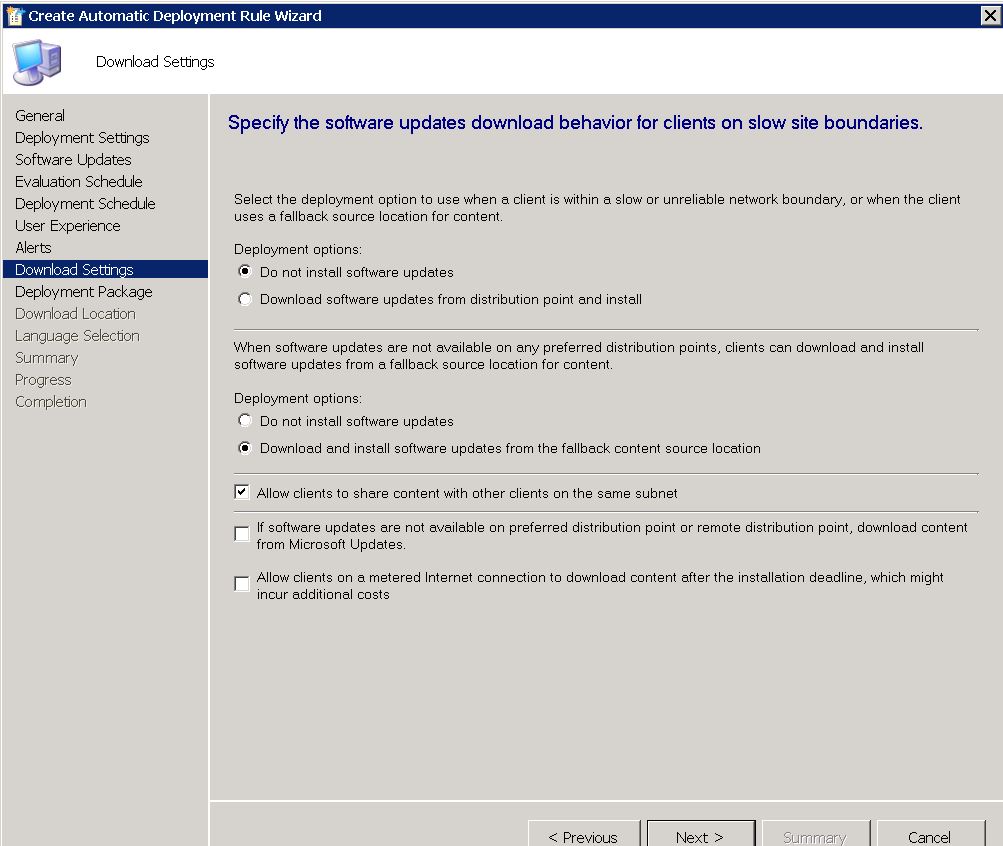
The ADR download settings tab will allow you to specify what and where the client machine downloads the updates from. Obviously, if they are connected to your corporate LAN, the nearest SCCM distribution point is the ideal location. Should the updates not be available on a preferred distribution point, then you can choose not to install updates, or from a fallback location. Allowing the client machines to share the update content with other clients on the same subnet is a great thing to have, especially if they do not have a local SCCM distribution point, or are on a slow WAN link. Additionally, you can allow those clients to download from Microsoft Update.
Click on NEXT when ready to proceed.
ADR Deployment Package TAB
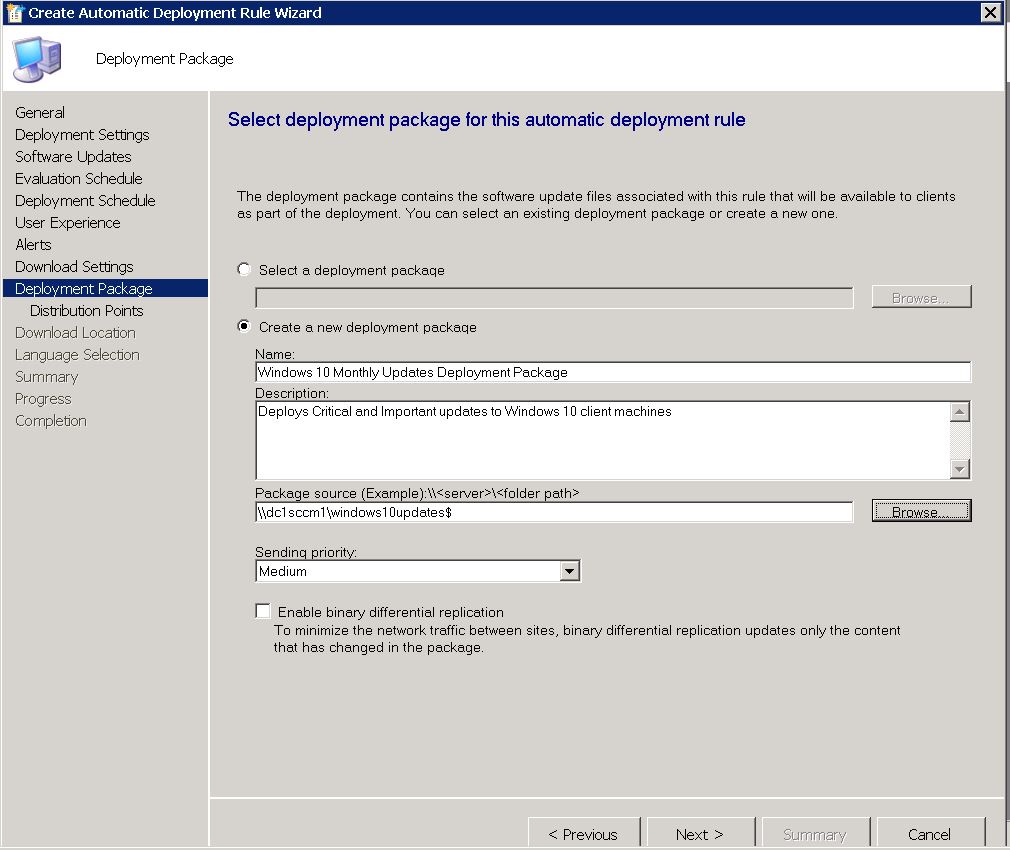
We can now create a new deployment package, or select an existing one. I will create a new deployment package in this example to show you how that is done.
Choose CREATE A NEW DEPLOYMENT PACKAGE.
Give the deployment package a descriptive name, a description that is easy to identify, where you would like the source files to live (remember this should be a UNC path, so make sure to have shared out the folder and given the correct permissions for SCCM to save the updates to).
Click on NEXT when completed.
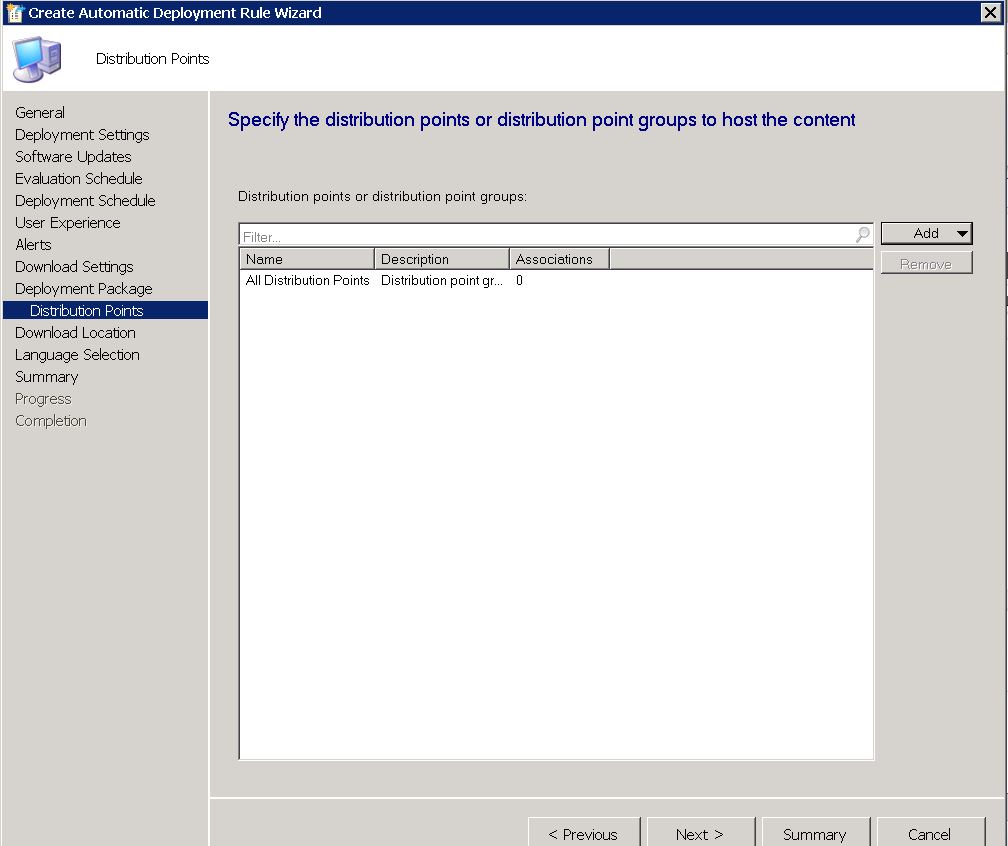
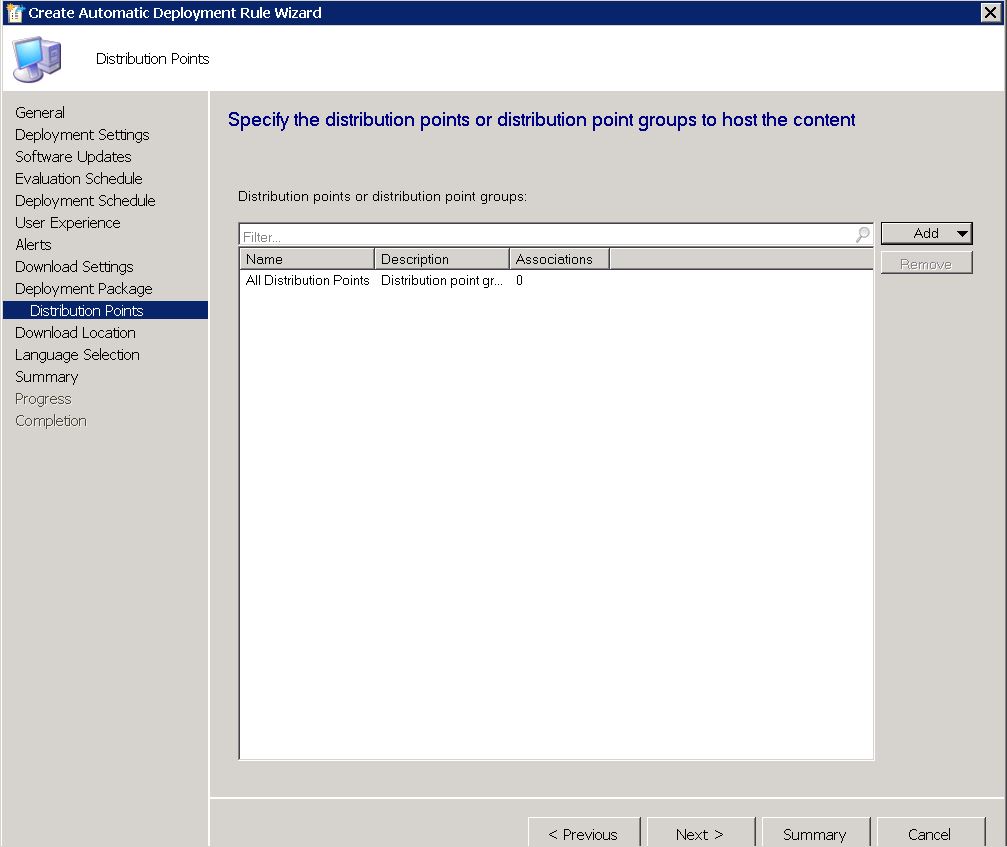
ADR Distribution Points TAB
Select the distribution points you wish the updates to be available from and for you client machines to download from. You can choose individual SCCM Distribution Points, or a Distribution Point Group. Click on NEXT when you have entered these details.
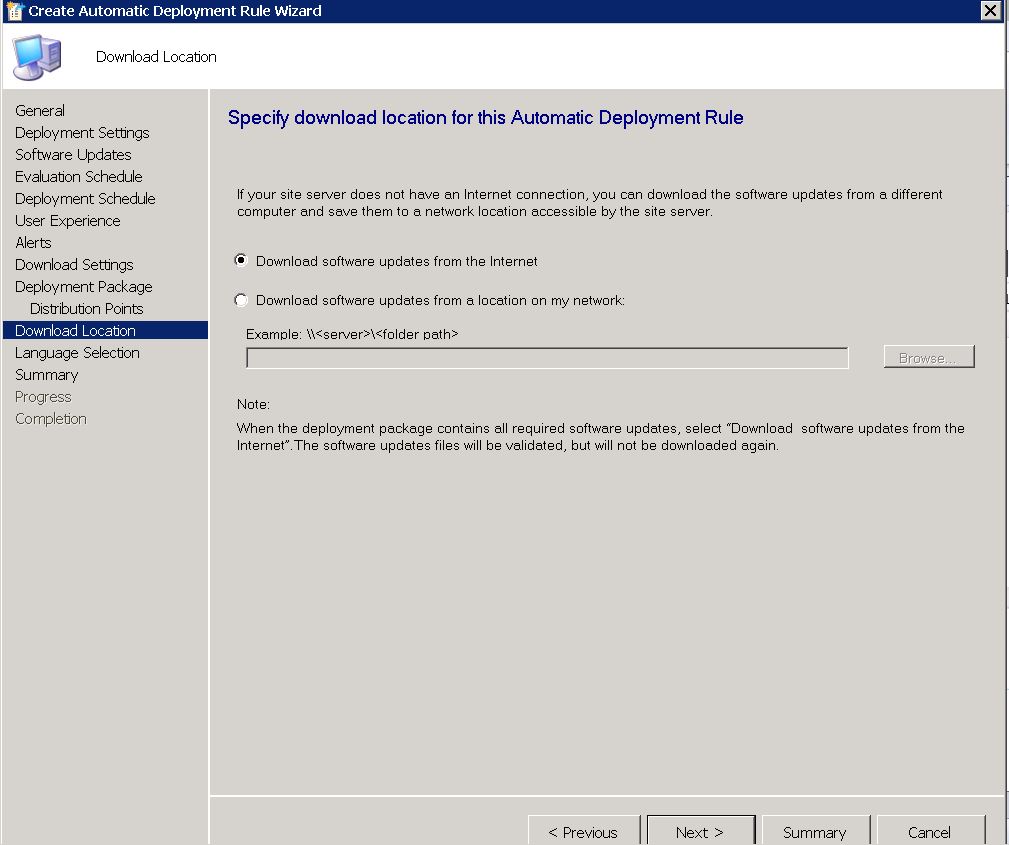
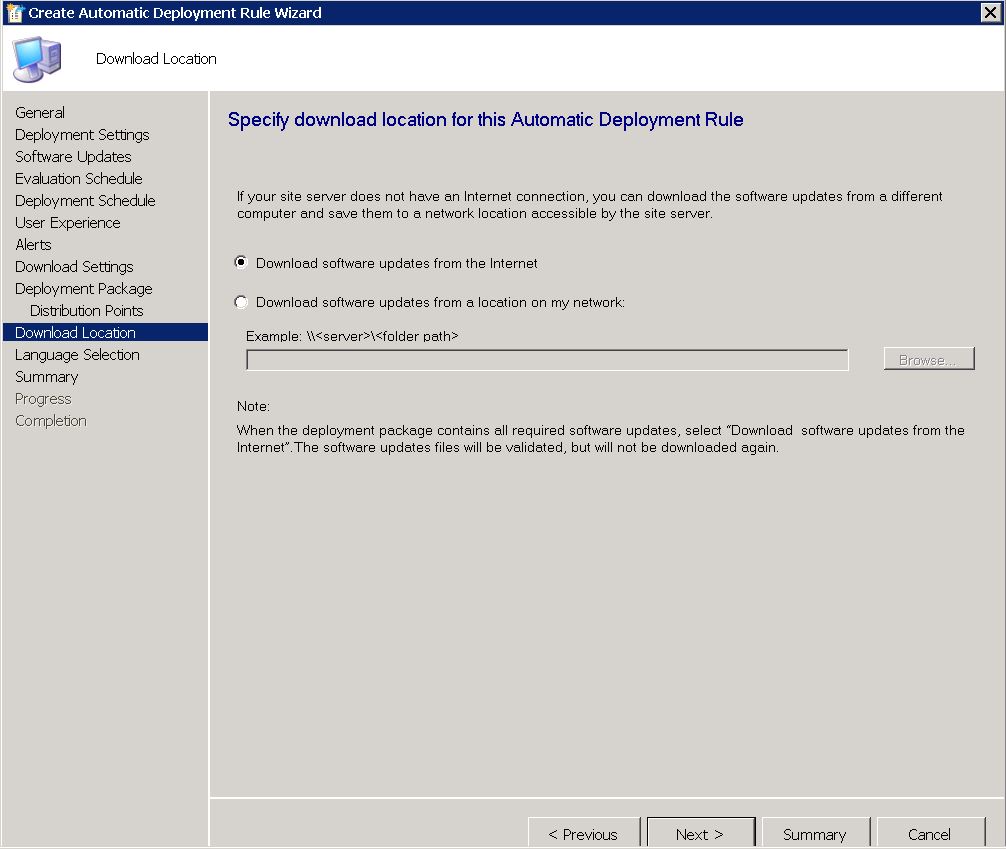
ADR Download Location TAB
Choose where to download the updates from. Should you have a location where updates are downloaded, you can specify that, or should you be using a Microsoft’s WSUS Server, to download them directly from the internet. Click on NEXT when done.
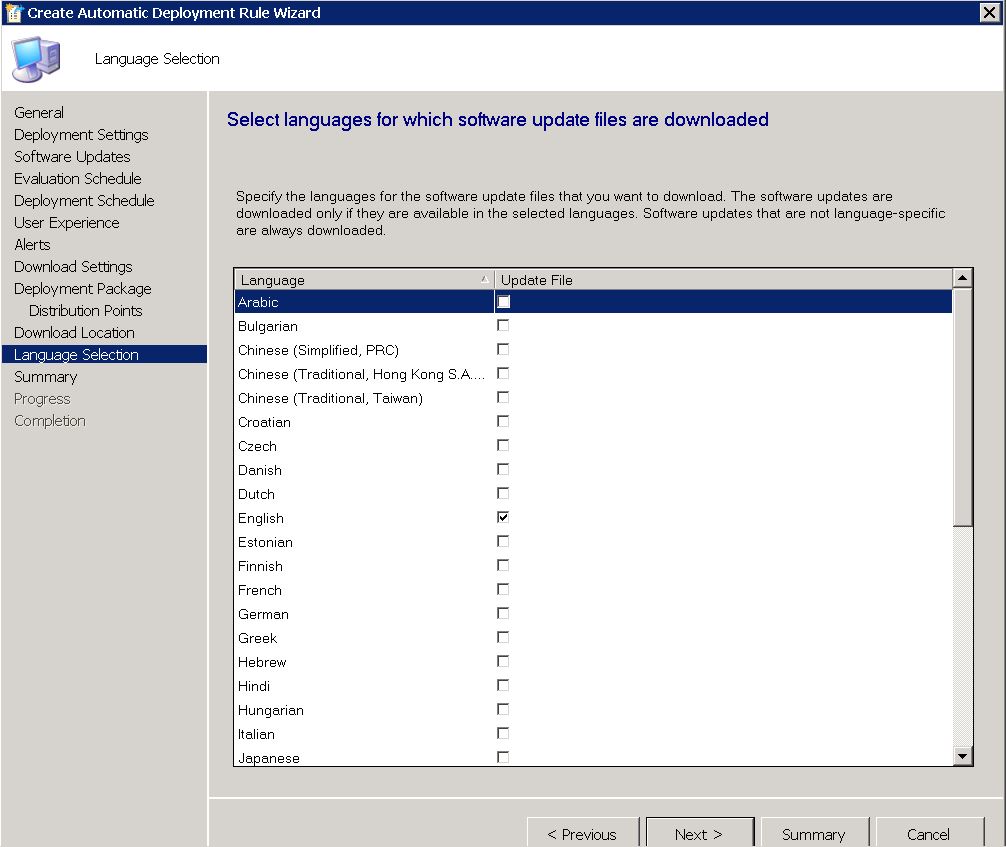
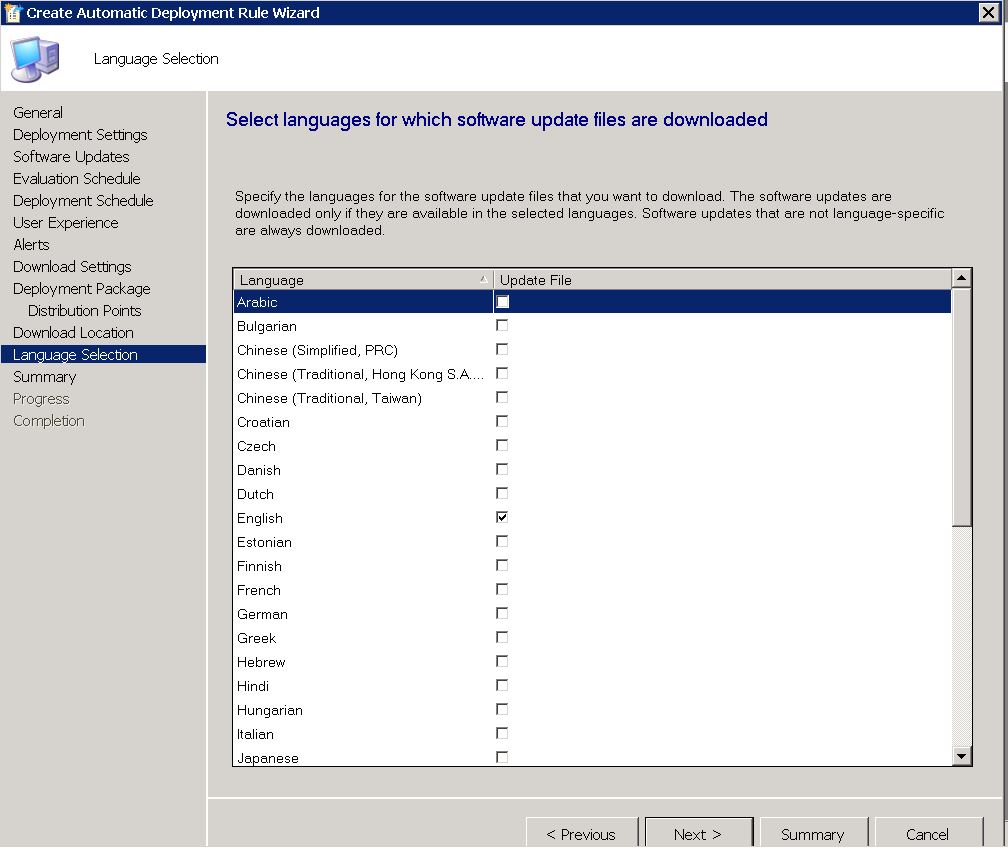
ADR Language Selection TAB
Now choose the appropriate languages you want the patches to download in and then click NEXT.
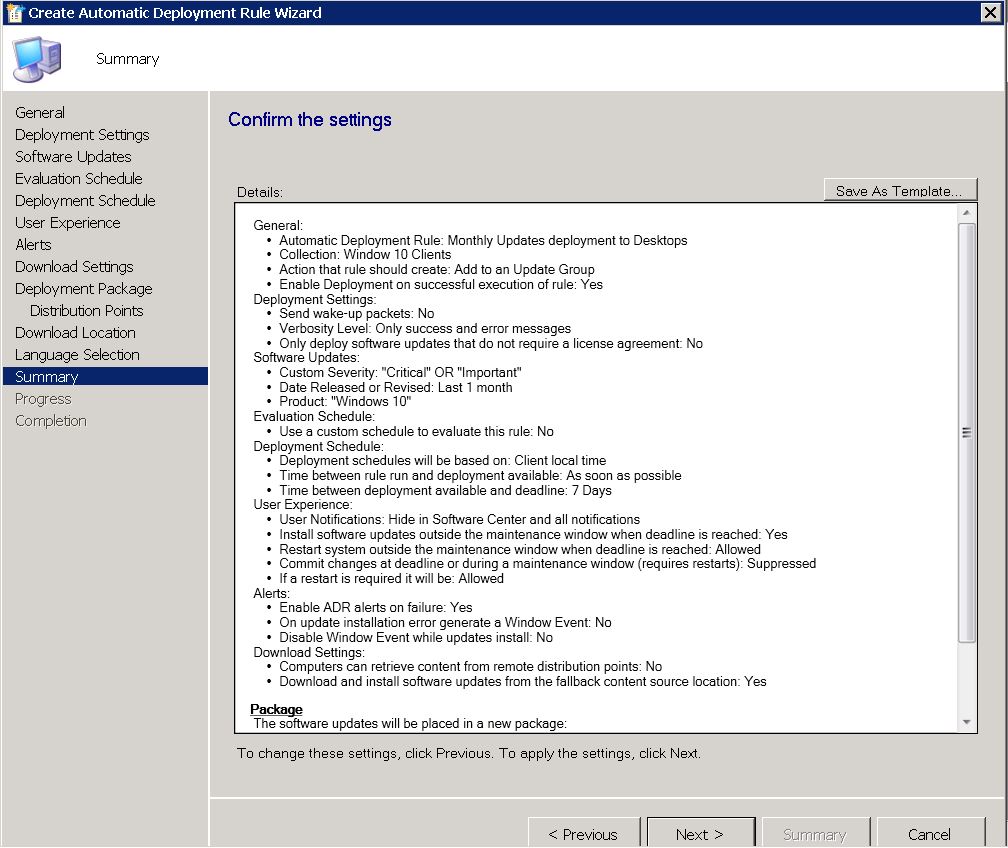
ADR Summary TAB
We are almost there. Almost finished. At the SCCM Automatic Deployment Rule Summary TAB, review the choices you have made and make sure they are correct. When you are happy with the settings, click on NEXT to continue.
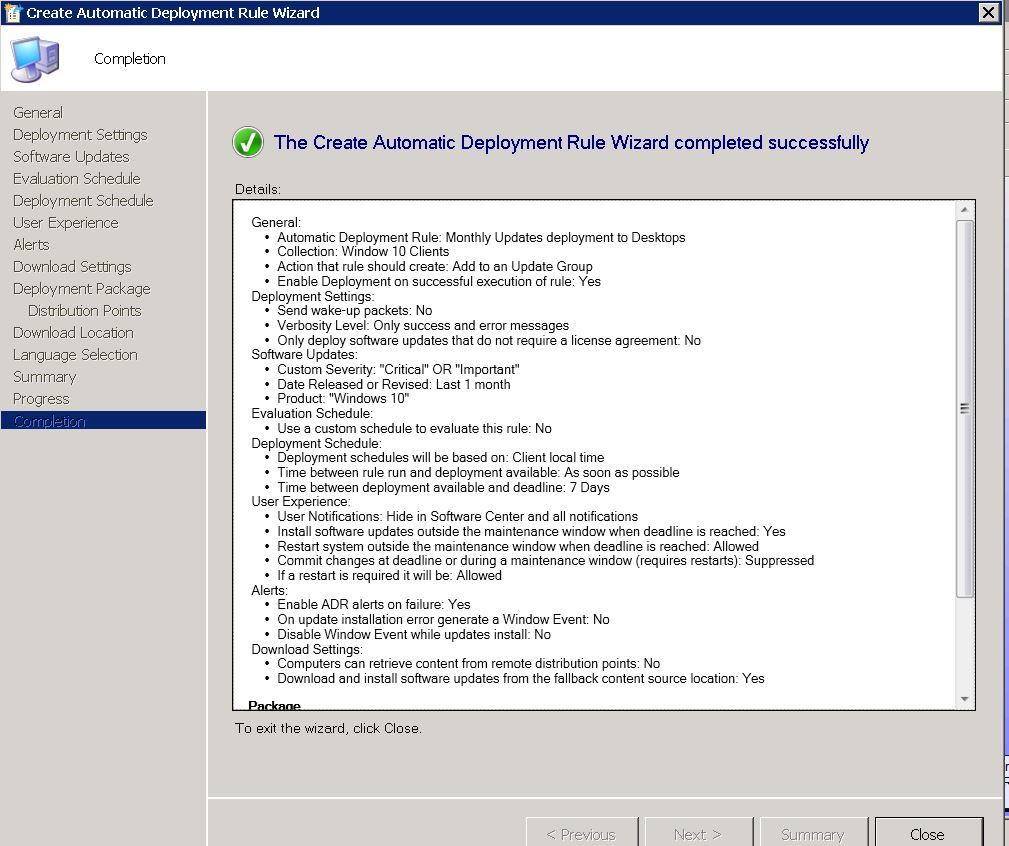
ADR Completion TAB
We made it. We finally got there. The Automatic Deployment Rule is now setup and will run with the settings you have specified. You can now close the wizard.
If you followed this post and were careful with the settings you have chosen for your SCCM Automatic Deployment Rule, then the updates you have selected will now deploy to your client machines, when and how you have requested.
See how SnaPatch can help you with Patching your Virtual Server environment.


 T
T