What’s the Difference Between Gen 1 and Gen 2 VMs?

What’s the Difference Between Gen 1 and Gen 2 VMs?

Virtual machines (VMs) have been around for quite some time now and have become a cornerstone of modern-day IT infrastructure. They provide a convenient way to run multiple operating systems on a single physical machine, allowing users to consolidate their hardware and save costs. However, as VM technology has evolved, newer versions of VMs have been introduced, such as generation 1 and generation 2 VMs. In this article, we’ll explore the differences between the two and help you understand which one is right for your needs.

What Are VMs?

A virtual machine is essentially a software-based emulation of a physical computer. It allows users to run one or more operating systems on a single physical machine, thereby saving costs and increasing efficiency. VMs are often used to create virtual environments for development, testing, and deployment of software applications.

What Are Generation 1 VMs?

Generation 1 VMs were introduced with the release of Windows Server 2008 R2. They are essentially the first iteration of virtual machines and are based on the traditional BIOS firmware. Generation 1 VMs use a virtualized hardware layer to present virtualized devices to the guest operating system.

What Are Generation 2 VMs?

Generation 2 VMs were introduced with the release of Windows Server 2012. They are the newer iteration of virtual machines and are based on the Unified Extensible Firmware Interface (UEFI) firmware. Generation 2 VMs use a more modern virtualized hardware layer to present virtualized devices to the guest operating system.

What Are the Differences Between Gen 1 and Gen 2 VMs?

There are several key differences between generation 1 and generation 2 VMs. These include:

Boot Process:

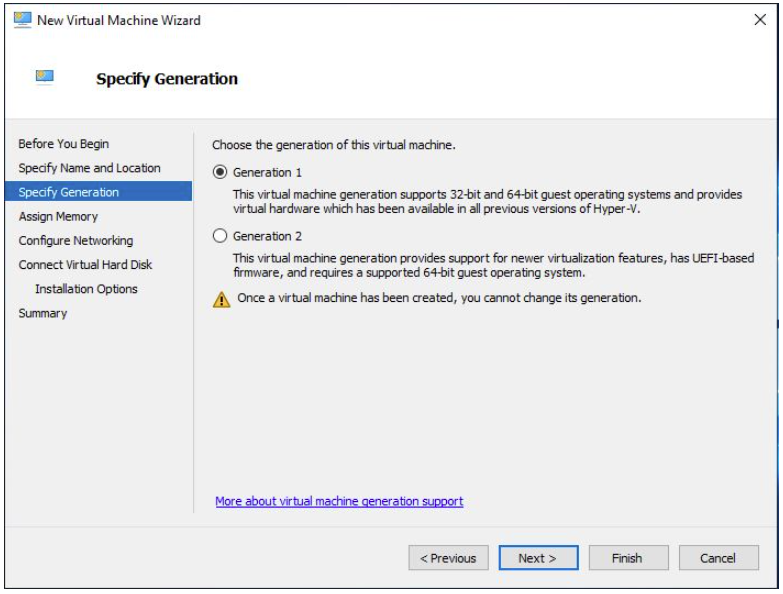
Generation 1 VMs use the traditional BIOS boot process, while generation 2 VMs use the more modern UEFI boot process.

Firmware:

Generation 1 VMs use BIOS firmware, while generation 2 VMs use UEFI firmware.

Boot Options:

Generation 2 VMs support more advanced boot options such as Secure Boot, which is not available in generation 1 VMs.

Device Support:

Generation 2 VMs have improved device support, including support for larger virtual hard disks (up to 64 TB), which is not available in generation 1 VMs.

Operating System Support:

Generation 2 VMs only support 64-bit guest operating systems, while generation 1 VMs support both 32-bit and 64-bit guest operating systems.

Integration Services:

Generation 2 VMs come with improved integration services, including support for online backups, remote desktop, and more.

Prons and Cons of Gen 1 and Gen 2 VMs

Feature Gen 1 VMs Gen 2 VMs

Pros

Widely used Secure boot
Easy setup Improved performance
Compatibility with older OS versions Better Linux Integration

Cons

Slower boot time Requires Windows Server 2016 or newer
Limited scalability More complex setup
Limited security features Limited compatibility with older OS versions

Gen 1 and Gen 2 VMs FAQs

FAQ Answer

Can I convert a Gen 1 VM to a Gen 2 VM?

No, it’s not possible to convert a Gen 1 VM to a Gen 2 VM. You’ll need to create a new Gen 2 VM and migrate your data and settings over manually.

Can I run both Gen 1 and Gen 2 VMs on the same host server?

Yes, it’s possible to run both Gen 1 and Gen 2 VMs on the same host server, as long as the server meets the hardware requirements for both types of VMs.

Are Gen 2 VMs more expensive than Gen 1 VMs?

No, there is no cost difference between Gen 1 and Gen 2 VMs. Both types of VMs are included with the appropriate versions of Windows Server.

Gen 1 and Gen 2 VMs Use Cases

Use Case Gen 1 VMs Gen 2 VMs

Compatibility

Better suited for running older software applications or 32-bit guest operating systems. May not support older software applications or 32-bit guest operating systems.

Device Support

Supports a limited number of virtual devices, and may not be able to use larger virtual hard disks or more advanced boot options like Secure Boot. Supports more virtual devices, and can use larger virtual hard disks or more advanced boot options like Secure Boot.

Boot Time

Slower boot times due to the legacy BIOS firmware used in Gen 1 VMs. Faster boot times due to the use of the Unified Extensible Firmware Interface (UEFI) firmware in Gen 2 VMs.

Integration

Limited integration services, such as support for online backups or remote desktop. Improved integration services, such as support for online backups or remote desktop, are available.

Security

Limited security features, such as the lack of Secure Boot support. More advanced security features, such as support for Secure Boot, shielded VMs, and virtual TPM, are available.

Migration

Limited migration options, as Gen 1 VMs cannot be converted to Gen 2 VMs. Migrating from Gen 1 VMs to Gen 2 VMs is possible, but requires creating a new VM and manually migrating data and settings.

OS Support

Supports a wide range of guest operating systems, including older versions of Windows and Linux. Supports newer versions of Windows and Linux, but may not support older operating systems.

Hardware Support

Runs on a wide range of hardware, including older processors and non-virtualization capable CPUs. Requires newer hardware, including a 64-bit processor with second-level address translation (SLAT) support, virtualization extensions (Intel VT or AMD-V), and support for UEFI firmware.

Performance

May not be able to take advantage of the latest hardware improvements and virtualization features, leading to slower performance. Can take advantage of the latest hardware improvements and virtualization features, leading to better performance.

Choosing the Right VM for Your Organization:

When it comes to choosing the right VM for your organization, it’s important to consider your specific needs and requirements. Here are some factors to keep in mind:

Compatibility:

If you’re running older software applications or need to support 32-bit guest operating systems, generation 1 VMs may be the better option for you.

Device Support:

If you need to use larger virtual hard disks or want more advanced boot options like Secure Boot, generation 2 VMs may be the better option.

Speed:

Generation 2 VMs generally have faster boot times than generation 1 VMs, so if boot speed is a concern for you, consider choosing a generation 2 VM.

Integration Services:

If you require improved integration services, such as support for online backups or remote desktop, generation 2 VMs are the better option.

Security:

If security is a top priority for your organization, consider choosing a generation 2 VM with Secure Boot and other advanced boot options.

What are the common VM platforms?

The common VM platforms are either On-premise virtualisation or Cloud virtualisation. These VM platforms are;

Feature VMware Hyper-V Xen Azure AWS GCP

Virtualization Platform

On-Premise On-Premise On-Premise Cloud-Based Cloud-Based Cloud-Based

Customer Managed

Yes Yes Yes No No No

Cloud-Based

No No No Yes Yes Yes

Hypervisor Type

Type 1 Type 1 Type 1 Type 1 Type 1 Type 1

Live Migration

Yes Yes Yes Yes Yes Yes

High Availability

Yes Yes Yes Yes Yes Yes

Snapshot Capabilities

Yes Yes Yes Yes Yes Yes

Networking

Yes Yes Yes Yes Yes Yes

Storage

Yes Yes Yes Yes Yes Yes

Resource Management

Yes Yes Yes Yes Yes Yes

Integration with Other Technologies

Yes Yes Yes Yes Yes Yes

Licensing Model

Proprietary Proprietary Open Source Proprietary Proprietary Proprietary

Works with Snapshot Master

Yes Yes No Yes Coming soon Coming soon

In conclusion, the choice between generation 1 and generation 2 VMs depends on your specific needs and requirements. Generation 1 VMs are a good option if you need to support older software applications or 32-bit guest operating systems, while generation 2 VMs offer more advanced boot options, improved device support, and faster boot times. By considering factors such as compatibility, device support, speed, integration services, and security, you can choose the right VM for your organization’s needs.

Gen 1 or Gen 2 Further reading

Some useful links for further reading on Gen 1 or Gen 2 VMs, if you so require.

Source Description
Microsoft Docs
Official documentation from Microsoft on the differences between Gen 1 and Gen 2 VMs
VMware Blog
A blog post from VMware that discusses the advantages and disadvantages of Gen 1 and Gen 2 VMs
TechTarget
An article from TechTarget that provides a comparison between Gen 1 and Gen 2 VMs
Red Hat
A whitepaper from Red Hat that explores the benefits and use cases of Gen 2 VMs
GitHub
A GitHub repository that contains scripts for converting Gen 1 VMs to Gen 2 VM

In conclusion, the choice between generation 1 and generation 2 VMs depends on your specific needs and requirements. Generation 1 VMs are a good option if you need to support older software applications or 32-bit guest operating systems, while generation 2 VMs offer more advanced boot options, improved device support, and faster boot times. By considering factors such as compatibility, device support, speed, integration services, and security, you can choose the right VM for your organization’s needs.

Why Migrate Azure VMs to VMware: The Benefits

Why Migrate Azure VMs to VMware: The Benefits

Azure VM Repatriation

Azure to VMware migration?

As organizations transition to the cloud, they are faced with the question of which platform is best suited to their needs. While Microsoft Azure has been a popular choice for cloud computing, many organizations are finding that VMware is a better fit for their virtualized infrastructure needs. This article will explore the reasons why you should consider migrating your Azure VMs to VMware and the benefits that come with making this transition.

Microsoft Azure has been a popular choice for cloud computing due to its scalability and ease of use. However, as organizations grow, they may find that they need more control over their virtualized infrastructure, which is where VMware comes in. With VMware, organizations have complete control over their virtualized environment, which can provide them with more flexibility, reliability, and security.

The Benefits of Migrating Azure VMs to VMware

There are several benefits to migrating Azure VMs to VMware, including increased control, improved performance, and enhanced security.

Increased Control

With VMware, organizations have complete control over their virtualized environment, which means they can manage their VMs in a way that best meets their business needs. They can also easily configure their virtual infrastructure to meet specific requirements, such as resource allocation and network configurations. This level of control is not possible with Azure, where organizations are limited to the resources and configurations provided by the platform.

Improved Performance


VMware also provides improved performance compared to Azure. This is because VMware provides dedicated hardware resources, which can result in faster and more reliable performance. Additionally, VMware’s virtual infrastructure is designed to support high-availability configurations, which can help ensure that VMs remain available even if there are hardware failures.

Enhanced Security

One of the biggest benefits of migrating Azure VMs to VMware is enhanced security. With VMware, organizations have complete control over their virtualized environment, which means they can implement robust security measures to protect their data and applications. This is not possible with Azure, where organizations are limited to the security measures provided by the platform.


Azure VM to VMware Migration FAQs

What is the process for migrating Azure VMs to VMware? 

The process for migrating Azure VMs to VMware will depend on the specific needs of your organization. However, the process typically involves configuring a virtual infrastructure, migrating your VMs to the new infrastructure, and testing to ensure that everything is working as expected.

Can I still use Microsoft Azure after migrating my VMs to VMware?

Yes, you can still use Microsoft Azure after migrating your VMs to VMware. However, your VMs will no longer be hosted on the Azure platform, and you will have more control over your virtualized environment.

What are the costs associated with migrating Azure VMs to VMware?

The costs associated with migrating Azure VMs to VMware will depend on the specific needs of your organization. However, the costs can include hardware, software, and support costs.

How best to migrate your Azure VMs to VMware.

In conclusion, migrating Azure VMs to VMware can provide organizations with increased control, improved performance, and enhanced security. With complete control over their virtualized environment, organizations can better manage their VMs and implement robust security measures to protect their data and applications. If you are considering migrating your Azure VMs to VMware, it is important to consider the specific needs of your organization and to work with a professional who can help you make the transition.

Moreover, with the help of software such as Carbon, the administrator can quickly and easily migrate their Azure VMs to either VMWare or Hyper-V. Carbon connects directly to your Azure Subscription, displays your Azure Virtual Machines, and integrates with either your VMware or Hyper-V environments. The software replicates and converts your Azure VMs to your on-premise hypervisor of choice, automatically sets up your replicated Azure VMs on either VMware or Hyper-V with the same configurations, and provides email alerts once the process is completed. By using Carbon, the migration process becomes efficient and straightforward, giving administrators more time to focus on other important tasks.

How to download an Azure VM

How to download an Azure VM

Migrate an Azure VM to VMware or Hyper-V

If you’re looking to download an Azure Virtual Machine to either VMware or Hyper-V for cost savings or compliance reasons, our software Carbon automates the process with just a few clicks. With Carbon, you won’t need to use PowerShell or download the VHD from the Azure portal.

To download your Azure VM to your preferred hypervisor, simply follow the steps outlined below for VMware.

First, download and install Carbon. Then, select your Azure VM and specify your VMware environment as the target. Carbon will handle the rest, downloading and converting your Azure VM to VMware.

In addition to VMware, Carbon also supports Hyper-V as a target environment. So whether you need to export your Azure VM to VMware or Hyper-V, Carbon can help.

To get started, download a free trial of Carbon and try it out for yourself. Don’t waste time with manual downloads or complicated PowerShell scripts – let Carbon simplify the process for you.

The Easiest way to convert your Azure VM to VMWare or Hyper-V

Launch Carbon

Once you have Carbon installed, the first task is to launch Carbon.

Carbon Azure Migration Tool Loading Screen

Sign in to the Azure Portal

You will now be prompted to login to Azure, so enter your credentials with access to your Azure Portal.

Carbon Azure VM Download Login

Scan your Azure Portal for all of your Azure Virtual Machines

Find all your Azure VMs

Once you have authenticated against your Azure Tenant, Carbon will now start scanning your Azure environment for all your Azure Virtual Machines.

This could obviously take some time if you have a large Azure Environment.

Once the scan of your Azure VMs has completed, you will see the list of all the Azure VMs in your Azure Tenancy.

Carbon Azure VM Download Scanning

List all your Azure VMs

Now that your scan of all your Azure VMs is complete, choose Select Virtual Machine/s to list all your Azure VMs in your Tenancy and start the migration process.

Carbon Home Screen

Select your Azure VM for Migration

Which Azure VMs do you want to migrate back to your Hypervisor

Now you should see a list of all your virtual machines in your Azure Environment.

Details displayed include:

  • The Azure VM Name
  • The status of the Azure VM
  • The Azure VM size
  • The number of CPUs your Azure VM has
  • The amount of Ram
  • The Azure VM’s IP Address
  • The Azure vNet it resides in
  • The Operating System of your Azure Virtual Machine
  • The Azure Resource Group
  • The Azure Subscription
  • The Azure location
  • and finally, the number of disks attached to your virtual machine

You simply select (by using the checkbox on the very right of the screen) the Azure VMs you want to download to VMware, then click Next.
The VMs you want to migrate will need to be powered off, so make sure you do this prior to attempting the migration.


Carbon Azure VM Details

Managed or Unmanaged Disks

Azure VM Disk Configuration

Now if the Azure VMs you are going to convert to VMware are using Azure Managed Disks, you will get this prompt.

Click OK to proceed.

What Carbon will do next is copy this Azure VM disks to a storage account that you specify in the next screen.

Please take note of the location of your Azure VM, as you want to use an Azure Storage Account in the same region.

Azure Managed Disk Prompt

Azure Storage Account for Conversion

Choose a destination Azure Storage Account

Next we select the appropriate Azure Storage Account that the Azure VM will be copied and converted to.

Choose the storage account you want and then choose Select.

Carbon will now read your Azure VM disk configuration. This can take a few minutes.

Azure Storage Account Details

Choose your VMWare or Hyper-V Environment for Azure VM Migration

Connect to you Hypervisor

Now we are presented with your virtual environment (in this case our VMware vCentre environment)

Choose from the dropdown lists the VMware Host, the datastore and virtual network you want your Azure VM to download to.

You have the option here to send you an email once the migration has completed.

Click Start Migration to proceed to the final step


Azure VM Download VMware

Ready to start the Migration of your Azure VM

Start the Migration Process

Finally we are prepared to start the conversion of your Azure VM to VMware.

Review the information here, when you are ready, click the circle next to Understood and Accepted, then click Start.  

Azure VM Migration to VMware

Azure VM Migration Process

Converting your Azure VM

Now, the conversion process is underway. Your Azure VM will be downloaded and converted to the appropriate format for either VMware or Hyper-V before finally being deployed to your on-premise virtual infrastructure.

Please Note: This may take some time, dependent on the size of your Azure VM disks, so please be patient. 

If you have email alerting setup and turned on, you will receive an email once the process has completed.

Azure VM Conversion Process

Azure VM Conversion Progress

Converting your Azure VM for your selected Hypervisor

Watching the Progress window you can see the status of your download and conversion of your Azure VM.

In this picture you can see that the disk download has completed as well as the conversion and its currently being uploaded to our VMware environment.

Azure VM Conversion Status

Azure VM Converted

Azure VM Conversion is now Complete

After some time your Azure VM should now have downloaded, converted to VMware and be available within your vCentre server.

Azure VM download to VMware Complete

Azure VM Migration Alerts

If you requested an email alert, you should have received one in your inbox stating that the Azure VM has now deployed to your VMware environment.

Azure VM Download Email

Azure VM Conversion Completed

View the migrated VM in your Hypervisor

If you go to your vCentre now you should be able to find the Azure VM you had migrated to your VMware environment.

All left for you to do now, is power it on then log on to the VM and update the IP address if needed.


Azure VM on VMware

Azure VM Conversion Completed

Find the migrated VM in your Hypervisor

If you go to your vCentre now you should be able to find the Azure VM you had migrated to your VMware environment.

All left for you to do now, is power it on then log on to the VM and update the IP address if needed.


Azure VM on VMware

Your Azure VM has been converted and then migrated to your Hyper-v or VMware environment.

And that’s all there is to it. You have downloaded an Azure VM and converted it to VMware or Hyper-V. (Obviously in this example we converted the Azure VM to VMWare. For HyperV the last few steps are replaced with VCentre with SCVMM)

You can download a fully functioning trial of Carbon here to test it for yourself.

Carbon: Moving You Forward by Bringing You Back.

How to schedule a snapshot on multiple Virtual Machines.

How to schedule a snapshot on multiple Virtual Machines.

How to schedule the snapshot of multiple VMware or Hyper-V Virtual Machines with auto deletion.

Every so often you need to schedule a snapshot on a virtual machine, whether that be a VMware virtual machine or a Hyper-V virtual machine, or even multiple virtual machines because someone or something is going to be changed and you need a quick way to roll them back to a running state, just in case things go belly up. It’s a very common task that administrators need to do. Other times you need to create a snapshot on a schedule, whether it’s a one-off snapshot at a specific date and time, or a recurring one that happens every week or month. Doing this using the standard vCenter console is fairly simple and easy to do. But how do you schedule it for multiple VMs? And to then also automatically remove the snapshot? Or what if you have a combination of VMware and Hyper-V? Doing that usually involves a combination of scheduled tasks via the console and PowerShell with PowerCLI.

But the easiest and simplest way by far is to use Snapshot Master. Hopefully you have installed and are running Snapshot Master in your environment, if not, you can download and request a 30 Day trial key and try it out for yourself.

Creating a schedule to snapshot one or multiple virtual machines and then automatically deleting the snapshot after a period you define is a walk in the park.

OK, so now that I’ve talked up Snapshot Master and how easy it is to create a scheduled snapshot on one or multiple VMs either VMware or Hyper-V with auto-deleting the snapshot, how do you actually do it?

Snapshot Scheduling Use Cases

Use Case Why Schedule a Snapshot?

Testing and Development

To quickly roll back changes made to a virtual machine during testing and development.

Software Upgrades

To create a snapshot before performing a software upgrade, in case the upgrade causes issues that need to be rolled back.

Disaster Recovery

To have a recent snapshot available in the event of a disaster or data loss.

Compliance

To maintain compliance with data retention policies or audit requirements.

Resource Optimization

To free up disk space on a virtual machine by automatically deleting old snapshots after a specified time period.

Performance Tuning

To create a snapshot before making changes to a virtual machine’s configuration or performance settings, in case the changes negatively impact performance.

By scheduling snapshots, you can ensure that you have a recent backup of your virtual machines that can be easily restored in the event of issues or data loss. Additionally, scheduling snapshots can help you meet compliance requirements, optimize resource usage, and improve the overall performance of your virtual environment.

Launch Snapshot Master

The first step is to open Snapshot Master. Ensure that you have already installed Snapshot Master on your system. If not, you can download it and request a 30-day trial key to test it out.

Snapshot auto delete 1

Select the Virtual Machines you want to Schedule a Snapshot

Once you launch Snapshot Master, select the virtual machines you want to snapshot. You can do this by either placing a tick in the checkbox or double-clicking the row.

Snapshot auto delete 2

Take a Virtual Machine Snapshot

Right-click anywhere on the screen, move to Selected VMs, and click Take Snapshot. A dialog box will appear to give the job a name and description. Tick the box to automatically delete the snapshot and use the drop-down list to select the number of days after which it should be deleted, then press OK.

Snapshot auto delete 3

VM Snapshot Name

Give the job a name and descriptionTick the box to automatically delete the snapshot and use the drop down list to select the number of days it should be deleted in and press OK.

Snapshot auto delete 4

VM Snapshot Execute Now or Scheduling

 Click Schedule job.

Note, if you need to run a pre or post script along with this job, you may call it here.

Snapshot auto delete 5

Schedule VM Snapshot Creation

Click New and setup the schedule for this job.

Press OK when done.

SnapShot Master will now start the snapshot / checkpoint creation process, at the schedule you have created.

Snapshot auto delete 6Snapshot auto delete 7

Scheduled VM Snapshot Job Notification

You will receive a notification letting you know the job has been scheduled.

Snapshot auto delete 8

Scheduled VM Snapshot Email Alerts

That’s all there is to it. Doesn’t get much easier than that. And if you have setup email notifications, you will receive an email detailing the success and failures of the job.

Snapshot auto delete 9

SnapShot Master FAQs

Question Answer

What is Snapshot Master?

Snapshot Master is a software tool that simplifies the process of creating and managing snapshots of VMware and Hyper-V virtual machines.

How does Snapshot Master work?

Snapshot Master provides a user-friendly interface for scheduling and creating snapshots of virtual machines, as well as automatically deleting old snapshots after a specified time period. It also supports pre- and post-snapshot scripts for more advanced customization.

Can Snapshot Master handle both VMware and Hyper-V virtual machines?

Yes, Snapshot Master can create and manage snapshots for both VMware and Hyper-V virtual machines.

Is Snapshot Master easy to use?

Yes, Snapshot Master is designed to be simple and user-friendly, with an intuitive interface that makes it easy to schedule and create snapshots of virtual machines.

Can I try Snapshot Master before purchasing it?

Yes, a free 30-day trial version of Snapshot Master is available for download.

What are the system requirements for Snapshot Master?

Snapshot Master requires Windows 7 or higher and .NET Framework 4.5 or higher. It also requires administrative privileges to install and run.

Does Snapshot Master provide email notifications?

Yes, Snapshot Master can send email notifications to inform you of the success or failure of snapshot jobs.

Can Snapshot Master automate the snapshot creation and deletion process?

Yes, Snapshot Master can automatically create and delete snapshots on a schedule that you define.

What other features does Snapshot Master offer?

Snapshot Master also includes the ability to clone virtual machines, and provide email reports of your virtual environment.

Automate VM Snapshot creation and deletions

Taking snapshots on multiple VMs has never been easier than with Snapshot Master. It’s a simple, automated process that helps to ensure the protection of your virtual machines. Snapshot Master is also capable of managing other aspects of your virtual machines. You can download a free fully functioning trial of Snapshot Master to explore its capabilities.

Free Fully Functioning Trial available to download.

Step by step guide on how to install Microsoft’s System Centre Virtual Machine Manager (SCVMM)

Step by step guide on how to install Microsoft’s System Centre Virtual Machine Manager (SCVMM)

How to install Microsoft’s System Centre Virtual Machine Manager (SCVMM)


scvmm install

System Centre Virtual Machine Manager (SCVMM)

 If you run Microsoft’s Hyper-V as your virtualisation platform rather than the ever popular VMware ESX then you probably want a way to manage your Hyper-V hosts as well as the virtual machines that reside on this. Well you can do a lot of the functions that SCVMM does with the free tool for managing Hyper-V, the Hyper-V Manager (which comes as part of the Windows Operating System).

So if they are similar why would we use System Centre VMM over and above the Hyper-V Manager you ask and have to pay more money to Microsoft?

Well I list out the main differences here to hopefully guide you to a decision before going through the installation process of SCVMM later on down the page.

SCVMM vs Hyper-V Manager Key Differences

Hyper-v Manager

  • Can manage the Hyper-V hosts and the virtual machines that reside on it.
  • Can manage a single host or multiple Hyper-V hosts that are members of a failover cluster.
  • Requires Failover Cluster manager to manage multiple hosts.
  • Requires powershell to setup affinity rules.
  • No single pane of glass to manage your complete Hyper-V environment which requires you to utilise the Hyper-V Manager console, Failover Cluster console and then powershell to do only some of what SCVMM can do.

System Center Virtual Machine Manager

SCVMM can do all the Hyper-V Manager does from a single console.;

  • Configure and manage your datacentre components as a single fabric in SCVMM. (Datacentre components include virtualization servers, networking components, and storage resources.)
  • SCVMM can add, provision, and manage Hyper-V and VMware virtualization hosts and clusters. SCVMM can manage VMware ESX servers and its virtual machines in limited capacity. It does however require you to have a VMware vCentre to connect to, to be able to manage your VMware virtual machines.
  • Add networking resources to the SCVMM fabric, including network sites defined by IP subnets, virtual LANs (VLANs), logical switches, static IP address and MAC pools.
    SCVMM provides network virtualization, including support for creating and manage virtual networks and network gateways. Network virtualization allows multiple tenants to have isolated networks and their own IP address ranges for increased privacy and security.
    Using gateways, VMs on virtual networks can connect to physical networks in the same site or in different locations.
  • SCVMM can discover, classify, provision, allocate, and assign local and remote storage.
    SCVMM supports block storage (fibre channel, iSCSI, and Serial Attached SCSI (SAS) storage area networks (SANs)).
  • The SCVMM fabric retains a library of file-based and non file-based resources that are used to create and deploy VMs and services on virtualization hosts.
    File-based resources include virtual hard disks, ISO images, and scripts.
    Non file-based resources include templates and profiles that are used to standardize the creation of VMs. Library resources are accessed through library shares.
  • Integrates with Azure (Though you cannot change settings of the Azure VMs but you can see them and at least stop and start them from your SCVMM console)

The biggest issue with using Hyper-V Manager over System Centre VMM is that it cannot scale to manage large environments, and with having three different consoles (Hyper-V Manager, Failover Cluster Manager and then Powershell) can be quite daunting to use to it’s full ability.

SCVMM Capacity Limits

Planning for your SCVMM deployment is a good practice and you want to make sure to size it right for your environment. The suggested limits of the software Microsoft details for SCVMM deployment are in the table below;

Entity Recommended maximum count
Physical hosts 1000
Virtual Machines 25000
Services 1000
User roles 1000
Clouds 20
Virtual networks 2000
logical networks 20
Library resources 1000
Library Objects (templates, profiles) 100

SCVMM Limits

Recommended hardware requirements are;

Hardware VMM server VMM database VMM library VMM console
Processor (minimum) 8 core Pentium 4, 2 GHz (x64) 8 core Pentium 4, 2.8 GHz 4 core Pentium 4, 2.8 GHz 2 core Pentium 4, 1 GHz CPU
Processor (recommended) 16-core, 2.66 GHz CPU 16 core 2.6 GHz CPU 4 core 2.8 GHz CPU 2 core 2 GHz CPU
RAM (minimum) 4 GB 8 GB 2 GB 4 GB
RAM (recommended) 16 GB 16 GB 4 GB 4 GB
Hard drive (minimum) 4 GB 50 GB Based on size/amount of stored files 10 GB
Hard drive (recommended) 10 GB 200 GB Based on size/amount of stored files 10 GB

SCVMM Operating System Requirements

The recommended Windows Operating System requirements for SCVMM 2019 are

  • Windows 2016 Server Core
  • Windows 2016 Full Desktop Experience
  • Windows 2019 Server Core
  • Windows 2019Full Desktop Experience.

SCVMM Database Requirements

The last piece to the SCVMM puzzle, is the database it requires. Obviously this database is another Microsoft product, SQL Server.

The supported Microsoft SQL database versions for SCVMM 2019 are;

  • SQL 2016
  • SQL 2017

How to install System Centre Virtual Machine Manager.

A step by step guide to install SCVMM.

Now that you can see the benefits to installing and using SCVMM to manage your Hyper-V hosts and it’s Virtual Machines. We will now get to the installation part to guide you through the process. I am going to assume here that you already have your Hyper-V hosts up and running and are ready to start your installation. To continue on with this installation guide I will run you through my current infrastructure setup. I have a newly deployed Hyper-V host and have prebuilt some generic virtual machines that are running on it. I am using a demo version of SCVMM which you can download for yourself from the Microsoft site (link here) and I have already predownloaded the files ready to start the installation.

So what are the prerequisites to install SCVVM? Obviously besides the requirements detailed up above, you will need a functioning Hyper-V environment to install the SCVMM on to, as well as administrator access to manage the Hyper-V hosts. As I have downloaded an image from Microsoft and if you are doing the same you will need Domain Administrator access to add the SCVMM Windows server to the domain.

Launch SCVMM Installer

Since the files are downloaded to my location machine, browse to the SCVMM install files through windows explorer. To start the install, just run the Executable file


Installing SCVMM

Now the installation starts, click on NEXT on the SCVMM install welcome screen.


scvmm installation

SCVMM License Agreement

Accept the license agreement (make sure to read them if you wish) and click on NEXT.


scvmm install license agreement

SCVMM Installation Location

The SCVMM install needs to extract the downloaded files. Choose an appropriate folder location and make sure you have enough free disks space (approximately 28GB is needed) then click on NEXT.


scvmm install location

SCVMM File Extraction

You are now ready to extract the SCVMM files needed for the installation. Confirm the settings and folder looks right then click on EXTRACT.


scvmm install file extraction

SCVMM Install Extracting

The installation files will now extract from your downloaded media. This will take a little bit of time to complete the extraction process.


scvmm install extracting

SCVMM File Extraction Completed

Now the extraction of SCVMM is complete. Click on FINISH.


scvmm install extraction complete

SCVMM Import

Next we need to connect to one of your Hyper-V hosts with the Hyper-V Manager console to start the import of the SCVMM Virtual Machine. Open up your Hyper-V console and connect to your host.


scvmm hyper-v

SCVMM New Virtual Machine

We now need to build a new VM for the SCVMM server. Click on ACTIONthen NEWthen VIRTUAL MACHINE.


scvmm new vm

New Virtual Machine Wizard

The New Virtual Machine Wizard starts up, click on NEXT to proceed.


scvmm new virtual machine

New Virtual Machine Location

On the Specify Name and Location tab give your VM a name and you can choose where to store the VM files. When you have done that click on NEXT.


scvmm new vm location

VM Generation Selection

The Specify Generation window, make sure that Generation 1 is selected then click on NEXT


VM Memory Settings for SCVMM

Remember the minimum memory suggested by Microsoft above? Well if you dont, the minimum memory recommended was 4GB so as this is just a lab but I want some performance Im changing that to 8GB. When you have selected the memory size click on NEXT.


VM Virtual Switch Settings

Choose with virtual switch you want to deploy this VM to then click NEXT.


scvmm install networking

SCVMM Virtual Hard Disk Settings

This is one of the most important parts of the install process, make sure to change the virtual hard disk to Use an existing virtual hard disk and browse to the extracted location of the SCVMM download. When you have done that click NEXT.


SCVMM VM Deployment

Review everything on the Summary Tab and if you are happy to proceed with the SCVMM deployment click on Finish


scvmm install vm deployment

Power ON SCVMM VM

Now go back to your Hyper-V console and browse through your virtual machines until you find your newly deployed SCVMM virtual machine


Start SCVMM Installation

To start the installation you will need to power it on and open a console session so you can see what is happening.


scvmm start installation

Install Windows 2019 Server

We have to now run through the Windows 2019 server installation. Choose your country / region then click NEXT


win2019 install

Windows 2019 Server License Agreement

More license terms for you to read through, when you are happy to accept them, click on ACCEPT.


win2019 license agreement

Local Administrator Password Creation

Now provide a local administrator password and then click FINISH then the server will restart


local admin password

Login to SCVMM Server

Once Windows 2019 server has installed, log on to the server with the local administrator credentials you put in previously


win 2019 logon screen

SCVMM join Active Directory Domain

We now need to join the SCVMM virtual machine to the domain, so open up CONTROL PANEL then go to SYSTEMChange the virtual machine name so you can easily identify it in the future and add the VM to your Active Directory Domain and dont forget to Reboot the server.


Install SQL Server for SCVMM

So after your SCVMM server has rebooted and is joined to your domain, we next need to start the installation of the SQL Database if you have not got one already. On the desktop of my Windows 2019 VM, I can see Microsoft has placed two icons for me to use to start the SCVMM installation. Luckily in this case they tell me to start the SQL Server install first, so we need to DOUBLE CLICK on that.


scvmm install sql

SQL Product Key

On the Product Key page for the SQL install, put in your license details and click on NEXT.


sql install product key

SQL License Agreement

Accept the license terms and click NEXT.


sql license agreement

SQL Global Rules

On the Global Rules tab, the SQL installation will check to see if the prerequisites are met for the installation. If all went well as in the picture click on NEXT.


sql install global rules

SQL Features

The Select Prepared Features tab check the settings are correct and click NEXT


sql install features

SQL Features Confirmation

The SQL installation for SCVMM now lets you review the Features are correct. Again, review the features you have chosen are right for your environment then click NEXT


sql install confirmation

SQL Instance Selection

On the SQL Instance Configuration you need to change this to the Default Instance (if you are installing a fresh copy of SQL, if you are using another server please point the instance to what you have setup. Click  NEXT to proceed.


sql install instance

SQL Service Account

Confirm the Server Configuration tab is correct (if you want to change the accounts you can, but Im leaving this all default.) Click NEXT.


sql install service account

SQL Database Engine Configuration

The Database Engine Configuration tab make sure to add your account so that you can manage the SQL instance. In my screenshot below I added the Domain Admins for my lab environment. Click Next to continue.


sql install database engine

Review SQL Installation Options

We are almost ready to start the SCVMM SQL server installation. Double-check all these settings look correct for your environment then click on COMPLETE to start the install.


sql install review

SQL Installing

The installation will now run through the process to install the SQL server components on your Virtual Machine. Maybe go grab a coffee to give this sometime to complete and if all went well you should see something similar to the following screen.


Starting SCVMM Installation

Finally we are on to the fun bit, we can start the configuration of SCVMM. I rebooted the server after the SQL install just to be sure that the services all started correctly and there was no errors detected.
Locate the Configure VMM icon and then DOUBLE CLICK IT.


start scvmm installation

SCVMM Setup

Once the Microsoft System Centre 2019 Virtual Machine Manager setup wizard starts up, put in your details, your company details and your SCVMM licence key then click NEXT.


SCVMM Diagnostics and Usage Information

The SCVMM Diagnostics and Usage Data page describes that Microsoft does collect some data from you. Please read through this then click NEXT.


scvmm install diagnostics

SCVMM Update

It is always a good idea to turn on Microsoft Update to patch the system should any vulnerabilities be found, but this is up to you and your environment. I chose to turn on Microsoft Update, then clicked on NEXT.


scvmm microsoft update

SCVMM Database Configuration

On the Database Configuration tab make sure the settings are correct for SQL server install you did previously and when confirmed click on NEXT.


scvmm install database configuration

SCVMM System Account

Now to the Configure service account and distributed key management tab, change it to Local System account, and then click NEXT


scvmm install account

SCVMM Library Configuration

For Library Configuration you can choose to create a new library or an existing share. Im leaving it default here as its a new install of SCVMM. Click NEXT to proceed


scvmm library configuration

SCVMM Installation Summary

Finally we are almost there, SCVMM is almost configured. Review the details on the Installation Summary page and when you are happy with the details click INSTALL. 

This will start the install so be sure everything is correct.


scvmm install summary

SCVMM Installation Summary

Hopefully you got a successful screen saying that SCVMM is now installed and configured, but if you didnt the best place to look is at the SCVMM install logs located %SYSTEMDRIVE%ProgramDataVMMLogs ServerSetup.log.


scvmm installation successful

Schedule a Hyper-V Checkpoint

Now that you have SCVMM installed in the next blog post I will cover off how to add your Hyper-V Hosts and perhaps while you are already here you can see how easy it is to schedule snapshot creations and deletions of your Hyper-V or VMware virtual machines with SnapShot Master.

 Download and try it for yourself with a free and fully functioning 30 day trial.

Snapshot before Patching

Snapshot before Patching

Automate Snapshot Creation Before Deployment

Reduce Patching Risks with SnaPatch

System administrators are responsible for ensuring the smooth functioning of their organization’s computer systems. They are the ones who deploy new software and updates, perform maintenance tasks, and troubleshoot any issues that arise. However, keeping these systems up-to-date can be a daunting task, especially when new updates and patches are released frequently. This is where taking a snapshot before patching comes into play.

A snapshot before patching is a crucial tool that system administrators can use to protect their systems from vulnerabilities. In this article, we will discuss why taking a snapshot before patching is essential and how it can help system administrators safeguard their systems.

What is a Snapshot Before Patching?

A snapshot before patching is a backup copy of your system’s current state. This copy can be used to restore your system to its previous state in case something goes wrong during the patching process. Taking a snapshot before patching ensures that you have a stable and reliable system to fall back on if the patching process fails.

Why is a Snapshot Before Patching Important?

Taking a snapshot before patching is essential for several reasons. Here are some of the main reasons why system administrators should make this a standard practice:

  1. Protects Against System Failure: Patching can sometimes cause system failures. Having a snapshot before patching ensures that you can quickly restore your system to its previous state in case of such failures.
  2. Provides a Safe Environment for Testing: Taking a snapshot before patching allows system administrators to test the patches in a safe environment. This ensures that any issues that arise during the testing process can be addressed before the patches are applied to the live system.
  3. Helps in Disaster Recovery: Snapshots can be used as part of a disaster recovery plan. In case of a disaster, snapshots can be used to restore your system to a previous state.

Best Practices for Using Snapshots Before Patching

Here are some best practices for using snapshots before patching:

Always Test Patches:

Test patches in a safe environment before applying them to the live system.

Schedule Regular Snapshots:

Schedule regular snapshots so that you always have an up-to-date backup of your system.

Name Your Snapshots:

Give your snapshots meaningful names so that you can easily identify them.

Store Snapshots Securely:

Store your snapshots in a secure location to prevent unauthorized access.

Snapshots Before Patching FAQs

What is the difference between a snapshot and a backup?

A snapshot is a point-in-time copy of your system, whereas a backup is a copy of your system’s data that is stored separately.

How often should I take a snapshot before patching?

It depends on your organization’s needs. However, it is a good practice to take a snapshot before each patching session.

Can I take a snapshot of a virtual machine?

Yes, you can take a snapshot of a virtual machine. In fact, taking snapshots of virtual machines is a common practice in virtualized environments.

What happens if I don’t take a snapshot before patching?

If you don’t take a snapshot before patching, you run the risk of losing important data or causing system failures.

How to Snapshot before deploying Patches.

How SnaPatch Can Help You Take Snapshots Before Patching

When it comes to taking snapshots before patching, it can be a time-consuming and manual process for system administrators. However, there is a tool that can simplify the process and make it more efficient: SnaPatch.

What is SnaPatch?

SnaPatch is a software application that interacts with your Microsoft System Centre Configuration Manager (SCCM) environment to pull in all your machine information. It uses SCCM as the source of truth for all your VM information.

Next, it interfaces with either your vCentre or System Centre Virtual Machine Manager (SCVMM), or both. It takes control of your VM environment, allowing it to create and delete snapshots of your VMs.

How does SnaPatch work?

SnaPatch simplifies the snapshot process by automating it. It creates a snapshot of any virtual machine before allowing it to be patched. If the snapshot fails, the VM will not receive updates and will be removed from the patching schedule. SnaPatch streamlines the process and frees up your time by automating the snapshot and patching processes, while keeping you updated on progress via email notifications.

How do you deploy SnaPatch?

Deploying SnaPatch is easy and straightforward. After installation, the application discovers your SCCM environment and allows you to configure various settings such as email notifications, snapshot creation, and patch deployment.

Why use SnaPatch?

SnaPatch helps you take snapshots before patching in a more efficient and streamlined manner. It complies with SOX regulations and minimizes risk, and its automated snapshot creation feature ensures that you can easily roll back updates if necessary, giving you peace of mind and more time to focus on other critical tasks.

Conclusion

In conclusion, taking snapshots before patching is a critical step in ensuring the security and stability of your systems. SnaPatch can help simplify and automate this process, allowing you to deploy Microsoft updates in your VM environment safely and efficiently. Try SnaPatch today and streamline your patching process!