SharePoint Online provides 1 TB base storage plus 10 GB per user.
Monitoring and Management
Use the Microsoft 365 admin center to monitor and manage storage.
Flexible Storage Purchasing
Additional storage can be purchased as needed on a monthly basis.
Strategic Planning
Anticipate future needs with strategic planning and regular reviews.
Use of Tools
Leverage tools like SharePoint Storage Explorer for better management.
Proactive Adjustments
Adjust storage based on actual usage to optimize costs and efficiency.
SharePoint Storage Consumption Key Takeaways
SharePoint Online is a robust cloud-based service offered by Microsoft as part of the Office 365 suite. It enables organizations to create websites for information sharing, document management, and collaboration at scale, serving everything from small projects to enterprise-level deployments. As organizations increasingly shift to remote work environments, the ability to securely manage and collaborate on content has become crucial. SharePoint Online not only facilitates this collaboration but also provides comprehensive tools to manage and store the data securely in the cloud. This introduction to SharePoint’s storage capabilities is essential for IT professionals and business managers aiming to optimize their digital infrastructure.
Base Storage Allocation and User-Driven Additions
One of the fundamental aspects of SharePoint Online is its storage allocation model. Initially, every SharePoint Online environment is equipped with a base storage quota, which generally starts at 1 terabyte (TB). This base allocation is intended to serve the organization’s broad needs and is supplemented by additional storage that is calculated on a per-user basis. Specifically, for each licensed user added to the organization, an extra 10 gigabytes (GB) of storage is typically allocated. This model ensures that as an organization grows in size, its storage capacity scales accordingly, providing a scalable solution that adjusts to the number of active users.
For example, if an organization has 100 licensed users on SharePoint Online, the total storage capacity would be calculated as follows: the initial 1 TB base storage plus an additional 1,000 GB (100 users multiplied by 10 GB each), totaling 2 TB. This scalable approach allows businesses to plan their resource needs in alignment with their growth, ensuring that they are neither under-resourced in terms of storage nor paying for unused capacity.
Below is a table summarizing the SharePoint storage details for Office 365 (Microsoft 365) plans E1, E3, and E5:
Plan
Base Storage
Additional Storage per User
Key Features
E1
1 TB
10 GB per user
Basic SharePoint features, essential services
E3
1 TB
10 GB per user
Advanced security, compliance features, unlimited personal storage in OneDrive for Business
E5
1 TB
10 GB per user
Advanced analytics, enhanced security and compliance, unlimited personal storage in OneDrive for Business
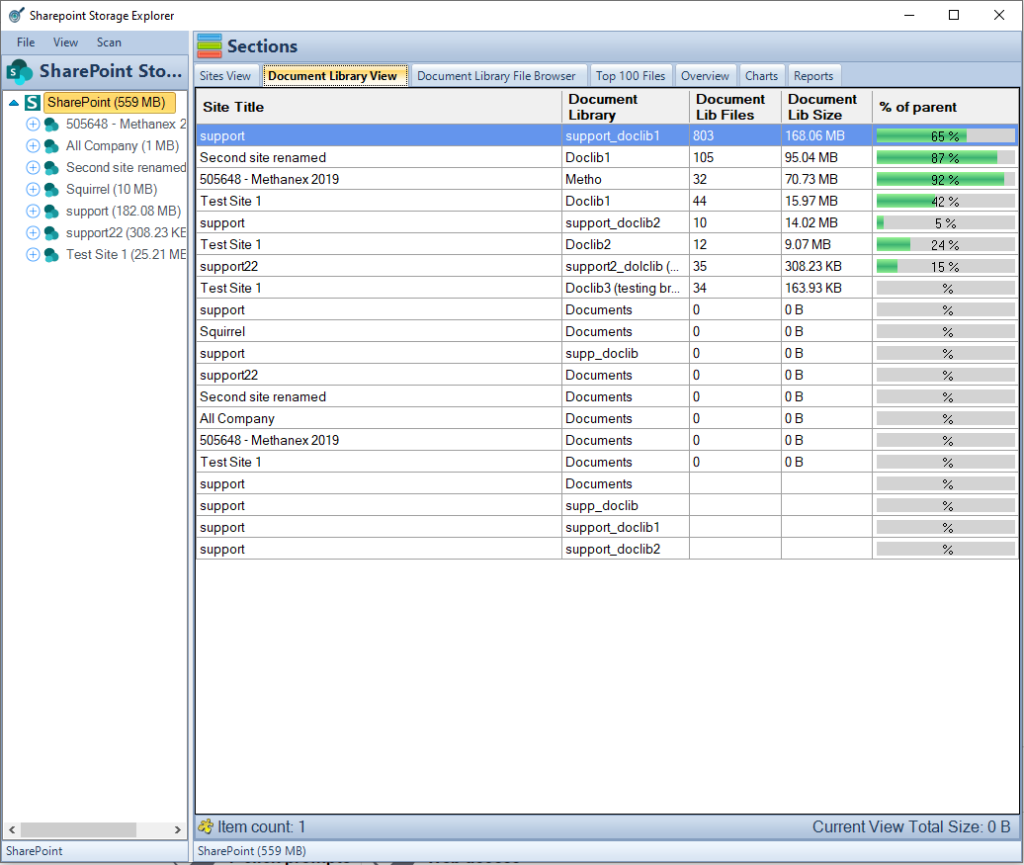
SharePoint Storage Usage
These plans share the same base storage and additional storage per user allocation but differ significantly in the additional features and capabilities they offer, especially around security and compliance for E3 and E5. Note that “unlimited personal storage” refers specifically to OneDrive for Business, which is often used in conjunction with SharePoint for personal file storage.
Navigating Through Storage Limits
Understanding how to manage within these limits is crucial. Administrators must monitor their available storage via the Microsoft 365 admin center, which provides detailed insights and reports on current usage across all services, including SharePoint Online. This monitoring is vital as it helps prevent scenarios where an organization might run out of storage unexpectedly, which could halt the uploading of new documents or the creation of additional content, potentially disrupting business operations.
Moreover, proactive storage management involves regular audits and clean-ups, which can significantly help in optimizing the storage usage. Archiving old documents, removing outdated content, and streamlining stored data not only free up space but also improve system performance and user accessibility. Effective storage management ensures that the organization makes the most out of its allocated storage, avoiding additional costs and maintaining system efficiency.
SharePoint Storage Explorer
Gain insights in to your SharePoint Online Storage Consumption
Download our completely FREE TOOL
FREE DOWNLOAD
Send download link to:
Managing SharePoint Online Storage Needs
Effective Storage Management Strategies
Effective storage management is essential for maintaining an optimal SharePoint Online environment. Regular storage audits are critical; they help identify rarely accessed files that can be archived or deleted. Organizations should consider implementing retention policies that automatically manage the lifecycle of documents and other content by archiving or deleting items based on age, sensitivity, or relevance. These policies not only help in maintaining compliance with legal and regulatory requirements but also optimize storage usage.
Organizations can leverage SharePoint’s built-in features like versioning and recycle bins to manage storage effectively. Versioning allows users to keep multiple versions of a document within the same storage footprint, while recycle bins provide a safety net for deleted files, ensuring they are not immediately removed from storage, thus protecting against accidental data loss. However, administrators should manage these features judiciously as unchecked versioning can lead to increased storage use.
To further enhance storage management, organizations can integrate Squirrel, an automated document archiving solution designed specifically for SharePoint Online. Squirrel not only automates the archiving process based on customizable lifecycle policies but also moves documents to cost-effective Azure Blob Storage. This transition reduces storage costs significantly while maintaining high levels of security and accessibility. By incorporating Squirrel into their storage management strategy, organizations can achieve more dynamic and cost-effective document management, freeing up valuable SharePoint Online space for active collaboration.
Leveraging SharePoint’s Reporting and Analytics Tools
To aid in storage management, SharePoint Online offers reporting and analytics tools that provide insights into how storage is being used across the organization. These tools can help administrators identify which sites or departments are consuming the most storage and whether the data they hold is justifiably needed or if it could be condensed. The SharePoint Storage Metrics page, for instance, allows site collection administrators to view detailed reports on storage usage down to individual items and documents, enabling precise management decisions.
Further, third-party tools and add-ons are available that can provide more granular analytics and enhanced visualization of storage data. These tools can be especially useful in larger organizations where complex data needs can exceed the capabilities of native SharePoint features.
Adapting to Growing Storage Needs
As an organization grows, so too does its data. It’s inevitable that at some point, the base storage plus per-user additions might no longer suffice. This scenario calls for purchasing additional storage, which SharePoint facilitates through a straightforward process accessible via the Microsoft 365 admin center. The flexibility of this system is a key benefit; administrators can purchase additional storage on an as-needed basis and adjust these purchases monthly, reflecting actual usage rather than projections. This pay-as-you-go model ensures that organizations only pay for the storage they need, when they need it, without long-term commitments.
Purchasing Additional SharePoint Online Storage
Understanding the Process of Adding Storage
When the existing storage capacity is no longer sufficient due to growth or increased project demands, purchasing additional storage becomes necessary. SharePoint Online facilitates this through a straightforward and accessible process in the Microsoft 365 admin center. Here, administrators can see their current storage usage and purchase additional storage as required.
The process is flexible; administrators can choose exactly how much additional storage they need and adjust their subscription on a monthly basis. This adaptability is crucial for managing costs effectively, ensuring that organizations pay only for the storage they actually need.
Cost Considerations and Billing
The cost of additional SharePoint storage is calculated on a per GB basis, making it easy for administrators to estimate the financial impact of increasing their storage limits. It’s important for administrators to monitor these costs regularly to avoid unexpected expenses. Regularly reviewing storage usage and adjusting the purchased amounts allows for better budget management and prevents waste.
Billing for additional storage is incorporated into the organization’s regular Microsoft 365 billing cycle. This integration simplifies administrative overhead and allows for a consolidated view of overall costs related to Microsoft services.
Tips for Efficient Storage Purchasing
Strategic Planning for Long-Term Storage Needs
Forecasting Future Storage Requirements
Strategic planning for storage involves more than reacting to immediate needs; it requires forecasting future requirements and understanding the factors that drive data growth within the organization. Consider historical data trends, projected business growth, and upcoming projects when planning for future storage needs.
Effective management of SharePoint Online storage requires a blend of SharePoint’s native tools and specialized third-party solutions. While SharePoint’s native tools provide fundamental insights and control over storage, third-party solutions like SharePoint Storage Explorer offer distinct advantages that can enhance your storage management strategy.
Integrating SharePoint Storage Explorer into your SharePoint management routine can streamline the oversight of your digital assets. This integration ensures that storage decisions are based on comprehensive data, potentially leading to better resource allocation, cost savings, and improved performance of your SharePoint environment.
Integrating Storage Management into Broader IT Strategies
Storage management should be integrated into the broader IT and business strategy to ensure it supports overall organizational goals. This includes aligning storage planning with IT security, compliance, and disaster recovery plans.
Engaging Stakeholders in Storage Decisions
Engage key stakeholders in the planning process to ensure that storage strategies align with departmental needs and business objectives. Regular communication with department heads and project managers can provide valuable insights into how storage is used and what may be needed in the future.
Emphasizing Proactive Storage Management
Summarizing Key Points
As we conclude, it’s clear that managing SharePoint Online storage effectively requires a combination of proactive strategies, flexible solutions, and comprehensive tools. By understanding the basics of storage allocation, actively managing storage needs, and strategically planning for future requirements, organizations can ensure they utilize their SharePoint environment to its full potential without incurring unnecessary costs.
Encouraging Proactive Management
Organizations should adopt a proactive approach to storage management to avoid potential disruptions and optimize their IT resources. Regular reviews, strategic planning, and the integration of advanced tools are essential components of a successful storage management strategy.
Mastering SharePoint Online
Please fill out the form below to get our free Ebook "Mastering SharePoint Online" emailed to you
FREE DOWNLOAD
Send download link to:
Explore SharePoint Storage Explorer
Introducing SharePoint Storage Explorer
To further enhance your storage management capabilities, consider exploring SharePoint Storage Explorer. This powerful tool offers advanced features that provide detailed visibility and control over your SharePoint storage:
Try SharePoint Storage Explorer Today
Visit our website to learn more about SharePoint Storage Explorer, download a free trial, or schedule a demo. Discover how this tool can transform your approach to managing SharePoint Online storage, making it more efficient and cost-effective.
Engage with Us
We invite you to share your experiences, challenges, or successes in managing SharePoint storage. Leave a comment below, or share this post with others who might find it useful. Let’s build a community of informed and proactive SharePoint users.
FAQs About Managing SharePoint Online Storage
Q: What is the base storage amount for SharePoint Online? A: SharePoint Online initially provides 1 TB of base storage.
Q: How is additional storage calculated per user in SharePoint Online? A: An additional 10 GB of storage is provided per licensed user.
Q: Can we purchase additional storage for SharePoint Online? How? A: Yes, additional storage can be purchased via the Microsoft 365 admin center on a pay-as-you-go basis.
Q: What happens if we exceed our SharePoint storage limit? A: You’ll receive notifications, and you may experience disruptions if not addressed. Additional storage can be purchased to resolve this.
Q: Are there long-term commitments for additional storage purchases? A: No, SharePoint Online offers the flexibility to adjust additional storage monthly as needed.
Q: How can we monitor our SharePoint storage usage? A: Use the SharePoint admin center or Storage Metrics page for detailed insights into your storage usage.
Q: What tools can help manage SharePoint Online storage more effectively? A: SharePoint Storage Explorer and other third-party tools can provide additional management features and analytics.
Q: Can storage settings be adjusted to automatically manage data lifecycle? A: Yes, implementing retention policies in SharePoint can help manage data automatically based on predefined rules.
Q: What strategies can be employed for long-term storage management? A: Regular audits, strategic planning, and integration with broader IT policies are effective for long-term storage management.
Q: Where can we find more information about managing our SharePoint environment? A: Microsoft’s official documentation and resources on their website provide comprehensive guides and updates on managing SharePoint environments.
Q: How does Squirrel complement SharePoint Online’s storage capabilities? A: Squirrel enhances SharePoint Online by automating the archiving of older, infrequently accessed documents to Azure Blob Storage, which helps in optimizing the overall storage space. This reduces costs and improves performance within SharePoint environments.
Q: What are the advantages of using Squirrel for document lifecycle management in SharePoint Online? A: Squirrel provides automated lifecycle management of documents, reducing the need for manual intervention. It helps enforce compliance with organizational policies by automatically archiving documents based on their age, sensitivity, or relevance, thereby ensuring both efficiency and adherence to regulatory standards.
Q: Can Squirrel help in reducing the overall cost of SharePoint Online storage? A: Yes, by archiving documents to cheaper Azure Blob Storage, Squirrel significantly reduces the storage footprint on SharePoint Online, which can lower the costs associated with purchasing additional SharePoint storage.
SharePoint allows the automation of retention policies, simplifying compliance and data management.
Retention Labels
Labels can be created and applied to manage the lifecycle of documents within SharePoint.
Security & Compliance Center
Central hub for managing retention policies and ensuring compliance across SharePoint sites.
Policy Application
Policies can be applied manually or automatically based on content types or sensitivity.
Monitoring Tools
SharePoint offers reporting and auditing tools to monitor compliance and effectiveness of retention policies.
SharePoint Storage Explorer
Enhances storage management capabilities with detailed views and reporting on SharePoint storage.
Accessibility
Suitable for businesses of all sizes, SharePoint’s retention tools are designed to be user-friendly.
Regular Updates
Regularly updating retention policies ensures ongoing compliance with legal and operational requirements.
Staff Training
Educating staff on the importance and application of retention policies is crucial for effective implementation.
Integration Capabilities
SharePoint integrates with Microsoft 365, allowing for uniform data governance across platforms.
SharePoint Document Retention Key Takeaways
SharePoint Document retention is a critical component of modern data governance, requiring meticulous strategy and precise execution. In today’s digital age, businesses are inundated with vast quantities of data, making effective document management not just advisable but essential. This is particularly true when considering the legal and compliance obligations that organizations must navigate. SharePoint, a widely adopted platform by Microsoft, offers robust tools tailored for this purpose, providing businesses with a sophisticated framework for managing their document lifecycle.
The concept of document retention involves maintaining records for a predetermined period for administrative, legal, and historical reasons. Effective document retention ensures that important records are preserved to meet legal standards and business needs, while redundant records are systematically disposed of, thereby optimizing storage management and reducing unnecessary overhead. Using SharePoint for document management enables organizations to automate these processes, ensuring compliance and enhancing efficiency. This introduction sets the stage for a deeper exploration into SharePoint’s document retention capabilities, showcasing how it can transform organizational data management practices.
Understanding SharePoint Document Retention
SharePoint document retention is defined by policies that control how long documents are kept before they are eligible for disposal. These policies are critical for organizations to ensure they comply with industry regulations, legal requirements, and internal data governance policies. Retention policies in SharePoint can be configured to apply to various content types, including emails, documents, and other records. This configuration is crucial because it allows for the automation of retention and disposal, thereby reducing the risk of human error and ensuring that the policies are applied uniformly across the board.
The need for such policies is driven by several factors: legal compliance requires certain documents to be kept for specific periods; operational needs dictate retaining records for smooth business processes; and data optimization strategies necessitate the deletion of obsolete, redundant, or trivial items that clutter systems and complicate management. SharePoint’s retention policies help organizations address these needs by providing tools to specify retention and deletion schedules based on content types, usage, and sensitivity. The ability to automate these functions means that organizations can maintain better control over their information architecture, making data easier to manage and access while ensuring compliance with external and internal policies.
Key Features of SharePoint Document Retention
SharePoint offers a range of features designed to facilitate effective document retention. One of the core functionalities is the creation and management of retention labels. These labels can be applied to content manually by users or automatically by administrators through classification rules. Once labeled, content is managed according to the rules defined in the retention policy tied to the label, which might specify retaining a document for a certain period, then reviewing it or disposing of it automatically.
Another significant feature is the retention policy itself, which is managed through SharePoint’s Security & Compliance Center. Here, administrators can define the conditions under which different types of content are retained or deleted. Policies can be finely tuned, for example, by specifying different retention durations for different types of documents or by varying the action taken when the retention period expires, such as deletion or transfer to a different storage location.
The integration of these retention policies into the wider Microsoft 365 compliance framework is another pivotal feature. This integration allows for a uniform governance approach across all platforms within the Microsoft 365 suite, not just SharePoint. By leveraging the comprehensive compliance solutions offered by Microsoft, organizations can ensure that their document retention practices are up to standard across all their communication and collaboration tools, providing a seamless data management experience that enhances productivity and maintains regulatory compliance.
Mastering SharePoint Online
Please fill out the form below to get our free Ebook "Mastering SharePoint Online" emailed to you
FREE DOWNLOAD
Send download link to:
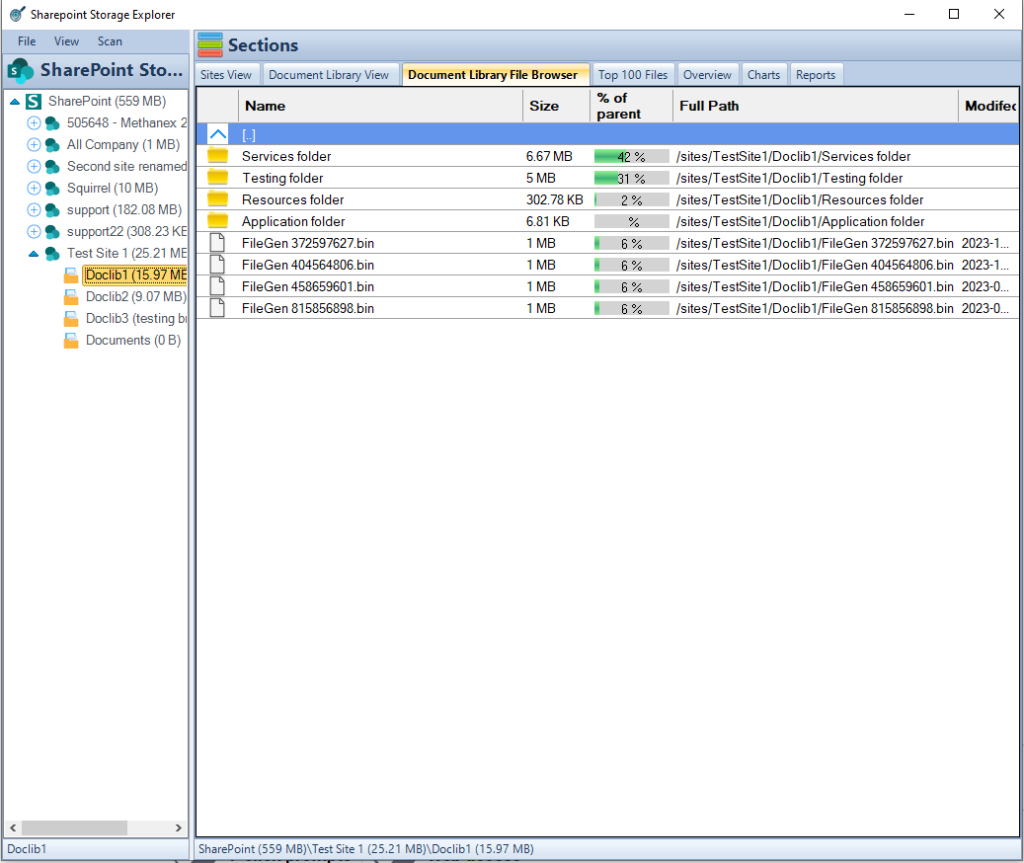
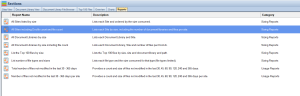
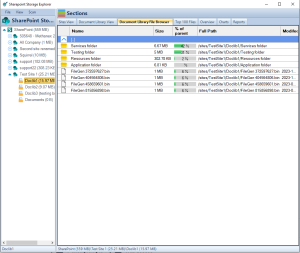
SharePoint Document Library File Explorer
Setting Up Document Retention in SharePoint
1. Accessing the Security & Compliance Center: The first step in setting up document retention in SharePoint is to access the Security & Compliance Center. This is the hub for all your compliance-related activities within Microsoft 365. Users need administrative permissions to access this center. Once there, you can navigate to the ‘Data governance’ section, where you will find the options for ‘Retention’ policies. This centralized access ensures that managing retention policies remains straightforward and integrates seamlessly with other compliance features offered by Microsoft 365.
2. Creating Retention Labels: Retention labels are powerful tools within SharePoint that help classify and manage content based on your organization’s retention policies. To create a retention label, go to the ‘Labels’ section under the ‘Information governance’ or ‘Records management’ tab, depending on your setup. Here, you can create a new label and define the retention settings. You can specify how long the content remains in SharePoint before an action is taken, such as deletion or review. Labels can also be configured to trigger disposition reviews, where designated reviewers are notified to examine content before it is disposed of.
3. Publishing Labels: Once labels are created, they need to be published so they can be applied to content across your organization. This is done through a label policy in the ‘Publish labels’ tab under the ‘Labels’ section. When publishing a label, you can choose specific locations where the label should be available, such as specific SharePoint sites or all sites, including OneDrive accounts. This step is crucial as it ensures that retention labels are available where they are needed and can be applied consistently across all designated content.
4. Applying Retention Policies: After publishing, retention labels are ready to be applied to documents and emails. This can be done manually by users or automatically through auto-apply policies based on content types or sensitive information types detected in the content. For example, a retention label might be automatically applied to all content containing financial information to comply with industry regulations. This automation is a significant advantage, reducing the burden on users and ensuring compliance through consistent application of policies.
5. Automating Retention with Policies: For greater efficiency, SharePoint allows the automation of retention through policy settings. You can set rules that automatically apply specific retention labels based on conditions such as the type of content, its location, or metadata. This feature is particularly useful for ensuring that all relevant documents are covered by appropriate retention policies without requiring manual intervention, thus minimizing the risk of non-compliance.
Best Practices for SharePoint Document Retention
When implementing document retention policies in SharePoint, following best practices can significantly enhance the effectiveness of your data governance strategy. It is advisable to start by clearly defining your organization’s retention requirements in consultation with legal, IT, and records management teams to ensure all regulatory and operational needs are met. Regular training and communication with staff about the importance of compliance and how to apply retention labels are also critical for successful adoption.
Additionally, it is beneficial to periodically review and update retention policies and labels to align with changing legal requirements and business needs. Leveraging analytics and reporting tools within SharePoint to monitor compliance and identify areas for improvement can help maintain an effective retention strategy.
SharePoint Storage Explorer
Gain insights in to your SharePoint Online Storage Consumption
Download our completely FREE TOOL
FREE DOWNLOAD
Send download link to:
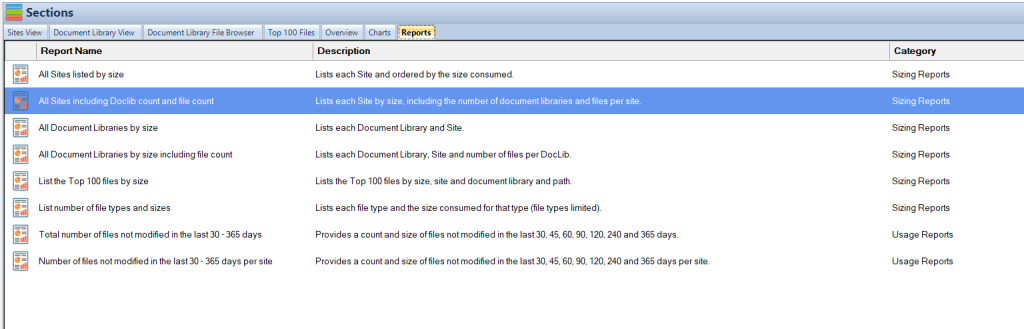
SharePoint Storage Explorer Reports
Step-by-Step Guide to Setting Up Document Retention in SharePoint
1. Accessing the Security & Compliance Center:
Log in to Microsoft 365: Start by logging into your Microsoft 365 admin account.
Open the Security & Compliance Center: Once logged in, navigate to the Security & Compliance Center. This can usually be done by finding the app launcher (often called the “waffle” icon) in the top left corner of the Office portal, then selecting the “Security” or “Compliance” option. Alternatively, you can directly access it via URL: https://protection.office.com.
Navigate to Retention Policies: In the Security & Compliance Center, find the ‘Information governance’ section or ‘Records management’, depending on your configuration. Click on ‘Retention’ to proceed to the policy management area.
2. Creating Retention Labels:
Initiate a New Label: Inside the retention policy section, choose ‘Labels’ and then click on ‘Create a label’. Give your label a name, description, and configure the retention settings.
Set Retention Period and Action: Define how long the content should be retained (e.g., 5 years, 10 years). You can also specify what happens after the retention period ends, such as automatically deleting the content or triggering a review.
Review and Save the Label: After configuring the label settings, review the details and save the label.
3. Publishing Labels:
Create a Label Policy: Go to the ‘Publish labels’ section under ‘Labels’. Click on ‘Publish labels’ and select the labels you want to publish.
Choose Locations: Decide where these labels should be available. You can select specific SharePoint sites, all SharePoint sites, or extend them to OneDrive accounts and Exchange email.
Review and Publish: Confirm the settings and publish the labels. It may take some time for the labels to become available across selected locations.
4. Applying Retention Policies:
Manual Application: Users can manually apply published labels to documents and emails as they create or modify content.
Auto-apply Using Content Types: Set up auto-apply rules if you want SharePoint to automatically apply labels based on certain conditions like content type or sensitive information present in the content. This is done by returning to the ‘Labels’ section, choosing ‘Auto-apply a label’, and setting the conditions for automatic application.
5. Automating Retention with Policies:
Set Up Retention Policies: Besides labels, you can create broader retention policies by navigating back to the ‘Retention’ section in the Security & Compliance Center. Here, you can specify more complex rules that apply to broader sets of content across SharePoint, OneDrive, and Exchange.
Configure Rules: Configure these policies by selecting locations, setting retention durations, and defining what actions should occur when the retention period expires. This might include deleting the content permanently or transferring it to a different storage location.
Monitoring and Compliance
Monitor Policy Application: Regularly check the application of your policies through the compliance center’s reporting features.
Audit and Compliance Logs: Utilize audit logs and compliance reports to ensure policies are adhered to and to identify any potential issues.
Mastering SharePoint Online
Please fill out the form below to get our free Ebook "Mastering SharePoint Online" emailed to you
FREE DOWNLOAD
Send download link to:
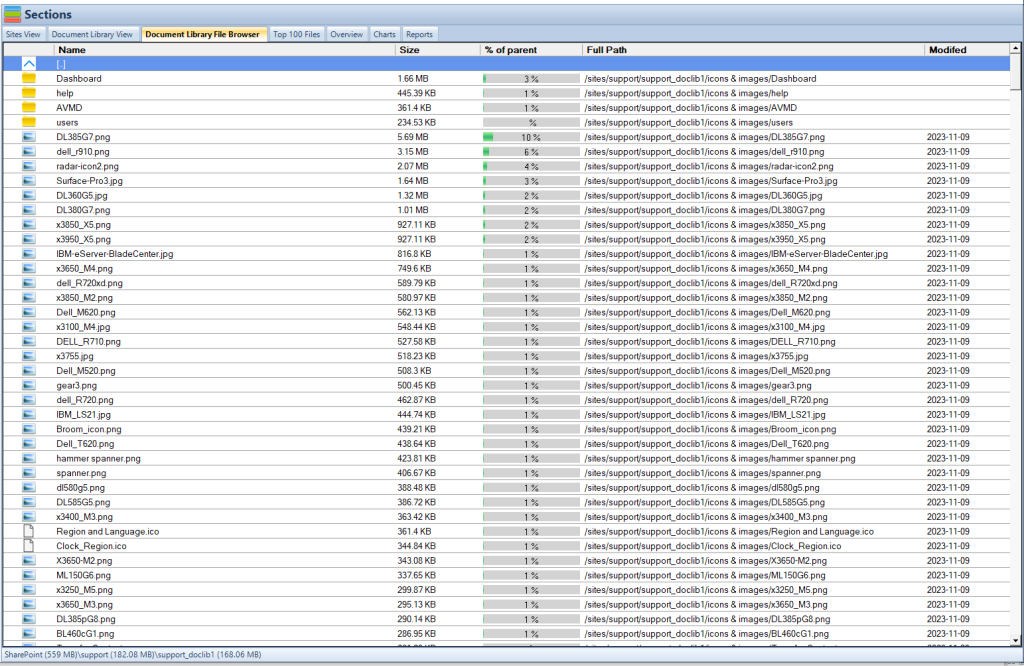
SharePoint Storage Explorer File Browser
Conclusion
Implementing effective document retention in SharePoint ensures that your organization can meet compliance requirements and manage data efficiently. With SharePoint, you can automate much of the retention process, allowing you to focus on strategic data management initiatives. Regularly revising your retention policies and ensuring your staff is knowledgeable about these practices are key steps towards maintaining a robust information governance framework.
SharePoint Storage Explorer
To further enhance your SharePoint document management capabilities, consider utilizing SharePoint Storage Explorer. This powerful tool offers comprehensive insights into your SharePoint storage, providing features like detailed site and document library views, an intuitive file browser, and extensive reporting. These features enable you to manage and optimize SharePoint storage effectively, making informed decisions about file storage and organization.
SharePoint Storage Explorer is free to use and designed to accommodate both small businesses and large enterprises, making it accessible for all SharePoint users. If you’re ready to elevate your SharePoint experience and streamline your storage management, download SharePoint Storage Explorer today. Visit SharePoint Storage Explorer to get started and discover how you can make the most of your SharePoint environment.
FAQs on SharePoint Document Retention
What is document retention in SharePoint? Document retention in SharePoint involves managing how long documents are stored before being deleted or archived according to legal and policy requirements.
How do I create a retention label in SharePoint? Retention labels are created in the Security & Compliance Center under the ‘Labels’ section where you can define retention settings and actions.
Can retention policies be applied automatically? Yes, SharePoint allows for automatic application of retention policies based on content type, metadata, or sensitive information.
What is the purpose of the SharePoint Storage Explorer? SharePoint Storage Explorer provides enhanced visibility and management of SharePoint storage, allowing users to optimize and organize their document storage efficiently.
How often should retention policies be reviewed? Retention policies should be reviewed annually or whenever there are significant changes to compliance requirements or business operations.
Can I apply different retention policies to different types of content? Yes, SharePoint supports applying different retention policies to various content types, including emails, documents, and more.
What happens when a retention policy expires? Actions specified in the policy, such as deletion or review, will be executed once the retention period expires.
Is SharePoint compliant with industry regulations? SharePoint’s retention tools are designed to help organizations comply with industry regulations, though policies should be specifically tailored to meet particular regulatory requirements.
How do I train my staff on using retention policies in SharePoint? Training can be conducted using SharePoint’s in-built guidance tools, external training resources, or through hands-on sessions led by IT.
What are the benefits of automating retention policies? Automating retention policies ensures consistent application, reduces manual errors, and saves time, enhancing overall compliance and data management efficiency.
How does Squirrel enhance SharePoint’s retention capabilities? Squirrel complements SharePoint’s retention policies by providing an automated solution to archive documents to Azure Blob Storage based on predefined lifecycle policies. This integration allows organizations to seamlessly manage the lifecycle of documents, ensuring that storage is optimized and documents are archived securely and in compliance with retention schedules.
What added value does Squirrel offer in managing compliance with retention policies? Squirrel ensures that archived documents are encrypted and stored securely, helping organizations meet stringent compliance and regulatory requirements. Additionally, Squirrel’s automation reduces the risk of human error in document management, enhancing compliance and governance within SharePoint environments.
Restore from recycle bin (if available), use version history (if enabled), consult site administrators for permanent deletions.
SharePoint Document Library Issues Key Takeaways
Document libraries are the backbone of document management within SharePoint Online. They provide a centralized location for storing, sharing, and collaborating on files. These libraries offer features like version control, access control, and easy searchability, making them a powerful tool for businesses of all sizes.
However, even with their many benefits, users might encounter occasional issues with document libraries. These problems can range from access restrictions to upload errors, hindering productivity and workflow.
This blog post aims to equip you with the knowledge to troubleshoot common document library challenges in SharePoint Online. By following the solutions provided, you can get your document library functioning smoothly and efficiently.
Common Issues and Solutions
Access and Permissions
One of the most frequent issues users encounter is difficulty accessing specific documents or entire document libraries. This can be caused by several factors, including:
Insufficient Permissions: Users might not have the necessary permissions to view or interact with the library or its contents.
Here’s what you can do:
Verify User Permissions: Check your permission level for the document library. This can be done through the library settings or by contacting the site administrator. Different permission levels grant varying degrees of access, so ensure yours aligns with the actions you need to perform.
Check for Hidden Libraries: In some cases, document libraries might be hidden from view. You can consult the site administrator or use advanced search functionalities to locate hidden libraries.
Troubleshoot Account Issues: Occasionally, issues might stem from problems with your SharePoint Online account. Try logging out and logging back in, or clearing your browser cache to resolve temporary glitches.
Sharing Problems: Another common hurdle involves difficulty sharing documents or folders with colleagues. This can happen due to:
Incorrect Permission Levels: When sharing documents or folders, ensure you assign the appropriate permission level to the recipient. Levels like “Read” only allow viewing, while “Edit” grants editing capabilities.
Inheriting Permissions: Document libraries often inherit permissions from their parent site. If you need to grant specific access to a document within a library, you might need to “break inheritance” and set unique permissions for that document.
Uploads and Downloads
Difficulties uploading or downloading documents can significantly impact workflow. Here are some common scenarios and solutions:
Upload Errors: If you encounter errors while uploading documents, consider the following:File Size Limits: SharePoint Online has limitations on file sizes that can be uploaded. Verify the file size of the document you’re trying to upload and ensure it falls within the allowed limit.
Supported File Formats: Not all file formats are compatible with SharePoint Online libraries. Check if the document format is supported by the platform. You might need to convert the file to a compatible format before uploading.
Connectivity Issues: Sometimes, upload errors might be caused by unstable internet connectivity. Try refreshing the page or restarting your browser to see if it resolves the issue.
Download Problems: Slow download speeds or encountering issues while downloading documents can be frustrating. Here’s what you can try:
Browser Compatibility: Ensure you’re using a compatible web browser for optimal performance. Outdated browsers might have issues downloading files from SharePoint Online libraries.
Clear Browser Cache: A cluttered browser cache can sometimes lead to download problems. Try clearing your browser cache and cookies to see if it improves download speeds.
Alternative Download Methods: Consider using alternative methods like the OneDrive desktop app for offline access and synchronization of document libraries. This can provide a more reliable download experience.
Synchronization Problems
Keeping your local files and the SharePoint Online document library in sync ensures everyone has access to the latest versions of documents. However, synchronization issues can arise. Here are some common problems and solutions related to syncing document libraries with the OneDrive desktop app:
Sync Errors: If you encounter errors while syncing your document library, try the following:
Restart OneDrive App: Sometimes, a simple restart of the OneDrive desktop app can resolve temporary glitches that might be causing sync issues.
Firewall Settings: Check your firewall settings to ensure they’re not blocking the OneDrive app from syncing with SharePoint Online. You might need to configure exceptions for the OneDrive process.
Conflicting Software: In rare cases, other software running on your computer might interfere with OneDrive’s syncing functionality. Try temporarily disabling any programs you suspect might be causing conflicts.
Documents Not Syncing Between Devices: Ensuring seamless document access across all your devices is crucial. Here’s how to troubleshoot syncing issues between devices:
Account Sign-In: Verify that you’re signed in to the same SharePoint Online account on all devices you want to keep synchronized.
Internet Connectivity: Ensure a stable internet connection on all devices to facilitate smooth syncing between the cloud and your local storage.
Rebuild Local SharePoint Folders: In some cases, rebuilding the local SharePoint folders on your device can resolve syncing problems. This essentially involves deleting the local folders associated with the library and allowing OneDrive to recreate them during the next sync cycle.
Missing or Deleted Documents
Losing track of documents or accidentally deleting them can be a cause for concern. Here’s how to address these situations:
Missing Documents: If you can’t locate a specific document within a document library, consider the following:
Advanced Search: Utilize the advanced search functionalities within SharePoint Online. You can filter by file type, date modified, or other criteria to narrow down your search and potentially find the missing document.
Recycle Bin: Check the recycle bin of the document library. Deleted documents might reside there for a certain period, allowing for recovery.
Site Administrators: If the document remains missing, consult with the site administrators. They might have additional access and tools to locate the document within the SharePoint site.
Deleted Documents: Accidental deletion of documents happens. Here’s how to recover them:
Recycle Bin (if available): The first stop should be the document library recycle bin. If the deletion hasn’t exceeded the retention period, you can easily restore the document from there.
Version History: SharePoint Online automatically maintains version history for documents. If the document was deleted recently, you might be able to restore an earlier version from the version history. This depends on whether versioning is enabled for the library.
Site Administrators: For permanently deleted documents or situations where version history isn’t available, contact the site administrators. They might have access to backup and restore functionalities to retrieve the lost document.
Preventing Document Library Issues
While troubleshooting helps resolve existing problems, taking preventative measures can significantly reduce the likelihood of document library issues arising in the first place. Here are some best practices to keep your document libraries running smoothly:
Clear Naming Conventions: Implement clear and consistent naming conventions for documents and folders within the library. This makes it easier for users to locate specific files and reduces confusion.
Organized Folder Structures: Create a well-organized folder structure within the document library. This helps categorize documents logically and improves searchability.
User Permission Management: Assign permissions judiciously. Avoid granting excessive access to users, and utilize security groups for efficient permission management.
Regular Backups: Consider implementing regular backups of your document library, especially for critical files. This ensures you have a copy in case of accidental deletion or unforeseen issues.
User Training: Provide basic training to users on document library best practices. This can cover topics like proper file naming, folder organization, and responsible sharing practices.
ConclusionDocument libraries are a valuable tool for collaboration and document management in SharePoint Online. By understanding how to troubleshoot common issues and implementing preventative measures, you can ensure your document libraries function optimally and contribute to a productive and efficient work environment.
Additional Resources
Top FAQs on Troubleshooting SharePoint Online Document Libraries
Q: I can’t access a document library, what should I do?
A: Verify your user permissions for the library. Check with the site administrator if you believe you should have access. Additionally, some libraries might be hidden, so consult the administrator or try advanced search functionalities.
Q: Why can’t I share documents or folders with others?
A: There could be two reasons. First, ensure you’re assigning the appropriate permission level to the recipient (e.g., “Read” for viewing, “Edit” for editing capabilities). Second, document libraries often inherit permissions from their parent site. If you need specific access control for a document, you might need to “break inheritance” and set unique permissions for that document.
Q: I’m encountering errors while uploading documents. Help!
A: There are a few possibilities. File size limitations exist on SharePoint Online, so ensure your document falls within the allowed limit. Additionally, not all file formats are supported. Check if your format is compatible and convert it if necessary. Finally, verify a stable internet connection as connectivity issues can cause upload errors.
Q: My downloads are slow or encountering problems. What can I do?
A: Consider using a compatible web browser, as outdated browsers can lead to download issues. Clearing your browser cache and cookies can also sometimes resolve download problems. As an alternative, explore using the OneDrive desktop app for offline access and synchronization of document libraries, which can provide a more reliable download experience.
Q: My OneDrive desktop app isn’t syncing my document libraries properly.
A: A few things can be tried. Restarting the OneDrive app can sometimes resolve temporary glitches. Additionally, check your firewall settings to ensure they’re not blocking OneDrive from syncing. In rare cases, conflicting software on your computer might interfere with syncing. Try temporarily disabling any programs you suspect might be causing issues.
Q: Documents aren’t syncing between all my devices.
A: Verify that you’re signed in to the same SharePoint Online account on all devices you want to keep synchronized. A stable internet connection on all devices is also crucial for seamless syncing between the cloud and your local storage. If these are confirmed, rebuilding the local SharePoint folders on your device can sometimes resolve syncing problems. This essentially involves deleting the local folders associated with the library and allowing OneDrive to recreate them during the next sync cycle.
Q: I can’t find a document in my library. What happened?
A: Utilize the advanced search functionalities within SharePoint Online. You can filter by file type, date modified, or other criteria to narrow down your search. Additionally, check the document library recycle bin. Deleted documents might reside there for a certain period, allowing for recovery. Finally, consult with the site administrators as they might have additional tools to locate the document within the SharePoint site.
Q: I accidentally deleted a document. Is it gone forever?
A: Not necessarily! The first stop should be the document library recycle bin. If the deletion hasn’t exceeded the retention period, you can easily restore the document from there. SharePoint Online also maintains version history for documents (if enabled). If the document was deleted recently, you might be able to restore an earlier version. Finally, if the document is permanently deleted or version history isn’t available, contact the site administrators. They might have access to backup and restore functionalities to retrieve the lost document.
Q: How can I prevent document library issues from occurring?
A: Several best practices can minimize these issues. Implement clear and consistent naming conventions for documents and folders within the library. This makes it easier for users to locate specific files. Create a well-organized folder structure to categorize documents logically. Assign permissions judiciously and avoid granting excessive access. Consider regular backups of critical documents in case of accidental deletion. Finally, providing basic training to users on document library best practices can significantly reduce problems.
Q: Where can I find more resources on SharePoint Online?
A: Microsoft offers a wealth of resources. The Microsoft Support website (https://support.microsoft.com/en-us) has troubleshooting guides and documentation specifically for SharePoint Online. The Microsoft SharePoint Blog (https://techcommunity.microsoft.com/t5/microsoft-sharepoint-blog/bg-p/SPBlog) provides updates and insights on using SharePoint effectively. Finally, the SharePoint Community Forum (https://techcommunity.microsoft.com/) is a platform where you can connect with other users and experts for additional guidance and support.
Q: How does Squirrel enhance the management of archived documents in SharePoint Online?A: Squirrel offers an automated solution to enhance document management in SharePoint Online by archiving older, less frequently accessed documents to Azure Blob Storage. This process helps maintain a cleaner, more efficient SharePoint environment by reducing clutter and optimizing storage usage. Additionally, Squirrel’s encryption features ensure that archived documents remain secure yet accessible when needed. This seamless integration allows for more effective management of storage costs and compliance with retention policies, making it an essential tool for organizations looking to streamline their SharePoint document lifecycle management.
SharePoint sets are a powerful tool for enhancing productivity and collaboration within organisations.
Using Document Sets in SharePoint
Key Takeaways
Details
Enhanced Document Management
Document Sets group related documents, allowing for shared metadata, workflows, and settings, which simplifies management and enhances consistency.
Efficient Collaboration and Sharing
SharePoint’s sharing capabilities are fully supported, making it easy to collaborate on documents within a Document Set, ensuring all team members have the latest versions.
Advanced Organizational Features
Document Sets support content organizer rules, workflows, and custom welcome pages, aiding in the automation and personalization of document management.
Security and Compliance
Permissions for Document Sets can be finely controlled, ensuring that only authorized users have access, which is crucial for maintaining document security and compliance.
Troubleshooting and Support
SharePoint provides extensive resources and community support to help users troubleshoot issues and learn more about Document Sets functionalities.
SharePoint Document Sets Key Takeaways
Introduction to Document Sets in SharePoint
In the digital age, efficient document management is more than a convenience—it’s a necessity. SharePoint, a product of Microsoft, stands out as a premier tool for organizing, storing, and retrieving documents. But the real game-changer within SharePoint is the feature known as “SharePoint Document Sets.”
Document Sets in SharePoint serve as a method to group related documents together, allowing them to be managed as a single unit. This feature is particularly useful for projects or tasks that involve multiple documents, such as reports, plans, contracts, and more. It helps in keeping these documents organized under a single umbrella, making them easier to manage and access.
Understanding Document Sets
At its core, a Document Set is a specialized content type within SharePoint that enables users to work with a group of related documents as though they were one entity. This functionality is particularly beneficial for project management, where various types of documents need to be accessed and updated regularly.
Unlike traditional folders, Document Sets allow users to apply shared metadata, workflows, and even home page views across all contained documents. This means that any changes made to the Document Set’s properties can automatically apply to all its contents, ensuring consistency and saving time.
SharePoint Storage Explorer
Gain insights in to your SharePoint Online Storage Consumption
Download our completely FREE TOOL
FREE DOWNLOAD
Send download link to:
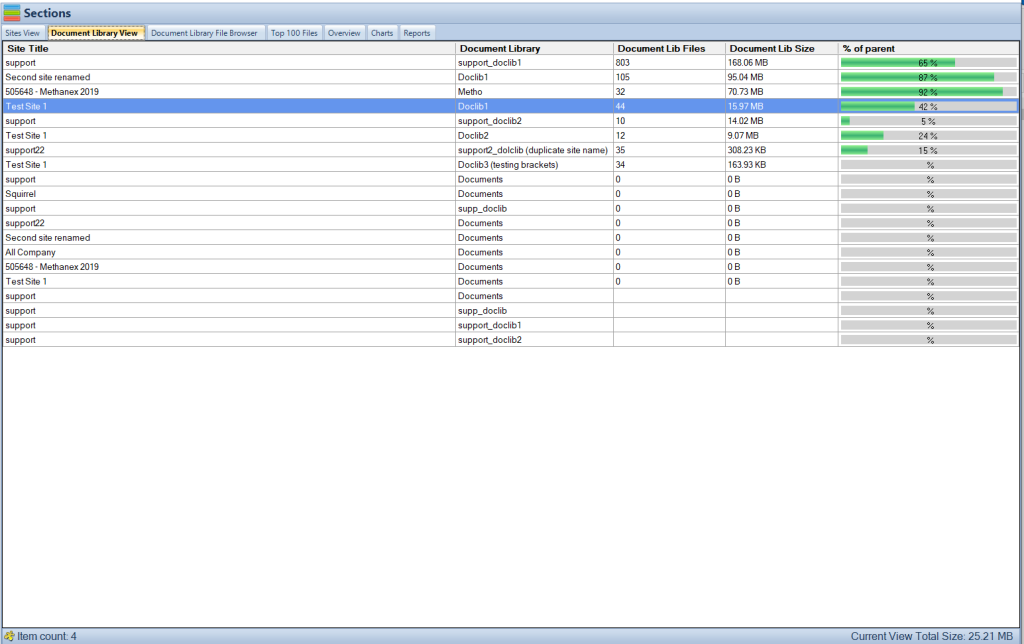
SharePoint Storage Explorer Doc Library View
Document Sets vs. Folders: What’s the Difference?
While both folders and Document Sets serve the purpose of organizing files, they differ significantly in functionality. Folders in SharePoint are simple storage containers that hold files and other folders. They don’t offer shared metadata or workflows; each file within a folder is treated individually.
In contrast, Document Sets are more sophisticated. They not only group files together but also allow these files to share common properties and settings. For example, if you apply a workflow to a Document Set, it can automatically apply to all documents within that set. This shared property feature makes Document Sets incredibly powerful for managing project documentation and ensuring uniformity across related documents.
Setting Up Document Sets
To start using Document Sets, you first need to enable them in your SharePoint environment. This involves adding the Document Set content type to your site collection and then to the specific document library where it will be used. Once enabled, creating a new Document Set is as simple as adding a new item to the library, but with the added benefit of grouping related documents together.
The setup process includes naming the Document Set and configuring its settings to match the needs of your project or organization. These settings can include the types of documents allowed in the set, the metadata to be shared among the documents, and the appearance of the Document Set’s welcome page.
Configuring Document Set Settings
After creating a Document Set, you can fine-tune its settings to better suit your project’s requirements. This includes configuring which document templates to include in the set, customizing the welcome page that users see when they open the set, and defining the shared metadata fields.
The ability to customize these settings makes Document Sets a flexible tool that can be adapted to various types of projects and workflows. For instance, you can set up a Document Set specifically for financial reports that includes templates for balance sheets, income statements, and cash flow statements, all sharing relevant financial metadata.
Best Practices for Organizing Document Sets
Effective organization is key to getting the most out of Document Sets. It’s important to develop a logical structure and naming convention for your Document Sets and the documents within them. This structure should be intuitive and aligned with how your team works and accesses information.
Shared metadata plays a crucial role in this organization. By defining common metadata fields for documents within a set, you can streamline the search and retrieval process, making it easier for team members to find the documents they need. Consistency in naming and metadata ensures that documents are not only well-organized but also easily searchable and manageable.
Mastering SharePoint Online
Please fill out the form below to get our free Ebook "Mastering SharePoint Online" emailed to you
FREE DOWNLOAD
Send download link to:
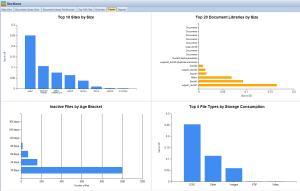
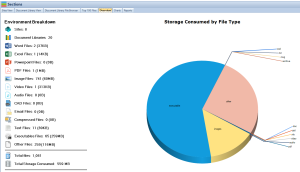
SharePoint Storage Explorer Charts
Step-by-Step Guide to Using Document Sets in SharePoint
Step 1: Enable Document Sets Feature
Access SharePoint Admin Center: Log in to the SharePoint Admin Center with an administrator account.
Activate the Site Collection Feature: Navigate to the ‘Site Collection Features’ section under ‘Site Settings’ and activate the ‘Document Sets’ feature.
Step 2: Add Document Set Content Type
Go to Library Settings: In your SharePoint site, navigate to the document library where you want to use Document Sets.
Open Library Settings: Click on ‘Library Settings’ in the ribbon.
Add Content Type: Under ‘Advanced Settings’, ensure that content types are allowed. Then, add the ‘Document Set’ content type from the existing site content types.
Step 3: Create a Document Set
Navigate to Your Library: Go to the document library where you’ve added the Document Set content type.
Create New Document Set: Select ‘New’ and then ‘Document Set’ from the dropdown menu.
Name Your Document Set: Give your Document Set a meaningful name and fill in any other required metadata fields.
Step 4: Configure Document Set Settings
Access Document Set Settings: From the library settings, click on the Document Set content type to configure its settings.
Customize the Welcome Page: Define the welcome page layout and information displayed when users open the Document Set.
Specify Allowed Content Types: Choose which content types can be added to the Document Set.
Set Shared Metadata: Define the metadata fields that will be shared across all documents within the Document Set.
Step 5: Add Documents to Your Document Set
Open the Document Set: Navigate to the newly created Document Set in your library.
Add Documents: Click on ‘New Document’ or upload existing documents into the Document Set.
Step 6: Manage Documents within the Set
Edit Documents: Open individual documents within the Document Set for editing.
Update Metadata: Modify the shared metadata as needed to reflect changes in the project or document status.
Version Control: Utilize SharePoint’s version control features to manage different versions of the documents within the set.
Step 7: Configure Security and Permissions
Set Permissions: Determine who can view or edit the Document Set and its contents.
Manage Access: Apply unique permissions if necessary to restrict or grant access to specific users or groups.
Step 8: Use and Collaborate
Share the Document Set: Use SharePoint’s sharing features to collaborate with team members.
Track Changes and Updates: Monitor changes to documents within the set using SharePoint’s version history and notification features.
Step 9: Monitor and Maintain
Regular Review: Periodically check the Document Set for relevancy and accuracy of content.
Update as Necessary: Adjust the Document Set’s structure, content, and metadata based on evolving project or organizational needs.
By following these steps, you can effectively set up and manage Document Sets in SharePoint, making it easier to handle related documents as a cohesive unit. This guide should help users to understand the process from creation to ongoing management, ensuring efficient and organized document handling within their SharePoint environment.
Managing Documents within a Set
Adding and Organizing Documents
Once your Document Set is created, adding documents is straightforward. Click on the Document Set to open it, and use the ‘Upload’ button to add files.
Organizing documents within the set can be done by setting up custom views or sorting options based on metadata, making it easier for users to find specific documents.
Editing and Versioning Documents
Documents within a Document Set can be edited like any other document in SharePoint. When a document is edited and saved, SharePoint automatically updates the version, keeping a history of changes.
Versioning is particularly useful in Document Sets as it allows team members to track the evolution of a document over time, revert to previous versions if necessary, and understand the document’s progression.
Using Metadata Effectively
Metadata is critical in Document Sets for categorizing and retrieving documents efficiently. Consistent use of metadata across documents in the set enables powerful search capabilities.
SharePoint allows for the bulk editing of metadata within a Document Set, facilitating uniform updates and ensuring that documents remain synchronized in terms of categorization and status.
Mastering SharePoint Online
Please fill out the form below to get our free Ebook "Mastering SharePoint Online" emailed to you
FREE DOWNLOAD
Send download link to:
SharePoint Storage Explorer Doc Library Total View
Security and Permissions
Setting Up Permissions for Document Sets
Document Sets can have unique permissions independent of the document library they reside in. You can restrict or grant access to a Document Set to specific users or groups.
To manage permissions, navigate to the Document Set’s settings, and choose the ‘Permissions’ option. From there, you can inherit permissions from the parent library or define custom permissions for the Document Set.
Ensuring Document Security and Compliance
SharePoint’s security features extend to Document Sets, allowing administrators to ensure that sensitive documents are protected and only accessible to authorized personnel.
Compliance is also a key consideration, and Document Sets can be configured to adhere to organizational or legal requirements, including retention policies, auditing, and record management.
By managing documents effectively within Document Sets and ensuring proper security and permissions, organizations can enhance their SharePoint environment’s efficiency and reliability. These practices not only improve document management but also support compliance and governance initiatives.
Collaboration and Sharing
Sharing Document Sets with Team Members
SharePoint’s collaboration features are fully supported within Document Sets. Users can share an entire set with team members, granting access to all documents within the set.
Sharing can be as simple as sending a link to the Document Set or setting up group permissions to ensure that all relevant team members have the necessary access.
Integrating Document Sets with SharePoint Features
Document Sets can be integrated with other SharePoint features like workflows, alerts, and notifications. This integration enhances collaboration by automating tasks, such as approval processes and review cycles, and by keeping team members informed of changes.
Advanced Features of Document Sets
Using Content Organizer Rules and Workflows
SharePoint allows the creation of content organizer rules, which can automatically route documents to the appropriate Document Set based on their metadata. This feature streamlines the process of managing incoming documents and ensures they are stored correctly.
Workflows can be associated with Document Sets to automate business processes, such as document approval, review, and archiving. These workflows can be triggered by actions like adding a new document to the set or updating an existing one.
Customizing Document Sets for Projects
Document Sets can be customized to fit the specific needs of a project or team. This includes creating custom metadata properties, designing unique welcome pages for the Document Set, and setting up templates for common document types within the set.
These customizations ensure that Document Sets provide a consistent and efficient environment for managing project documents, aligning with the project’s requirements and workflows.
Troubleshooting and Support
Common Issues and How to Solve Them
Users may encounter issues like difficulty in finding documents, problems with metadata or permissions, or challenges in integrating with other SharePoint features. These problems can often be resolved through proper setup and configuration, regular training for users, and leveraging SharePoint’s support resources.
Resources for Help and Learning
Microsoft offers extensive documentation, tutorials, and community forums for SharePoint users. These resources can be invaluable for troubleshooting issues, learning more about advanced features, and connecting with other SharePoint professionals.
In conclusion, SharePoint’s Document Sets are a robust tool for managing related documents efficiently and effectively. By understanding how to create, configure, and manage Document Sets, users can improve collaboration, ensure security and compliance, and leverage advanced features to meet their project or organizational needs. With the right approach, Document Sets can transform the way teams manage and interact with their documents in SharePoint.
SharePoint Storage Explorer
Gain insights in to your SharePoint Online Storage Consumption
Download our completely FREE TOOL
FREE DOWNLOAD
Send download link to:
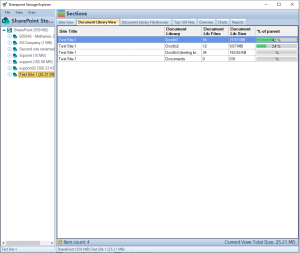
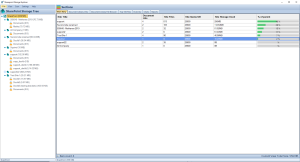
SharePoint Storage Explorer Doc Library Total View
FAQs
What makes Document Sets different from regular folders in SharePoint? Document Sets allow for shared metadata, workflows, and custom settings across all documents within the set, unlike regular folders which manage files individually.
Can I convert an existing folder into a Document Set? Direct conversion isn’t typically possible, but you can move documents from a folder to a new Document Set and then apply shared metadata and settings.
How do I ensure only authorized users can access a Document Set? Manage permissions for the Document Set by setting access rights specifically for it, separate from the document library permissions.
Can Document Sets be used across different SharePoint sites? Document Sets are generally used within the site they were created in, but documents can be shared or linked to other sites if needed.
Are there any limitations to the size or number of documents in a Document Set? While SharePoint has overall storage limits, Document Sets typically handle hundreds of documents well. Performance issues may arise with extremely large numbers of documents, so it’s important to plan and manage Document Sets according to SharePoint’s best practices.
How can Squirrel help manage archives of Document Sets efficiently? Squirrel enhances the management of Document Sets by automating the archiving process to Azure Blob Storage based on specific criteria such as age and access frequency. This helps maintain the efficiency of the Document Sets by offloading older documents while ensuring they remain accessible and secure, reducing both the operational overhead and storage costs.
Does Squirrel support applying retention policies specifically to Document Sets in SharePoint? Yes, Squirrel can be configured to apply retention policies specifically to Document Sets, ensuring that all documents within a set are archived and managed consistently according to organizational policies. This streamlines compliance and data management processes across SharePoint environments.
Explore integration with external data, workflows, and metadata navigation for enhanced document management capabilities.
Troubleshooting
Regularly audit views for issues like incorrect display, performance problems, or broken views after migrations.
Real-world Applications
Case studies provide context on how different industries can utilize SharePoint Views for efficiency and organization.
SharePoint Views Takeaways
In the digital age, effective document management is the cornerstone of operational efficiency, especially within platforms like SharePoint. SharePoint serves as a central repository for a myriad of documents—each vital for the day-to-day function of a business. However, without proper management, this repository can quickly turn into an unnavigable maze. Enter SharePoint Views—a powerful feature designed to cut through the clutter and showcase the documents you need, precisely the way you want them. This blog post will delve into the nuances of SharePoint Views, guiding you through their customization and filtering capabilities so that you can tailor your document management experience to fit your organizational needs seamlessly.
SharePoint Storage Explorer
Gain insights in to your SharePoint Online Storage Consumption
Download our completely FREE TOOL
FREE DOWNLOAD
Send download link to:
SharePoint Storage Explorer Reports
Understanding SharePoint Views
A SharePoint View is much like a camera lens on your content; it allows you to focus on specific documents or list items based on criteria important to you or your team. At its core, a View organizes, sorts, and displays content columns from your document libraries or lists in a way that makes sense for your particular task or project. SharePoint comes equipped with several default views, such as ‘All Documents’ or ‘My Documents’, but the real power lies in creating views that reflect the unique needs of your team.
There are several types of views you might encounter or create within SharePoint:
Standard Views: These are your typical, most commonly used views that display items in a list or library.
Datasheet Views: Ideal for bulk editing or managing data in a spreadsheet format.
Calendar Views: Perfect for items with date information, transforming your list into a calendar display.
Gantt Views: A boon for project managers, this view illustrates items in a timeline akin to a Gantt chart.
By understanding and utilizing these various views, you can drastically improve the manageability of documents within SharePoint, turning a sprawling document library into a well-organized system that enhances productivity and reduces frustration.
Creating Custom Views
To create a custom view, you’ll need to navigate to the list or library where your documents are stored. SharePoint offers a ‘Create View’ option, often found on the ribbon or under the settings gear icon, depending on the version you’re using. Here, you’re provided with a template starting point for your new view. You can choose to start from an existing view or build one from scratch. When crafting a custom view, you’ll decide on several key factors:
Name: Choose a descriptive name for your view, which will make it easily identifiable for yourself and others.
Audience: Decide whether this view will be a personal view (visible only to you) or a public view (available to all with the necessary permissions).
Columns: Select which columns from your list or library you wish to include in your view.
Sort Order: Determine how items should be sorted by default—perhaps by date, name, or a custom metadata field.
Filters: Apply criteria to only display items that meet specific conditions, which is particularly useful for large libraries.
Group By: Group items by a particular column to see them categorized within your view, such as by author or project.
Creating a custom view can be as simple or as intricate as your business needs dictate. A thoughtful approach to setting up views can save significant time in the long run, empowering users to find exactly what they need without wading through irrelevant data.
Mastering SharePoint Online
Please fill out the form below to get our free Ebook "Mastering SharePoint Online" emailed to you
FREE DOWNLOAD
Send download link to:
SharePoint Storage Explorer Doc Library Total View
Customization Options
Once you’ve established the framework for your custom view, SharePoint offers a robust set of customization options that give you control over how your documents are presented. Adding, removing, or rearranging columns is just the start. You can choose from a variety of column types—single lines of text, choice fields, dates, and more—to ensure your view captures the necessary data points.
Grouping items can drastically enhance the navigability of your view, especially when dealing with extensive lists. By grouping, you can collapse or expand sets of documents based on shared attributes, which makes finding the right set of documents much easier. For example, grouping by ‘Project Name’ could help team members quickly access all documents related to a particular project.
Sorting and filtering are about efficiency. You might sort documents by ‘Modified Date’ to see the most recent changes, or filter to view only items that are marked with a specific status. Filtering becomes particularly powerful when dealing with lists that contain a mix of content relevant to different teams or projects.
Conditional formatting takes your view a step further, enabling you to highlight documents that meet certain conditions, like overdue tasks or documents pending approval. This visual cue can quickly draw attention to priority items, ensuring they’re not overlooked.
Filtering Documents in Views
The true might of SharePoint’s document management prowess is revealed when we dive into filtering. Filters allow users to pare down their views to only the items that meet specific criteria. This is incredibly valuable when you’re dealing with large libraries where documents can easily get lost in the volume.
Here’s how to harness filtering within your views:
Single Filters: Start by applying a single filter to a view to narrow down your list. For instance, you could filter by a column like ‘Department’ to view documents related only to a particular team.
Multiple Filters: For more precision, combine filters. SharePoint allows you to stack filters by using ‘And’ or ‘Or’ logical operators. This means you could filter documents that are ‘Approved’ AND created by ‘User X’, or you could set up a view that shows items that are either ‘In Progress’ OR ‘Under Review’.
Filter by Metadata: Utilizing metadata for filtering can vastly improve the discoverability of documents. For instance, if your documents are tagged with metadata such as ‘Project Phase’, you can filter to see only documents in ‘Phase 1’.
Understanding and effectively applying filters can transform a sprawling mass of files into a well-oiled machine where every document is exactly where it should be, accessible with just a few clicks. Remember, the key to successful filtering is having consistent metadata and a clear structure for your documents.
SharePoint Storage Explorer
Gain insights in to your SharePoint Online Storage Consumption
Download our completely FREE TOOL
FREE DOWNLOAD
Send download link to:
SharePoint Storage Explorer Doc Library Single Site View
Best Practices for Managing Views
Creating views is one thing, but managing them effectively is another. Here are some best practices to keep your SharePoint views useful and relevant:
Naming Conventions: Establish clear naming conventions for views to make their purpose obvious at a glance. For instance, ‘Marketing – Approved Campaigns’ is more descriptive than simply ‘Marketing View’.
View Permissions: Be mindful of permissions when creating public views. Not every user needs access to every view, and limiting visibility can prevent confusion.
Avoid Clutter: While SharePoint allows the creation of multiple views, it’s best to limit the number of views to those that are truly necessary. Too many views can be just as confusing as a cluttered document library.
Maintenance: Regularly review your views to ensure they remain relevant. Update them to reflect changes in team structure, projects, or document types. Retire views that are no longer needed to keep your SharePoint environment tidy and efficient.
Following these practices will help maintain the integrity of your SharePoint document management system, making it an enduring tool that evolves with your organization’s needs.
Advanced View Features
For those looking to take SharePoint views to the next level, there are several advanced features that can further enhance document management:
External Data Sources: With Business Connectivity Services (BCS), you can connect a SharePoint view to external data sources, bringing in valuable data from outside your SharePoint environment.
Integration with Workflows: Views can be integrated with SharePoint workflows to automate processes. For example, you could create a view for documents that need review and tie a workflow to that view to notify reviewers automatically.
Metadata Navigation: If you have a complex system of metadata, you can set up metadata navigation for your views. This allows users to filter and sort documents based on hierarchical metadata, such as categories and subcategories, making it easier to drill down to the exact document they need.
These advanced options require a deeper understanding of SharePoint’s capabilities but can significantly improve the document management experience for all users.
Mastering SharePoint Online
Please fill out the form below to get our free Ebook "Mastering SharePoint Online" emailed to you
FREE DOWNLOAD
Send download link to:
SharePoint Storage Explorer Charts
Troubleshooting Common Issues with SharePoint Views
Even the most well-planned SharePoint views can encounter issues. Here are some common problems and how to address them:
Views Not Displaying Correctly: If a view isn’t displaying as intended, check for filters or columns that have been misconfigured. Ensure that any columns used in the view are still part of the list or library and haven’t been deleted or renamed.
Performance Issues: Views that aggregate thousands of items can slow down. To mitigate this, use indexed columns for filtering and try to avoid using ‘All Items’ without folders in large lists. Implementing paged views where only a certain number of items are displayed at a time can also help.
Broken Views after Migration: Migrations can sometimes break views, especially if they involve custom fields or templates. Review each view post-migration to ensure it’s functioning and update as necessary.
Regular audits of your SharePoint views can prevent many of these issues from becoming major headaches. Set up a schedule to routinely check the health and relevance of each view.
Case Studies and Examples
To solidify the concepts we’ve discussed, let’s consider a few case studies:
A Law Firm’s Client Files: A law firm could use SharePoint views to manage client documents. They create a view filtered by ‘Client ID’ and ‘Case Status’, with documents grouped by ‘Case Type’. This allows lawyers to quickly access relevant documents for each case they’re working on.
A Marketing Team’s Campaign Assets: A marketing department may set up views for different stages of campaign development. One view could display all ‘In Progress’ assets, while another could show ‘Ready for Review’ items. They also use conditional formatting to highlight overdue items, keeping campaigns on track.
A Non-Profit’s Grant Applications: A non-profit organization might create views for grant management, filtering by ‘Funding Cycle’ and ‘Application Status’. This helps them track applications throughout the grant process and prioritize their efforts.
These examples demonstrate how views can be adapted to various scenarios, improving document accessibility and efficiency across different industries and departments.
Conclusion
SharePoint views are more than just a way to sort your documents—they are an essential tool for managing the ebb and flow of information in your organization. By customizing views to your specific needs, employing advanced filtering, and adhering to best practices, you can transform a simple document library into a powerful resource that drives productivity and collaboration.
Mastering SharePoint Online
Please fill out the form below to get our free Ebook "Mastering SharePoint Online" emailed to you
SharePoint offers default permission levels: Full Control, Edit, Contribute, Read, and View Only, each designed for different roles and access needs within an organization.
Custom Permission Levels
Administrators can create custom permission levels by combining SharePoint’s granular permissions to meet specific organizational requirements.
Group-based Permissions Management
Assigning permissions to groups rather than individuals simplifies management and ensures consistent access control based on roles.
Principle of Least Privilege
Applying the least privilege principle by giving users the minimum access necessary reduces security risks and protects sensitive information.
Integration with Active Directory
SharePoint integrates with Active Directory for streamlined user and group management, enhancing permissions management across the organization’s IT ecosystem.
Advanced Security Measures
Beyond basic permissions, implementing encryption and two-factor authentication (2FA) adds layers of security, protecting data from unauthorized access even if credentials are compromised.
Monitoring and Auditing
Regular monitoring and auditing of permissions and access patterns are essential for identifying potential security gaps and ensuring compliance with data protection regulations.
SharePoint RBAC Key Takeaways
In the digital age, where data flows as freely as water, securing our digital documents and libraries has become a paramount concern. As we navigate through an ever-expanding digital universe, the line between accessibility and security is often blurred. Striking the perfect balance requires not just technical know-how but a strategic mindset. Setting appropriate permissions is not just a safeguarding tactic; it’s a critical component of modern data management. This guide delves into the essence of data security through the lens of permissions management, offering insights, strategies, and actionable advice to secure your digital assets effectively.
The Importance of Data Security
In today’s interconnected world, the sanctity of our digital information is under constant threat. Data security is not just about protecting information from unauthorized access; it’s about ensuring that the right people have the right access at the right time. The stakes are incredibly high. A single breach can lead to catastrophic losses, both financial and reputational. Understanding the risks associated with inadequate data protection is the first step towards crafting a robust security strategy. This section will explore the critical role of permissions in mitigating these risks and safeguarding digital assets against both external and internal threats.
Data breaches are not just a threat to large corporations; they pose a significant risk to organizations of all sizes. The fallout from these incidents can be devastating, affecting every aspect of an organization. Financial repercussions, legal challenges, and the erosion of customer trust are just the tip of the iceberg. The importance of data security in today’s digital landscape cannot be overstated. It is the foundation upon which the trust between organizations and their stakeholders is built. As we delve deeper into the nuances of data security, we’ll uncover the pivotal role permissions play in creating a secure digital environment.
SharePoint Storage Explorer
Gain insights in to your SharePoint Online Storage Consumption
Download our completely FREE TOOL
FREE DOWNLOAD
Send download link to:
SharePoint Storage Explorer Doc Library Total View
Understanding the Risks
The digital realm is fraught with risks. From sophisticated cyber-attacks to simple human error, the avenues through which data can be compromised are vast and varied. Unsecured documents and libraries are akin to open doors for cybercriminals, inviting unauthorized access and potential data breaches. These vulnerabilities can lead to a range of adverse outcomes, including data theft, espionage, and the introduction of malware or ransomware into an organization’s systems.
Understanding these risks is crucial for developing an effective data security strategy. This section will dissect the various threats to digital documents and libraries, highlighting the importance of a proactive and comprehensive approach to data protection. Through real-world examples and expert insights, we’ll explore how permissions play a critical role in mitigating these risks, providing a layer of security that is both flexible and robust.
The Impact of Data Breaches
The consequences of a data breach can be far-reaching and long-lasting. Beyond the immediate financial losses, which can be significant, the intangible costs of a breach often have a more profound impact. The damage to an organization’s reputation, the loss of customer trust, and the potential legal ramifications can have lasting effects on its future prospects.
SharePoint RBAC Model
The SharePoint Role-Based Access Control (RBAC) model is an approach to managing users’ permissions that focuses on roles within an organization rather than on individual users. This model simplifies the management of permissions by assigning access rights based on the roles users have within the organization, rather than assigning permissions to each user individually. SharePoint’s implementation of RBAC is designed to make the process of granting, adjusting, and revoking access to resources both efficient and secure. Let’s delve into the key components and how SharePoint applies the RBAC model
Mastering SharePoint Online
Please fill out the form below to get our free Ebook "Mastering SharePoint Online" emailed to you
FREE DOWNLOAD
Send download link to:
SharePoint Document Library File Explorer
Key Components of SharePoint RBAC
Roles: In SharePoint, roles represent sets of permissions that are designed to correspond to the tasks users need to perform within the site or organization. These roles could be predefined by SharePoint, such as “Reader,” “Contributor,” and “Full Control,” or they can be custom-defined by administrators to cater to specific organizational needs.
Permission Levels: Each role in SharePoint is associated with a specific permission level, which is a collection of permissions that define the access level for that role. Permission levels are granular and can be customized to include any combination of SharePoint’s extensive list of permissions, from viewing items and editing items to managing lists and overriding checkouts.
Groups: SharePoint groups are collections of users that are treated as a single entity. Administrators assign roles to groups instead of individual users. By managing access at the group level, SharePoint simplifies the process of permissions management. When a user’s role within an organization changes, administrators can simply move the user to a different group, automatically updating their access rights according to their new role.
How SharePoint Applies the RBAC Model
Simplifying Permissions Management: By assigning users to groups based on their roles and then assigning roles to resources, SharePoint allows for a streamlined approach to managing access. This model significantly reduces the complexity and time involved in permissions management, especially in large organizations or sites with a high number of users.
Enhancing Security: RBAC helps in minimizing the risk of unauthorized access by ensuring that users only have the permissions necessary to perform their roles. This principle of least privilege is a fundamental security best practice, and SharePoint’s RBAC model facilitates its implementation.
Improving Compliance: SharePoint’s RBAC model supports compliance with internal policies and external regulations by providing a clear framework for access control. The model makes it easier to audit who has access to what information, which is crucial for meeting compliance requirements.
Flexibility and Scalability: SharePoint’s RBAC model is both flexible and scalable, accommodating the changing needs of organizations. New roles can be created, and permission levels adjusted as the organization evolves. This adaptability is essential for growing businesses and evolving security landscapes.
User and Group Management: SharePoint integrates with Active Directory (AD) for user and group management, allowing for seamless synchronization of user roles between SharePoint and other systems. This integration further simplifies the management of user access across an organization’s entire IT ecosystem.
Practical Application
In practice, an administrator might set up a SharePoint site for project collaboration. Instead of individually assigning permissions to each user, the administrator creates groups such as “Project Managers,” “Team Members,” and “Viewers,” each with different roles and permission levels. Users are then added to these groups based on their role in the project, automatically granting them the appropriate level of access.
The SharePoint RBAC model offers a powerful and efficient way to manage permissions, ensuring that access control is both secure and aligned with organizational roles. By leveraging roles, permission levels, and groups, SharePoint administrators can effectively control access to resources, streamline the permissions management process, and uphold security and compliance standards.
SharePoint Storage Explorer
Gain insights in to your SharePoint Online Storage Consumption
Download our completely FREE TOOL
FREE DOWNLOAD
Send download link to:
SharePoint Storage Explorer Overview
Advanced Security Measures
Beyond the basic assignment of permissions, safeguarding sensitive information requires the implementation of advanced security measures. These measures serve as additional layers of defense, enhancing the protection of documents and libraries against sophisticated threats.
Encryption
Encryption transforms readable data into a coded format that can only be accessed with the correct decryption key, providing a strong layer of protection for sensitive information. In the context of document and library permissions, encryption ensures that even if unauthorized access is somehow gained, the data remains unintelligible and secure.
Implementation: Effective encryption strategies involve selecting the right encryption standards (such as AES-256 for documents) and ensuring encryption is applied both in transit and at rest. This section will guide readers through the process of implementing encryption, including key management practices and compliance with regulatory requirements.
Impact on Permissions: While encryption primarily protects the contents of documents and libraries, it also influences how permissions are managed. For instance, access to decryption keys must be tightly controlled, aligning with the permissions set for each document or library.
Two-Factor Authentication (2FA)
Two-factor authentication adds an extra layer of security by requiring two forms of identification from users before granting access to documents or libraries. This significantly reduces the risk of unauthorized access due to compromised credentials.
Application in Permissions Management: Integrating 2FA into permissions management involves setting up a system where access to certain levels of permissions requires additional authentication steps. This might include access to highly sensitive documents or admin-level permissions.
Benefits and Challenges: This section will explore the benefits of implementing 2FA, such as reduced risk of data breaches and enhanced trust among stakeholders, alongside the challenges, including potential user friction and the need for user education.
Mastering SharePoint Online
Please fill out the form below to get our free Ebook "Mastering SharePoint Online" emailed to you
FREE DOWNLOAD
Send download link to:
SharePoint Storage Explorer Reports
SharePoint Permissions
In SharePoint, permissions are fundamental to managing access to content and resources, ensuring that users have appropriate levels of access based on their roles and responsibilities. SharePoint organizes these permissions into various levels and groups to facilitate granular control over site access, document libraries, and individual items. Understanding the types of permissions is crucial for effective SharePoint administration. Here’s an overview of the key permission types in SharePoint:
Basic Permission Levels
SharePoint defines a set of default permission levels that correspond to common roles within an organization. Each permission level is a collection of individual permissions designed to suit particular tasks or responsibilities. Here are some of the default permission levels:
Full Control: Users with this level have complete control over all site content, settings, and permissions. They can add, edit, delete, and change permissions on all items. Typically, this is reserved for administrators.
Edit: This level allows users to add, edit, and delete lists; view, add, update, and delete list items and documents. It’s designed for users who manage content but do not need to manage site settings.
Contribute: Contributors can view, add, update, and delete list items and documents. This level is suitable for team members who need to collaborate on documents or list items but don’t need to change the site structure.
Read: Users with Read permissions can view pages and items in existing lists and document libraries. They can also download documents. This level is ideal for users who need access to information but do not contribute content.
View Only: Similar to Read, but users cannot download documents from the library. This is useful for sharing sensitive information that should not be copied.
Special Permission Levels
In addition to the basic permission levels, SharePoint allows for the creation of custom permission levels to accommodate specific needs. Administrators can mix and match from a comprehensive list of individual permissions to create new levels. Some special permissions include:
Manage Permissions: Create and change permission levels on the web site and assign permissions to users and groups.
Approve Items: Approve or reject list items or documents in lists with content approval enabled.
Manage Web Site: Create and delete sites, list templates, and libraries, including managing site themes and borders.
Add and Customize Pages: Add, change, or delete HTML pages or web part pages, and edit the website using a SharePoint Designer and web browser.
Individual Permissions
Individual permissions are the building blocks of permission levels. SharePoint provides a wide range of these granular permissions, allowing administrators to precisely control access to site features and content. These permissions include actions like viewing items, opening items, editing personal user information, managing lists, and more.
Mastering SharePoint Online
Please fill out the form below to get our free Ebook "Mastering SharePoint Online" emailed to you
FREE DOWNLOAD
Send download link to:
SharePoint Storage Explorer Main Windows
How Permissions are Applied
Permissions in SharePoint can be assigned directly to individual users, but it’s generally recommended to assign permissions to SharePoint groups. Groups organize users with similar access needs, simplifying the management of access rights. Permissions can also be inherited from parent objects (like sites or libraries), or they can be set uniquely for more granular control.
When setting up permissions, administrators should carefully consider the principle of least privilege—providing users with the minimum level of access necessary to perform their roles. This approach minimizes security risks and helps protect sensitive information.
Understanding the types and levels of permissions in SharePoint is critical for maintaining a secure and well-organized digital workspace. By judiciously assigning permissions, administrators can ensure that users have the access they need to collaborate effectively while safeguarding the organization’s data.
Monitoring and Auditing
Maintaining a secure document and library environment requires ongoing vigilance. Regular monitoring and auditing practices are essential for identifying potential security gaps and ensuring that permission settings are consistently applied and updated according to organizational policies and compliance requirements.
Regular Reviews
Conducting regular reviews of permissions settings helps ensure that access rights remain aligned with users’ current roles and responsibilities. This section will cover strategies for scheduling and conducting these reviews, including which metrics to monitor and how to address discrepancies.
Tools for Monitoring: Leveraging tools that provide real-time monitoring and alerting for unusual access patterns or permission changes can help organizations respond quickly to potential security threats. Recommendations for effective tools and practices will be discussed.
Compliance Standards
Compliance with data protection regulations (such as GDPR, HIPAA, etc.) often requires specific permissions settings and auditing practices. This part of the guide will delve into how organizations can ensure their permissions management practices meet these regulatory requirements, highlighting key considerations for maintaining compliance.
Auditing Practices: Effective auditing practices involve tracking and documenting changes to permissions settings, access attempts, and data handling activities. This section will offer guidance on setting up an auditing framework that supports both security and compliance objectives.
Common Challenges and Solutions
Despite best efforts, organizations may encounter challenges in managing permissions and ensuring data security. This section will address some of the most common challenges, such as managing permissions at scale, dealing with legacy systems, and training users on security practices.
Scalability: As organizations grow, managing permissions for an increasing number of documents and users can become complex. Solutions such as role-based access control (RBAC) and attribute-based access control (ABAC) can offer more scalable approaches.
Legacy Systems: Integrating advanced permissions management and security measures with legacy systems can be particularly challenging. Strategies for modernizing these systems or implementing interim measures will be explored.
User Training: Ensuring that all users understand the importance of data security and how to comply with permissions policies is crucial. This section will provide tips for effective security awareness training and fostering a culture of security.
SharePoint Storage Explorer
Gain insights in to your SharePoint Online Storage Consumption
Download our completely FREE TOOL
FREE DOWNLOAD
Send download link to:
Mastering SharePoint Online
Please fill out the form below to get our free Ebook "Mastering SharePoint Online" emailed to you