Hello, and welcome to this deep dive into one of the most underappreciated yet profoundly useful technologies in the Windows operating system—Volume Shadow Copy Service, commonly known as VSS. Have you ever been caught in a situation where your computer crashes, and you lose hours, days, or even weeks of work? It’s a heart-stopping moment that most of us have unfortunately experienced. But here’s where VSS comes into play. This built-in Windows feature acts as a time traveler for your files and system settings, enabling you to take snapshots or “shadow copies” at specific points in time. These snapshots can then be used to restore your system to a previous state, effectively becoming your digital safety net.
Importance of VSS in Modern Computing
We’re living in an era where our lives are increasingly digital. From important work documents to irreplaceable photos and videos, our data is more than just 1s and 0s; it’s our memories, our work, our identity. In such a landscape, the importance of robust backup and restore capabilities cannot be overstated. That’s where VSS shines. It’s not just a backup tool; it’s a real-time backup tool that doesn’t require you to shut down your applications or disrupt your workflow. This is crucial in professional environments where downtime equals lost revenue or in emergency situations where every second count.
Scope of the Article
In this article, we’re going to delve deep into VSS. We’ll explore its origins, how it works under the hood, its various applications, and why it’s an essential tool for anyone who uses a Windows operating system. Whether you’re a casual user who wants to safeguard personal files or a system administrator responsible for maintaining an enterprise network, this guide is for you. So, let’s get started!
What is VSS?
Definition
So, what exactly is VSS? Standing for Volume Shadow Copy Service, it’s a technology developed by Microsoft to allow snapshots, also known as shadow copies, of computer files or volumes. But don’t mistake it for a simple backup solution. While traditional backup methods create a copy of your data at a specific point in time, VSS is smarter. It enables you to take snapshots that are consistent at the block level, ensuring that files are not in a half-written state. This is immensely beneficial when you’re dealing with databases or other files that are continuously in use.
Historical Background
VSS isn’t a new kid on the block. It has been part of the Windows family since the Windows Server 2003 era. But why was it developed in the first place? Well, Microsoft recognized the limitations of existing backup solutions, especially in enterprise environments. Traditional backup methods often required stopping services or locking files to take a consistent snapshot, which led to downtime or service degradation. Enter VSS—a technology designed to create consistent backups without interrupting user activities, a godsend for businesses where time is money.
Core Functionality
At its essence, VSS serves three main functions—requesting, providing, and writing. The ‘requestor’ is typically the backup software that asks for a snapshot. The ‘provider’ handles the heavy lifting of actually creating the shadow copy, and the ‘writer’ ensures that applications are in a consistent state during the snapshot process. Together, these components make VSS a powerful yet flexible solution that can be tailored to various backup scenarios, from simple file backups to complex database archiving.
How Does VSS Work?
Components of VSS
Think of VSS as a finely tuned orchestra, each component playing its part to produce a harmonious outcome—a snapshot. In the VSS world, this orchestra consists of the VSS service, VSS providers, and VSS writers. The VSS service is the conductor, directing the entire operation. It receives the backup request and coordinates with the other components to execute it. VSS providers are the instrumentalists, responsible for creating the shadow copies. They interact directly with the storage medium, be it a hard disk, SSD, or network storage. Last but not least, we have the VSS writers—these are the composers. They make sure that the data being backed up is in a consistent state, particularly important for complex data types like databases or system settings.
The VSS Process
So how does a VSS backup actually happen? Let’s break it down:
Initialization: A VSS requestor (often backup software) kicks things off by asking the VSS service to create a shadow copy.
Preparation: The VSS service communicates with all the VSS writers to make sure that the data is in a consistent state. This may involve flushing buffers or completing pending transactions.
Freeze: For a brief moment, write I/O requests to the disk are paused, ensuring that no changes occur during the snapshot.
Snapshot: This is the moment of truth. The VSS provider creates the shadow copy, essentially taking a snapshot of the data’s current state.
Thaw: Write I/O requests are resumed, and life goes back to normal, but now you have a snapshot safely stored away.
Interaction with the Operating System
VSS doesn’t operate in a vacuum; it’s deeply integrated into the Windows operating system. This integration allows for a seamless user experience and ensures high data integrity. For example, VSS works hand-in-hand with the NTFS file system (and ReFS in newer versions of Windows) to track changes to files during the backup process. It can also tap into Windows’ security features to ensure that backups are encrypted and access-controlled, adding a layer of security to your snapshots.
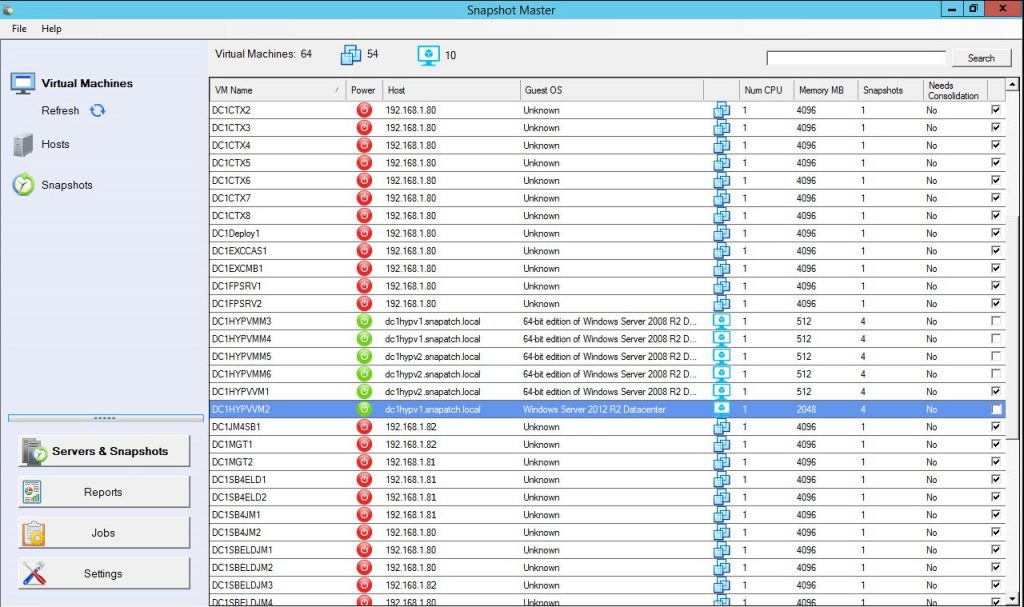
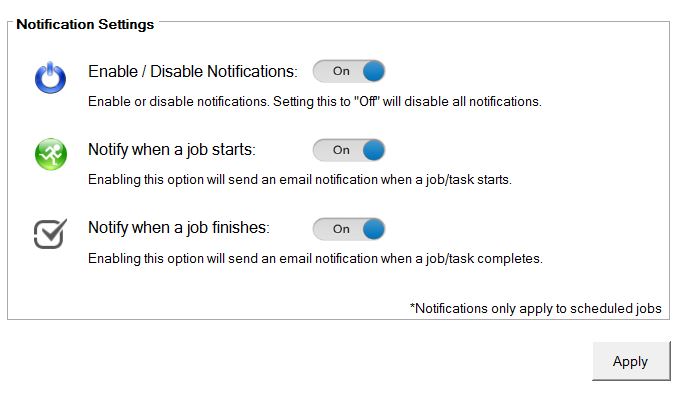
SnapShot Master Power On
Why Use VSS?
Advantages
So, you’re sold on the idea of backups, but why choose VSS over other methods? First and foremost, it’s the real-time aspect. Traditional backup methods might require you to schedule backups during off-hours to avoid affecting performance. But with VSS, those backups can happen while you’re working on that crucial presentation or binge-watching your favorite series. The service is designed to be non-disruptive. Secondly, it’s about data consistency. VSS ensures that the data in the snapshot is in a coherent state, meaning you won’t end up with half-saved files or databases in an unstable state. Lastly, there’s the matter of resource efficiency. VSS is designed to be light on system resources, so you won’t experience a sudden slowdown during the backup process.
Use Cases
The beauty of VSS lies in its versatility. For casual users, it’s an easy way to take regular backups of important files. For businesses, it’s a cornerstone of business continuity plans, allowing for quick recovery from data loss incidents or cyberattacks. The service is also a boon for database administrators. Traditional database backups can be a complex affair requiring careful planning to avoid data corruption. VSS simplifies this by ensuring that the database is in a consistent state before taking a snapshot. And let’s not forget virtual machines (VMs). Managing backups for VMs can be challenging due to their dynamic nature, but VSS comes to the rescue here as well, ensuring that VM snapshots are just as reliable as those of physical machines.
Real-World Applications
Let’s put this into a real-world context. Imagine you’re working in a healthcare setting where patient data is continuously updated. The last thing you want is to pause the system for backups, potentially delaying critical care. With VSS, backups can run in the background, ensuring data protection without disrupting essential services. Similarly, in fast-paced trading environments where downtime can mean significant financial loss, VSS allows for continuous data protection without affecting trading activities.
Setting up VSS on Windows
System Requirements
Before diving into the setup, let’s talk prerequisites. You’ll need a Windows operating system that supports VSS (Windows 10, Windows Server 2019, etc.), and your file system should be either NTFS or ReFS for newer Windows versions. Also, ensure you have enough disk space for the snapshots; otherwise, older snapshots might be deleted to make room for new ones.
Step-by-Step Guide
Setting up VSS is a walk in the park. Navigate to the Control Panel and then to the ‘System and Security’ section. Here, you’ll find ‘Backup and Restore’ options. Once you’re in, Windows will guide you through the setup, asking you to select the drive you want to back up, how often you want these backups, and where to store them. It’s that simple, yet it offers a level of customization that can satisfy even the most demanding users.
Configuration Options
VSS isn’t a one-size-fits-all solution; it’s highly customizable. You can specify which volumes or folders to include in the snapshots, set the frequency, and even choose the storage location, whether it’s on the same machine, a network drive, or an external storage device. There are also advanced settings that allow you to control how much disk space is allocated for shadow copies, giving you the power to manage system resources effectively.
Restoring Data with VSS
How to Restore Files
So you’ve accidentally deleted that essential report due tomorrow. Panic sets in. But wait, you’ve got VSS! Restoring your file is as easy as navigating to the folder where it used to be, right-clicking, and selecting ‘Restore previous versions.’ A window will pop up, showing available snapshots. Pick the one you want, click ‘Restore,’ and your file is back from the digital beyond.
Versioning with VSS
One of the standout features of VSS is versioning. Every snapshot you take serves as a version of your data at that specific point in time. This means you’re not just restoring the latest version of a file; you can go back to any point in its history, provided you have a snapshot from that time. This is invaluable when dealing with complex projects that go through multiple revisions, or databases where historical data may be required for audits or compliance checks.
Pitfalls to Avoid
While VSS is a robust system, it’s not infallible. One common pitfall is running out of allocated disk space for shadow copies, leading to older snapshots being deleted. Another is ignoring the ‘throttle’ settings, which control the impact of VSS on system performance. Overloading your system with frequent, large-scale snapshots can lead to performance issues. Therefore, it’s essential to balance your backup needs with available system resources.
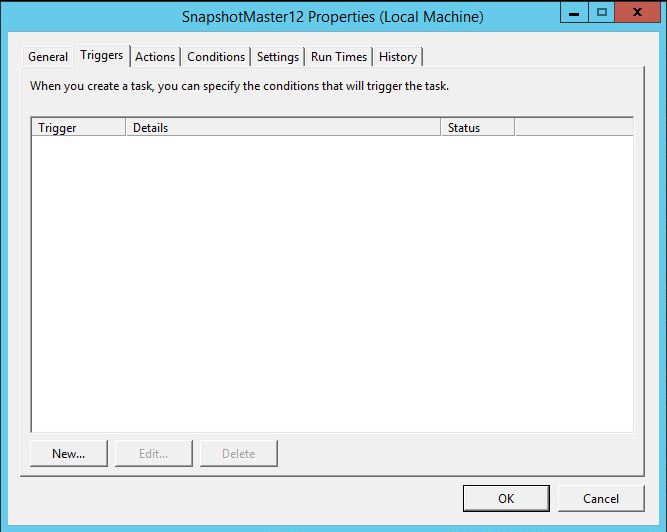
Snapshot Master Restart
Comparison with Other Backup Solutions
Traditional Methods
Before the inception of VSS and similar technologies, data backup was a labor-intensive task. Remember those magnetic tapes? They were widely used for backups, requiring manual operations and careful handling. While they offered a tangible means of storage, accessing data from these tapes was slow. Restoring data meant sifting through tapes, finding the right one, and hoping it wasn’t corrupted. There were also disk-based backups, which were faster than tapes but still had limitations. They often required significant downtime, especially when backing up large volumes of data.
Cloud-based Solutions
Enter the age of cloud computing. With services like AWS, Google Cloud, and Azure, cloud backups have become the buzzword. They offer scalability, off-site storage, and easy access. You can backup data in real-time, automate the process, and scale as your data grows. Plus, there’s the added advantage of accessing your backups from anywhere, anytime. However, while cloud backups offer numerous benefits, they come with challenges. Data transfer speeds, especially for large volumes of data, can be a concern. There’s also the ever-present worry about security in the cloud, with fears of data breaches and unauthorized access.
Pros and Cons
So, how does VSS stack up against these methods? It offers the best of both worlds. You get the immediacy and data consistency of disk-based backups, combined with the flexibility and scalability of cloud backups. While VSS is tied to the Windows ecosystem, its integration with the operating system ensures optimal performance. However, one could argue that being OS-specific is also a limitation, especially in diverse IT environments.
Advanced Features
VSS for Databases
Databases are the backbone of many applications, from your favorite online shopping site to critical financial systems. Backing up databases, especially transactional ones like SQL Server, can be tricky. The challenge is to capture a consistent state of the database without interrupting its operations. VSS to the rescue! With its ability to work with database-specific VSS writers, it ensures that backups capture a consistent state of the database, even if transactions are ongoing. This means no more scheduling late-night backups or experiencing downtime during backup operations.
VSS for Virtual Machines
With the rise of virtualization, managing backups for virtual machines (VMs) has become crucial. VMs can be dynamic, with states changing rapidly. VSS is adept at handling this dynamism. Whether you’re running VMs on Hyper-V, VMware, or any other platform, VSS ensures that your VM snapshots are as reliable and consistent as those of physical machines.
Automation Capabilities
In today’s fast-paced IT environments, automation is key. VSS doesn’t disappoint in this department. With its integration with Windows Task Scheduler and compatibility with PowerShell scripts, you can automate your backup processes. Whether it’s taking daily snapshots, cleaning up old backups, or restoring data, you can set it and forget it, letting VSS handle the heavy lifting.
Common Issues and Troubleshooting
Typical Error Messages
No technology is without its quirks, and VSS is no exception. Users might occasionally encounter errors like “Failed to create a shadow copy” or “VSS encountered a problem.” These can be due to various reasons, from low disk space to conflicts with other applications.
Resolution Steps
Before you pull your hair out, here are some general troubleshooting steps:
Check Disk Space: Ensure there’s enough space for VSS to take snapshots.
Restart the VSS Service: Sometimes, a simple restart can resolve issues.
Check for Conflicting Software: Some software, especially disk utilities, can conflict with VSS.
Update Windows: Ensure your operating system is up-to-date, as updates often include fixes for known issues.
Third-Party Tools for Troubleshooting
If you’re still stuck, there’s a plethora of third-party tools designed to diagnose and fix VSS issues. Tools like VSSDiag can analyze VSS logs, pinpointing the root cause of problems. Additionally, forums and online communities can be a treasure trove of solutions, as chances are someone else has faced a similar issue.
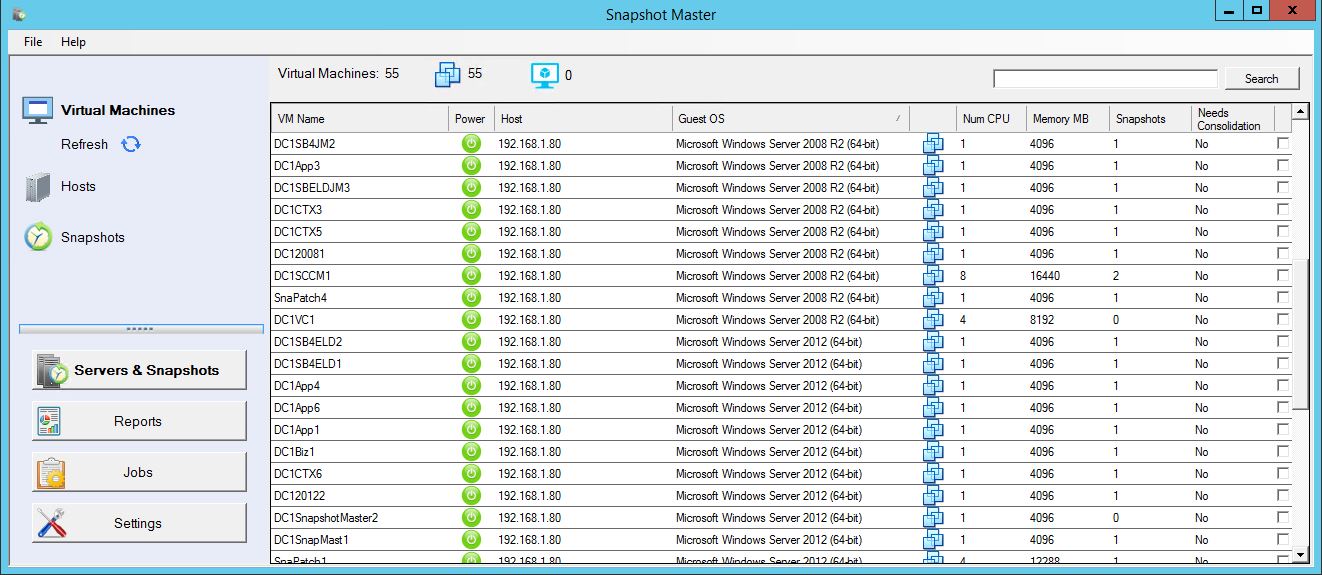
Snapshot Master Manage Snapshots
Conclusion
In the vast universe of data protection and backup solutions, Volume Shadow Copy Service (VSS) shines bright as a beacon of reliability and efficiency. Through our journey, we’ve unraveled the layers of this intricate technology, witnessing its power to safeguard our most precious digital assets. We’ve seen how VSS stands tall, not just as a backup solution, but as a real-time, integrated, and versatile tool designed for the modern age of computing.
The digital world is fraught with unpredictabilities, from system crashes to cyber-attacks. But with VSS in our arsenal, it feels like having a trusty shield, always ready to defend and restore. Whether you’re a casual user or an IT professional, embracing VSS can be a game-changer.
Yet, like any technology, it’s essential to keep learning, adapting, and evolving. As VSS continues to mature and expand its capabilities, we, as users, must stay informed, ensuring we harness its full potential.
In wrapping up, remember this: In the realm of data, being proactive beats being reactive. And with VSS, proactivity is just a snapshot away. So, have you taken yours today?
FAQs
Is VSS exclusive to Windows?
Yes, VSS is a technology developed by Microsoft and is specific to the Windows operating system.
How is VSS different from traditional backup methods?
VSS allows for real-time, consistent snapshots without needing to halt applications or services, unlike some traditional backup methods that require downtime.
Can VSS backups be stored on external drives or cloud storage?
While VSS itself creates local shadow copies, backup software leveraging VSS can store backups on external drives, network locations, or even cloud storage.
Is there a performance impact when using VSS?
VSS is designed to be lightweight and efficient. While there’s a minimal resource usage during the snapshot process, it’s generally negligible for most users.
What should I do if I encounter errors with VSS?
Start with basic troubleshooting like checking disk space, restarting the VSS service, and updating Windows. If problems persist, consider third-party diagnostic tools or seek help from online forums and communities.
I hope this conclusion and the FAQs provide a rounded end to our in-depth look into VSS. If there are any other questions or areas you’d like to explore further, please let me know!
In the ever-evolving landscape of IT, virtualization has established itself as an irreplaceable cornerstone. While various platforms offer virtualization services, Microsoft’s Hyper-V stands out as a robust, scalable, and user-friendly option. If you’re an IT professional, chances are you’ve come across Hyper-V at some point in your career. With its intricate features and multi-faceted architecture, Hyper-V serves as the backbone for many virtualized environments.
However, just like any piece of complex software, Hyper-V is not immune to errors and glitches. These can disrupt the virtual environment, impact productivity, and ultimately cost both time and resources to fix.
Understanding Hyper-V Architecture
Components
At the heart of Hyper-V lies its architecture—a complex system of interlocking components designed to deliver virtualization services seamlessly. Understanding these parts can be crucial when you’re trying to solve any glitches. The main components are:
Hypervisor: This is the core of Hyper-V. It manages the distribution of system resources to each virtual machine (VM).
Virtual Machines: These are the simulated systems running on your host machine.
Virtual Hard Drives (VHDs): These files act like physical hard drives but are flexible and can be easily moved and resized.
Virtual Network: This includes all networking components, such as switches, adapters, and configurations that tie your virtual world together.
Workflow
Hyper-V operates using a straightforward but effective workflow. It begins with the Hypervisor that sits directly on the hardware and oversees all system resources. Above the Hypervisor, there’s a parent partition running a version of Windows, Linux, or other compatible OS, which in turn hosts multiple child partitions where the VMs reside.
Understanding this architecture is not just academic curiosity; it’s practical knowledge that can help you pinpoint the root cause of issues more effectively. For instance, knowing the difference between Gen 1 and Gen 2 VMs could be crucial in troubleshooting. To dig deeper into the intricacies of Hyper-V architecture, check out this comprehensive guide.
Common Errors and Their Symptoms
Understanding common errors and their symptoms is the first line of defense in effective troubleshooting. By recognizing the signs early, you can nip issues in the bud before they escalate into full-blown problems.
Configuration Errors
These types of errors often occur during the initial setup or during major changes in the Hyper-V environment. They can involve network settings, storage configurations, and even Hyper-V Manager settings. If you notice connectivity issues or unexpected VM behavior, it might be worth taking a closer look at your configuration settings.
Performance Issues
Performance problems can manifest in various ways, such as slow VM boot-up, laggy applications, or even complete system hang-ups. Several factors could be at play here, from CPU overload to memory deficits. These issues may require in-depth analysis to solve but identifying them early can save you a lot of trouble down the line.
Network Errors
Network-related errors can be among the most frustrating to troubleshoot. Symptoms can range from disconnected VMs, latency issues, to DNS resolution failures. The root cause is often elusive but could include everything from misconfigured Virtual NICs to VLAN tagging errors.
Virtual Machine Failures
When a VM fails to start, or experiences data corruption, it’s usually a sign of a deeper problem within your Hyper-V environment. Boot failures and data corruption are telltale signs of virtual machine problems. It’s crucial to identify the cause quickly to minimize downtime.
Recognizing common errors and their symptoms is the cornerstone of effective troubleshooting. A detailed understanding can not only help in solving current issues but can also assist in the prevention of future problems. For more tips on Hyper-V best practices that can help prevent common issues, check out this article.
Identifying Errors: Where to Look
Finding the root of a problem is half the battle won. Knowing where to look can drastically reduce your troubleshooting time. Here are some quick pointers on where you can spot these common errors:
Event Viewer
This built-in Windows tool is often the first stop for any IT professional. For Hyper-V related issues, the Hyper-V-VMMS and Hyper-V-Worker admin logs can be particularly useful. Here you’ll find error codes and descriptions that can guide you to the problem’s origin.
Hyper-V Manager
Hyper-V Manager not only allows you to configure and manage your virtual machines but also provides feedback in the form of statuses and error messages. For example, if a VM fails to start, Hyper-V Manager will display an error message that can clue you in on what went wrong.
Performance Monitor
For performance-related issues, the Performance Monitor tool can be invaluable. You can set up specific counters for CPU, Disk I/O, and network usage to monitor the performance of your Hyper-V host and the VMs running on it.
PowerShell Scripts
PowerShell is a powerful tool for automating tasks and retrieving information. Numerous Hyper-V related PowerShell cmdlets can be used to gather detailed information about your virtual machines and their current state, offering another route to identify issues.
Third-Party Tools
There are specialized third-party tools designed to manage and monitor Hyper-V environments. For instance, Snapshot Master offers comprehensive reports on all your VM snapshots, allowing you to spot issues that may not be immediately apparent through native tools.
By knowing where to look, you’re well-equipped to start the troubleshooting process effectively. Armed with this information, diagnosing issues can become a less daunting task.
Diagnosing and Fixing Common Errors
Now that you know the types of errors you might encounter and where to look for them, let’s dive into the nitty-gritty of diagnosing and fixing these common glitches.
How to Diagnose Configuration Errors
Check Network Settings: In the Hyper-V Manager, ensure that your virtual switches are correctly set up. Verify IP addresses and subnet masks to ensure they’re in the correct range.
Verify Storage Paths: Make sure that the paths to your VHDs are correct. Inaccessible or incorrect paths can lead to VM start-up failures.
User Permissions: Ensure that the users have the necessary permissions to access the resources they need.
Fixing Performance Issues
Optimize Resource Allocation: Use Performance Monitor to check if the system resources are being overutilized. If so, consider redistributing resources or adding more to the Hyper-V host.
Update Drivers and Software: Outdated software can often be the culprit. Make sure you’re running the latest versions of all drivers and software.
Check for Malware: Performance issues can also be caused by malware affecting your system. Run a complete malware scan to rule out this possibility.
Resolving Network Errors
Examine Virtual Network Configuration: Incorrect settings here can lead to various network issues. Make sure VLAN IDs and subnet configurations are accurate.
Reset Winsock Configuration: Sometimes, resetting the Winsock catalogue can resolve network issues. Use the command netsh int ip reset in the Command Prompt.
Check Firewall Rules: Sometimes, firewall configurations can interfere with Hyper-V’s network communication. Make sure the necessary ports are open.
Rectifying Virtual Machine Failures
Check Event Logs: As mentioned earlier, the Event Viewer can offer valuable insights into what went wrong. Look for any Critical or Error events that might point to the issue.
Repair VHDs: Corrupt VHD files can cause a VM to fail. Use Hyper-V’s native tools or third-party software to repair these files.
Snapshot Management: Sometimes, lingering snapshots can cause VM failures. Managing these effectively can often resolve the issue. For detailed insights into how to manage VM snapshots, here is a complete guide.
Now that we’ve covered some of the most frequent Hyper-V errors and how to fix them, you’re better equipped to manage your virtual environment efficiently.
Enhancing Your Troubleshooting Game
While native Hyper-V tools are robust and offer a plethora of features for troubleshooting, sometimes, a third-party tool can offer that extra edge in managing your virtual environment. These tools often come with specialized functionalities that can make your life a lot easier.
Snapshot Master: An All-in-One Solution
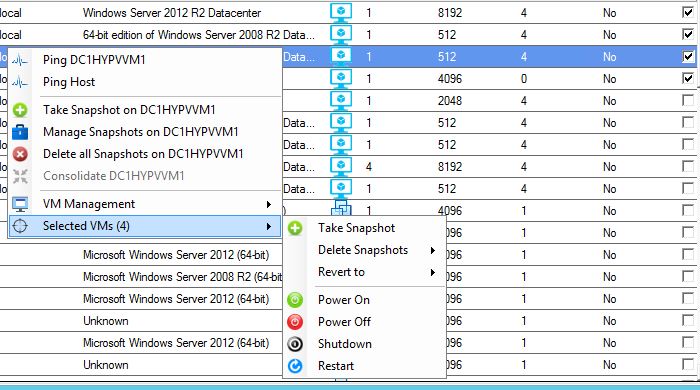
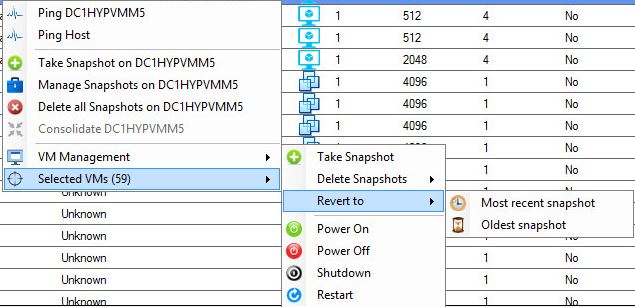
You’ve probably been through the painstaking process of manually managing snapshots or scripting out automated jobs. What if you could simplify this into a few clicks? Meet Snapshot Master by SmiKar, an all-encompassing tool designed to make snapshot management a breeze.
Features of Snapshot Master
Automated Snapshot Creation: No more late nights or weekends spent creating snapshots. Automate the process and sleep easy.
Comprehensive Management Dashboard: Keep track of all your snapshots across VMware, Hyper-V, and Azure platforms from a single pane.
Scheduled Snapshot Deletion: Keep your storage optimized by setting up rules for snapshot deletion.
Benefits
Saves Time and Resources: Automation means you can allocate your precious IT resources elsewhere.
Enhanced Reliability: With set-and-forget automation, human error is significantly reduced, thereby improving your system’s reliability.
Not only does it offer a robust snapshot management solution, but Snapshot Master also serves as a reliable tool for backup and disaster recovery. Here is how to use Snapshot Master effectively.
Preventive Measures: Best Practices for Hyper-V
An ounce of prevention is worth a pound of cure. While it’s crucial to know how to troubleshoot issues, implementing some best practices can help avoid many problems from arising in the first place.
Regular Updates and Patches
Ensure that your Hyper-V environment is always updated with the latest patches and updates. This can improve performance and fix known bugs, reducing the likelihood of encountering issues.
Resource Allocation
Ensure that your Hyper-V host has enough resources to manage all the VMs adequately. Overloading your host can lead to performance issues for all the VMs it hosts.
Keep an eye on CPU, memory, disk, and network metrics. Use Performance Monitor or third-party tools to set up alerts for abnormal behavior.
Network Configuration
Ensure that your network configurations, including VLAN settings and virtual switches, are set up correctly. This will reduce the risk of network-related issues.
Even if there’s no immediate issue, regularly checking the Event Viewer can help you spot potential problems before they turn into actual issues.
Limit Administrative Access
The fewer people who have admin access to your Hyper-V setup, the lower the risk of human errors that could lead to problems. Only grant access to trusted and trained personnel.
Compliance Checks
Regularly check your system for compliance with internal policies and regulatory standards. This can often prevent issues that may arise due to non-compliance.
Implementing these best practices can make your Hyper-V management experience much smoother and reduce the frequency and impact of issues.
Conclusion
Troubleshooting in Hyper-V doesn’t have to be a daunting task. Armed with the right knowledge, tools, and best practices, you can efficiently manage your virtual environment. From understanding common errors and their symptoms to using third-party tools like Snapshot Master, there’s a lot you can do to simplify this process. So, are you ready to take control of your Hyper-V setup? Why not give Snapshot Master a try and simplify your Hyper-V management today!
Frequently Asked Questions
Q1: Where can I find Hyper-V logs for troubleshooting?
Answer: The Event Viewer under Hyper-V-VMMS and Hyper-V-Worker admin logs is a good place to start.
Q2: What are some common Hyper-V performance issues?
Answer: CPU overutilization, disk I/O bottlenecks, and network latency are some common performance issues.
Q3: Can third-party tools integrate with Hyper-V?
Answer: Yes, many third-party tools like Snapshot Master are designed to integrate seamlessly with Hyper-V.
Q4: Are snapshots a good backup strategy for Hyper-V?
Answer: Snapshots are useful but should not replace a comprehensive backup strategy. Learn more about it here.
Q5: How can I update Hyper-V?
Answer: You can update Hyper-V through Windows Update or download specific patches from Microsoft’s website.
I hope this article serves as a comprehensive guide for all your Hyper-V troubleshooting needs. Feel free to try out Snapshot Master to see how it can make your life easier!
Hyper-V has rapidly become an indispensable tool in the system administrator’s toolkit. Not only does it provide a robust, feature-rich platform for virtualization, but it also seamlessly integrates with Windows Server, making it a must-have for any Windows-based enterprise environment. As a system administrator, you’ve probably realized that managing Hyper-V manually through its GUI can be time-consuming. That’s where PowerShell steps in, offering automation capabilities and more nuanced control of your Hyper-V environment.
Why Use PowerShell for Hyper-V Management
PowerShell and Hyper-V together are like Batman and Robin for system administrators. PowerShell brings with it an extensive range of commands specifically tailored for Hyper-V management. This means you can manage virtual machines, set configurations, and even perform monitoring tasks without having to click through countless windows. Plus, PowerShell allows you to automate repetitive tasks, so you can set it and forget it, freeing up more time for you to deal with those pressing tickets piling up in your inbox.
What to Expect in this Article
This article will serve as your comprehensive guide to understanding Hyper-V PowerShell commands. Whether you’re new to Hyper-V or you’ve been a sysadmin for years, we’ll walk you through the essential commands, how to automate tasks, and best practices for optimizing your virtual environment.
Understanding Hyper-V PowerShell Module
What Is Hyper-V PowerShell Module
The Hyper-V PowerShell module is a set of cmdlets for managing Hyper-V that are available in the Hyper-V role on Windows Server. These cmdlets enable the automation of the Hyper-V platform, allowing you to orchestrate and automate virtual machine deployments, configurations, and even the underlying storage and networking components. Think of it as the control panel of your virtualized environment, but with the ability to script every knob and button.
Installing the Hyper-V PowerShell Module
The Hyper-V PowerShell module is typically installed by default when you install the Hyper-V role on Windows Server. However, if for some reason it isn’t installed, you have two methods for installing it:
Using Install-WindowsFeature
The Install-WindowsFeature cmdlet enables you to install specified roles, role services, and features on a computer that is running Windows Server. It’s as simple as running Install-WindowsFeature -Name Hyper-V -IncludeAllSubFeature.
Using Enable-WindowsOptionalFeature
If you prefer a more granular approach, the Enable-WindowsOptionalFeature cmdlet allows you to enable or disable optional features in Windows. Here, you’d simply run Enable-WindowsOptionalFeature -Online -FeatureName Microsoft-Hyper-V-All.
Importing the Hyper-V Module into Your Session
Once you’ve confirmed the Hyper-V PowerShell module is installed, you can import it into your PowerShell session by using the Import-Module Hyper-V command. This will give you access to all the Hyper-V cmdlets, effectively turning your PowerShell session into a control center for managing Hyper-V.
Essential Hyper-V PowerShell Commands
Basic Commands
Now that you’re equipped with the background knowledge and have the Hyper-V PowerShell module at your fingertips, let’s delve into the essential commands. When you’re starting out, these are your bread and butter.
Get-VM
The Get-VM command allows you to retrieve the state, status, and other important details of virtual machines. It’s the first thing you’d typically run when you log in, giving you an overview of what’s running, what’s stopped, and what’s in a critical state.
New-VM
Creating a new VM is as easy as pie with the New-VM command. By specifying parameters like name, the path where the VM files will be stored, and initial configurations, you can spin up a new VM in no time.
Start-VM and Stop-VM
Starting and stopping VMs are basic tasks that you’ll often need to do. The Start-VM and Stop-VM commands let you do this efficiently, without having to navigate through the GUI. If you need to force stop a VM, the -Force switch is your go-to option.
Advanced Commands
As you gain more experience, you’ll find yourself wanting to do more than just the basics. That’s where advanced commands like Set-VMProcessor, Convert-VHD, Add-VMHardDiskDrive, and Remove-VMHardDiskDrive come in. These allow you to modify VM configurations, convert VHD files to different formats, add or remove hard disk drives, and more.
Monitoring Commands
Keeping an eye on resource usage is a crucial part of system administration. Hyper-V PowerShell offers a range of monitoring commands like Get-VMHost, Measure-VM, and Get-VMResourceMetering that allow you to keep tabs on VM performance, the Hyper-V host’s capabilities, and even measure the resources consumed by individual VMs.
Troubleshooting Commands
When things go south, and they inevitably will at some point, you have a toolbox of troubleshooting commands at your disposal. Test-VMReplicationConnection can test the connection between two Hyper-V hosts, while Repair-VM can be used to fix a malfunctioning VM.
Command Reference Table
Command
Switch
Description
Get-VM
-Name
Retrieves the state of a specified VM
New-VM
-Name, -Path
Creates a new VM with specified parameters
Start-VM
-Name
Starts a specified VM
Stop-VM
-Name, -Force
Stops a specified VM, with the option to force shutdown
Tests the replication connection between two hosts
Repair-VM
-Name
Repairs a malfunctioning VM
Automation with Hyper-V PowerShell Scripts
Automation is not just a buzzword; it’s a lifesaver for system administrators. Hyper-V PowerShell scripts allow you to automate routine tasks, thereby freeing you up to focus on more pressing issues. While the basics are great for day-to-day management, mastering automation scripts can
transform you from a regular sysadmin to a Hyper-V wizard. The idea is simple: you write a PowerShell script using the commands you’ve learned, specify triggers or schedules, and let the system do the work for you. It’s like setting up a bunch of dominos, then just tapping the first one and watching them all fall down in perfect order.
For instance, let’s say you need to run backups for all your VMs. Instead of going through each one, you could write a script that uses Checkpoint-VM to create snapshots, then stores them in a designated location. Once written, you can schedule this script to run at a specific time, say 2:00 a.m., when server traffic is at its lowest.
Another powerful use-case for automation is in scaling operations. Suppose you monitor your virtual machines and notice they’re consistently hitting high CPU usage. Instead of manually allocating more resources, a well-crafted PowerShell script could automatically add extra CPUs to VMs reaching a certain threshold, without any downtime or manual intervention.
Best Practices for Using Hyper-V PowerShell Commands
While PowerShell offers incredible utility, it also demands responsibility. A wrongly executed command can have significant consequences, so it’s vital to follow best practices.
Test Commands in a Sandbox Environment: Before running any new commands or scripts on your production environment, test them in a sandbox. It’s like the rehearsal before the grand play; if something goes wrong, it’s far better for it to happen here.
Document Your Scripts and Commands: Good documentation serves as a roadmap for anyone who follows, ensuring that they understand the what, why, and how behind each command or script.
Use Commenting Liberally: When writing scripts, always add comments to explain what each part does. A few months down the line, even you might not remember why you wrote a particular line of code.
Limit the Scope of Administrative Privileges: Not every script or task needs full admin rights. Limit the scope to what’s absolutely necessary for that specific task to minimize security risks.
Regularly Update and Review Scripts: As your infrastructure evolves, so should your scripts. Regular updates and reviews ensure they remain effective and secure.
Conclusion
PowerShell’s integration with Hyper-V provides system administrators with a powerful set of tools to manage and automate tasks in virtual environments. By understanding and utilizing the available commands and following best practices, you can streamline operations, enhance efficiency, and bolster the security of your virtual machines. So why click when you can script? Elevate your sysadmin game and make PowerShell your go-to tool for managing Hyper-V.
FAQs
Is the Hyper-V PowerShell module automatically installed with Hyper-V?
Typically, yes. The module is usually installed by default when you add the Hyper-V role. However, it’s always good to double-check and manually install if necessary.
Can I manage multiple Hyper-V hosts using PowerShell?
Absolutely. PowerShell enables you to manage multiple Hyper-V hosts through remote sessions. Commands like Enter-PSSession or Invoke-Command can help you administer multiple hosts efficiently.
How do I find a list of all available Hyper-V PowerShell commands?
You can list all the Hyper-V cmdlets available to you by running Get-Command -Module Hyper-V. This will provide a complete list, and you can dive into each command’s specifics with Get-Help <CommandName>.
Is it safe to run PowerShell scripts for critical operations?
Provided you have thoroughly tested and documented your scripts, using PowerShell for critical operations is generally considered safe and efficient. Always make sure to run new scripts in a sandbox environment first.
Can I revert actions taken through PowerShell on Hyper-V?
The reversibility of actions depends on what you’ve done. While some actions, like creating or deleting VMs, are irreversible, changes to configurable settings like memory or CPU allocation can usually be undone.
What are the benefits of automating tasks in Hyper-V with PowerShell?
Automation saves time, reduces the chances of human error, and allows you to focus on more critical tasks. It’s an efficient way to manage resources and can be particularly helpful in scaling operations.
How can I schedule PowerShell scripts to run at specific times?
You can use the Task Scheduler in Windows to run PowerShell scripts at specified times. Just set up a new task that triggers the script and define your preferred timing.
Do I need administrative rights to run Hyper-V PowerShell commands?
Many Hyper-V PowerShell commands do require administrative rights to execute, especially those that make changes to VM configurations. However, you should always apply the principle of least privilege and use only the permissions necessary for the task at hand.
Is there a way to log the output of PowerShell commands for auditing?
Yes, you can redirect the output of PowerShell commands to a text or log file for auditing purposes. Simply append > Output.txt or >> Output.txt to save the output to a file.
Can I use PowerShell to manage Hyper-V on remote servers?
Yes, PowerShell remoting allows you to manage Hyper-V instances on remote servers. You’ll need to set up remoting with commands like Enable-PSRemoting and use Enter-PSSession or Invoke-Command to execute commands on the remote server.
Command Line Interface (CLI) for VMware is not just a feature but a cornerstone for effective virtualization management. Think of it as the hidden trapdoor that takes you straight to the control room of a spaceship. It’s less fancy than the graphical user interface (GUI), but it gets you direct access to the nuts and bolts of your VMware environment.
Importance of CLI over GUI
While GUIs are visually appealing and easier for beginners, they can be restrictive. The CLI allows for a level of granularity and automation that you simply can’t achieve with a GUI. It’s like comparing a multi-tool Swiss knife (CLI) with a regular knife (GUI); both have their uses, but one clearly offers more functionality.
Carbon Hypervisor Screen
Prerequisites
Setting Up the VMware Environment
Before you start commanding your virtual empire, you’ll need to install VMware and set up your virtual environment. This is the equivalent of setting up your chess board before starting the game. You’ll need to ensure you have the proper hardware requirements, software dependencies, and sufficient storage space.
Gaining CLI Access
Once your environment is set up, gaining access to the CLI is your next step. This usually involves opening a terminal window within your VMware environment or connecting remotely via SSH (Secure Shell). It’s like unlocking the door to your control room with a special key.
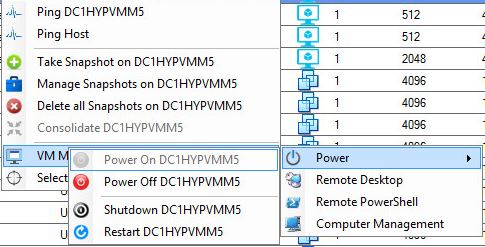
SnapShot Master Power On
Virtual Machine Management
Creating a New VM
A virtual machine (VM) in VMware is like a simulated computer running within your physical computer. Creating a new VM via the CLI is akin to setting up a new office in an empty room. You need to define its size (disk space), capacity (RAM and CPU), and connections (networking). The primary tool for this is a configuration file with a .vmx extension, which acts as your blueprint. Here, you define parameters like memsize, numvcpus, and ethernet0.connectionType.
Starting, Stopping, and Suspending VMs
Just as you wouldn’t leave all the devices in your house running when you’re not using them, you also need to manage the state of your VMs effectively. VMware CLI provides simple yet powerful commands for these operations. For instance, the vmware-cmd /path/to/vm.vmx start command fires up your VM, while vmware-cmd /path/to/vm.vmx stop will shut it down. To pause it, you’d use vmware-cmd /path/to/vm.vmx suspend, effectively freezing the VM’s state for later use.
CLI Commands: The Core Syntax
Essential Commands for Beginners
As a beginner, you don’t have to know all the commands; you just need to master a few to get started. Here are some essentials:
vmware -v: Displays the installed VMware version.
vmrun list: Lists all running VMs.
vmware-cmd: The Swiss Army knife of VMware CLI, used for various operations such as creating, modifying, and controlling VMs.
Advanced Commands for Seasoned Users
For those who are more comfortable, diving deeper into VMware CLI’s command set can unlock powerful functionalities. Commands like vicfg-vswitch for intricate network configurations or esxtop for real-time system monitoring are tools that offer granular control over your environment.
Network Management
Configuring Virtual Networks
Networks are the highways that data travels on, and managing them efficiently is paramount. VMware CLI allows you to configure virtual switches, port groups, and more. For example, to create a new virtual switch, you can use the vicfg-vswitch command:
vicfg-vswitch --add vSwitch1
This command is akin to laying down a new highway for your data to travel. You’re essentially giving your virtual machines more lanes to move data around.
Understanding NAT and Bridged Modes
In VMware, the NAT (Network Address Translation) and Bridged modes define how your VM interacts with your network. Bridged mode allows the VM to appear as its own entity on the network, whereas NAT places the VM behind a private network. It’s like deciding whether you want your kid to have their own room (Bridged) or share it with a sibling (NAT). The CLI lets you toggle these settings, tailoring each VM’s network access according to your needs.
SnapShot Master Home Screen
Storage and Disk Management
Creating Virtual Disks
The primary command for creating a new virtual disk is vmkfstools. For instance, to create a 10GB disk, you would run:
vmkfstools -c 10G NewVirtualDisk.vmdk
This would allocate a 10GB disk with the label “NewVirtualDisk.”
Managing Disk Space
Over time, as data accumulates, you might need to expand your disk. The CLI makes this straightforward:
vmkfstools -X 15G NewVirtualDisk.vmdk
This resizes the disk to 15GB. This action is similar to extending a partition on a physical drive. But remember, you’ll also need to resize the partition inside the VM to make use of the new space.
Resource Allocation and Monitoring
Allocating CPU and Memory
Let’s say you have a VM that’s sluggish and needs a power boost. You can reallocate resources like CPU and RAM using various CLI commands or by directly editing the VM’s .vmx configuration file.
vi /path/to/your/vm.vmx
Inside this file, you can modify the numvcpus and memsize parameters to adjust the number of CPUs and RAM size, respectively.
Monitoring Tools in VMware CLI
Awareness is key to maintaining a healthy virtual environment. VMware CLI has commands like esxtop for real-time monitoring. It shows you an ocean of metrics like CPU usage, memory usage, and network stats—think of it as your personal weather report for the virtual environment.
Automation and Scripting
Basics of Scripting in VMware
Automation is the art of teaching your systems to do tasks without your manual intervention. In VMware CLI, this often involves writing scripts that use a series of CLI commands. Simple scripts can automate tasks like backups, while more complex ones can handle failover procedures and more.
Real-World Scripting Examples
One practical example might be a script that takes snapshots of all running VMs. Such a script would loop through all active VMs, using the vmware-cmd command to create snapshots. This is a time-saving tool that could be invaluable in a production environment.
Security Aspects
Secure Login and SSH
Secure Shell (SSH) allows for secure remote access to your VMware host. SSH is like a secure tunnel in a mountain; it ensures that no unauthorized users can snoop on your data as it travels.
Encryption and Data Protection
VMware CLI also offers options to encrypt your virtual disks, making unauthorized access to data almost impossible. It’s like installing a high-tech security system in your home, making it impenetrable to burglars.
Table of VMware CLI Commands and Their Explanations
Command
Parameters
Description
Example Usage
vmware -v
N/A
Displays the installed VMware version.
vmware -v
vmrun list
N/A
Lists all currently running VMs.
vmrun list
vmware-cmd
Multiple
A multipurpose command for VM operations like creating, modifying, and controlling VMs.
vmware-cmd /path/to/vm.vmx start
vicfg-vswitch
--add, --delete
Manages virtual switches.
vicfg-vswitch --add vSwitch1
vmkfstools
-c, -X
Used for disk operations like creating and resizing virtual disks.
vmkfstools -c 10G NewVirtualDisk.vmdk
esxtop
N/A
Provides real-time monitoring for ESXi and associated VMs.
Another multipurpose command for managing VMs and ESXi hosts.
vim-cmd vmsvc/power.on VM-ID
vicfg-route
--add, --delete
Adds or removes routes in the VMkernel.
vicfg-route --add 192.168.1.0/24 192.168.1.1
vicfg-dns
--dns
Configures the DNS servers used by ESXi.
vicfg-dns --dns 192.168.1.1
vicfg-user
--adduser
Adds a new user to the ESXi host.
vicfg-user --adduser new_user --password password
vicfg-advcfg
Multiple
Allows for advanced configuration options for ESXi.
vicfg-advcfg -g /Net/FollowHardwareMac
vicfg-syslog
--server
Specifies a syslog server for logging.
vicfg-syslog --server syslog.example.com
This table provides a quick reference for the most commonly used CLI commands in VMware. Each of these commands plays a vital role in configuring, managing, and optimizing your virtual environments. Feel free to bookmark this section for easy future reference.
This wraps up our in-depth exploration of managing VMware through its CLI. The CLI offers an unparalleled level of control and customization, making it an essential tool for VMware users of all levels. From managing VMs and networks to automating complex tasks, CLI offers a robust set of features designed to make your life easier.
Carbon Hypervisor Screen
Conclusion
So, what’s the verdict? Is CLI a rudimentary, old-fashioned tool? Far from it! In the context of VMware, CLI is a powerful, intricate system that can streamline complex tasks, optimize resource allocation, and even bolster security measures. Whether you’re a beginner or a seasoned expert, there’s always more to learn and explore in VMware’s CLI.
FAQs
Is VMware CLI difficult to learn?
While it has a learning curve, the VMware CLI is highly rewarding to master, offering capabilities that the GUI often can’t match.
Can I manage multiple VMs at once with CLI?
Absolutely, automation and scripting capabilities allow you to manage multiple VMs simultaneously.
Is CLI secure for remote management?
Yes, with SSH and various encryption options, CLI is designed with security in mind.
Can I use CLI to monitor real-time system performance?
Yes, tools like esxtop provide comprehensive real-time statistics.
Where can I find more resources to learn VMware CLI?
VMware’s own documentation is an excellent start. Online forums, webinars, and courses are also available for deeper understanding.
I hope you found this guide both informative and engaging! Feel free to explore the expansive world of VMware CLI.
We’ve all had moments when we wish we could just rewind time, especially when dealing with complex software or system configurations. Well, with VMware’s snapshot feature, that’s essentially what you can do. Let’s explore this concept further.
Understanding VMware
What is VMware?
VMware is a global leader in cloud infrastructure and digital workspace technology, accelerating digital transformation through a software-defined approach to business and IT. This pioneering platform in the field of virtualization has revolutionized the tech industry, offering tools that enable businesses and individual users to create and manage virtual machines (VMs) – these are standalone emulations of computer systems, all operating on a single piece of hardware. What makes VMware especially appealing is its ability to run multiple operating systems and applications on one server, dramatically boosting the efficiency and cost-effectiveness of your hardware usage.
Why VMware?
The decision to choose VMware as your go-to virtualization platform can bring a myriad of benefits to your IT operations. Its robust and scalable solutions present a remarkable level of versatility, allowing you to manage VMs across a wide array of hardware platforms. Whether your systems are on-premise or cloud-based, VMware can seamlessly adapt. Its intuitive user interface simplifies VM management, while the platform’s security features offer robust protection against threats, making it a highly reliable choice for businesses of all sizes and industries.
Peeling Back the Layers of VMware Snapshot Files
Deciphering VMware Snapshot Files
At first glance, the term “snapshot” in VMware might seem like it only refers to a visual capture or a digital photograph of a VM’s state. However, a snapshot in VMware’s context is much more powerful – it’s a comprehensive copy of the entire VM at the time the snapshot is taken. This includes not just an image, but the VM’s disk state, the data stored in its memory, its system settings, and much more. A snapshot is essentially a preservation tool, capturing a specific moment in the VM’s timeline, allowing you to return to that precise instance whenever required.
The Rationale Behind Using VMware Snapshot Files
VMware snapshot files serve a vital role in system backup and recovery processes. If you’re planning significant changes to your VM – such as installing new software, applying updates, or adjusting configurations – taking a snapshot beforehand provides a safety net. If anything doesn’t go as planned, the snapshot enables you to restore the VM to its state when the snapshot was taken, bypassing the often complex and time-consuming troubleshooting and recovery procedures.
Interacting with VMware Snapshot Files
Creating a VMware Snapshot – A Walkthrough
The process of creating a snapshot in VMware is remarkably simple, even for those with minimal experience with the platform. Once you’re in the vSphere Client, navigate through the system’s menu to locate the VM you wish to snapshot. A simple right-click on the desired VM opens a context menu, where you can select “Take a snapshot”. The system will then prompt you to name the snapshot and, if you prefer, provide a description of what the snapshot represents. This could be a useful reminder of the snapshot’s purpose, especially if you manage multiple snapshots. Once you’ve entered these details, with a single click, your snapshot will be created!
Managing VMware Snapshot Files – Best Practices
While creating a snapshot is relatively straightforward, effective snapshot management is crucial for maintaining an organized and efficient VM environment. An integral part of this process is understanding how to delete and consolidate snapshots, as these actions are key to ensuring your system remains up-to-date and doesn’t become cluttered with outdated or unnecessary snapshot files. To delete a snapshot, you simply right-click on it in the vSphere Client and select “Delete”. This action merges the data from the snapshot with the original VM disk data, bringing everything up to the current state. In situations where you have multiple snapshots of a VM, you might want to consolidate them. This involves merging the data from the snapshots into a single, up-to-date VM disk file. To consolidate snapshots, you right-click on the VM in the vSphere Client, select “Snapshot”, and then choose “Consolidate”. By adopting these practices, you can ensure your snapshot strategy is effective and manageable.
Exploring VMware Snapshot Files
A Deep Dive into Different VMware Snapshot Files
It’s essential to understand that several different file types are involved when a snapshot is taken. This includes files for configuration, memory, disk, and logs, each playing a unique role in the operation of your VMs and the creation and management of snapshots.
VMDK Files: These are virtual disk files, which contain the contents of the virtual machine’s hard disk drive. A snapshot process creates a new VMDK file, known as a delta disk file, which records changes made to the virtual machine’s original disk file. The delta disk filename format is -00000x.vmdk, where ‘x’ indicates the snapshot’s order.
VMX Files: VMX files are the primary configuration files for a virtual machine. They store the settings chosen during the creation of the VM, including its name, the number of virtual CPUs, memory size, and network adapter settings. A snapshot preserves the state of this file.
VMSD Files: The VMSD file is a central place for VMware to store metadata and information about snapshots. This file starts as a small 16KB file when a VM is first created and grows when snapshots are taken. The filename format is vmname.vmsd.
VMSN Files: These files, called snapshot state files, store the running state of a VM at the time the snapshot was taken. This includes the contents of the VM’s memory and the virtual machine settings. The filename format is Snapshotname.vmsn.
-delta.vmdk Files: These differential files represent changes to a VM’s base disk file since the snapshot was taken. Any write operations performed on the VM are written to these files, rather than the base disk. This approach allows the base disk to remain unchanged, preserving its state at the time of the snapshot.
.log Files: While not directly related to snapshots, .log files play an integral role in maintaining the overall health of your VMs. Created by the VMkernel and vmx processes, these files contain diagnostic information that is extremely useful for troubleshooting.
By familiarizing yourself with these files and understanding their roles, you can greatly enhance your ability to manage your virtual environment.
The Limitations and Precautions of VMware Snapshot Files
Understanding Snapshot Limitations
While snapshots are an incredibly powerful tool, they are not without their limitations. For instance, snapshots are not meant to be a full-fledged, long-term backup solution. They don’t provide the same level of redundancy and security as traditional backup methods. In addition, extensive use of snapshots can lead to degraded performance due to the additional overhead of maintaining multiple disk states. VMware recommends limiting the number of snapshots you use per VM and deleting or consolidating snapshots once they are no longer needed.
Taking Precautions with VMware Snapshot Files
When managing snapshots, it’s crucial to follow some best practices. Always remember to delete or consolidate your snapshots once they’re no longer needed to prevent unnecessary storage consumption. Also, be mindful that deleting or consolidating snapshots can consume considerable system resources, so these operations are best performed during off-peak hours to minimize impact on VM performance.
Enhancing Snapshot Management with SnapShot Master
Introduction to SnapShot Master
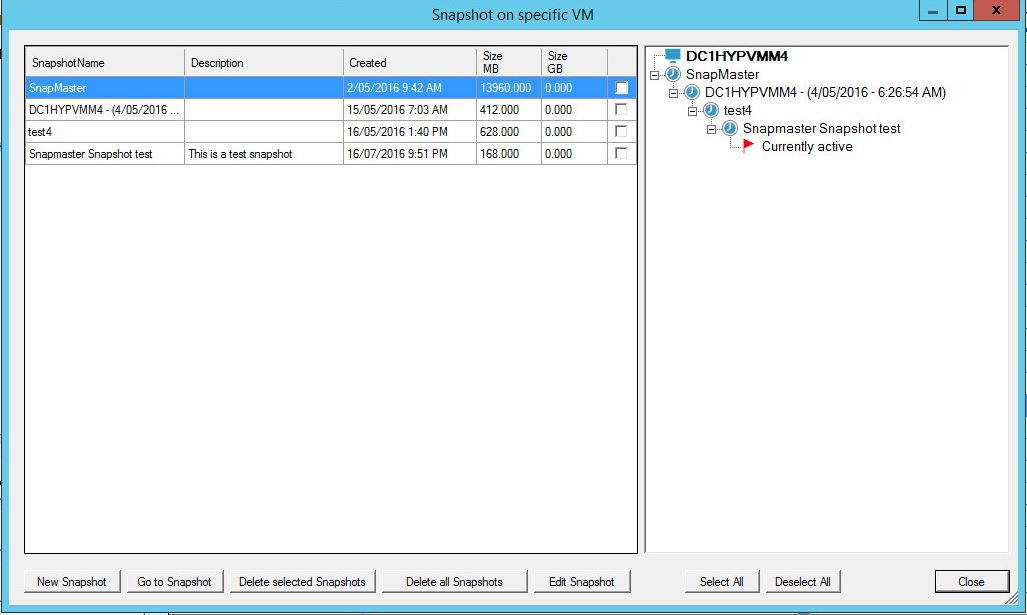
In light of the complexity and precision required for effective snapshot management, tools like SnapShot Master have emerged to streamline these processes. SnapShot Master is a comprehensive solution designed to manage virtual machine (VM) snapshots, checkpoints, and data stores for VMware, Hyper-V, and Azure.
Superior Snapshot Management with SnapShot Master
SnapShot Master simplifies the process of creating and deleting snapshots by allowing these tasks to be scheduled ahead of time. This proactive approach to snapshot management can alleviate the potential strain on system resources during peak times.
SnapShot Master‘s impressive capabilities extend to its interoperability with leading VM platforms. It can interface with VMware’s vCentre, Microsoft’s System Center Virtual Machine Manager (SCVMM), and Microsoft Azure. This flexibility gives users a complete and unified view of their virtual environment, regardless of the platform.
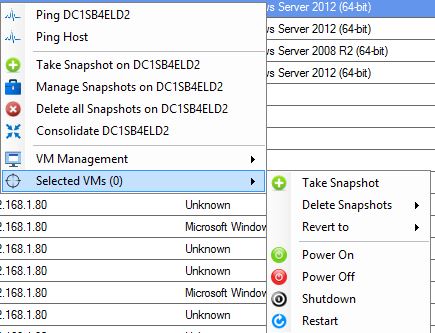
Automating VM Management with SnapShot Master
Aside from handling snapshots, SnapShot Master provides features to manage your VMs in more ways. Schedule power on and off for your VMs, connect to them remotely via RDP or PowerShell, and execute Remote PowerShell commands. This tool is designed to give you greater command of your virtual environment, boosting efficiency and reducing manual intervention.
Simplified Reporting with SnapShot Master
Never be out of the loop with SnapShot Master’s automated reporting feature. You can schedule reports about your virtual servers and VMware or Hyper-V environments to be delivered straight to your inbox. This feature makes monitoring your VM environment’s health and performance as easy as checking your email.
Wrapping Up
In conclusion, VMware snapshot files are an essential component of an effective virtual machine management strategy. They provide a vital safety net when making changes to your VMs, allowing you to return to a known good state if things don’t go as planned. By understanding the different snapshot file types and following best practices for snapshot management, you can harness the full power of this feature to maximize your VMware environment’s efficiency and reliability.
FAQs
1. Can VMware snapshots replace my regular backup strategy?
No, VMware snapshots are not designed to be a full-fledged backup solution. While they can help in certain recovery scenarios, they do not provide the same level of redundancy and security as traditional backup methods.
2. What happens to my VM when I take a snapshot?
When a snapshot is taken, VMware pauses the VM, captures its current state, and then resumes the VM. This process typically happens quickly enough that there is no noticeable impact on the VM’s performance.
3. Can I take multiple snapshots of a single VM?
Yes, you can take multiple snapshots of a VM. However, each new snapshot creates a new delta disk file, which can consume significant storage space and lead to degraded performance over time.
4. What is the maximum number of snapshots I can have for a VM?
As of vSphere 7.0, the maximum supported number of snapshots per VM is 32. However, VMware recommends limiting the number of snapshots you use due to the potential performance impact.
5. What happens if I delete a snapshot?
When you delete a snapshot, VMware merges the data from the snapshot with the original VM disk data. This brings the VM up to the current state, as represented by the snapshot and all subsequent changes recorded in the delta disk file. The merge operation can consume considerable system resources, so it’s recommended to perform this action during off-peak hours.
Snapshot quiescing, a technique employed in the world of virtualization, stands as a pivotal concept to grasp for anyone involved in IT operations. In particular, when working with VMware, understanding snapshot quiescing can significantly streamline your backup and restore operations. It’s a crucial process that ensures the data on a Virtual Machine (VM) is in a consistent state when a snapshot is taken. Imagine it as a photographer asking everyone to stay still for a moment to capture a clear picture. That’s precisely what quiescing does – it momentarily pauses or alters the state of running processes on a VM to get a clear, consistent snapshot.
Concept of VMWare Snapshots
Taking a snapshot is akin to capturing a moment in time. In VMware vSphere, snapshots allow you to preserve the state of a VM at a specific point in time. This includes the VM’s configuration settings, memory state, and disk state. Think of it as a time machine allowing you to go back to a particular moment when a change had not yet occurred or an error had not yet taken place. Snapshots are invaluable in situations like applying system updates or performing testing – if something goes wrong, you can simply revert the VM to the state it was in when the snapshot was taken, effectively undoing any negative impact.
The Quiescing Process
In essence, the quiescing process ensures that the data on a VM is in a consistent state suitable for backups. The operation of quiescing a VM suspends or alters the state of ongoing processes on a VM, especially if a particular process may modify stored data during a backup. When a snapshot is taken during the quiescing process, it represents a consistent view of the guest file system state at a specific point in time.
Understanding Types of VMWare Snapshots
Memory State Snapshots
Memory state snapshots are the default option for taking snapshots in VMware vSphere. They capture and retain the active state of a VM. For instance, if you’re running an application on your VM, a memory state snapshot will save the state of that application. If you revert to this snapshot later, the VM will return to that exact moment, with the application running in the same state. It’s important to note that memory state snapshots take longer to create than non-memory snapshots. The time it takes for the host to write the memory to disk is directly related to the amount of memory the VM is configured to use.
Quiesced Snapshots
On the other hand, quiesced snapshots are used when you need to perform operations on a VM that require a consistent state. The process of quiescing the guest file system ensures that a snapshot represents a consistent view of the guest file system state at a specific point in time. This involves suspending or altering the state of ongoing processes on a VM, especially those that may modify stored data during a backup.
To create a quiesced snapshot, VMware Tools must be installed and running on the VM. The process involves creating a new Volume Snapshot Service (VSS) snapshot inside the guest operating system using the VMware Snapshot Provider function, preparing active applications for backup with VSS writers, writing transactions from the memory to the disk, and signaling the completion of the writing process to the VMware Tools Service. At this point, the system is ready to take a quiesced snapshot. Quiesced snapshots are best used when you configure a VM for regular backups.
In terms of consistency, quiescing a VM achieves both file-system and application consistency. File-system consistency ensures that all file system metadata reflects the actual data on disk. Application consistency ensures that the application data is consistent with the application’s state. Quiescing is essential for highly transactional applications as it helps create transactionally consistent backups or replicas, guaranteeing the safety of application data.
Snapshots in VMware vSphere
Taking snapshots of a virtual machine (VM) in vSphere serves as a powerful tool in the management and protection of your data. These snapshots essentially capture a VM’s memory state, disk state, and configuration settings at particular moments in time, providing a robust mechanism for preserving the state of a VM.
With snapshots, you can effectively revert a VM to a state it was in before a snapshot was taken. This capability proves invaluable in scenarios such as testing new software or system updates. For instance, imagine you’ve just installed a new operating system on your VM. By taking a snapshot before applying any significant changes, such as updates or software installations, you establish a safety net. If any issues arise from these changes, you can effortlessly revert back to the state when the snapshot was taken, effectively undoing any problems.
However, it’s important to note that the process of taking a snapshot can be influenced by the ongoing activities on a VM. As such, snapshots are most effectively taken when a VM is not running I/O-intensive tasks or programs that are constantly communicating with other machines. This is because active data transfer or communication during a snapshot can lead to errors. For instance, if a snapshot is taken during the transfer of a file from a server to a VM, the file in question could appear to be corrupted when you revert back to that snapshot.
Memory State Snapshots vs Quiesced Snapshots
In the realm of snapshots, there are two primary types you can create in a VMware vSphere environment: memory state snapshots and quiesced snapshots. The choice between these two largely depends on your specific needs and the operations you intend to perform on a VM.
Memory state snapshots serve as the default option for taking snapshots in VMware vSphere. They capture and retain the active state of a virtual machine, allowing a running VM to be reverted to the state it was in when the snapshot was taken. This type of snapshot is ideal when you need to save the state of running applications. However, it’s important to note that memory snapshots take longer to create than non-memory snapshots. The time it takes the host to write the memory to disk is directly related to the amount of memory the VM is configured to use. It’s also recommended to avoid using memory snapshots as a replacement for true backups as they don’t provide the same level of data protection and recovery.
On the other hand, quiesced snapshots involve a process known as quiescing the guest file system. Quiescing essentially means bringing the data on a VM into a state suitable for backups. Backup solutions often use VM snapshots to copy data from a VM. The operation of quiescing a VM ensures that a snapshot represents a consistent view of the guest file system state at a specific point in time. This is particularly important if a process might modify stored data during a backup. Quiesced snapshots are most effective when you configure a VM for regular backups.
Quiesced Snapshots and the Importance of Quiescing
Quiescing a VM’s file system is crucial for creating a snapshot that represents a consistent view of the file system state at a specific point in time. This consistency is essential for backups and achieving both file-system and application consistency. During the process of creating a quiesced snapshot, the guest OS’s active applications are prepared for backup using VMware Tools and the VMware Snapshot Provider function, which creates a new Volume Snapshot Service (VSS) snapshot inside the guest operating system. As part of this process, transactions are written from memory to disk, and once the writing process is complete, a quiesced snapshot is taken.
There are two types of consistency to consider when quiescing a VM: file-system consistency and application consistency. File-system consistency refers to the state where all file system metadata reflects the actual data on disk. Application consistency, on the other hand, ensures that the application data is consistent with the application’s state. Quiescing is essential for highly transactional applications as it helps create transactionally consistent backups or replicas, guaranteeing the safety of application data.
However, obtaining more detailed, step-by-step information on the process of creating quiesced snapshots in VMware proved to be challenging within the given time frame. I recommend consulting the official VMware documentation or reaching out to a VMware technical support resource for a more thorough explanation.
Snapshot Master
Snapshot Master is a software solution designed to simplify the process of managing virtual machines (VMs), specifically in regards to maintaining backups and ensuring data security. It provides an automated process for creating snapshots or checkpoints of your virtual machines, ensuring regular backups and data protection. It offers a user-friendly interface for scheduling these snapshots or checkpoints, optimizing VM performance while safeguarding data.
One of the key benefits of Snapshot Master is its compatibility with multiple platforms, including VMWare ESX, Microsoft’s Hyper-V, and Azure Virtual Machines, making it a versatile solution for IT professionals working across different systems. Additionally, it allows efficient management of multiple VMs by enabling you to schedule snapshots or checkpoints for all of them at once, saving time and effort on manual backups.
In conclusion, Snapshot Master is a valuable tool for IT professionals managing virtual machines across different platforms. It automates the process of creating snapshots or checkpoints, simplifies scheduling, and ensures data protection across multiple platforms and VMs, making it an essential solution for those seeking to streamline their backup process and maximize efficiency.
Snapshot FAQs
What is a VMware snapshot?
A VMware snapshot is a copy of the state of a virtual machine at a specific point in time. It preserves the VM’s memory state, disk state, and configuration settings, allowing you to revert the VM back to that state if needed.
What is quiescing in the context of VMware snapshots?
Quiescing is the process of bringing the data on a VM into a state suitable for backups. This process ensures that a snapshot represents a consistent view of the guest file system state at a specific point in time.
What is the difference between a memory state snapshot and a quiesced snapshot?
A memory state snapshot preserves the active state of a VM, including running applications. A quiesced snapshot, on the other hand, suspends or alters ongoing processes to provide a consistent state suitable for backups.
What are the benefits of quiesced snapshots?
Quiesced snapshots ensure that the data in the snapshot is in a consistent state, which is essential for reliable backups. This is particularly important for VMs running databases or other transactional applications that continuously modify data.
Why do memory state snapshots take longer to create?
The time it takes to create a memory state snapshot depends on the amount of memory the VM is configured to use. The more memory that is in use, the longer it will take for the host to write the memory to disk.
What are the requirements for creating a quiesced snapshot?
To create a quiesced snapshot, you need to have VMware Tools installed and running on the VM. The VMware Tools use the Snapshot Provider function to prepare the VM for the snapshot.
What does it mean for a snapshot to be file-system consistent or application consistent?
File-system consistency ensures that all files on the disk are in a consistent state, while application consistency ensures that all in-memory data and transactions have been committed to the disk.
What is SnapShot Master and how can it assist with VM snapshot management?
SnapShot Master is a software solution that simplifies the process of scheduling and managing snapshots for single or multiple VMs across different platforms. It helps automate the creation of backups and offers a user-friendly interface for scheduling snapshots.
Can SnapShot Master be used with different virtualization platforms?
Yes, SnapShot Master is compatible with a wide range of platforms, including VMware ESX, Microsoft’s Hyper-V, and Azure Virtual Machines.
What is the advantage of using SnapShot Master when managing multiple VMs?
With SnapShot Master, you can schedule snapshots for multiple VMs at once, saving time and effort. This is particularly useful for IT professionals managing a large number of VMs across different systems.