How to see all your Azure VM Snapshots

How to see all your Azure VM Snapshots

Snapshot an Azure VM

Snapshots in Azure is a nice feature that allows you to take a read-only, “point in time” snapshot of a Virtual Machine’s disk. You can take a snapshot of a VM’s OS or data disk. You can use this snapshot to revert the VM to a point in time before an event occurred, or you installed something that didn’t go quite right.

Azure VM Disk Snapshot

The process to take a snapshot of a VM that is using Managed Disks is quite simple, all you have to do is browse to the Disk of the VM and select “Create Snapshot”.
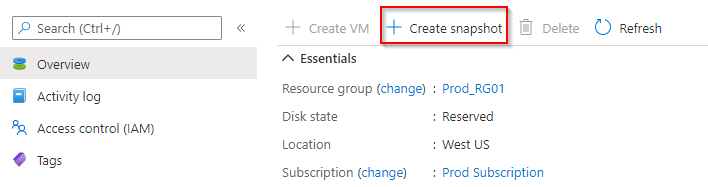

Azure Snapshot

Azure VM Snapshot

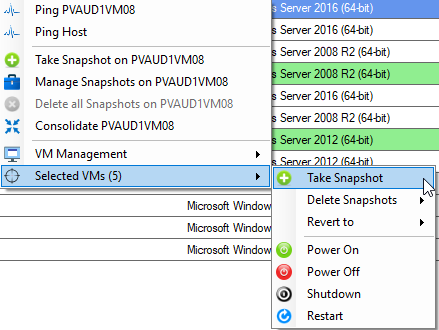
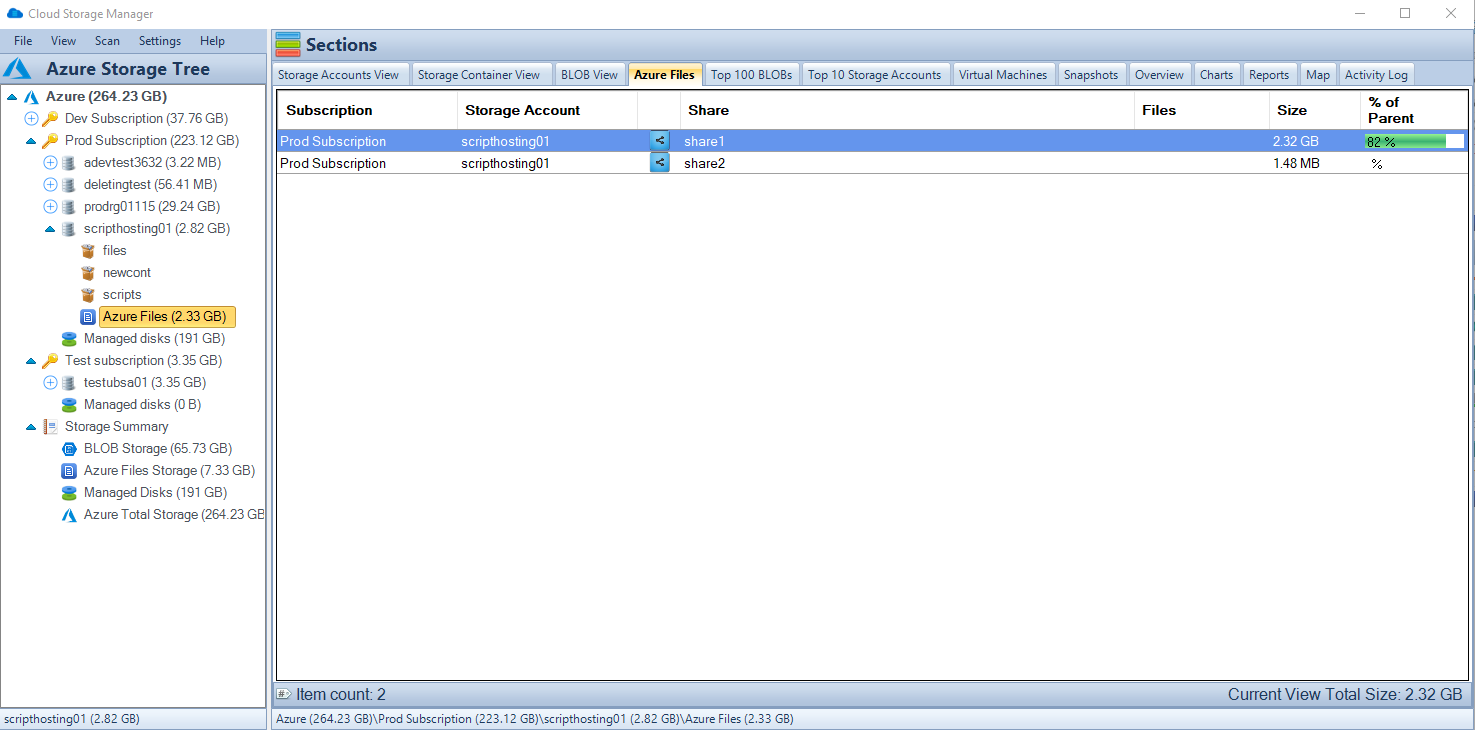
Now that we’ve created these Snapshots, where do we find them?

That is where things get a little tricky. If you’ve taken Snapshots of VMs using Managed Disks, all you need to do is search for “Snapshots” and you will see all the Azure snapshots along with information such as the snapshot type, source disk, date and time it was created, the size and a few other items.

OK, great, what’s the problem?

Where are all your Azure VM Managed / Unmanaged Disks?

Well, this view will only show you snapshots of Managed Disks. If you are using unmanaged disks there is no one portal or view where you can see all your snapshots.

Much like everything else in Azure, Snapshots are not free! And if you have numerous VMs using unmanaged disks, you will need to check them one by one through the Storage Account view, locate their VHD and click on the Snapshots menu to see if there is a snapshot associated with the VM.

You could be paying for storage that Snapshots are consuming that were taken months or even years ago that have been forgotten.

OK, so how do you get this information without having to go through each and every VM disk?

Why are leaving Snapshots in Azure a bad thing?

The cost of storing snapshots in Azure depends on several factors, such as the size of the snapshots, the number of snapshots, and the type of storage you use. In Azure, snapshots are stored as page blobs in a storage account, and you are charged for the amount of storage used by the snapshots, as well as any additional features or services you may use, such as data transfer, data management, and data retrieval.

Snapshots stored in Azure are billed based on the size of the snapshots, so the larger the snapshots, the more storage you will be charged for. Additionally, snapshots are billed for the time they are stored, so the longer the snapshots are stored, the more you will be charged for storage.

In addition to storage, you may also incur charges for data retrieval and data transfer. Data retrieval charges apply when you access data stored in a snapshot, and data transfer charges apply when you move data to and from a snapshot.

To reduce the cost of storing snapshots in Azure, it is important to manage your snapshots carefully and only store the snapshots that you need. You can also use features such as automatic snapshot deletion or snapshots compression to reduce the size of your snapshots and reduce the cost of storage.

Overall, the cost of storing snapshots in Azure can be significant, so it is important to plan and manage your snapshots carefully to ensure that you are only paying for the storage that you actually need.

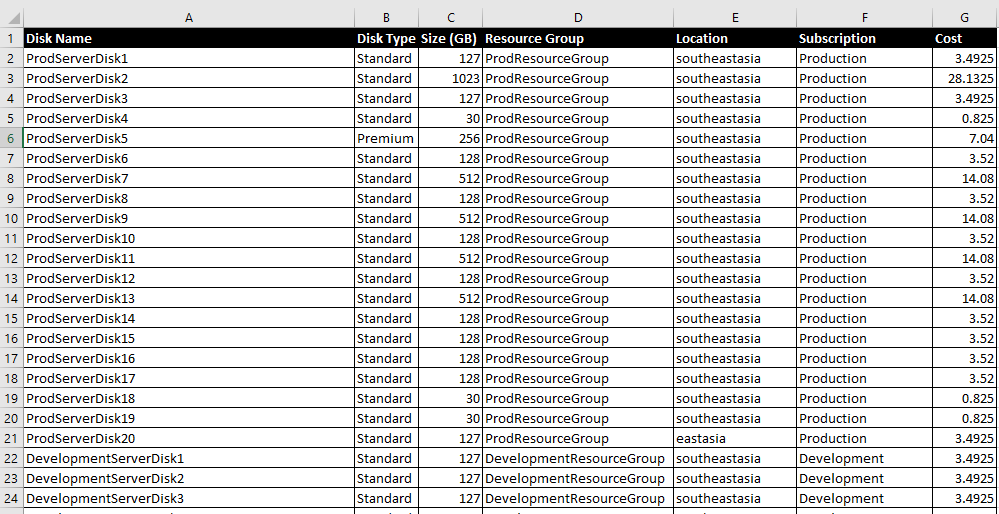
Azure Snapshot Sizes

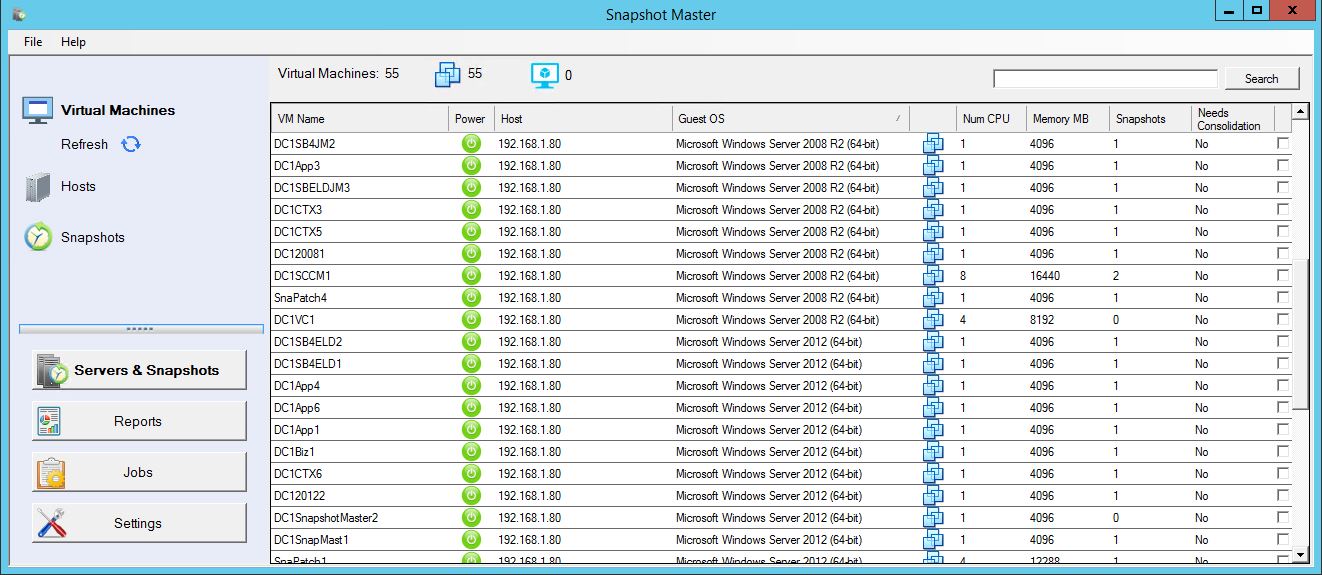
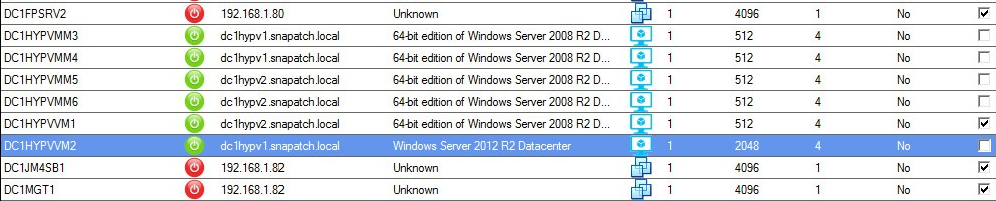
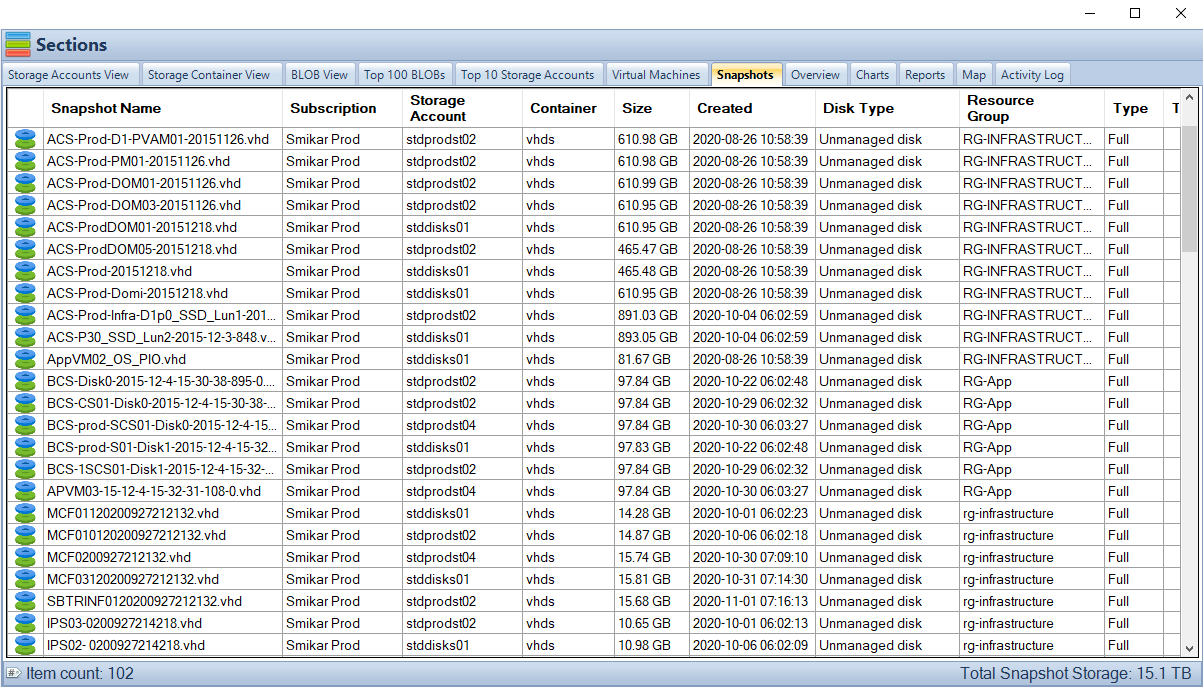
Easy, just use Cloud Storage Manager and run the report to tell you.

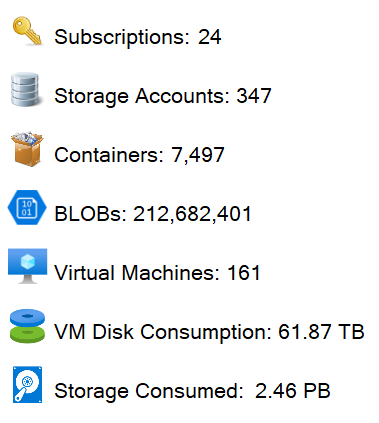
Once you’ve installed Cloud Storage Manager, it will scan your Azure environment and collect a heap of information. Then all you have to do is launch it, and select the “Snapshot” tab to see all your VM snapshots across your Azure environment, including both managed and unmanaged disks.

Of course Cloud Storage Manager doesnt only show how much storage your Snapshots are consuming, it also shows you the capacity of your Storage Accounts, and historical storage growth patterns, and loads more insights in to your Blob Storage within Azure.


Azure VM Snapshot List

Where are all my Azure VM Snapshots?

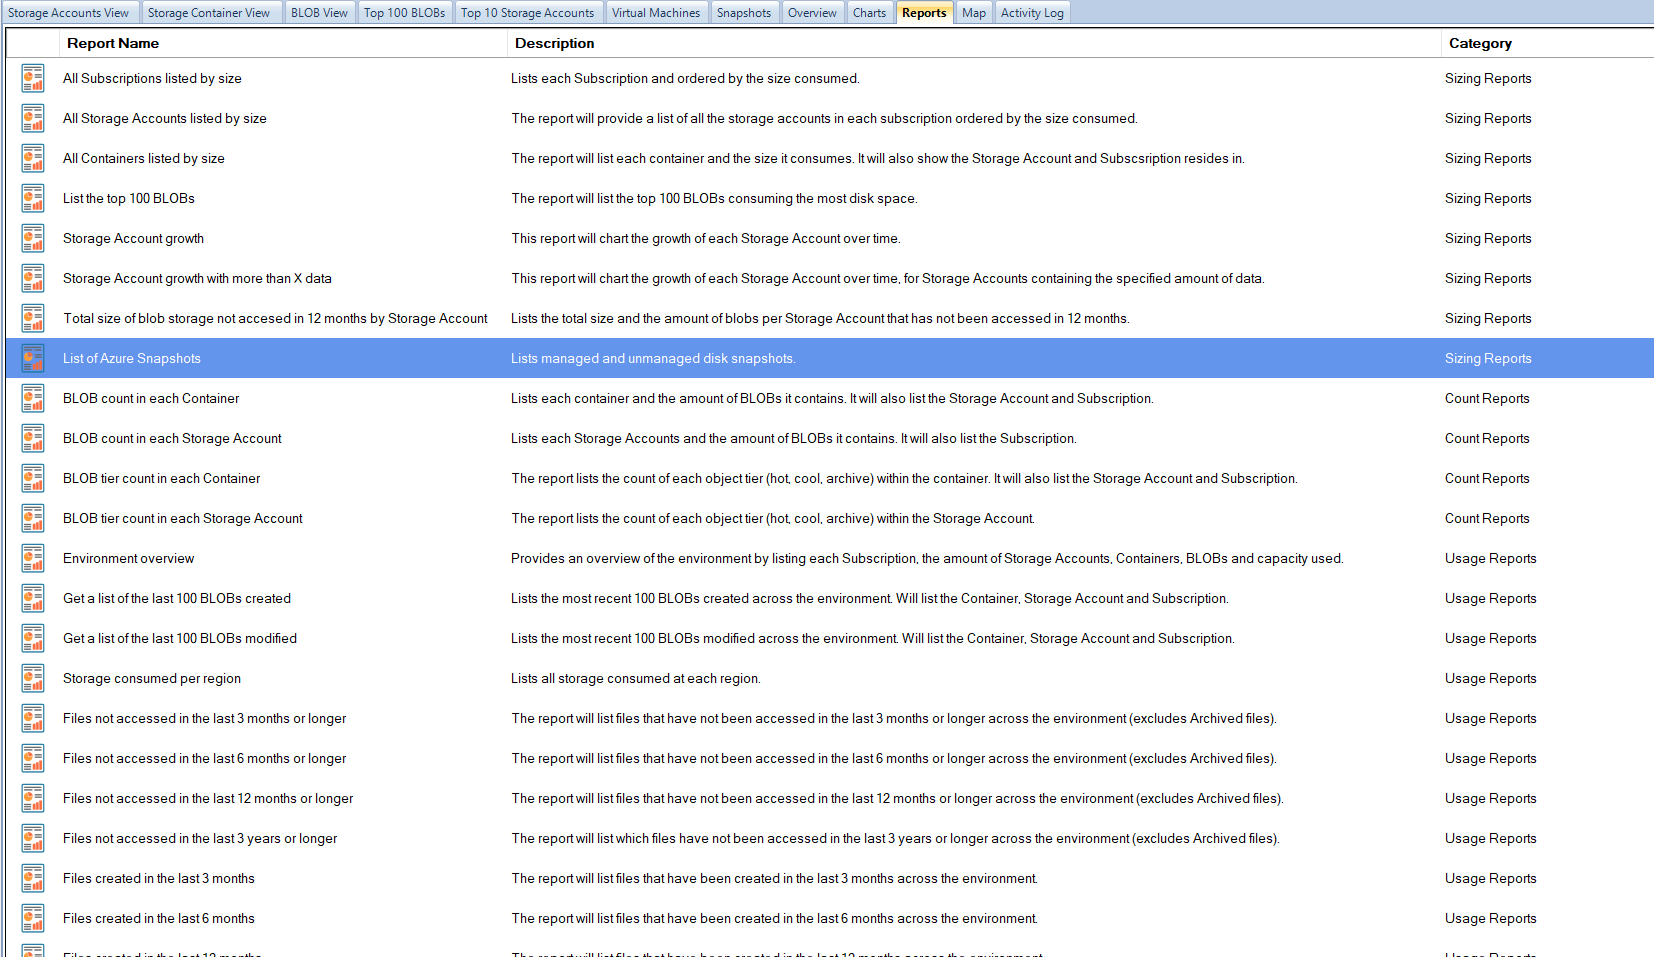
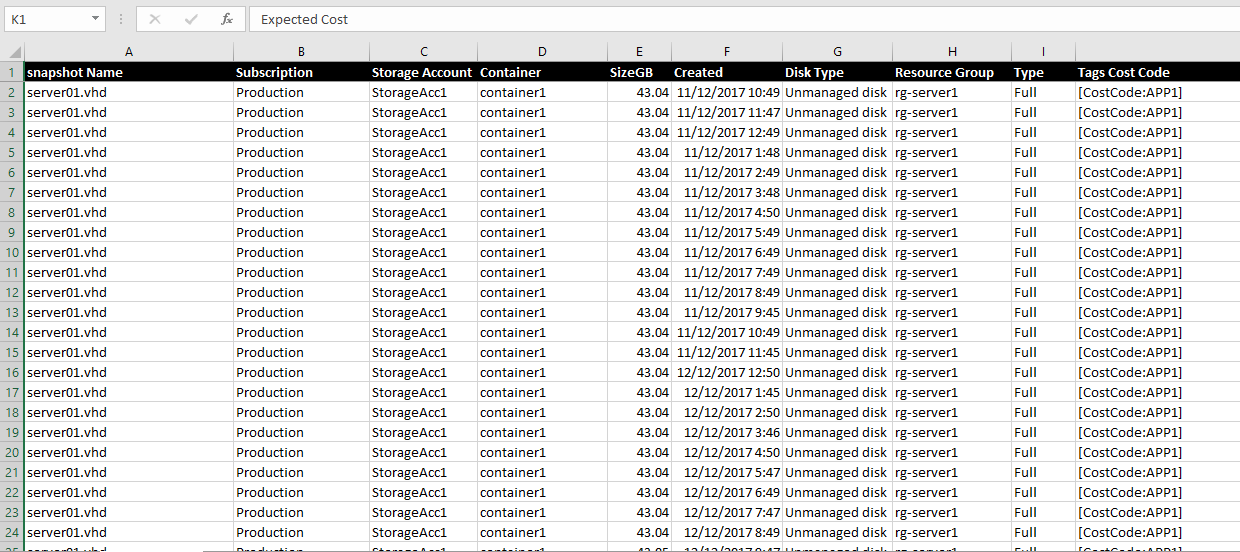
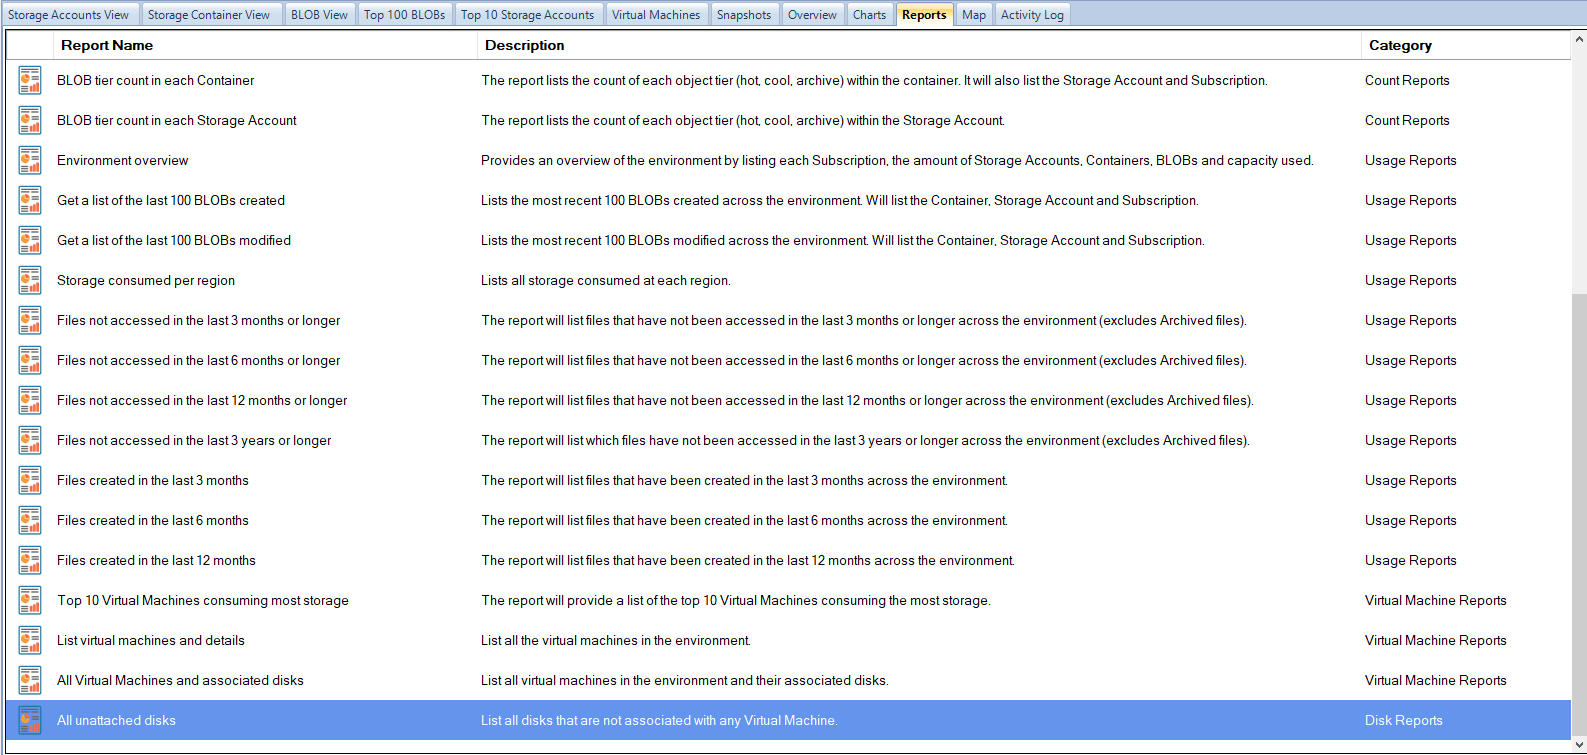
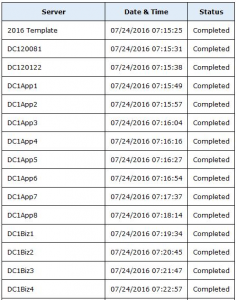
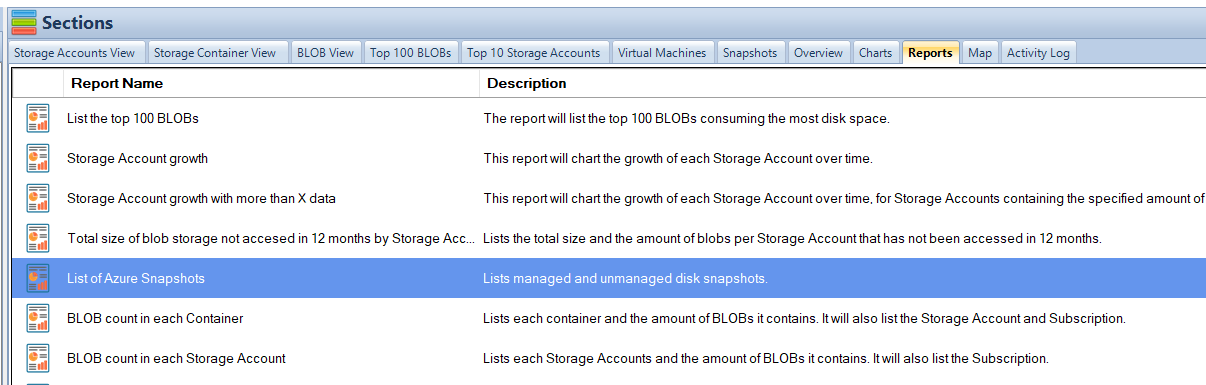
You may also export these results to a report using the Reports tab.

Select the Reports tab and click on the “List of Azure Snapshots”. You will also have the option to export the report to a CSV file.


Azure VM Snapshot Report

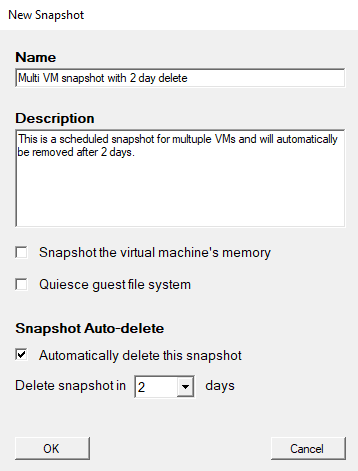
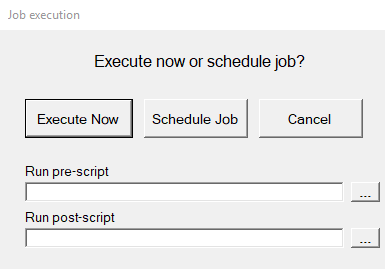
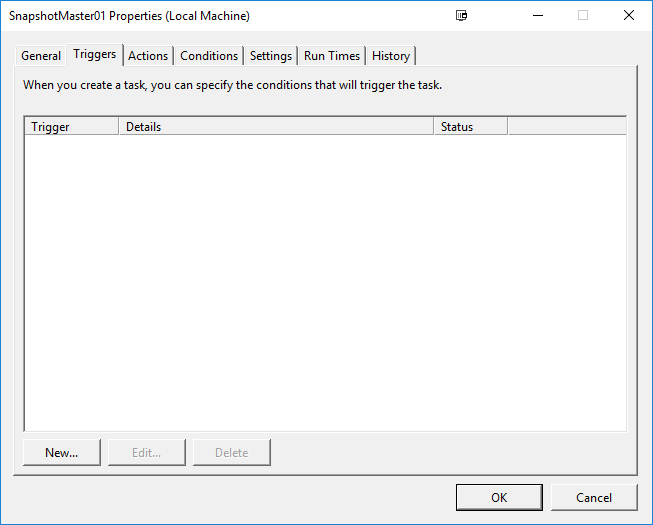
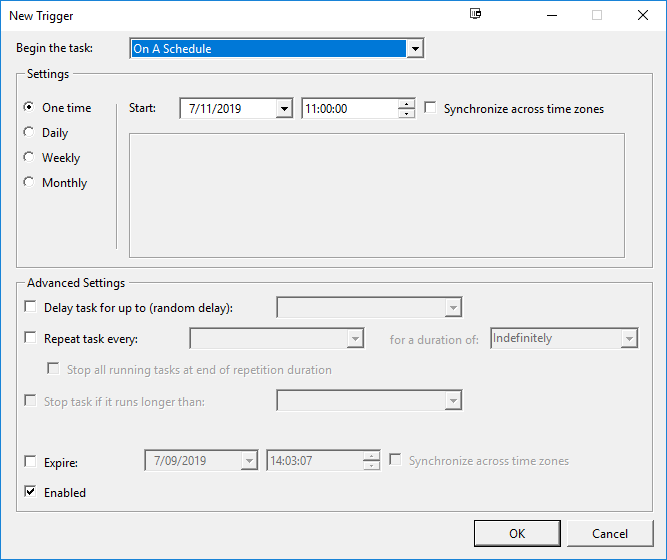
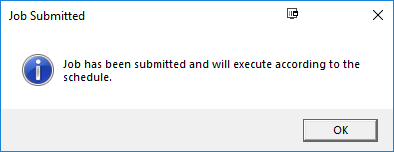
Automate Azure VM Snapshot Creation

Now you may want to schedule the creation and deletion of Azure Virtual Machines automatically.

SnapShot Master can do this for you with just a few clicks. 

SnapShot Master also shows you all your Azure Cloud and even your VMware or Hyper-V snapshot / checkpoint information and more


Vmware Snapshot Overview

Minimizing Azure Blob Storage Costs: Tips and Tricks

Minimizing Azure Blob Storage Costs: Tips and Tricks

Maximizing cost savings on Azure Blob Storage and Files has become increasingly important as more businesses migrate their data to the cloud. In this article, we’ll discuss how utilizing Cloud Storage Manager can help you optimize Azure storage consumption and significantly reduce expenses. We’ll also explore various ways to identify and remove redundant data and manage your virtual machine snapshots effectively.

Uncovering Azure Blob Storage Consumption

A Comprehensive Scan with Cloud Storage Manager

By using Cloud Storage Manager, you can perform a full scan of all your Azure Subscriptions and Blob Storage Accounts, providing a clear overview of your Azure Blob Storage usage. This visibility allows you to identify potential areas where you can cut costs and better allocate resources.


Azure Storage Overview

Azure Blob Storage Locations

Not only could they easily see the amount of Azure Blob Storage in use, they could also see all the Microsoft Datacentres where they are using storage from the map tab.


How much blob storage are your VM snapshots consuming?

Azure Blob Storage Reporting

One of the easiest ways to start saving on your Azure Blob Storage is to find often forgotten about Azure Virtual Machine Snapshots.

Often snapshots are created and then forgotten about.

Simply go to the Reports Tab in Cloud Storage Manager and run the LIST OF AZURE SNAPSHOTS report.

From the reports, you can quickly see where you could apply an Azure Storage Lifecycle Management Policy, and move the files that havent been accessed to a lower storage Tier to save you money.


Azure VM Snapshot Storage

Azure Virtual Machine Snapshots: Out of Sight, Out of Mind

Once the Azure Snapshot report has been generated, simply open it up in excel to see all your Azure VM snapshots.

The report provides you with information including the name of the Azure snapshot, which subscription it resides in, the Azure Storage Account, the relevant Container, size of the Azure VM snapshot, when it was created, if its a managed or unmanaged disk, the Azure Resource Group, type of snapshot created and finally any Azure Tags if you have them.

From this report, we found that they had 1168 Azure VM snapshots lingering in their environment, some well over 3 years old.

Using a simple calculation in Excel using standard Azure storage costs, ($0.02750 per TB using azure blob storage pricing provided by Microsoft – IN $AUS.


Azure Pricing Calculator

Visit the Azure Pricing Calculator for pricing in your currency ) deleting all these snapshots saved the client just under $2,000 per month, an approximate saving of $24,000 a year.

Just running these two simple reports and then taking action on them
saved this client $33,600 in their yearly Azure Blob Storage Costs.

Managing Azure Files Consumption

Gaining Insights with Cloud Storage Manager

As organizations increasingly adopt Azure Files to replace on-premise file servers, it’s crucial to understand exactly how much data resides in your Azure Files.

Cloud Storage Manager can scan all your Azure Files across your tenancy, offering quick and easy insights into Azure Files consumption.

Identifying Cost-Saving Opportunities

With a clear view of your Azure Files consumption, you can identify opportunities to reduce costs by optimizing storage usage and eliminating unnecessary data.


Azure Files Overview

Handling Unattached Azure VM Disks

Finding Unattached Disks with Cloud Storage Manager

Next on the list to reduce their Azure Storage costs, was finding unattached Azure Virtual Machine disks.

Again, this is often overlooked, to delete any disks no longer needed when decommissioning your Azure VMs.

Another standard report is run, this time All Unattached Disks.

Once the report has completed, again open it up in Microsoft Excel, and you can go through this data to see which Azure VM Unattached Disks can be deleted, further reducing your Azure Storage Costs.


Azure VM Unattached Disk

Azure VM Storage Cost Savings

Now using the same quick costing formulas from before, we can see an estimated monthly Azure Storage cost for these unattached virtual machine disks.

Estimating Savings with the Azure Pricing Calculator

After running this report and using the Azure Cost Estimator (I used AUD pricing here) to get cloud storage pricing, we found that the client had over 110 unattached Azure Virtual Machine Disks.

Removing all these unattached disks saved them $800 per month, so around $9,600 per year.


Reduce your Microsoft Azure Storage Costs

In a follow-up blog post, we will then dig a little deeper into more Azure Storage cost-saving initiatives (looking to further reduce your Azure Blob and FIles storage pricing and costs) using the insights from Cloud Storage Manager.

Download a free trial of Cloud Storage Manager today and start saving money with your Azure Storage.

Azure Cost Optimisation Conclusion

Azure pricing is based on a pay-as-you-go model, where customers are only charged for the services and resources they consume. This allows for flexible and cost-effective cloud computing. There are a variety of services available in Azure, including computing, storage, networking, and security. The pricing for these services can vary based on factors such as the type of service, the amount of resources used, and the duration of use.

The Azure pricing calculator is a tool that can be used to estimate the cost of using Azure services. The calculator allows you to select the services you want to use, input the details of your usage, and see an estimated cost. This can help you to budget for your cloud computing needs and make informed decisions about which services to use and how much to use them.

In addition to the pricing calculator, there are also a number of pricing options and discounts available to help you save money on your Azure bill. For example, you can use reserved instances to save up to 72% on virtual machine costs, or you can take advantage of Azure Hybrid Benefit to use your existing Windows Server licenses in Azure and save up to 40%.

The Cloud Storage Manager is a tool that helps manage and optimize cloud storage costs for organizations using Azure storage. By providing insights into storage usage patterns, the tool helps organizations make informed decisions about storage capacity planning, tiering, and rightsizing, which can result in cost savings. With its easy-to-use interface and intuitive navigation, the Cloud Storage Manager simplifies the process of managing and optimizing cloud storage costs.

In addition to cost savings, the Cloud Storage Manager also offers benefits such as improved visibility into storage usage, with the ability to view storage costs by usage, users can identify and eliminate redundant, underutilized, or unnecessary storage resources.

Overall, the Cloud Storage Manager is a valuable tool for organizations using Azure storage. By helping to optimize cloud storage costs and streamline management of storage resources, the tool enables organizations to focus on delivering value to their customers, rather than managing storage resources.

How to schedule a snapshot on multiple Virtual Machines.

How to schedule a snapshot on multiple Virtual Machines.

How to schedule the snapshot of multiple VMware or Hyper-V Virtual Machines with auto deletion.

Every so often you need to schedule a snapshot on a virtual machine, whether that be a VMware virtual machine or a Hyper-V virtual machine, or even multiple virtual machines because someone or something is going to be changed and you need a quick way to roll them back to a running state, just in case things go belly up. It’s a very common task that administrators need to do. Other times you need to create a snapshot on a schedule, whether it’s a one-off snapshot at a specific date and time, or a recurring one that happens every week or month. Doing this using the standard vCenter console is fairly simple and easy to do. But how do you schedule it for multiple VMs? And to then also automatically remove the snapshot? Or what if you have a combination of VMware and Hyper-V? Doing that usually involves a combination of scheduled tasks via the console and PowerShell with PowerCLI.

But the easiest and simplest way by far is to use Snapshot Master. Hopefully you have installed and are running Snapshot Master in your environment, if not, you can download and request a 30 Day trial key and try it out for yourself.

Creating a schedule to snapshot one or multiple virtual machines and then automatically deleting the snapshot after a period you define is a walk in the park.

OK, so now that I’ve talked up Snapshot Master and how easy it is to create a scheduled snapshot on one or multiple VMs either VMware or Hyper-V with auto-deleting the snapshot, how do you actually do it?

Snapshot Scheduling Use Cases

Use Case Why Schedule a Snapshot?

Testing and Development

To quickly roll back changes made to a virtual machine during testing and development.

Software Upgrades

To create a snapshot before performing a software upgrade, in case the upgrade causes issues that need to be rolled back.

Disaster Recovery

To have a recent snapshot available in the event of a disaster or data loss.

Compliance

To maintain compliance with data retention policies or audit requirements.

Resource Optimization

To free up disk space on a virtual machine by automatically deleting old snapshots after a specified time period.

Performance Tuning

To create a snapshot before making changes to a virtual machine’s configuration or performance settings, in case the changes negatively impact performance.

By scheduling snapshots, you can ensure that you have a recent backup of your virtual machines that can be easily restored in the event of issues or data loss. Additionally, scheduling snapshots can help you meet compliance requirements, optimize resource usage, and improve the overall performance of your virtual environment.

Launch Snapshot Master

The first step is to open Snapshot Master. Ensure that you have already installed Snapshot Master on your system. If not, you can download it and request a 30-day trial key to test it out.

Snapshot auto delete 1

Select the Virtual Machines you want to Schedule a Snapshot

Once you launch Snapshot Master, select the virtual machines you want to snapshot. You can do this by either placing a tick in the checkbox or double-clicking the row.

Snapshot auto delete 2

Take a Virtual Machine Snapshot

Right-click anywhere on the screen, move to Selected VMs, and click Take Snapshot. A dialog box will appear to give the job a name and description. Tick the box to automatically delete the snapshot and use the drop-down list to select the number of days after which it should be deleted, then press OK.

Snapshot auto delete 3

VM Snapshot Name

Give the job a name and descriptionTick the box to automatically delete the snapshot and use the drop down list to select the number of days it should be deleted in and press OK.

Snapshot auto delete 4

VM Snapshot Execute Now or Scheduling

 Click Schedule job.

Note, if you need to run a pre or post script along with this job, you may call it here.

Snapshot auto delete 5

Schedule VM Snapshot Creation

Click New and setup the schedule for this job.

Press OK when done.

SnapShot Master will now start the snapshot / checkpoint creation process, at the schedule you have created.

Snapshot auto delete 6Snapshot auto delete 7

Scheduled VM Snapshot Job Notification

You will receive a notification letting you know the job has been scheduled.

Snapshot auto delete 8

Scheduled VM Snapshot Email Alerts

That’s all there is to it. Doesn’t get much easier than that. And if you have setup email notifications, you will receive an email detailing the success and failures of the job.

Snapshot auto delete 9

SnapShot Master FAQs

Question Answer

What is Snapshot Master?

Snapshot Master is a software tool that simplifies the process of creating and managing snapshots of VMware and Hyper-V virtual machines.

How does Snapshot Master work?

Snapshot Master provides a user-friendly interface for scheduling and creating snapshots of virtual machines, as well as automatically deleting old snapshots after a specified time period. It also supports pre- and post-snapshot scripts for more advanced customization.

Can Snapshot Master handle both VMware and Hyper-V virtual machines?

Yes, Snapshot Master can create and manage snapshots for both VMware and Hyper-V virtual machines.

Is Snapshot Master easy to use?

Yes, Snapshot Master is designed to be simple and user-friendly, with an intuitive interface that makes it easy to schedule and create snapshots of virtual machines.

Can I try Snapshot Master before purchasing it?

Yes, a free 30-day trial version of Snapshot Master is available for download.

What are the system requirements for Snapshot Master?

Snapshot Master requires Windows 7 or higher and .NET Framework 4.5 or higher. It also requires administrative privileges to install and run.

Does Snapshot Master provide email notifications?

Yes, Snapshot Master can send email notifications to inform you of the success or failure of snapshot jobs.

Can Snapshot Master automate the snapshot creation and deletion process?

Yes, Snapshot Master can automatically create and delete snapshots on a schedule that you define.

What other features does Snapshot Master offer?

Snapshot Master also includes the ability to clone virtual machines, and provide email reports of your virtual environment.

Automate VM Snapshot creation and deletions

Taking snapshots on multiple VMs has never been easier than with Snapshot Master. It’s a simple, automated process that helps to ensure the protection of your virtual machines. Snapshot Master is also capable of managing other aspects of your virtual machines. You can download a free fully functioning trial of Snapshot Master to explore its capabilities.

Free Fully Functioning Trial available to download.

VMWare – Reverting a Virtual Machine Snapshot

VMWare – Reverting a Virtual Machine Snapshot

Reverting Snapshots in VMWare


A Comprehensive Guide


Have you ever needed to revert a snapshot of a virtual server in VMWare? Perhaps you made some changes that caused issues, or maybe you just want to go back to a previous state. Whatever the reason, reverting snapshots is a crucial feature in VMWare that can save you time and hassle. In this article, we’ll go over the process of reverting snapshots and what happens when you do.

Understanding Snapshot Reversion in VMWare

Have you ever needed to revert a snapshot of a virtual server in VMWare? Perhaps you made some changes that caused issues, or maybe you just want to go back to a previous state. Whatever the reason, reverting snapshots is a crucial feature in VMWare that can save you time and hassle. In this article, we’ll go over the process of reverting snapshots and what happens when you do.

Reverting to a Snapshot in VMWare

Revert VMware Snapshot

To revert to a snapshot in VMWare, follow these steps:

  1. Open the VMWare console and select the virtual machine you want to revert.
  2. Click on the “Snapshot” dropdown menu and select “Snapshot Manager”.
  3. In the Snapshot Manager, select the snapshot you want to revert to (the parent snapshot).
  4. Click the “Go to” button and select “Revert to Snapshot”.
  5. VMWare will prompt you to confirm the snapshot reversion. Click “Yes” to continue.
  6. VMWare will begin the snapshot reversion process, which may take some time depending on the size of your virtual machine and the complexity of your snapshot hierarchy.

What Happens When You Revert to a Snapshot in VMWare?

The exact behavior of VMWare when reverting to a snapshot depends on a few factors, such as whether the virtual machine was powered on or off when the snapshot was taken, and whether you have the “revert to snapshot” option enabled in your virtual machine settings.

If the parent snapshot was taken when the virtual machine was powered off, reverting to that snapshot will move the virtual machine to a powered-off state. Any changes made since the snapshot was taken will be discarded, and the virtual machine will be restored to the exact state it was in when the snapshot was taken.

If the parent snapshot was taken when the virtual machine was powered on, and the “revert to snapshot” option is enabled in your virtual machine settings, reverting to that snapshot will move the virtual machine to a suspended state. Again, any changes made since the snapshot was taken will be discarded, and the virtual machine will be restored to the exact state it was in when the snapshot was taken.

However, if the “no memory” option is set in your virtual machine settings, the virtual machine will move to a suspended state even if the revert operation is performed but not through the powered-off action. If the “memory” option is set, the power-off revert action puts the virtual machine in a suspended state.

VMware Snapshot FAQs

What is a snapshot in VMWare?

A snapshot is a point-in-time image of a virtual machine’s disk and memory state.

Why would I want to revert to a snapshot?

You may want to revert to a snapshot if you’ve made changes that caused issues or if you want to go back to a previous state of your virtual machine.

What happens when I revert to a snapshot?

When you revert to a snapshot, any changes made since that snapshot was taken will be discarded, and the virtual machine will be restored to the exact state it was in when the snapshot was taken.

Can I choose which snapshot to revert to?

Yes, when you open the Snapshot Manager in VMWare, you can select the specific snapshot you want to revert to.

How long does it take to revert to a snapshot?

The time it takes to revert to a snapshot depends on the size of your virtual machine and the complexity of your snapshot hierarchy.

What happens if the virtual machine was powered on when the snapshot was taken?

If the virtual machine was powered on when the snapshot was taken, and the “revert to snapshot” option is enabled in your virtual machine settings, reverting to that snapshot will move the virtual machine to a suspended state.

What happens if the virtual machine was powered off when the snapshot was taken?

If the virtual machine was powered off when the snapshot was taken, reverting to that snapshot will move the virtual machine to a powered-off state.

Can I revert to a snapshot if I have made changes to my virtual machine since the snapshot was taken?

No, if you have made changes to your virtual machine since the snapshot was taken, those changes will be lost when you revert to the snapshot.

How many snapshots can I take in VMWare?

You can take up to 32 snapshots per virtual machine in VMWare.

Can I delete snapshots in VMWare?

Yes, you can delete snapshots in VMWare using the Snapshot Master. However, be aware that deleting a snapshot will also delete all child snapshots that were taken after that snapshot.

Can I schedule snapshot creations and deletions automatically?

Yes, with SnapShot Master you can schedule your snapshot creations and deletions with automated email alerts.

Final Thoughts

Reverting to snapshots is an essential feature in VMWare that can save you time and hassle when something goes wrong. By following the steps outlined above, you can easily revert to a previous state of your virtual machine and discard any changes made since the snapshot was taken. Understanding how snapshot reversion works in VMWare is crucial to ensuring that you can take full advantage of this powerful feature.

Azure Tools

Azure Tools

Azure tools

Azure Cloud

Cloud Computing

As cloud computing continues to transform the IT landscape, businesses are turning to cloud providers to meet their infrastructure and service needs. Microsoft’s Azure is one of the top cloud providers on the market, offering an array of cloud services and solutions for businesses of all sizes. In this article, we’ll explore the suite of Azure tools and how they can help you optimize your cloud infrastructure.

Azure Cloud Computing: The Game Changer

Cloud computing has revolutionized the way businesses approach IT. With Azure, you have access to a range of cloud-based services, including Platform as a Service (PAAS), Software as a Service (SAAS), Disaster Recovery as a Service (DRAAS), and Infrastructure as a Service (IAAS). With these tools, you can create, manage, and deploy your applications and services with ease, allowing you to scale your business and increase your bottom line.

Azure Management Tools

SmiKar Software has developed a suite of Azure management tools that allow you to recover costs and time. Here are some of the key tools you should know about:

Azure Virtual Machine Scheduler – AVMS

If you’re using virtual machines within Azure, you know that they’re billed every minute they’re running. If you don’t shut them down and deallocate them properly, you’ll end up incurring unnecessary costs. The Azure Virtual Machine Scheduler (AVMS) is a tool that automates and schedules the shutdown, deallocation, and powering up of your virtual machines. This can save you significant time and money. Imagine having your development and test servers shut down and deallocate every night at 7 pm, then power back up at 7 am, ready for your developers and application owners to use. By doing this alone, you can save thousands of dollars a year. Try the Azure Virtual Machine Scheduler now for free with a 30-day trial key.

Azure Virtual Machine Cloner – AVMC

Whether you need to migrate your VMs within Azure from Azure Service Manager to Azure Resource Manager, or simply want to clone one of your VMs quickly and easily, the Azure VM Cloner (AVMC) is the tool for you. With AVMC, you can create a clone of your VM (like a snapshot) while you patch or upgrade components of your server, avoiding the risk of upgrades. Try the Azure Virtual Machine Cloner now for free with a trial key.

Azure Virtual Machine Deployer – AVMD

Deploying virtual machines to Microsoft Azure cloud can be challenging and may require you to learn PowerShell. However, SmiKar Software has developed a completely free tool to help make the process easier: the Azure Virtual Machine Deployer. With this tool, you can deploy virtual machines to Azure cloud without needing to learn PowerShell. Download the Azure Virtual Machine Deployer for free today.

Final Thoughts

By leveraging the power of Azure’s cloud services and SmiKar Software’s management tools, you can optimize your cloud infrastructure, save time, and reduce costs. Whether you need to automate the shutdown and deallocation of virtual machines or deploy virtual machines without learning PowerShell, Azure and SmiKar Software have you covered. Download and try these tools for yourself to see how they can benefit your business.

How to snapshot multiple VMs

How to snapshot multiple VMs

How to snapshot multiple VM servers with SnapShot Master​

SnapShot Master is a software that helps to create or delete snapshots of multiple VMs in unison. It is a useful tool for VMware’s Vsphere and Microsoft’s HyperV users. With this software, taking snapshots of multiple VMs is a relatively easy task. In this article, we will guide you through the process of snapshotting multiple VM servers using SnapShot Master.

Installing SnapShot Master Before you can use SnapShot Master, you need to install it in your environment. If you haven’t done so, you can download the software and request a 30-day trial key. Once you have installed and are running SnapShot Master in your environment, you can proceed to snapshot multiple VMs.

Synchronous or Asynchronous Snapshotting SnapShot Master can perform snapshotting synchronously or asynchronously. This means that it can keep systems that need to be in sync, have snapshots taken at the same time, or one after the other. To learn more about the functions of SnapShot Master, click this link.

Syncing with Your Virtual Environment Open your SnapShot Master console and let it synchronize with your VMware or HyperV environment. Depending on your virtual environment, this may take some time.

The need arises at times for the creation or deletion of snapshots of multiple VMs in unison. Creating snapshots of multiple VMs (virtual servers) for VMware’s Vsphere or even for Microsoft’s HyperV with SnapShot Master is a relatively easy task. Hopefully you have installed and are running SnapShot Master in your environment, if not, you can download and request a 30 Day trial key and try it out for yourself.


snapshot master
SnapShot Master can do this synchronously or asynchronously. This can keep systems that need to be in sync, have snapshots taken at the same time, or one after the other. To learn more about the functions of SnapShot Master, click this link.

VM Console Screen

Open you SnapShot Master console and let it synchronise with your Vmware or HyperV environment. Depending on your virtual environment, this may take some time.

SnapShot Master Home Screen

Virtual Machines Populated.

Now that the console has populated, Tick the checkboxes of the corresponding virtual machines that you wish a snapshot to be performed for.


Select Mutliple VMs

Virtual Machine Selection

Once you have selected the multiple VMs for a snapshot, right click on any VM and scroll down the drop down menu to Selected VMs then across to Take Snapshot.


Schedule VM Snapshot Selection

VM Snapshot Name

Once you have selected the multiple VMs for a snapshot, right click on any VM and scroll down the drop down menu to Selected VMs then across to Take Snapshot.


Schedule HyperV Checkpoint Name

Execute or Schedule VM Snapshot Job

You are now prompted to either Execute Now or Schedule Job. If you choose to execute now, the job will start to immediately snapshot multiple VMs. To schedule the snapshot for a later time, choose Schedule Job.


Schedule VMware Snapshot Execution

Schedule Snapshot Time

We now need to create a schedule for when you wish the snapshots to be performed. Click on New in the scheduling window and set the Date and Time then close the Windows.


Schedule Vmware snapshot ScheduleTask

Scheduled Snapshot Notifications

So thats all there is to it. You have chosen the virtual machines that require a snapshot, set your snapshot schedule and SnapShot Master will complete all this. If you have setup email notifications, you will receive emails detailing success and any failures.


SnapShot Master Email Notification

Taking a snaphot multiple VMs has never been easier than with SnapShot Master. To learn what else SnapShot Master can do, other than snapshot multiple VMs, click this link.

Download a trial of SnapShot Master today.

To trial SnapShot Master, fill in the form below to get access to download the trial software.


FREE DOWNLOAD

Send download link to:

I confirm that I have read and agree to the End User License Agreement.

SnapShot Master FAQs

Disaster Recovery

SnapShot Master can be used to create snapshots of multiple VMs at once, ensuring that all the VMs are captured at the same point in time. This makes it easy to restore the VMs in case of a disaster.

Testing and Development

SnapShot Master can be used to create a snapshot of a VM before making any changes. This allows developers and testers to revert back to the original state if anything goes wrong during testing.

Reporting and Auditing

SnapShot Master can be used to create snapshots of VMs on a regular basis for reporting and auditing purposes. This ensures that you always have a historical record of the VMs.

Performance Tuning

SnapShot Master can be used to create snapshots before making any performance tuning changes. This allows you to compare the performance of the VM before and after the changes.

Patch Management

SnapShot Master can be used to create snapshots before applying patches to the VMs. This ensures that you have a backup of the VM before applying any changes.

Overall, SnapShot Master is a versatile tool that can be used for a variety of use cases, providing a simple and efficient way to create and manage snapshots of multiple VMs.