by Mark | Mar 7, 2023 | Azure, Azure Blobs, Azure FIles, Storage Accounts
Key Takeaways
| Topic |
Insight |
| Storage Visibility |
Use Cloud Storage Manager to get a complete view of storage usage across all accounts. |
| Tiered Storage |
Move data to Hot, Cool, or Archive tiers based on how often it’s accessed. |
| Auto-Tiering |
Automate data movement between tiers to save on long-term storage costs. |
| Retention Policies |
Set automatic deletion timelines for stale data to prevent waste. |
| Compression |
Compress data to save space and reduce transfer costs. |
| Monitoring |
Regularly monitor usage to avoid unexpected overages. |
| Excel Exports |
Export reports to Excel for detailed offline analysis or audits. |
| Subscription Breakdown |
See which subscription each storage account belongs to for chargeback clarity. |
| Azure Advisor |
Use recommendations to optimize costs, security, and performance. |
| Security |
Apply access policies and encryption to protect stored data. |
How big are your Storage Accounts?
In today’s digital age, managing data storage has become increasingly important, especially with the growth of cloud-based solutions. Azure Storage Accounts, a cloud-based storage solution provided by Microsoft, offer users a scalable and cost-effective way to store large amounts of data. However, as the amount of data stored in a storage account grows, it becomes crucial to manage the size of the account to optimize cost and performance.
Considering Performance Tiers: When managing Azure Storage Accounts, it’s not just about the size of the storage but also the performance tier. Standard storage is perfect for general-purpose workloads and cost savings, but for applications requiring high-speed data access, Premium storage may be necessary. Understanding the balance between storage size and performance needs can help optimize both cost and efficiency in your Azure environment.
In this article, we will explore how to view the sizes of all Azure Storage Accounts and provide best practices for managing them.
What are the benefits to knowing the size of your Azure Storage Accounts?
- Cost optimization: By understanding how to manage Azure Storage Account sizes, users can optimize their storage environment and reduce storage costs.
- Performance optimization: Users can optimize the performance of their storage environment by understanding how to select the appropriate storage tier and monitoring usage metrics.
- Compliance: Understanding how to view and manage Azure Storage Account sizes can help users ensure they are meeting compliance requirements for data retention and deletion.
- Capacity planning: By monitoring usage metrics and understanding how to manage Azure Storage Account sizes, users can better plan for future storage needs and avoid unexpected storage overages.
- Security: Implementing security best practices, such as configuring access policies and using encryption, can help users protect their data stored in Azure Storage Accounts.
Overall, understanding how to view and manage Azure Storage Account sizes is essential for users who want to optimize their storage environment for cost, performance, compliance, capacity planning, and security purposes.
How to view Azure Storage Account sizes
To view the sizes of your Azure Storage Accounts, you can use Cloud Storage Manager, a powerful tool that enables you to manage all aspects of your Azure Storage environment from a single interface. Here’s how to use Cloud Storage Manager to view Azure Storage Account sizes:
Launch Cloud Storage Manager
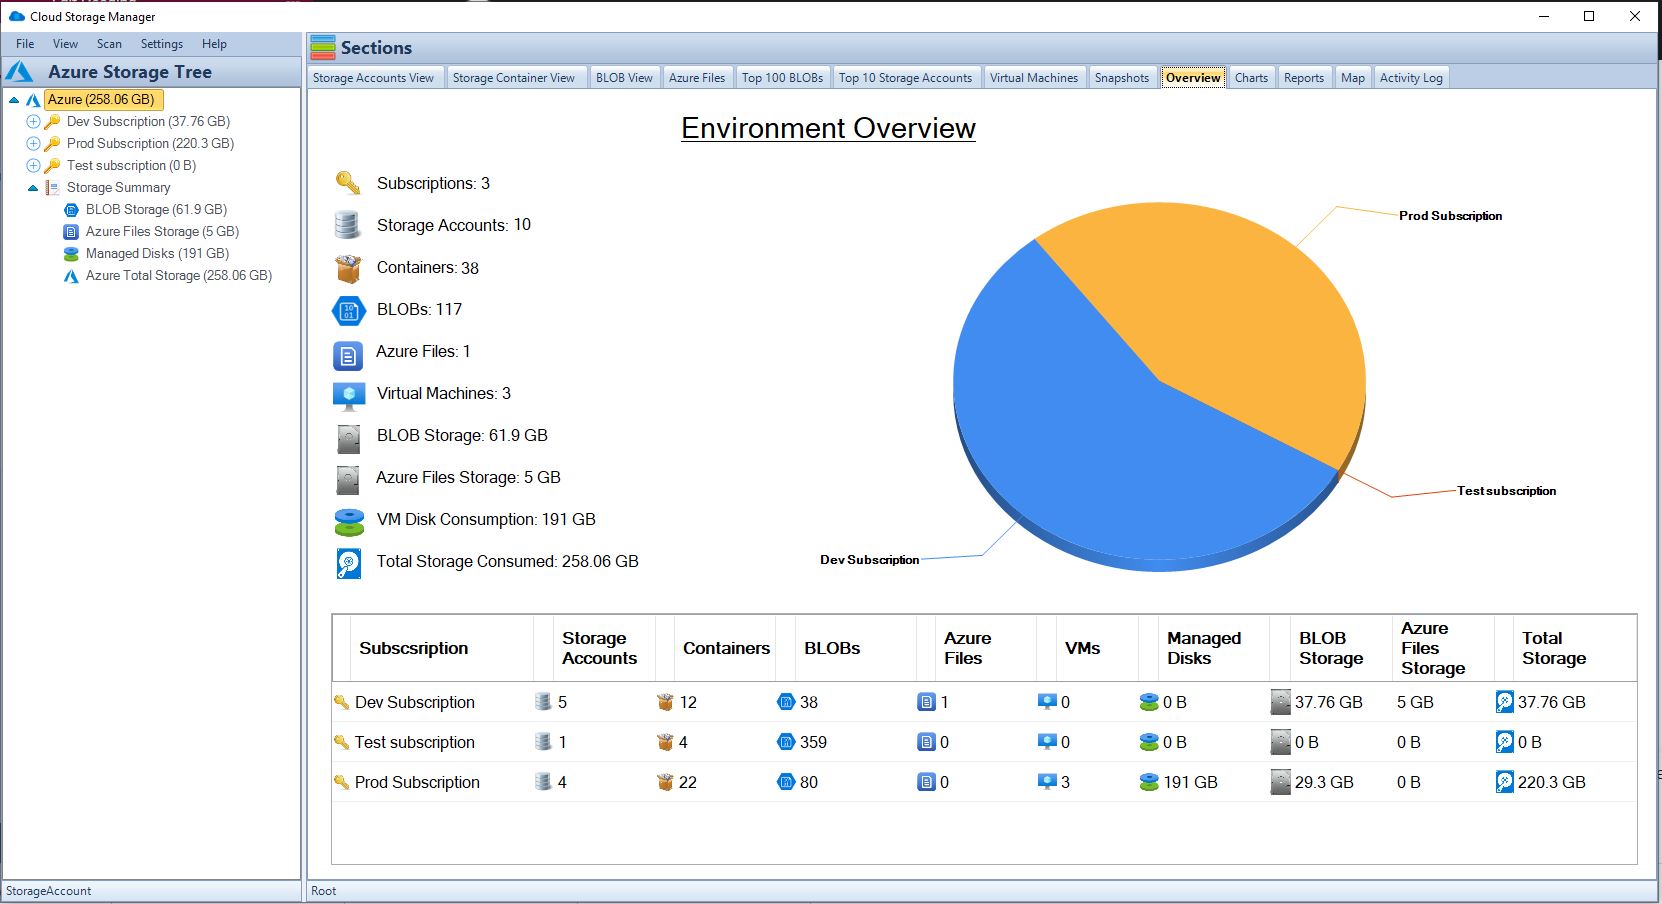
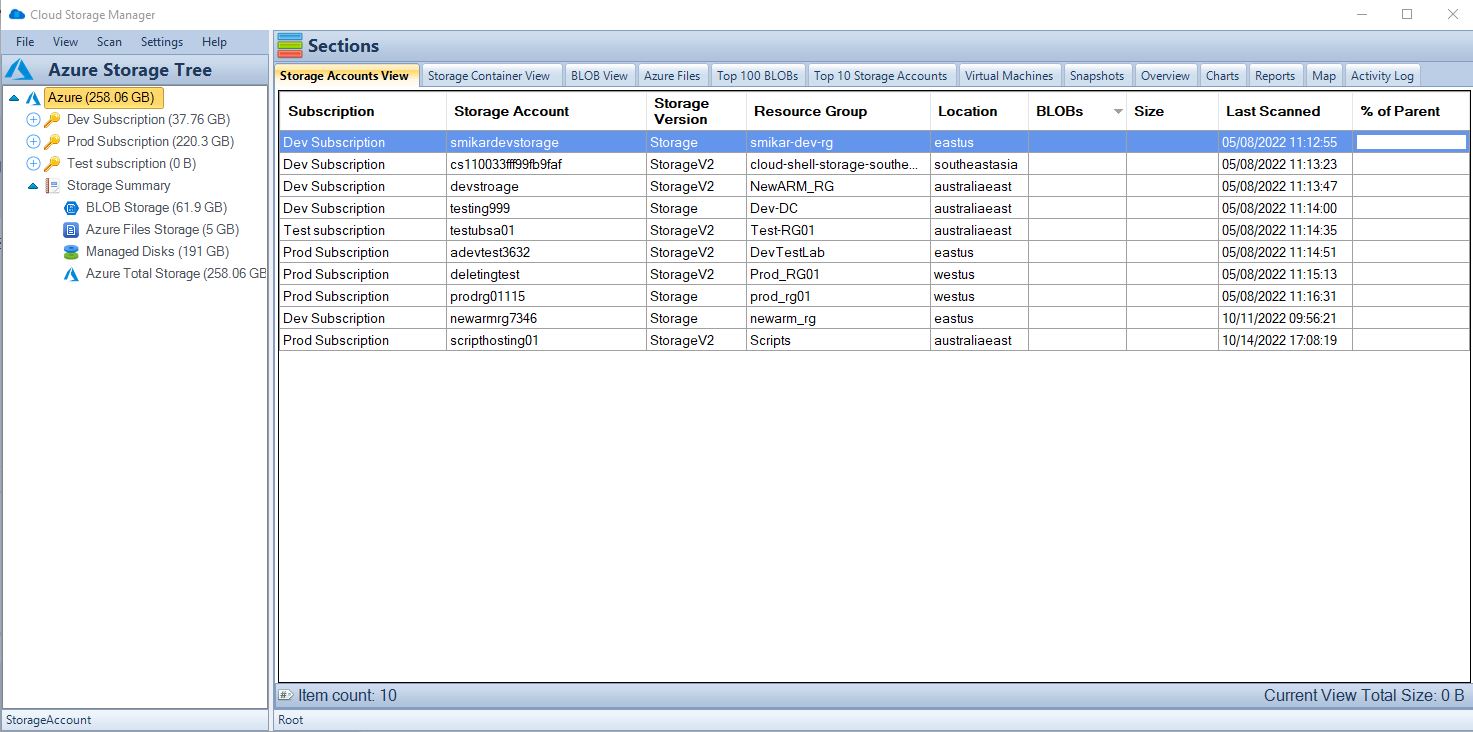
Launch Cloud Storage Manager. From the Overview Tab, you can quickly see how much Azure Storage you are consuming, including the number of Azure Subscriptions, Storage Accounts, Containers, Blobs, Azure Files, your Azure Virtual Machines, and more.

Cloud Storage Manager Reports TAB
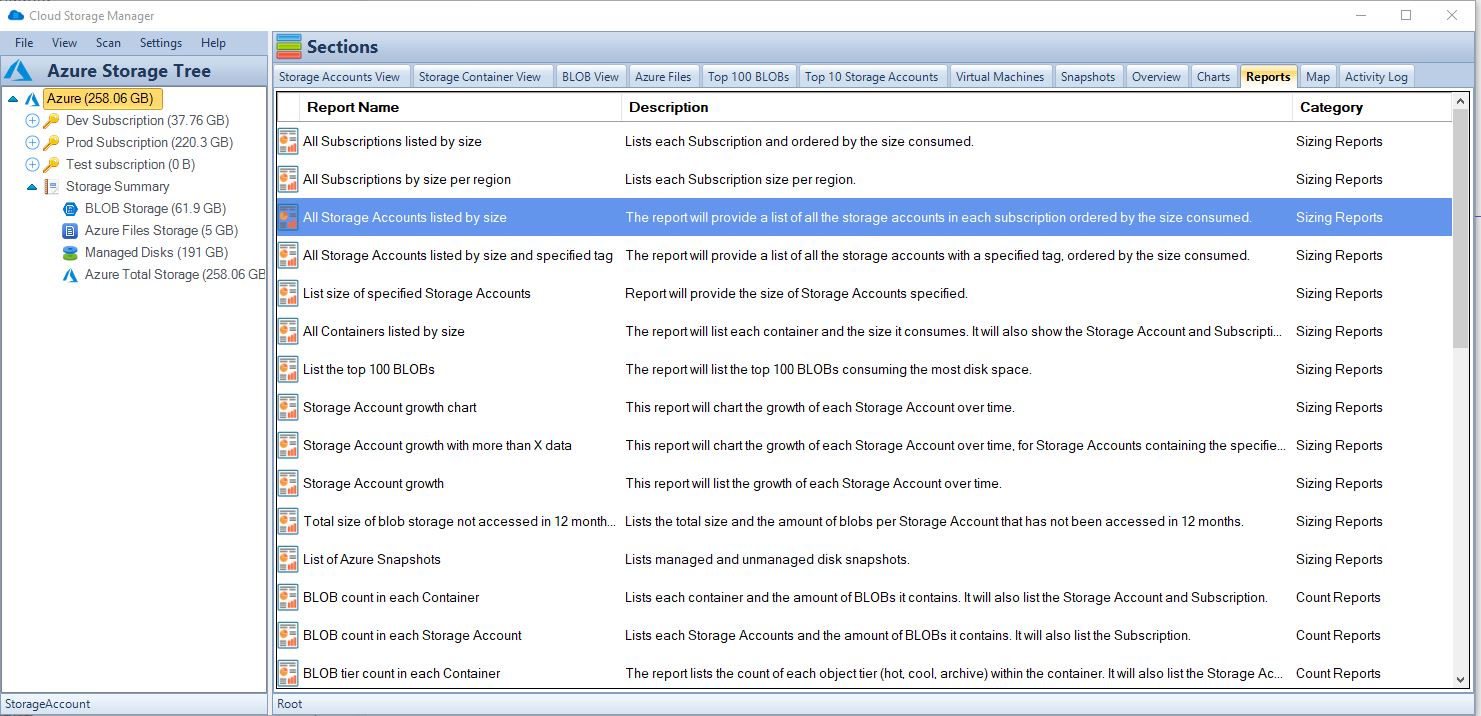
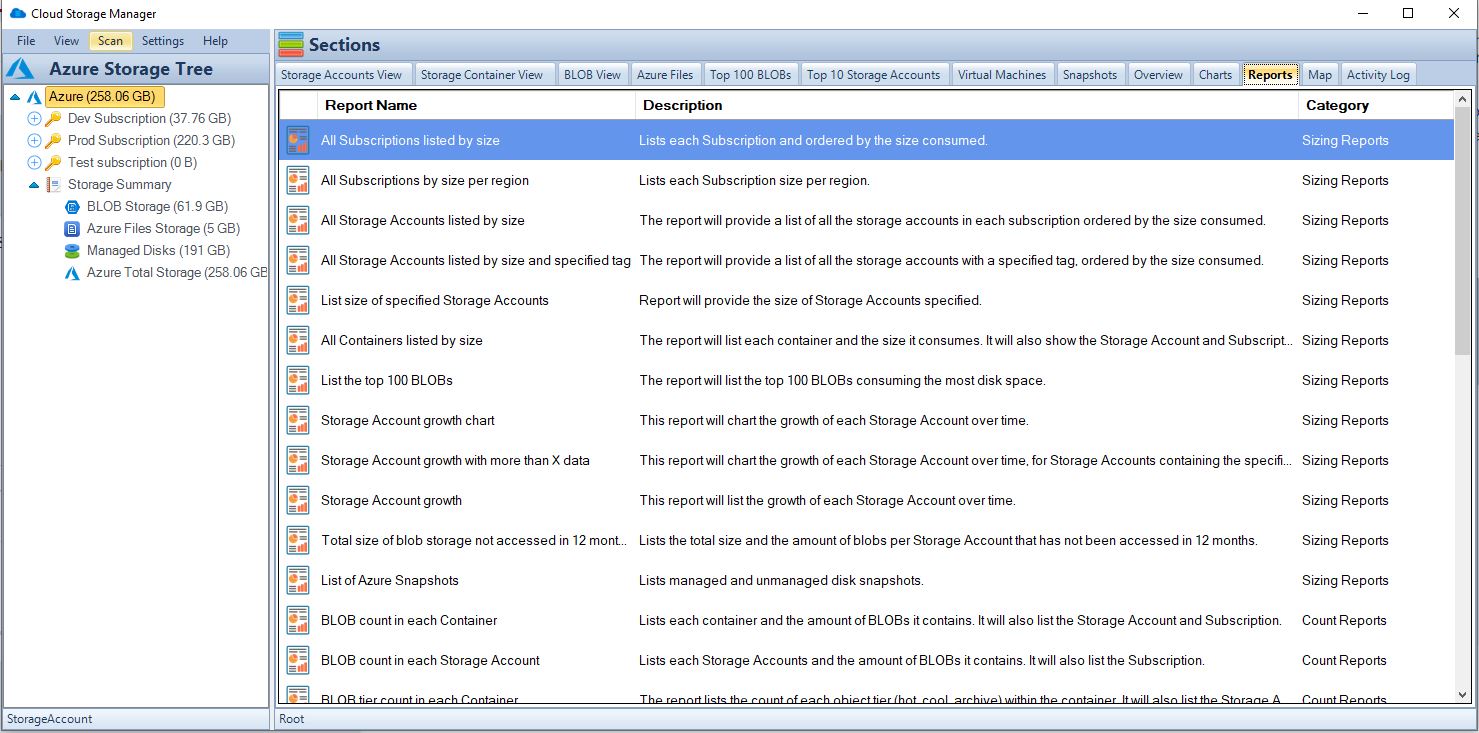
Now, since we are trying to find out just how much Azure storage we are consuming across our complete Azure Tenancy, we need to go to the Reports TAB.

Cloud Storage Manager Reporting
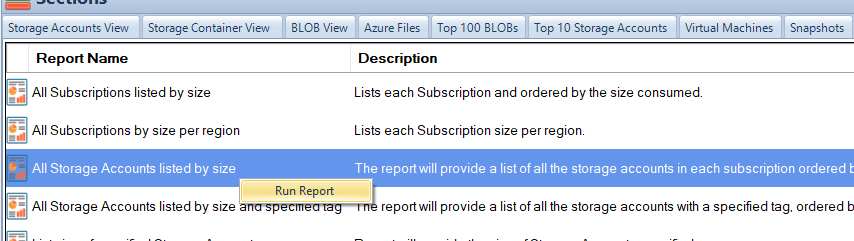
Highlight the report named “All Storage Accounts listed by size”
Right click this report and choose Run Report

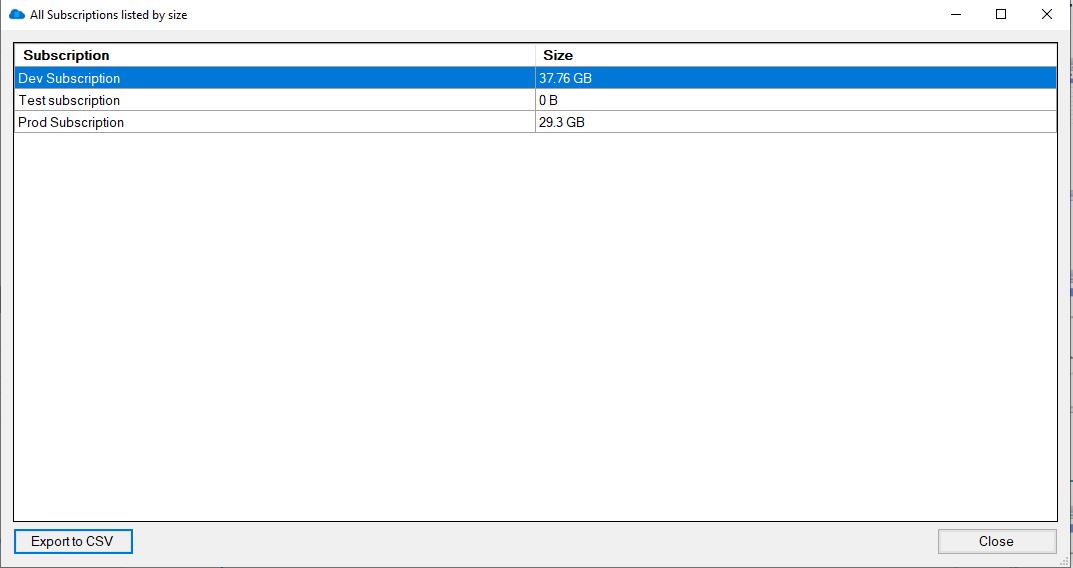
All Storage Accounts listed by Size Report
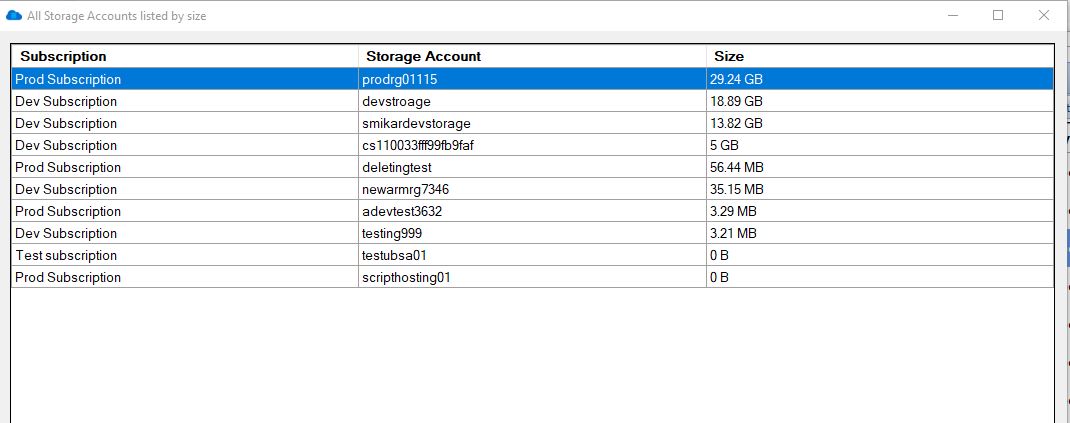
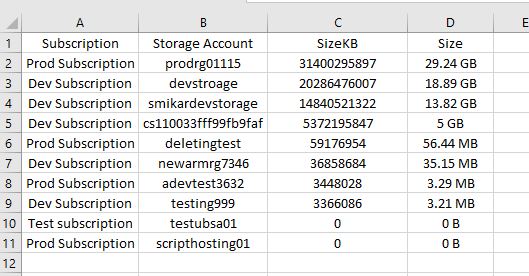
Cloud Storage Manager will now detail all the Storage Accounts you have in Azure, including which subscription they are in, the Storage Account name and most importantly the size.

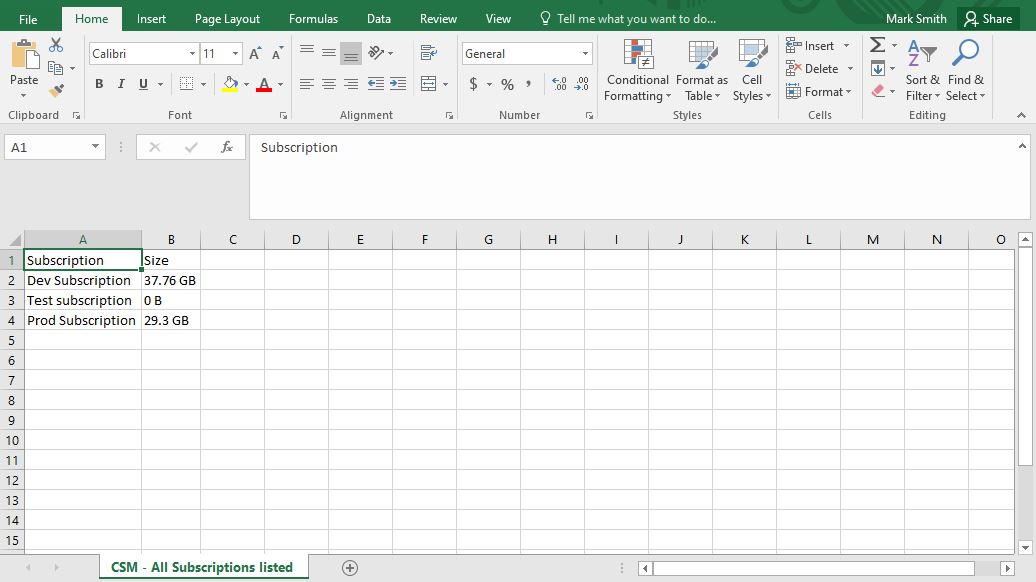
All Storage Accounts listed by Size in Microsoft Excel
As with all our Cloud Storage Manager reports on Azure Storage, you can choose to export this data to Microsoft Excel.

Storage Account Sizes Best Practices
| Best Practice |
Description |
Use tiered storage
|
Azure Storage offers hot, cool, and archive tiers for Blob storage. The hot tier is designed for frequently accessed data, the cool tier for infrequently accessed data, and the archive tier for data that is rarely accessed. By using the appropriate tier for your data based on access patterns and retention requirements, you can save costs by only paying for the storage you need. |
Implement retention policies
|
Setting retention policies for data that is no longer needed ensures that it is deleted automatically after a specified time period. This can help you to avoid incurring unnecessary storage costs for data that is no longer needed. |
Use auto-tiering
|
Azure Blob Storage’s automatic tiering feature automatically moves data to the appropriate tier based on access patterns. This means that frequently accessed data is moved to the hot tier, while infrequently accessed data is moved to the cool or archive tier, depending on the access patterns. This helps to optimize performance and cost. |
Compress data
|
Compressing data before storing it in Azure Storage can save space and reduce costs. Compressed data takes up less storage space and requires less bandwidth to transfer, which can reduce storage and data transfer costs. |
Monitor usage
|
Monitor the usage of your Azure Storage Account with Cloud Storage Manager to ensure you are not exceeding storage limits or incurring unexpected costs. |
Use Azure Advisor
|
Azure Advisor provides personalized recommendations for optimizing your Azure Storage Account. It can provide recommendations on cost savings, security, and performance. By following these recommendations, you can optimize your storage account for your specific use case. |
Follow security best practices
|
Implementing security best practices is important to ensure that your data is protected. This includes configuring access policies, using encryption, and implementing other security measures to protect against unauthorized access. |
Conclusion
Managing Azure Storage Account sizes is essential for optimizing cost, performance, and scalability. By using Cloud Storage Manager and following best practices, you can ensure that your Azure Storage environment is optimized for your specific use case. With Cloud Storage Manager, you can easily view and manage the size of your Storage Accounts, making it simple to optimize storage usage and reduce costs. Start managing your Azure Storage Account sizes today and enjoy a more efficient and cost-effective storage environment.
Azure Storage Unlocked
Please fill out the form below to get our free Ebook "Azure Storage Unlocked" emailed to you
FREE DOWNLOAD
Frequently Asked Questions (FAQs)
1. Why is it important to track Azure Storage Account sizes?
Storage costs can grow quickly in Azure. Tracking account sizes helps avoid bill surprises, identify unused storage, and improve overall efficiency.
2. How do I find out which storage accounts are using the most space?
Use Cloud Storage Manager’s “All Storage Accounts Listed by Size” report to see usage by account, subscription, and container.
3. What types of Azure storage are included in this report?
The tool reports on Blob storage, Azure Files, and associated container usage across all subscriptions you connect.
4. Can I export Azure storage size data for reporting?
Yes. Cloud Storage Manager allows exporting any report—including storage size breakdowns—to Microsoft Excel.
5. Does Azure provide native reports like this?
Not with the same depth or usability. Azure Portal provides limited views, but Cloud Storage Manager gives detailed, actionable insights.
6. What is Azure’s tiered storage model?
Azure offers Hot, Cool, and Archive tiers for Blob storage. The Hot tier is for frequent access, while Cool and Archive are for less frequent access at lower costs.
7. How does auto-tiering work in Azure?
Auto-tiering automatically moves blobs between tiers based on access patterns—ensuring you only pay for what you need.
8. Are there security considerations when managing storage?
Yes. Always configure access controls, enable encryption at rest and in transit, and audit storage regularly for unusual access patterns.
9. How can I reduce my Azure storage bill?
Use tiered storage, delete old data using retention policies, compress files, and use tools like Cloud Storage Manager to spot inefficiencies.
10. Is Cloud Storage Manager a Microsoft tool?
No. It’s a SmiKar Software tool designed to give deeper insights and control over your Azure storage than native Microsoft solutions. It is also completely FREE to use.
by Mark | Mar 7, 2023 | Azure, Storage Accounts
Deleted Azure Storage Account Recovery
As a cloud administrator or developer, you may have accidentally deleted a storage account containing critical data. Losing important information can be a frustrating and costly experience. Fortunately, Azure provides several ways to recover a deleted storage account. In this article, we will discuss the steps involved in recovering a deleted storage account in Azure.
Azure Storage Accounts provide a reliable and scalable solution for storing unstructured data in the cloud. A storage account is a logical container for data objects such as blobs, files, tables, and queues. Accidental deletion of a storage account can result in the loss of critical data, which can have severe consequences for businesses. In this article, we will explore the steps involved in recovering a deleted storage account in Azure.
Understanding Azure Storage Accounts
Azure Storage Accounts are the basic building blocks for storing data in Azure. There are four types of storage accounts in Azure: General-purpose v2 storage accounts, General-purpose v1 storage accounts, Blob storage accounts, and Premium performance v2 storage accounts. Each storage account has a unique name that is used to access its data objects. Azure storage accounts provide several features, such as data replication, scalability, and security.
- General-purpose v2 storage accounts
- General-purpose v1 storage accounts
- Blob storage accounts
- Premium performance v2 storage accounts
Each storage account has a unique name that is used to access its data objects. Azure storage accounts provide several features, such as data replication, scalability, and security.
Reasons for Deleting a Storage Account
There can be various reasons for deleting a storage account in Azure, such as:
- The storage account is no longer required.
- The storage account is not compliant with organizational policies.
- The storage account contains sensitive data that needs to be deleted.
- Accidental deletion by a user.
Regardless of the reason, it is important to have a plan in place for recovering a deleted storage account in case of accidental deletion.
Steps to Recover a Deleted Storage Account
Azure provides a mechanism to recover a deleted storage account within a specified time frame. The recovery period for a storage account is determined by the type of storage account and the subscription type. Here are the steps to recover a deleted storage account:
Step 1: Check the Recovery Period
The first step in recovering a deleted storage account is to check if the recovery period has not expired. Azure provides a default recovery period of 14 days for all types of storage accounts. The recovery period can be extended up to 90 days for general-purpose v2 storage accounts and up to 365 days for blob storage accounts. To check the recovery period for a storage account, follow these steps:
- Log in to the Azure portal.
- Click on the Storage accounts menu item in the left-hand pane.
- Click on the Deleted accounts tab to view the list of deleted storage accounts.
- Check the status of the deleted storage account. If the status is “deleted,” the storage account can be recovered.
- Check the recovery period for the storage account. If the recovery period has not expired, the storage account can be recovered.
Step 2: Restore the Storage Account
The second step in recovering a deleted storage account is to restore the account. To restore a deleted storage account, follow these steps:
- Select the deleted storage account from the list of deleted accounts.
- Click on the Restore button at the top of the page.
- In the Restore Account pane, review the details of the storage account, such as the account name, type, and location.
- Click on the Restore button to start the recovery process.
- The restored storage account will appear in the list of storage accounts once the recovery process is complete.
Alternative Method to Recover a Deleted Storage Account
If the recovery period has expired, or if the storage account cannot be recovered using the previous method, there is an alternative method to recover the account. This method involves contacting Azure support to recover the account. To recover a deleted storage account using Azure support, follow these steps:
- Log in to the Azure portal.
- Click on the Help + support menu item in the left-hand pane.
- Click on the New support request button at the top of the page.
- In the Basics tab, select the subscription that contains the deleted storage account.
- In the Issue type tab, select “Storage accounts” and “Recover deleted storage account.”
- Fill out the details of the support request, such as the deleted storage account name and the reason for the recovery request.
- Submit the support request.
Azure support will review the support request and initiate the recovery process. The recovery process may take several hours to complete.
Best Practices to Avoid Accidental Deletion of Storage Accounts
Accidental deletion of a storage account can be avoided by following these best practices:
- Use role-based access control (RBAC) to restrict access to storage accounts.
- Use resource locks to prevent accidental deletion of storage accounts.
- Use Azure Backup to create regular backups of storage accounts.
- Use Azure Resource Manager templates to deploy storage accounts with predefined configurations.
Azure Storage Account Deletion RABC
To prevent accidental deletion of storage accounts using Role Based Access Controls, here are some guiding principles;
| Prevention Method |
Description |
Example |
Role-based access control (RBAC)
|
Assign appropriate access roles to users and groups to limit their permissions on the storage account. |
Assign a user with the “Contributor” role instead of “Owner” to restrict their ability to delete the storage account. |
Resource locks
|
Use locks to block users from deleting a resource, even if they have the necessary permissions. |
Apply a “CanNotDelete” lock on the storage account to prevent accidental deletion. |
It’s important to note that RBAC can be used not only to prevent accidental deletion, but also to restrict other types of operations on the storage account, such as reading or modifying data. Resource locks are specifically designed to prevent deletion and can be applied at the resource group or resource level.
Here’s a table that of the different RBAC roles and their permissions in Azure:
| RBAC Role |
Description |
Permissions |
Owner
|
Has full access to all resources and can manage access to resources |
Can create, read, update, and delete all resources and assign access to others |
Contributor
|
Can create and manage all types of resources but cannot grant access to others |
Can create, read, update, and delete all resources, but cannot assign access to others |
Reader
|
Can view existing resources but cannot make any changes |
Can only read existing resources |
User Access Administrator
|
Can manage user access to Azure resources |
Can assign roles to users and groups to control access to resources |
Security Administrator
|
Can manage security-related operations |
Can manage security-related resources like security center, key vaults, and Azure AD security solutions |
Network Contributor
|
Can manage network-related resources like virtual networks, network security groups, and IP addresses |
Can create and manage network-related resources |
And here’s a table that explains the different types of resource locks in Azure:
| Resource Lock Type |
Description |
CanNotDelete
|
Prevents the deletion of a resource or resource group |
ReadOnly
|
Prevents any modification of a resource, but allows for reading |
DoNotDelete
|
Similar to CanNotDelete, but also prevents the deletion of any child resources |
ReadOnlyWithCanNotDelete
|
Combination of ReadOnly and CanNotDelete |
Azure Storage Account Deletion FAQs
| Question |
Answer |
|
|
A storage account in Azure is a secure and scalable cloud storage solution for data objects, such as blobs, files, queues, tables, and disks. |
|
|
To create a storage account in Azure, log in to the Azure portal, select “Create a resource,” search for “Storage account,” and follow the prompts to configure the storage account. |
|
|
You can access your storage account in Azure using the Azure portal, Azure Storage Explorer, Azure PowerShell, or Azure CLI. |
What is the recovery period for a deleted storage account in Azure?
|
The recovery period for a deleted storage account in Azure is between 0 and 14 days, depending on the type of storage account. |
How do I recover a deleted storage account?
|
You can recover a deleted storage account in Azure by using the recovery period or by contacting Azure support. To use the recovery period, go to the deleted storage account and select “Recover.” To recover a storage account using Azure support, log in to the Azure portal and submit a support request. |
How do I recover a deleted container in Azure storage?
|
You can recover a deleted container in Azure storage by using the Azure portal or the Azure Storage Explorer. To recover a container in the Azure portal, go to the deleted container and select “Undelete.” To recover a container in the Azure Storage Explorer, right-click on the deleted container and select “Undelete.” |
What is soft delete in storage account?
|
Soft delete is a feature in Azure storage accounts that allows deleted data to be retained for a specific period of time. During this time, the data can be recovered in case of accidental deletion. Soft delete can be enabled for blob storage accounts and file storage accounts. |
What is the purpose of soft delete?
|
The purpose of soft delete is to prevent accidental data loss and to provide an option for data recovery in case of accidental deletion. Soft delete also allows users to comply with retention policies and legal requirements for data retention. |
Azure Storage Account Recovery Periods
| Storage Account Type |
Default Recovery Period |
Maximum Recovery Period |
General-purpose v2
|
14 days |
90 days |
General-purpose v1
|
14 days |
Not applicable |
Blob storage
|
14 days |
365 days |
Premium performance v2
|
14 days |
Not applicable |
Note that the maximum recovery period can only be extended for certain types of storage accounts. It’s important to check the recovery period for a deleted storage account before attempting to recover it.
Azure Storage Account Deletion Further Reading
If you would like to know more about Storage Accounts, visit these sites.
Azure Storage Account Deletion Conclusion
Recovering a deleted storage account in Azure can be a challenging and time-consuming task, but it is essential to avoid data loss. Azure provides several mechanisms to recover a deleted storage account, such as the recovery period and Azure support. It is important to follow best practices to avoid accidental deletion of storage accounts and ensure the safety and security of data stored in Azure.
Azure Storage Unlocked
Please fill out the form below to get our free Ebook "Azure Storage Unlocked" emailed to you
FREE DOWNLOAD
by Mark | Mar 6, 2023 | Azure, Cloud Storage Manager, Storage Accounts
Azure Storage Consumed per Region
If you’re using Azure, you likely already know that it offers a wide range of storage options that can be used for various purposes. However, with so many storage options and regions available, it can be challenging to keep track of your usage in each Azure region. In this article, we’ll explore how to track your storage usage in each Azure region, and optimize your storage usage using Azure’s built-in monitoring and analytics tools, and Cloud Storage Manager.
Azure Storage is available in several regions around the world, and the amount of storage consumed by users varies depending on their location. The consumption of Azure Storage per region is important because it can affect the performance of Azure services in that region. The more storage consumed in a region, the more data is being processed, which can impact the performance of the Azure services in that region.
The consumption of Azure Storage per region is also important because it can affect the cost of Azure services. The cost of Azure services depends on the usage of resources, and the consumption of Azure Storage is one of the major resources used in Azure services. The more storage consumed in a region, the more expensive it can be to use Azure services in that region.
Factors that affect Azure Storage consumption per region
There are several factors that can affect the consumption of Azure Storage per region. These include:
Data type and size
The type and size of data being stored in Azure Storage can affect the consumption of storage per region. Different types of data have different storage requirements, and the larger the size of data, the more storage it requires.
Replication
Azure Storage provides different types of replication options such as locally-redundant storage (LRS), geo-redundant storage (GRS), and zone-redundant storage (ZRS). The type of replication chosen can affect the consumption of storage per region.
Access frequency
The frequency at which data is accessed can also affect the consumption of storage per region. Data that is frequently accessed requires more storage space than data that is rarely accessed.
Backup and restore
The frequency at which backups and restores are performed can also affect the consumption of storage per region. Backups and restores require additional storage space, which can impact the consumption of storage per region.
Importance of Azure Storage consumed per region
The consumption of Azure Storage per Azure region is important because it can affect the performance and cost of Azure services. By monitoring the consumption of Azure Storage per region, users can optimize their usage of Azure services and reduce their costs. They can also ensure that their data is stored in the most optimal region for their needs, which can improve the performance of their Azure services.
Tracking Storage Usage in Each Azure Region:
Azure Storage Consumption Overview Tab
Open your Cloud Storage Manager console.
From the Overview TAB you can quickly see how much storage you are using in each Azure Subscription. See how many containers you have, and even the number of Blobs. Plus how many Virtual Machines as well, and the amount of data storage they are consuming.
Azure Storage Consumption Reports Tab
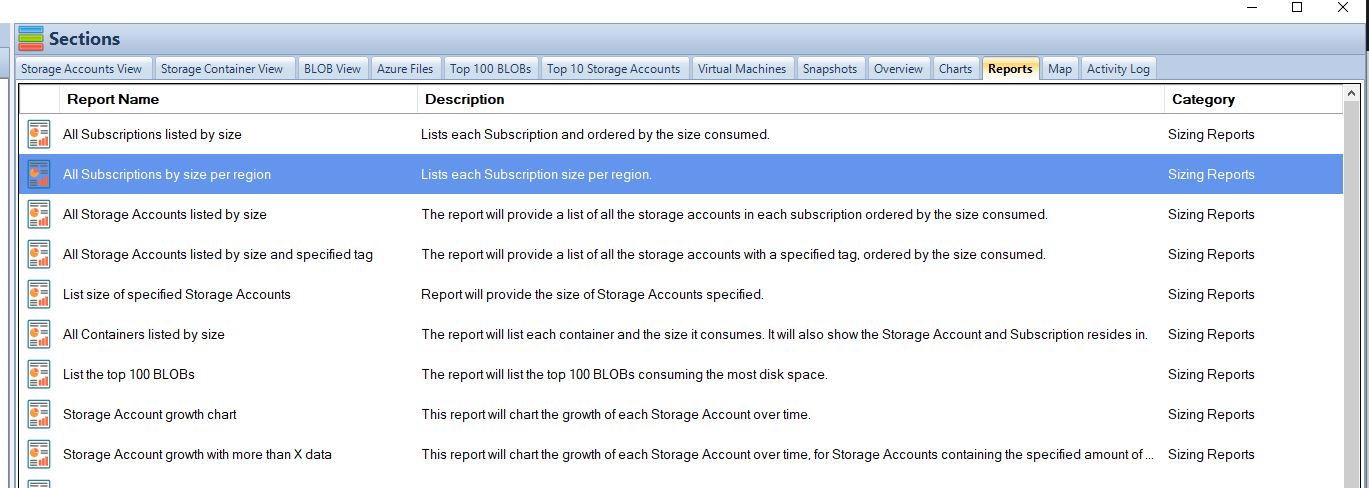
Go to the Reports Tab in the Cloud Storage Manager console.
The many Azure storage reports available within Cloud Storage Manager are listed here

Azure Storage Consumption Reports
Right click the report called All Subscriptions by size per region and choose Run Report.

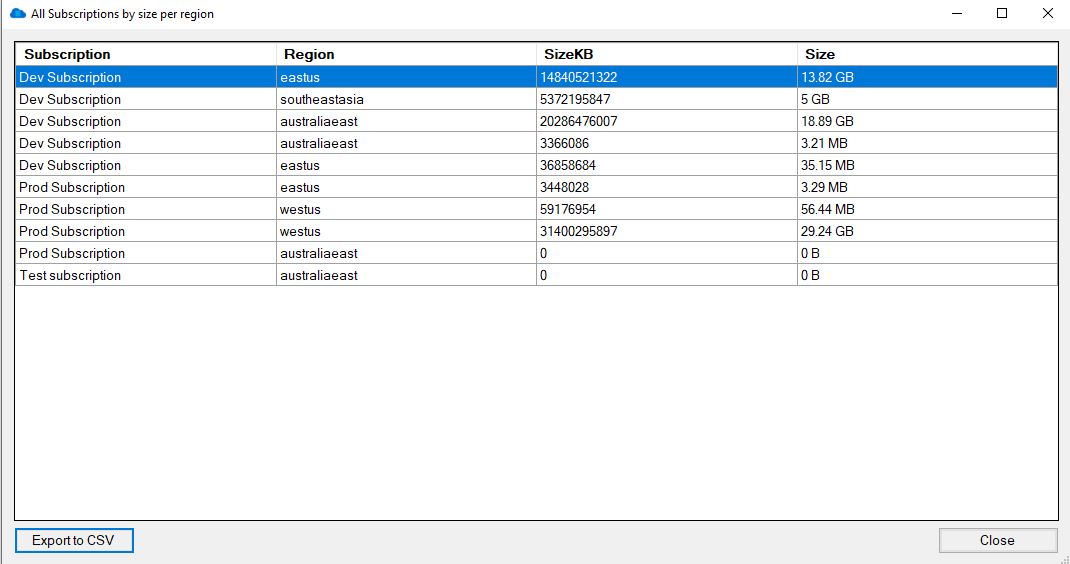
Azure Storage Consumption per Region Report
Cloud Storage Manager will now show you how much Azure Storage you are consuming per region.

Azure Storage Consumed per Region
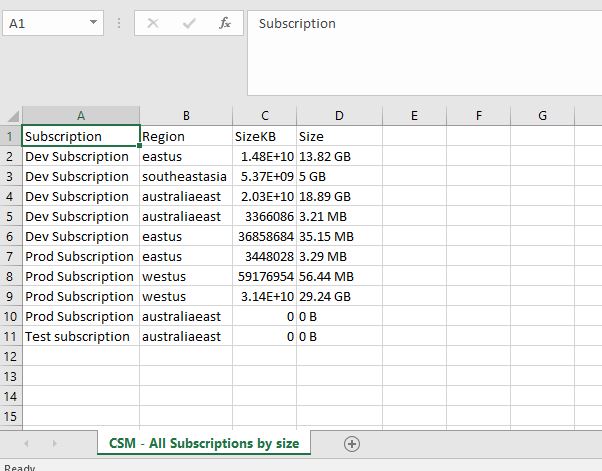
If you want to manipulate the data further, click the Export to CSV button and chose a location to save the file.
From the file you can open the data in Microsoft Excel for further analysis

Storage Options in Azure
Azure offers several storage options that can be used for various use cases, including Blob Storage, File Storage, Queue Storage, and Table Storage. Here’s a brief overview of each storage option:
Blob storage is designed for storing large unstructured data like documents, images, and videos.
File storage provides fully managed file shares in the cloud that can be accessed using standard SMB protocols.
Queue storage is a message queuing service that enables reliable messaging between services.
Table storage is a NoSQL key-value store that can be used for structured data like customer profiles, device information, and other metadata.
Azure Storage Used per Region
In conclusion, Azure offers a wide range of storage options that can be used for a variety of use cases. To track your storage usage in each Azure region, use Azure’s built-in monitoring and analytics tools, and set up alerts to notify you when your usage reaches certain thresholds. By following these best practices, and using Cloud Storage Manager you can ensure that you’re using Azure’s storage options efficiently and effectively.
Azure Storage Unlocked
Please fill out the form below to get our free Ebook "Azure Storage Unlocked" emailed to you
FREE DOWNLOAD
Azure Storage Used FAQs
| FAQ |
Answer |
How do I check storage utilization in Azure?
|
To check your storage utilization in Azure, use Cloud Storage Manager to analyse and provide insights in to your Azure Storage consumption. Easily understand where your Azure Storage costs are increasing and follow best practices to reduce your Azure costs. |
How does Azure calculate storage size?
|
Azure calculates storage size based on the size of the data being stored, as well as any additional overhead required by the storage option being used. For example, Blob storage requires additional overhead for metadata, which can increase storage size. |
How is Azure region calculated?
|
Azure region is calculated based on the location of the data centers where your resources are deployed. When you create a resource in Azure, you choose a region that corresponds to a specific data center. |
Is Azure storage account region specific?
|
Yes, Azure storage accounts are region-specific. When you create a storage account, you choose a specific region to host your data in. |
How do I check my storage allocation?
|
Use Cloud Storage Manager to monitor how much storage you are actually using. |
How do I check my storage capacity?
|
Get Cloud Storage Manager to scan your complete Azure Tenancy, to see a detailed analysis of your Azure Storage consumption. |
How does Azure measure consumption?
|
Azure measures consumption based on the amount of data being stored or processed, as well as any additional services or features being used. Consumption is typically measured in terms of storage size, data transfer, or compute usage. |
What is the maximum amount of Azure storage space?
|
The maximum amount of Azure storage space varies depending on the type of storage being used and the pricing tier selected. For example, Blob storage has a maximum capacity of 5 PB, while File storage has a maximum capacity of 100 TiB. |
|
|
The storage capacity of Azure is virtually unlimited, as Azure can scale to meet the needs of even the largest workloads. However, the amount of storage available to a specific user or resource is limited by the pricing tier selected and any associated usage limits. |
by Mark | Feb 27, 2023 | Azure, Azure Blobs, Cloud Storage Manager, Storage Accounts
How to Get the Total Size of Storage Used in Azure Per Subscription
A Step-by-Step Guide
As a Microsoft Azure user, it’s essential to keep track of your storage usage to prevent exceeding your storage limits or wasting resources. In this article, we’ll guide you on how to get the total size of storage used in Azure per subscription.
Understanding Storage Usage in Azure
Azure provides a highly available and scalable cloud storage solution that allows you to store large amounts of unstructured data. Azure storage includes four different types of storage: Blob, Queue, File, and Table storage, each with its own pricing model and use case.
When you create an Azure subscription, you’re provided with a storage capacity that you can use across all your storage accounts. As you create storage accounts and store data, your storage usage will increase. Monitoring your storage usage is crucial to optimize your resources for maximum efficiency.
How to Get the Total Size of Storage Used in Azure Per Subscription
Open Cloud Storage Manager
Open the Cloud Storage Manager console.
Hopefully, you have scanned your whole environment, if not kick off a full scan.

Go to the Cloud Storage Manager TAB
Go to the Reports TAB. Choose the report called “All Subscriptions Listed by Size”. Right click the report and choose Run Report.
This report will provide you with a list of Each Subscription and will be ordered by size consumed.
View the report
Cloud Storage Manager will now show you the total amount of Storage used per your Azure Subscription across your complete Azure Tenant.
You can export this data to Microsoft Excel if you wish to manipulate the data further

Export to Excel
Now you have the data in excel that shows each Azure Subscription and how much data resides within.
By exporting the data to Microsoft Excel, you’ll have a clear understanding of your storage usage and can optimize your resources accordingly. Regularly monitoring your storage usage, analyzing your data, and taking steps to optimize your usage can help you save costs and prevent waste.

FAQs
| Question |
Answer |
What is Microsoft Azure?
|
Microsoft Azure is a cloud computing service that provides a wide range of services, including virtual machines, databases, and storage. |
What is Azure Storage?
|
Azure storage is a scalable, highly available, and durable cloud storage solution that allows you to store and retrieve large amounts of unstructured data. |
What are the different types of Azure Storage?
|
Azure provides four different types of storage: Blob, Queue, File, and Table storage, each with its own use case and pricing model. |
How can I check my Azure Storage usage?
|
You can check your Azure storage usage by opening the Cloud Storage Manager console, going to the Reports tab, selecting the “All Subscriptions Listed by Size” report, and viewing the report to see the total amount of storage used per Azure subscription. |
Why is it important to monitor Azure Storage usage?
|
Monitoring your Azure storage usage is essential to prevent exceeding your storage limits or wasting resources. Regular monitoring and optimization can help you save costs and ensure maximum efficiency. |
Can I export Azure Storage usage data to Excel?
|
Yes, you can export your Azure Storage usage data to Microsoft Excel to manipulate the data further. |
What is the benefit of optimizing Azure Storage usage?
|
Optimizing your Azure Storage usage can help you save costs and ensure maximum efficiency by preventing waste and unnecessary resource consumption. |
In conclusion, getting the total size of storage used in Azure per subscription is an important task for any Azure user. By following the steps outlined in this article, you can easily get a clear understanding of your storage usage and optimize your resources for maximum efficiency.
Regularly monitoring your storage usage with Cloud Storage Manager, analyzing your usage data, and taking steps to optimize your usage can help you save costs and ensure you’re not wasting resources.
Azure Storage Unlocked
Please fill out the form below to get our free Ebook "Azure Storage Unlocked" emailed to you
FREE DOWNLOAD
by Mark | Feb 20, 2023 | Azure, Azure Blobs, Storage Accounts
Azure Files Overview
As businesses grow, so does the amount of data they accumulate. And as data grows, so does the need for a reliable, secure, and scalable storage solution. One such solution is Microsoft Azure Files. Azure Files is a cloud-based file storage solution that can be accessed from anywhere, on any device. In this article, we’ll walk you through how to set up Azure Files step-by-step.
What is Azure Files?
Azure Files is a cloud-based storage solution that allows businesses to store and access their files from anywhere, on any device. It is a fully managed service that eliminates the need for businesses to manage their own file servers. Azure Files provides businesses with a scalable, secure, and reliable storage solution that can be accessed over the internet or through a virtual private network (VPN).
Benefits of Azure Files
Azure Files is a fully managed cloud-based file share service provided by Microsoft Azure. It allows users to store and share files in the cloud, with support for the Server Message Block (SMB) protocol, which is commonly used by Windows file shares.
Azure Files provides a number of advantages for users, including:
- Scalability: Azure Files can easily scale to meet the growing needs of users and organizations, allowing them to store and share files in the cloud without worrying about capacity limits.
- Easy management: Azure Files is fully managed by Microsoft, so users don’t have to worry about maintaining their own file servers or managing the underlying infrastructure.
- Accessibility: Azure Files supports the SMB protocol, making it easy for users to access and share files from any Windows-based device, including desktops, laptops, and servers.
- Data protection: Azure Files provides built-in data protection and disaster recovery features, including geo-redundancy and automatic backups, to help ensure that users’ data is always available and secure.
Azure Files is often used by organizations that need to share files across multiple locations or teams, or that need to provide secure access to files for remote or mobile workers. It can also be used for backup and archiving purposes, and to support applications that require file share access.
How to setup Azure Files
Creating an Azure Files account
Before you can start using Azure Files, you’ll need to set up an Azure account. If you don’t already have an Azure account, you can sign up for a free trial.
Once you have an Azure account, you can follow these steps to set up Azure Files:
The first step in setting up Azure Files is to create an account. Follow these steps to create an account:
- Go to the Azure portal and sign in to your account.
- Click on the “Create a resource” button in the top left corner of the dashboard.
- Search for “Azure Files” in the search bar and select it from the list of available services.
- Click on the “Create” button to start the setup process.
- Choose a subscription, resource group, and storage account for your Azure Files account.
- Choose a location for your account and click on the “Review + create” button.
- Review your settings and click on the “Create” button to create your account.
Creating a file share
The first step in setting up Azure Files is to create a file share. A file share is a container for your files. To create a file share, follow these steps:
- Go to your Azure Files account and select the “File shares” option from the left-hand menu.
- Click on the “New” button to create a new file share.
- Enter a name for your file share and set the quota for the share.
- Click on the “Create” button to create your file share.
Configuring security settings
Once you have created a file share, you can configure its properties to meet your specific needs. To configure the properties of an Azure file share, follow these steps:
- Go to your file share and select the “Access control (IAM)” option from the left-hand menu.
- Click on the “Add” button to add a new role assignment.
- Select the role you want to assign to the user or group.
- Enter the name or email address of the user or group you want to assign the role to.
- Click on the “Save” button to save the changes.
Mapping a drive to Azure Files
You can map a drive to Azure Files to access your files as if they were stored on your local computer. Follow these steps to map a drive to Azure Files:
- Go to your file share and select the “Connect” option from the top menu.
- Select the “Windows” option to download the PowerShell script.
- Open PowerShell as an administrator and run the downloaded script.
- Enter the storage account name and the file share name when prompted.
- Enter your storage account key when prompted.
- The drive will be mapped to your computer.
Accessing Azure Files from the web
You can also access your Azure Files from the web. Follow these steps to access your Azure Files from the web:
- Go to the Azure portal and sign in to your account.
- Go to your Azure Files account and select the “File shares” option from the left-hand menu.
- Click on the file share you want to access
- Click on the “Connect” button and select the “Connect with file explorer” option.
- Enter your Azure Files account credentials when prompted.
- File Explorer will open, and you can access your files just as you would on your local computer.
Azure Files Best Practices
To get the most out of Azure Files, it’s important to follow best practices. Some best practices for using Azure Files include:
- Using the appropriate access level for your file shares.
- Setting up alerts for important events, such as exceeding your file share quota.
- Monitoring your file shares regularly to ensure they are performing as expected.
- Backing up your data regularly to protect against data loss.
Azure Files FAQ
Is Azure Files secure?
Yes, Azure Files offers several security features, such as access control and encryption, to ensure that your files are secure.
Can I access my Azure Files from anywhere?
Yes, you can access your Azure Files from anywhere with an internet connection.
How much does Azure Files cost?
Azure Files pricing is based on the amount of storage and data transfer you use. You can check the current pricing on the Azure website.
Can I share my Azure Files with others?
Yes, you can share your Azure Files with others by assigning them appropriate permissions.
What security measures are in place to protect my data stored in Azure Files?
Azure Files use a variety of security features, such as role-based access control (RBAC), Azure Active Directory (AAD) authentication, and encryption at rest. Microsoft also offers various compliance certifications for Azure services, including Azure Files, to meet different regulatory requirements.
Can I use Azure Files for backup and disaster recovery?
Yes, you can use Azure Files for backup and disaster recovery by setting up regular backups of your file shares and replicating them to another region or data center. Azure also offers other backup and disaster recovery solutions, such as Azure Backup and Azure Site Recovery, that can be used in combination with Azure Files to provide a comprehensive data protection strategy.
Azure Files Final Thoughts
In conclusion, as your organization’s storage needs grow, it can be challenging to keep track of where your Azure storage is being consumed, leading to unnecessary costs. However, with Cloud Storage Manager, you can easily monitor and manage your Azure Files and Blob Storage, which will help you take back control and reduce costs.
With features like the Azure Storage Tree view and Reports, you can quickly identify which files are taking up the most space and move them to lower storage tiers. You can also utilize Azure Blob Search to find specific files and gain insights into the growth and tiering of your storage accounts.
In addition, Cloud Storage Manager provides a comprehensive overview of your Azure Files consumption, allowing you to quickly identify areas for improvement and optimize your storage usage. With Cloud Storage Manager, you can stay on top of your Azure Files and keep your costs under control.
Azure Storage Unlocked
Please fill out the form below to get our free Ebook "Azure Storage Unlocked" emailed to you
FREE DOWNLOAD
by Mark | Feb 16, 2023 | Azure, Azure Queues, Storage Accounts
As more and more applications move to the cloud, it becomes increasingly important to design them for high availability, scalability, and reliability. One of the key components of building such applications is message queuing, which allows you to send and receive messages between different parts of your application. Azure Queues is a service provided by Microsoft Azure that enables developers to build highly scalable and distributed applications that can handle large volumes of messages.
In this article, we’ll explore what Azure Queues are, how they work, and how you can use them to build robust cloud-based applications. We’ll cover the basics of message queuing, the features and benefits of Azure Queues, and some common use cases. So let’s get started!
What are Azure Queues?
Azure Queues is a message queuing service provided by Microsoft Azure. It allows you to store and retrieve messages between different parts of your application in a reliable and scalable way. Azure Queues are designed to be highly available and fault-tolerant, with built-in redundancy and automatic failover.
How do Azure Queues work?
Azure Queues work by providing a simple and efficient way to send and receive messages between different parts of your application. Here’s how it works:
- First, you create a queue in Azure Queue storage. This queue can be thought of as a container that holds messages.
- Next, you can send messages to the queue using the Azure Storage SDK or the Azure portal. Each message can be up to 64 KB in size.
- Once the message is in the queue, it can be retrieved by any part of your application that has access to the queue. The messages are retrieved in the order in which they were added to the queue.
- When a message is retrieved from the queue, it becomes invisible to other parts of the application for a specified amount of time (known as the visibility timeout). This prevents multiple parts of the application from processing the same message simultaneously.
- After the message has been processed, it can be deleted from the queue, marking it as complete. If the message is not deleted, it will become visible again after the visibility timeout expires.
What are the benefits of using Azure Queues?
Here are some of the benefits of using Azure Queues:
- Highly scalable: Azure Queues can handle large volumes of messages, making it easy to build applications that can scale to meet changing demands.
- Fault-tolerant: Azure Queues are designed to be highly available and fault-tolerant, with built-in redundancy and automatic failover.
- Distributed: Azure Queues can be accessed from anywhere, making it easy to build distributed applications that can span multiple regions or data centers.
- Simple and efficient: Azure Queues provide a simple and efficient way to send and receive messages between different parts of your application.
What are some common use cases for Azure Queues?
Azure Queues can be used for a variety of scenarios, including:
- Decoupling: Azure Queues can be used to decouple different parts of your application, allowing them to communicate asynchronously and without having to know about each other.
- Workload processing: Azure Queues can be used to distribute workloads across multiple instances of an application, making it easy to scale out processing.
- Event-driven architectures: Azure Queues can be used to implement event-driven architectures, where events are stored in the queue and processed by different parts of the application based on their subscriptions.
- Data processing: Azure Queues can be used to process large volumes of data, such as log files or sensor data, by sending messages to a processing application or service.
- Reliable messaging: Azure Queues can be used to implement reliable messaging patterns such as store-and-forward, where messages are guaranteed to be delivered even if the recipient is temporarily unavailable.
How can I get started with Azure Queues?
To get started with Azure Queues, you’ll need an Azure subscription and access to the Azure portal or Azure Storage SDK. Here’s how you can create a queue and send a message to it:
- Sign in to the Azure portal and create a new storage account.
- From the storage account dashboard, click on “Queues” and then “Add Queue” to create a new queue.
- Once the queue is created, you can send a message to it using the Azure Storage SDK or the Azure portal.
- To retrieve messages from the queue, you can use the “Get Messages” operation provided by the Azure Storage SDK.
- You can also monitor the queue and view metrics such as the number of messages in the queue, the number of active connections, and the total number of messages processed.
Azure Queues FAQ
What is the difference between Azure Queues and Azure Service Bus?
Azure Queues and Azure Service Bus are both messaging services in Azure, but they have different use cases. Azure Queues is a simple message queuing service that is ideal for decoupling different parts of an application, whereas Azure Service Bus is a more advanced messaging service that supports features like pub/sub messaging, transactions, and message sessions.
Can I use Azure Queues to send messages between different Azure regions?
Yes, you can use Azure Queues to send messages between different Azure regions, but you will need to ensure that the storage account and the queue are in the same Azure subscription.
How many messages can I store in an Azure Queue?
You can store up to 500 TB of messages in an Azure Queue, but there is a limit of 64 KB per message.
Can I use Azure Queues with on-premises applications?
Yes, you can use Azure Queues with on-premises applications by using the Azure Storage SDK or the Azure REST API. You will need to create a hybrid connection between your on-premises network and Azure, and then use the storage account and the queue as you would in the cloud.
What happens if a message is not processed by the recipient?
If a message is not processed by the recipient within the visibility timeout period, it will become visible again in the queue and can be processed by another recipient. If a message is not processed after several attempts, it will be moved to the dead-letter queue, where you can investigate the reason for the failure.
How much does it cost to use Azure Queues?
The cost of using Azure Queues depends on factors such as the number of messages, the size of the messages, and the number of transactions. For more information on pricing, see the Azure Storage pricing page.
Azure Queues Final Thoughts
Azure Queues is a powerful and flexible message queuing service that can help you build highly scalable, resilient, and distributed applications in the cloud. By providing a simple and efficient way to send and receive messages, Azure Queues can help you decouple different parts of your application and distribute workloads across multiple instances. Whether you’re building event-driven architectures, processing large volumes of data, or implementing reliable messaging patterns, Azure Queues can help you achieve your goals in a reliable and scalable way. So why not get started today and see what Azure Queues can do for your next project?
Azure Storage Unlocked
Please fill out the form below to get our free Ebook "Azure Storage Unlocked" emailed to you
FREE DOWNLOAD