
by Mark | Feb 28, 2023 | Azure, Cloud Computing, Microsoft HyperV, VMWare
Virtual machines (VMs) have been around for quite some time now and have become a cornerstone of modern-day IT infrastructure. They provide a convenient way to run multiple operating systems on a single physical machine, allowing users to consolidate their hardware and save costs. However, as VM technology has evolved, newer versions of VMs have been introduced, such as generation 1 and generation 2 VMs. In this article, we’ll explore the differences between the two and help you understand which one is right for your needs.
What Are VMs?
A virtual machine is essentially a software-based emulation of a physical computer. It allows users to run one or more operating systems on a single physical machine, thereby saving costs and increasing efficiency. VMs are often used to create virtual environments for development, testing, and deployment of software applications.
What Are Generation 1 VMs?
Generation 1 VMs were introduced with the release of Windows Server 2008 R2. They are essentially the first iteration of virtual machines and are based on the traditional BIOS firmware. Generation 1 VMs use a virtualized hardware layer to present virtualized devices to the guest operating system.
What Are Generation 2 VMs?
Generation 2 VMs were introduced with the release of Windows Server 2012. They are the newer iteration of virtual machines and are based on the Unified Extensible Firmware Interface (UEFI) firmware. Generation 2 VMs use a more modern virtualized hardware layer to present virtualized devices to the guest operating system.
What Are the Differences Between Gen 1 and Gen 2 VMs?
There are several key differences between generation 1 and generation 2 VMs. These include:
Boot Process:
Generation 1 VMs use the traditional BIOS boot process, while generation 2 VMs use the more modern UEFI boot process.
Firmware:
Generation 1 VMs use BIOS firmware, while generation 2 VMs use UEFI firmware.
Boot Options:
Generation 2 VMs support more advanced boot options such as Secure Boot, which is not available in generation 1 VMs.
Device Support:
Generation 2 VMs have improved device support, including support for larger virtual hard disks (up to 64 TB), which is not available in generation 1 VMs.
Operating System Support:
Generation 2 VMs only support 64-bit guest operating systems, while generation 1 VMs support both 32-bit and 64-bit guest operating systems.
Integration Services:
Generation 2 VMs come with improved integration services, including support for online backups, remote desktop, and more.
Prons and Cons of Gen 1 and Gen 2 VMs
| Feature |
Gen 1 VMs |
Gen 2 VMs |
Pros
|
Widely used |
Secure boot |
|
Easy setup |
Improved performance |
|
Compatibility with older OS versions |
Better Linux Integration |
|
|
|
Cons
|
Slower boot time |
Requires Windows Server 2016 or newer |
|
Limited scalability |
More complex setup |
|
Limited security features |
Limited compatibility with older OS versions |
Gen 1 and Gen 2 VMs FAQs
| FAQ |
Answer |
Can I convert a Gen 1 VM to a Gen 2 VM?
|
No, it’s not possible to convert a Gen 1 VM to a Gen 2 VM. You’ll need to create a new Gen 2 VM and migrate your data and settings over manually. |
Can I run both Gen 1 and Gen 2 VMs on the same host server?
|
Yes, it’s possible to run both Gen 1 and Gen 2 VMs on the same host server, as long as the server meets the hardware requirements for both types of VMs. |
Are Gen 2 VMs more expensive than Gen 1 VMs?
|
No, there is no cost difference between Gen 1 and Gen 2 VMs. Both types of VMs are included with the appropriate versions of Windows Server. |
Gen 1 and Gen 2 VMs Use Cases
| Use Case |
Gen 1 VMs |
Gen 2 VMs |
Compatibility
|
Better suited for running older software applications or 32-bit guest operating systems. |
May not support older software applications or 32-bit guest operating systems. |
Device Support
|
Supports a limited number of virtual devices, and may not be able to use larger virtual hard disks or more advanced boot options like Secure Boot. |
Supports more virtual devices, and can use larger virtual hard disks or more advanced boot options like Secure Boot. |
Boot Time
|
Slower boot times due to the legacy BIOS firmware used in Gen 1 VMs. |
Faster boot times due to the use of the Unified Extensible Firmware Interface (UEFI) firmware in Gen 2 VMs. |
Integration
|
Limited integration services, such as support for online backups or remote desktop. |
Improved integration services, such as support for online backups or remote desktop, are available. |
Security
|
Limited security features, such as the lack of Secure Boot support. |
More advanced security features, such as support for Secure Boot, shielded VMs, and virtual TPM, are available. |
Migration
|
Limited migration options, as Gen 1 VMs cannot be converted to Gen 2 VMs. |
Migrating from Gen 1 VMs to Gen 2 VMs is possible, but requires creating a new VM and manually migrating data and settings. |
OS Support
|
Supports a wide range of guest operating systems, including older versions of Windows and Linux. |
Supports newer versions of Windows and Linux, but may not support older operating systems. |
Hardware Support
|
Runs on a wide range of hardware, including older processors and non-virtualization capable CPUs. |
Requires newer hardware, including a 64-bit processor with second-level address translation (SLAT) support, virtualization extensions (Intel VT or AMD-V), and support for UEFI firmware. |
Performance
|
May not be able to take advantage of the latest hardware improvements and virtualization features, leading to slower performance. |
Can take advantage of the latest hardware improvements and virtualization features, leading to better performance. |
Choosing the Right VM for Your Organization:
When it comes to choosing the right VM for your organization, it’s important to consider your specific needs and requirements. Here are some factors to keep in mind:
Compatibility:
If you’re running older software applications or need to support 32-bit guest operating systems, generation 1 VMs may be the better option for you.
Device Support:
If you need to use larger virtual hard disks or want more advanced boot options like Secure Boot, generation 2 VMs may be the better option.
Speed:
Generation 2 VMs generally have faster boot times than generation 1 VMs, so if boot speed is a concern for you, consider choosing a generation 2 VM.
Integration Services:
If you require improved integration services, such as support for online backups or remote desktop, generation 2 VMs are the better option.
Security:
If security is a top priority for your organization, consider choosing a generation 2 VM with Secure Boot and other advanced boot options.
What are the common VM platforms?
The common VM platforms are either On-premise virtualisation or Cloud virtualisation. These VM platforms are;
| Feature |
VMware |
Hyper-V |
Xen |
Azure |
AWS |
GCP |
Virtualization Platform
|
On-Premise |
On-Premise |
On-Premise |
Cloud-Based |
Cloud-Based |
Cloud-Based |
Customer Managed
|
Yes |
Yes |
Yes |
No |
No |
No |
Cloud-Based
|
No |
No |
No |
Yes |
Yes |
Yes |
Hypervisor Type
|
Type 1 |
Type 1 |
Type 1 |
Type 1 |
Type 1 |
Type 1 |
Live Migration
|
Yes |
Yes |
Yes |
Yes |
Yes |
Yes |
High Availability
|
Yes |
Yes |
Yes |
Yes |
Yes |
Yes |
Snapshot Capabilities
|
Yes |
Yes |
Yes |
Yes |
Yes |
Yes |
Networking
|
Yes |
Yes |
Yes |
Yes |
Yes |
Yes |
Storage
|
Yes |
Yes |
Yes |
Yes |
Yes |
Yes |
Resource Management
|
Yes |
Yes |
Yes |
Yes |
Yes |
Yes |
Integration with Other Technologies
|
Yes |
Yes |
Yes |
Yes |
Yes |
Yes |
Licensing Model
|
Proprietary |
Proprietary |
Open Source |
Proprietary |
Proprietary |
Proprietary |
|
|
Yes |
Yes |
No |
Yes |
Coming soon |
Coming soon |
In conclusion, the choice between generation 1 and generation 2 VMs depends on your specific needs and requirements. Generation 1 VMs are a good option if you need to support older software applications or 32-bit guest operating systems, while generation 2 VMs offer more advanced boot options, improved device support, and faster boot times. By considering factors such as compatibility, device support, speed, integration services, and security, you can choose the right VM for your organization’s needs.
Gen 1 or Gen 2 Further reading
Some useful links for further reading on Gen 1 or Gen 2 VMs, if you so require.
| Source |
Description |
|
|
Official documentation from Microsoft on the differences between Gen 1 and Gen 2 VMs |
|
|
A blog post from VMware that discusses the advantages and disadvantages of Gen 1 and Gen 2 VMs |
|
|
An article from TechTarget that provides a comparison between Gen 1 and Gen 2 VMs |
|
|
A whitepaper from Red Hat that explores the benefits and use cases of Gen 2 VMs |
|
|
A GitHub repository that contains scripts for converting Gen 1 VMs to Gen 2 VM |
In conclusion, the choice between generation 1 and generation 2 VMs depends on your specific needs and requirements. Generation 1 VMs are a good option if you need to support older software applications or 32-bit guest operating systems, while generation 2 VMs offer more advanced boot options, improved device support, and faster boot times. By considering factors such as compatibility, device support, speed, integration services, and security, you can choose the right VM for your organization’s needs.
by Mark | Feb 11, 2023 | Azure, VMWare
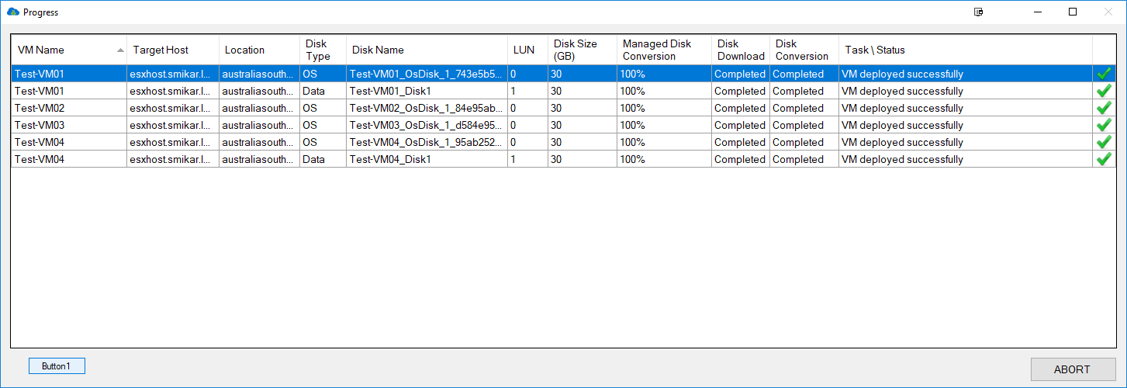
Azure Virtual Machines to VMware Migration
Migrating virtual machines from Microsoft Azure to VMware can be a complex and time-consuming process. But with the right planning and preparation, it can be a smooth and stress-free transition. In this blog post, we will be providing you with a comprehensive planning checklist to help guide you through the process of migrating Azure VMs to VMware. And with Carbon – the automated migration software – you can simplify and streamline the process even further.
Understanding the Migration Process
The process of migrating Azure VMs to VMware involves several steps. These steps include:
- Preparing the environment
- Configuring the migration settings
- Performing the actual migration
- Post-migration verification and cleanup
To help you successfully complete these steps, we have put together a comprehensive planning checklist. This checklist will help you gather all the necessary information, tools and resources, and ensure that you have a clear understanding of the migration process.
The Azure VM Migration Planning Checklist
Preparation
- Identify the VMs you need to migrate
- Gather information about the source environment (Azure)
- Gather information about the target environment (VMware)
- Plan the network infrastructure for the target environment
- Plan the storage infrastructure for the target environment
Configuration
- Download and install Carbon software
- Set up a migration project in Carbon
- Configure the migration settings in Carbon
- Plan and configure the network settings in the target environment
- Plan and configure the storage settings in the target environment
Migration
- Perform a test migration to ensure that everything is configured correctly
- Start the actual migration process
- Monitor the migration process to ensure that everything is running smoothly
- Resolve any issues that may arise during the migration process
Post-Migration
- Verify that the VMs have been successfully migrated to the target environment
- Clean up any unnecessary resources from the source environment
- Update the network and storage settings in the target environment if necessary
- Update any necessary DNS settings in the target environment

Common Migration FAQs
- What is Carbon? Carbon is an automated migration software that simplifies and streamlines the process of migrating Azure VMs to VMware. With Carbon, you can easily migrate your VMs with just a few clicks.
- What are the requirements for using Carbon? You will need to have an Azure account and a VMware environment to use Carbon. Carbon is compatible with both vSphere and vCenter.
- Can Carbon migrate multiple VMs at once? Yes, Carbon supports the migration of multiple VMs at once, making it a highly efficient and convenient tool for large-scale migrations.
- How long does it take to migrate VMs with Carbon? The time it takes to migrate VMs with Carbon depends on several factors, including the size and number of VMs, network speed, and storage capacity. In general, Carbon can complete a migration in a matter of hours, saving you time and effort compared to manual migration methods.
Azure VM to VMware Migration Conclusion
Migrating Azure VMs to VMware can be a complex process, but with the right planning and preparation, it can be a smooth and stress-free transition. By following the planning checklist outlined in this blog post, you can ensure that you have all the information, tools, and resources you need to complete the migration successfully. And with Carbon – the automated migration software – you
can simplify and streamline the process even further. With its user-friendly interface and support for multiple VMs, Carbon is the perfect tool to help you with your migration. So, why not try it out today and experience the ultimate solution for migrating Azure VMs to VMware.
In conclusion, The title of the blog post is “The Ultimate Planning Checklist for Migrating Azure VMs to VMware” is designed to provide you with a comprehensive guide to migrating Azure VMs to VMware. Whether you’re a seasoned IT professional or new to the world of virtualization, this checklist will help you successfully plan and execute your migration. And with the added benefits of using Carbon, you can simplify and automate the process, saving you time and effort in the process. So, start your migration today and see the benefits of migrating Azure VMs to VMware with Carbon!
by Mark | Feb 10, 2023 | Azure, clone, Cloud Computing, Microsoft HyperV, VMWare
Azure to VMware migration?
As organizations transition to the cloud, they are faced with the question of which platform is best suited to their needs. While Microsoft Azure has been a popular choice for cloud computing, many organizations are finding that VMware is a better fit for their virtualized infrastructure needs. This article will explore the reasons why you should consider migrating your Azure VMs to VMware and the benefits that come with making this transition.
Microsoft Azure has been a popular choice for cloud computing due to its scalability and ease of use. However, as organizations grow, they may find that they need more control over their virtualized infrastructure, which is where VMware comes in. With VMware, organizations have complete control over their virtualized environment, which can provide them with more flexibility, reliability, and security.
The Benefits of Migrating Azure VMs to VMware
There are several benefits to migrating Azure VMs to VMware, including increased control, improved performance, and enhanced security.
Increased Control
With VMware, organizations have complete control over their virtualized environment, which means they can manage their VMs in a way that best meets their business needs. They can also easily configure their virtual infrastructure to meet specific requirements, such as resource allocation and network configurations. This level of control is not possible with Azure, where organizations are limited to the resources and configurations provided by the platform.
Improved Performance
VMware also provides improved performance compared to Azure. This is because VMware provides dedicated hardware resources, which can result in faster and more reliable performance. Additionally, VMware’s virtual infrastructure is designed to support high-availability configurations, which can help ensure that VMs remain available even if there are hardware failures.
Enhanced Security
One of the biggest benefits of migrating Azure VMs to VMware is enhanced security. With VMware, organizations have complete control over their virtualized environment, which means they can implement robust security measures to protect their data and applications. This is not possible with Azure, where organizations are limited to the security measures provided by the platform.
Azure VM to VMware Migration FAQs
What is the process for migrating Azure VMs to VMware?
The process for migrating Azure VMs to VMware will depend on the specific needs of your organization. However, the process typically involves configuring a virtual infrastructure, migrating your VMs to the new infrastructure, and testing to ensure that everything is working as expected.
Can I still use Microsoft Azure after migrating my VMs to VMware?
Yes, you can still use Microsoft Azure after migrating your VMs to VMware. However, your VMs will no longer be hosted on the Azure platform, and you will have more control over your virtualized environment.
What are the costs associated with migrating Azure VMs to VMware?
The costs associated with migrating Azure VMs to VMware will depend on the specific needs of your organization. However, the costs can include hardware, software, and support costs.
How best to migrate your Azure VMs to VMware.
In conclusion, migrating Azure VMs to VMware can provide organizations with increased control, improved performance, and enhanced security. With complete control over their virtualized environment, organizations can better manage their VMs and implement robust security measures to protect their data and applications. If you are considering migrating your Azure VMs to VMware, it is important to consider the specific needs of your organization and to work with a professional who can help you make the transition.
Moreover, with the help of software such as Carbon, the administrator can quickly and easily migrate their Azure VMs to either VMWare or Hyper-V. Carbon connects directly to your Azure Subscription, displays your Azure Virtual Machines, and integrates with either your VMware or Hyper-V environments. The software replicates and converts your Azure VMs to your on-premise hypervisor of choice, automatically sets up your replicated Azure VMs on either VMware or Hyper-V with the same configurations, and provides email alerts once the process is completed. By using Carbon, the migration process becomes efficient and straightforward, giving administrators more time to focus on other important tasks.
by Mark | Feb 9, 2023 | clone, Schedule, Snapshot / Checkpoint, VMWare
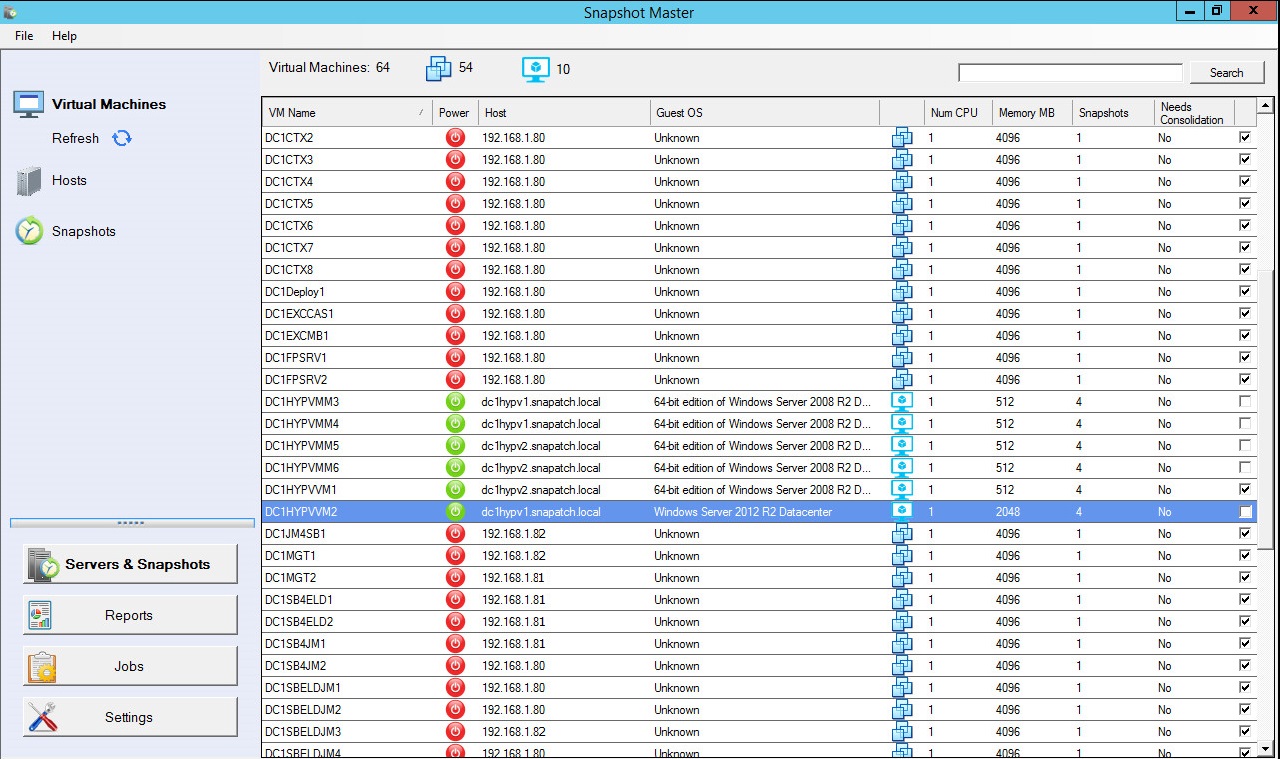
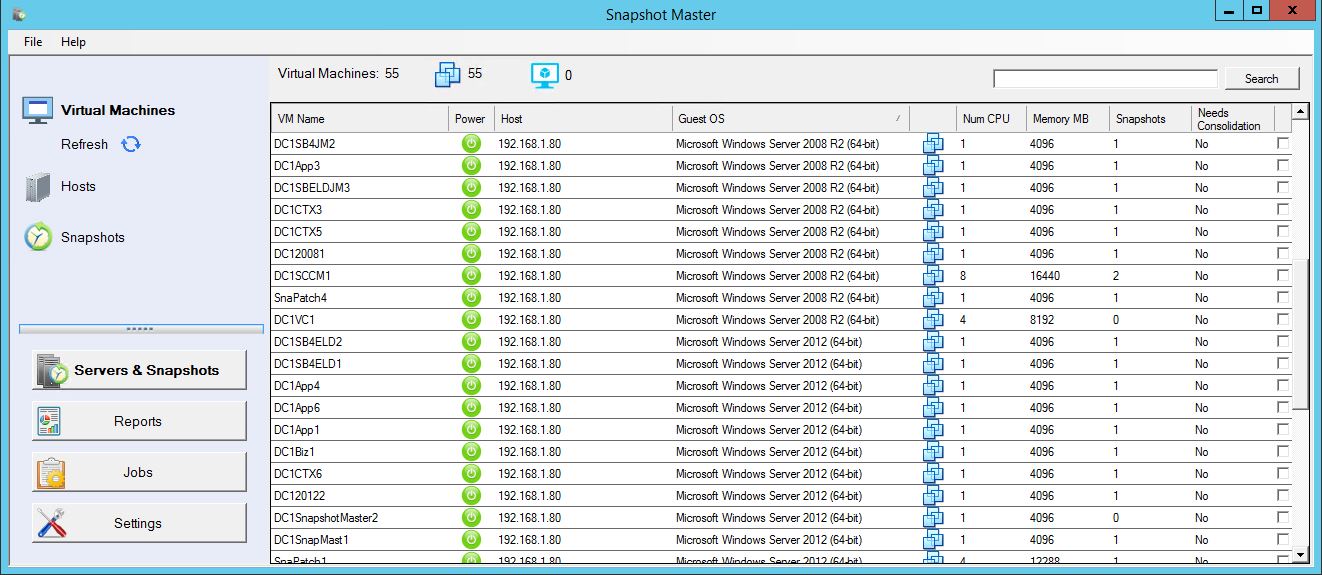
VMWare Snapshot Overview.
Snapshots are an essential part of virtual machine management, as they provide a convenient way to preserve the state of virtual machines and revert to an earlier version if necessary. However, without proper management, snapshots can quickly become a problem, consuming storage space and impacting performance. This is where SnapShot Master comes in.
SnapShot Master is a comprehensive solution for managing snapshots in your VMware environment. The tool offers a wide range of features to help you optimize your virtual environment, such as:
- Efficient Snapshot Management: With SnapShot Master, you can easily create, schedule, manage, and delete snapshots, and you can automate the process to run at specific intervals.
- Backup and Disaster Recovery: SnapShot Master provides reliable backup and disaster recovery solutions, ensuring that you can quickly restore your virtual environment in case of a failure.
- Storage Optimization: SnapShot Master helps you optimize your storage space by identifying and allowing you to remove stale snapshots, freeing up valuable disk space.
- Performance Optimization: The tool helps you improve the performance of your virtual environment by reducing the impact of snapshots on system performance.
- Simple and User-Friendly: SnapShot Master is designed to be user-friendly and intuitive, making it easy for you to manage snapshots and optimize your VMware environment.

Why Efficient Snapshot Management is Crucial for Your VMware Environment?
Snapshots are a critical aspect of virtual machine management, and efficient snapshot management is crucial to the success of your virtual environment. Here are some of the reasons why efficient snapshot management is important:
- Conserve Storage Space: Over time, snapshots can consume a significant amount of storage space, reducing the amount of space available for other important data.
- Improve Performance: Snapshots can have a significant impact on system performance, particularly if they are not properly managed.
- Ensure Data Protection: Snapshots are used to protect virtual machines and their data, and without proper management, they can actually create data loss or corruption.
The Benefits of Using SnapShot Master for Snapshot Management
SnapShot Master offers a range of benefits to help you maximize your VMware environment with efficient snapshot management. Here are some of the key benefits:
- Efficient and Automated Snapshot Management: SnapShot Master makes it easy to create, manage, and delete snapshots, and you can automate the process to run at specific intervals.
- Reliable Backup and Disaster Recovery: With SnapShot Master, you can be confident that your virtual environment is protected in case of a failure.
- Optimize Storage Space: The tool helps you optimize your storage space by automatically identifying and removing stale snapshots.
- Improve Performance: SnapShot Master helps you improve the performance of your virtual environment by reducing the impact of snapshots on system performance.
- Simple and User-Friendly: The tool is designed to be user-friendly and intuitive, making it easy for you to manage snapshots and optimize your VMware environment.
VMWare Snapshot FAQs
What is SnapShot Master?
SnapShot Master is a comprehensive solution for scheduling, and managing snapshots, backups, and disaster recovery in your VMware environment.
What are snapshots?
Snapshots are a feature of virtual machine management that allows you to preserve the state of a virtual machine at a particular point in time.
Why is efficient snapshot management important for my VMware environment?
Efficient snapshot management helps conserve storage space, improve performance, and ensure data protection in your virtual environment.
How does SnapShot Master help with snapshot management?
SnapShot Master offers a range of features to help you efficiently manage snapshots, including automated snapshot management, reliable backup and disaster recovery, storage optimization, and performance optimization.
Yes, SnapShot Master is designed to be simple and user-friendly, making it easy for you to manage snapshots and optimize your VMware environment.

VMWare Snapshot Final Thoughts
Maximizing your VMware environment with efficient snapshot management is crucial to the success of your virtual environment. SnapShot Master offers the best solution for managing snapshots, backups, and disaster recovery in your VMware environment. The tool offers a wide range of features to help you optimize your virtual environment, including efficient snapshot management, reliable backup and disaster recovery, storage optimization, performance optimization, and a user-friendly interface. If you’re looking for a solution to maximize your VMware environment with efficient snapshot management, look no further than SnapShot Master.
Download a fully functioning trial today and test it for yourself.
by Mark | Feb 2, 2023 | Snapshot / Checkpoint, VMWare
Key Takeaways for VMware Snapshot Usage
| Topic |
Key Insight |
| Primary Purpose |
Snapshots are for short-term recovery or testing—not backups. |
| Retention Time |
Avoid keeping snapshots longer than 72 hours to prevent performance issues. |
| Storage Impact |
Snapshots grow over time and can consume significant disk space. |
| Performance Considerations |
Running VMs with active snapshots may degrade performance, especially under load. |
| Consolidation |
Always consolidate snapshots after deletion to reclaim space and maintain health. |
| Quiescing |
Use quiesce for consistent snapshots of running applications (e.g., SQL, Exchange). |
| Automation |
Use tools like SnapShot Master for scheduled snapshots and cleanup automation. |
| Monitoring |
Regularly audit snapshots to avoid forgotten or orphaned deltas. |
| Risk of Reversion |
Reverting discards all changes made after the snapshot—use with caution. |
| Backups |
Always use proper backup solutions for long-term recovery. |
VMWare Snapshots Overview
VMware snapshots are a feature of the VMware vSphere platform that allows administrators to create a point-in-time copy of a virtual machine’s disk for backup, testing, or other purposes. When a snapshot is taken, the current state of the virtual machine’s disk is saved and all future writes are directed to a new delta file. This allows the virtual machine to continue running while the snapshot is taken and it can be used to revert the virtual machine’s disk to the state it was in when the snapshot was taken.
What are VMWare Snapshots and when should you use them?
A snapshot in VMware ESX is a point-in-time copy of the virtual machine’s disk that can be used for backup, testing, or other purposes. When a snapshot is taken, the current state of the virtual machine’s disk is saved and all future writes are directed to a new delta file.
This allows the virtual machine to continue running while the snapshot is taken, and it can be used to revert the virtual machine’s disk to the state it was in when the snapshot was taken.
Snapshots can be used in several ways:
- To revert a virtual machine to a previous state, for example, after a software update, installation or configuration change goes wrong.
- To create a point-in-time backup of a virtual machine, which can be used for disaster recovery.
- To create a test or development environment that is identical to the production environment.
It’s important to note that, taking too many snapshots or keeping them for a long period of time can cause disk space issues and also can impact the performance of the virtual machine. It’s recommended to use snapshots for short-term usage and regularly consolidate and delete them.
What does Quiesce a Virtual Machine mean?
“Quiesce” is a term that refers to the process of temporarily halting activity on a virtual machine so that a consistent point-in-time copy of its disk can be made. When a virtual machine is quiesced, all file system operations are frozen and all writes to the virtual machine’s disk are flushed to ensure that the data on the disk is in a consistent state. This allows for a consistent backup to be taken and for the virtual machine to be restored to that state.
When you take a snapshot of a virtual machine, the option to quiesce the file system is available. This option ensures that the file system is in a consistent state, by flushing all file system buffers and locking the file system, so that all data is captured correctly. This is especially useful for applications that maintain their own file systems, such as databases, where quiescing the file system guarantees that the data that is captured in the snapshot is in a consistent state.
It’s worth noting that, Quiescing a VM may cause a temporary disruption of the services running on the virtual machine, so it should be done during a maintenance window or during a period of low usage.
Why should you consolidate snapshots?
Consolidating snapshots is important because it helps to prevent disk space issues and maintain good performance of the virtual machine.
When a snapshot is taken, the current state of the virtual machine’s disk is saved, and all future writes are directed to a new delta file. As more snapshots are taken, the number of delta files increases, which can lead to disk space issues. These delta files can also cause performance issues as the virtual machine has to process more data to access the virtual disk.
Consolidating snapshots merges all the delta files into the base virtual disk file, reducing the number of files that need to be processed by the virtual machine and freeing up disk space. It also eliminates the possibility of running out of disk space and reduces the time required to back up and restore virtual machines.
Another important aspect is that, when a virtual machine is powered off, snapshots cannot be consolidated unless they are consolidated while the virtual machine is powered on. To avoid this, it’s important to regularly consolidate snapshots when the virtual machine is powered on.
In summary, consolidating snapshots helps to ensure that the virtual machine continues to perform well, and it also helps to free up disk space.
When should I use Vmware snapshots?
VMware snapshots should be used when you need to create a point-in-time copy of a virtual machine’s disk for backup, testing, or other purposes. Some common use cases for VMware snapshots include:
- Reverting a virtual machine to a previous state: If a software installation or configuration change goes wrong, you can use a snapshot to revert the virtual machine to the state it was in before the change was made.
- Creating a point-in-time backup: Snapshots can be used to create a point-in-time backup of a virtual machine, which can be used for disaster recovery.
- Testing and development: Snapshots can be used to create a test or development environment that is identical to the production environment.
- Upgrades and Patching: Snapshots can be useful when you need to upgrade or patch a virtual machine’s operating system or application, allowing you to quickly roll back in case of any issues.
- Quiesce a VM before taking backup: Taking a snapshot of a virtual machine before taking a backup can ensure that the backup is consistent and that all data is captured correctly.
It’s important to keep in mind that snapshots are not a replacement for traditional backups, as they may not capture all of the data that is present on the virtual machine.
Additionally, taking too many snapshots or keeping them for a long period of time can cause disk space issues and can impact the performance of the virtual machine. Therefore, it’s important to use snapshots judiciously and to consolidate and delete them regularly.
Now that you understand a bit more about VMWare snapshots, if you need to save yourself the manual task of creating and deleting the Snapshots yourself, give SnapShot Master a try. Not only will SnapShot Master do all this for you, it has heaps of other features that make maintaining your VMWare Snapshots a breeze.
Frequently Asked Questions (FAQs)
1. Are VMware snapshots the same as backups?
No. Snapshots are not full backups. They are temporary, point-in-time states of a VM used for short-term rollback or testing. For disaster recovery, always rely on full backups created by backup solutions.
2. How long should I keep a snapshot?
Ideally, no longer than 72 hours. The longer a snapshot is retained, the more it grows, which can degrade performance and consume large amounts of storage.
3. Can I take a snapshot of a powered-off VM?
Yes, but keep in mind that powered-off VMs cannot consolidate snapshots. You’ll need to power them on before consolidation can occur.
4. What happens if I forget to consolidate snapshots?
Over time, delta files grow and can severely impact VM performance and even lead to disk space exhaustion. Always monitor and consolidate regularly.
5. What is snapshot consolidation and why is it needed?
Consolidation merges snapshot delta files back into the base disk, preventing performance degradation and reclaiming storage space. It’s essential after deleting snapshots.
6. What is the performance impact of running a VM with snapshots?
The more snapshots you have—and the longer they exist—the more I/O operations the VM must process, which can slow down performance, especially under heavy workloads.
7. Can I automate snapshot management?
Yes. Tools like SnapShot Master can schedule snapshot creation, monitor usage, and automatically delete or consolidate snapshots to maintain system health.
8. Should I quiesce the VM every time I take a snapshot?
Quiescing is recommended for consistent backups, especially for applications like databases. However, it may cause a brief service disruption, so use it strategically.
9. Are there risks in reverting to a snapshot?
Yes. Reverting to a snapshot discards all changes made since the snapshot was taken. Use with caution, and always confirm the snapshot’s state before applying it.
10. How can I monitor snapshot usage across my environment?
vCenter provides basic visibility, but for advanced reporting and automation, tools like SnapShot Master give deeper insight into snapshot age, size, and health.
by Mark | Jan 28, 2023 | Security, Snapshot / Checkpoint, VMWare
VMware Snapshot Overview.
A VMware snapshot is a point-in-time copy of the virtual machine’s disk files and memory state. These snapshots are used to capture the state of a virtual machine at a specific point in time and allow users to revert to a previous state if necessary. They are commonly used for testing, patching, recovery, or rollback, but can also be used for taking backups of virtual machines. However, snapshots have limitations such as not providing the same level of protection as traditional backups, not including virtual machine’s configuration, consuming disk space and lack of granularity compared to traditional backups. Therefore, it is recommended to use snapshots in conjunction with traditional backups for data protection.
What are VMware SnapShots?
A VMware snapshot is a feature in VMware vSphere, which allows you to create a point-in-time copy of the virtual machine’s disk file(s) and the virtual machine’s memory state. This snapshot captures the virtual machine’s state, data, and configuration at the time the snapshot was taken. You can later use this snapshot to revert the virtual machine to that state, in case of any issues or failures.
Snapshots are used for several purposes, such as:
- Testing new software or updates
- Patching and upgrading applications
- Recovery from a failed configuration
- Rollback to a previous state if an update or patch causes issues
When a snapshot is taken, it captures the state of the virtual machine’s memory and all the virtual disk files associated with the virtual machine. The original disk files are then replaced with new, delta disk files that store only the changes made to the original disk files. This allows the virtual machine to continue running and making changes to the virtual disks while the snapshot is being taken.
It is important to note that Snapshots are intended for short-term use and are not intended to be used as a long-term backup solution. Because snapshots consume disk space and can lead to disk space depletion if not managed properly. It’s recommended to use them in conjunction with traditional backups to ensure your data is properly protected.
Should you use VMware SnapShots as backups?
A VMware snapshot is a point-in-time copy of the virtual machine’s disk file(s) and the virtual machine’s memory state. These snapshots are used to capture the state of a virtual machine at a specific point in time, allowing the user to revert to the previous state if necessary.
Snapshots are commonly used for several purposes such as testing new software, patching, recovery, or rollback. They can also be used for taking backups of virtual machines, but snapshots have some limitations and considerations compared to traditional backups:
- Snapshots don’t provide the same level of protection as backups do, they are not intended to be used as a long-term backup solution, they should be only used as a short-term backup solution or when taking backups is not possible.
- Snapshots don’t include the virtual machine’s configuration or settings, they only capture the disk and memory state.
- Snapshots consume disk space on the datastore and if left unmanaged, can lead to disk space depletion.
- While snapshots can help you recover quickly from a failure, they don’t provide the same level of granularity as traditional backups.
In summary, VMware snapshots can be used for backups, but they have limitations and may not provide the same level of protection or granularity as traditional backups. It’s recommended to use them in conjunction with traditional backups to ensure your data is properly protected.
Best Practices for Data Protection
Combine Snapshots with Backups
To ensure optimal data protection, it is essential to combine the use of VMware snapshots with a robust backup strategy. Snapshots can be used for short-term VM management and troubleshooting, while backups should be utilized for long-term data protection and disaster recovery. By employing both methods, you can maximize the benefits of snapshots while maintaining the security and reliability provided by traditional backups.
Regularly Monitor and Manage Snapshots
To prevent performance degradation and ensure efficient resource utilization, it’s important to regularly monitor and manage your snapshots. This includes deleting unnecessary snapshots and consolidating delta disks when appropriate. Proper snapshot management can help maintain optimal VM performance and prevent excessive resource consumption.
If you need to schedule the automated creation and then deletion on a schedule, download a copy of SnapShot Master and trial it for yourself.
VMWare Snapshot FAQs
Are VMware snapshots suitable for long-term data storage?
No, VMware snapshots are primarily designed for short-term VM management and troubleshooting. They are not intended to be a long-term data storage solution and should be used in conjunction with traditional backups.
Can VMware snapshots protect against ransomware attacks?
Snapshots alone cannot provide complete protection against ransomware attacks, as they are not isolated from the original VM. A comprehensive backup strategy is necessary to ensure data protection in the event of a ransomware attack.
Do VMware snapshots affect virtual machine performance?
Yes, snapshots can have a negative impact on VM performance due to the additional I/O overhead they introduce. Proper snapshot management, including deleting unnecessary snapshots and consolidating delta disks, can help mitigate performance degradation.
Is it possible to automate the snapshot process in a VMware environment?
Yes, SnapShot Master can integrate with VMware environments and offer automation features, making the snapshot process more efficient and streamlined.
Conclusion
In summary, while VMware snapshots offer valuable functionality for VM management and troubleshooting, they should not be considered a complete backup solution. Snapshots have limitations in terms of performance impact and data protection, and they are best used in conjunction with traditional backups. By employing a comprehensive data protection strategy that combines snapshots with robust backup solutions, you can ensure the security and reliability of your virtual environment.


