AzCopy is a command-line utility designed for copying data to and from Microsoft Azure Blob and File storage. It is a very powerful tool provided by Microsoft that helps users to copy and transfer data efficiently and securely. One of the key features of AzCopy is the ability to schedule transfers. Scheduled transfers can be extremely useful in managing data and ensuring that data is moved or backed up at the most appropriate times. AzCopy is particularly useful for businesses and individuals who handle large volumes of data and need a reliable and efficient way to manage data transfers. The ability to schedule transfers allows users to plan ahead and ensure that important data is transferred at the right times, without having to manually initiate the transfer each time.
Why Schedule Transfers?
Scheduling transfers can be incredibly beneficial for a number of reasons.
Importance of Scheduling
Firstly, scheduling transfers can help manage the load on your network. Transferring large amounts of data can be very resource-intensive and can impact the performance of other applications and services. By scheduling transfers for off-peak times, you can reduce the impact on your network and ensure that other services continue to run smoothly. This is particularly important for businesses that rely on their network for critical operations and cannot afford any downtime or reduced performance. Additionally, scheduling transfers can also help in managing costs. Many cloud providers charge based on the amount of data transferred and the time at which the transfer occurs. By scheduling transfers for off-peak times, you may be able to take advantage of lower rates and save on costs.
Use Cases
Another use case for scheduling transfers is for regular backups or data synchronizations. For example, if you have a database that needs to be backed up daily, you can schedule a transfer to occur every night at a specific time. This ensures that your data is always backed up and protected. Regular backups are essential for protecting against data loss due to hardware failure, data corruption, or other unforeseen events. By scheduling transfers, you can automate the backup process and ensure that it is always completed on time. Another common use case is for data synchronization between different systems or locations. For example, you may have a production environment and a backup environment that need to be kept in sync. By scheduling transfers, you can ensure that any changes made in the production environment are automatically replicated to the backup environment.
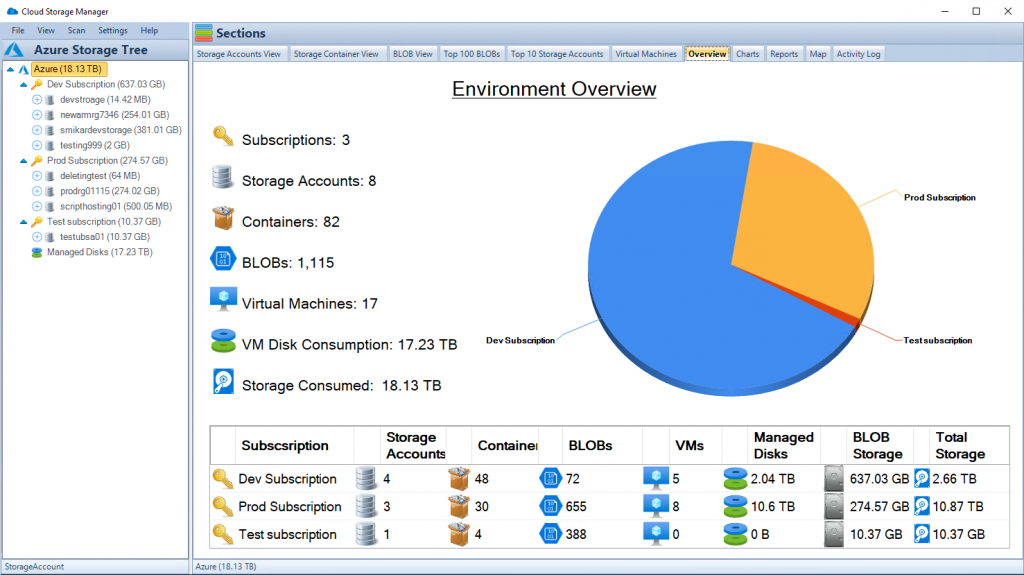
Cloud Storage Manager Main Window
How to Schedule Transfers
Scheduling transfers in AzCopy involves a few steps.
Installation and Setup
Before you can schedule transfers, you need to ensure that AzCopy is installed on your machine. The installation process is straightforward and involves downloading the AzCopy executable file from the Microsoft website and configuring it on your machine. It is important to ensure that you have the appropriate permissions to install software on your machine and to access the source and destination locations for the transfer. Additionally, you may need to configure your firewall or network settings to allow AzCopy to access the internet or other network resources.
Using the Command Line
AzCopy is a command-line tool, so you will need to use the command line to schedule transfers. The basic syntax for scheduling a transfer with AzCopy is as follows:
In this example, C:\source is the source directory, and https://destination.blob.core.windows.net/container is the destination URL. The --schedule parameter specifies the schedule for the transfer using a cron expression. The cron expression 0 2 * * * specifies that the transfer should occur at 2 AM every day.
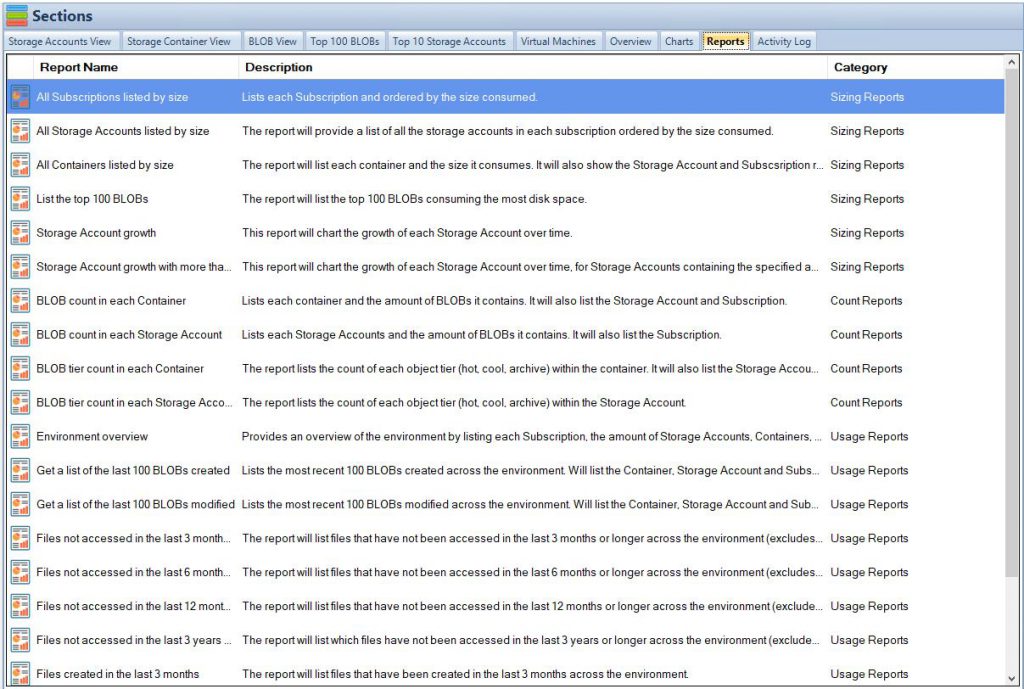
Cloud Storage Manager Reports Tab
Tips and Best Practices
It’s important to consider a few things when scheduling transfers with AzCopy.
Handling Errors
Errors can occur during the transfer process, and it’s important to handle them appropriately. AzCopy provides several options for handling errors, such as retrying the transfer, logging the error, or stopping the transfer completely. It is recommended to review the documentation for AzCopy and configure the appropriate error handling options for your use case. For example, you may want to configure AzCopy to retry the transfer a certain number of times before logging an error and stopping the transfer. Additionally, you may want to configure AzCopy to generate a log file that you can review after the transfer is completed to identify any issues or errors that occurred during the transfer.
Monitoring Transfers
Monitoring transfers is also important to ensure that they are completed successfully. AzCopy provides several options for monitoring transfers, such as generating a log file or displaying the status of the transfer in the command line. It is recommended to review the documentation for AzCopy and configure the appropriate monitoring options for your use case. For example, you may want to configure AzCopy to generate a log file that you can review after the transfer is completed to confirm that all files were transferred successfully. Additionally, you may want to monitor the status of the transfer in the command line to identify any issues or errors that occur during the transfer.
Automating Transfer Schedules
Automating transfer schedules can help streamline the process and ensure that transfers occur as planned.
Using Scripting
Scripting can be a powerful way to automate transfer schedules. You can create a script that contains the AzCopy command with the appropriate parameters for your transfer and then schedule the script to run at the desired times. There are several scripting languages available, such as PowerShell or Bash, that you can use to create your script. It is recommended to review the documentation for your preferred scripting language and the AzCopy command-line reference to create your script.
Using Task Scheduler
Another way to automate transfer schedules is by using the Task Scheduler on Windows. You can create a task that runs the AzCopy command at the desired times. The Task Scheduler provides a user-friendly interface for configuring tasks and allows you to specify various options, such as the start time, recurrence, and actions to take if the task fails. It is recommended to review the documentation for the Task Scheduler and the AzCopy command-line reference to create your task.
Conclusion
Scheduling transfers with AzCopy can be incredibly useful for managing data and ensuring that data is moved or backed up at the most appropriate times. By using the command line, scripting, or the Task Scheduler, you can automate transfer schedules and streamline the process. Remember to handle errors appropriately and monitor transfers to ensure they are completed successfully. Additionally, it is important to test your scheduled transfers thoroughly before relying on them in a production environment. By following these best practices, you can take full advantage of the scheduling capabilities of AzCopy and ensure that your data is always transferred on time and securely.
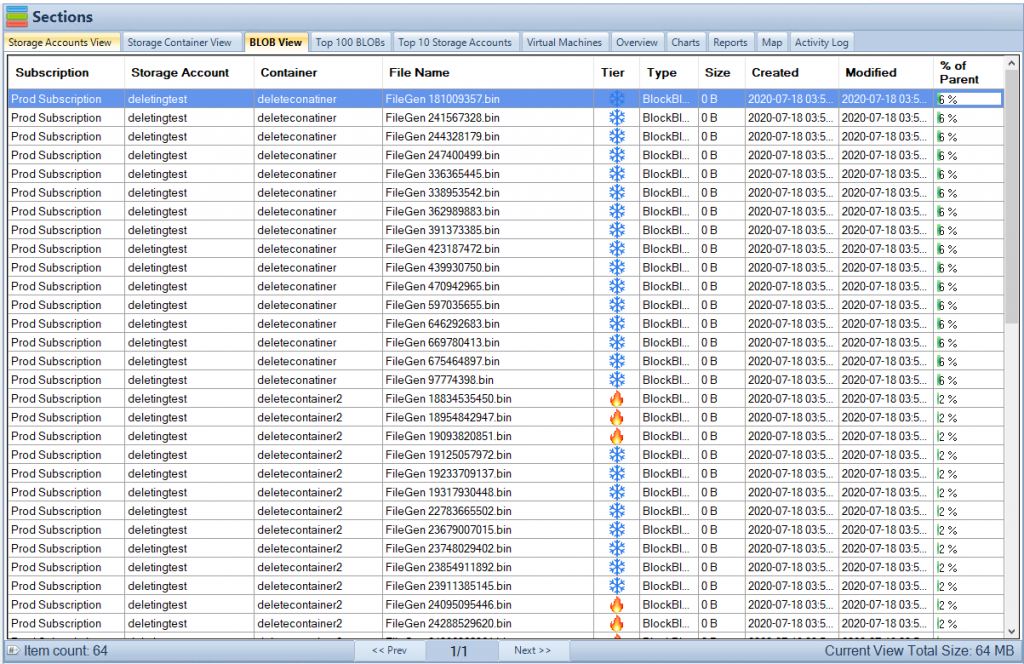
Cloud Storage Manager Blobs Tab
Frequently Asked Questions
Can I schedule transfers to occur at multiple times throughout the day? Yes, you can schedule transfers to occur at multiple times throughout the day by specifying multiple cron expressions in the --schedule parameter. For example, if you want to schedule a transfer to occur at 2 AM and 2 PM every day, you would use the following command: azcopy copy "C:\source" "https://destination.blob.core.windows.net/container" --schedule="0 2 * * *,0 14 * * * In this example, the cron expression 0 2 * * * specifies that the transfer should occur at 2 AM every day, and the cron expression 0 14 * * * specifies that the transfer should occur at 2 PM every day.
Can I schedule transfers from multiple sources to a single destination? Yes, you can schedule transfers from multiple sources to a single destination by running multiple AzCopy commands with different source and destination parameters. Each command will create a separate transfer, and you can schedule them to occur at the same time or at different times. For example, you may have two directories that you want to back up to the same destination, but at different times. You can create two separate AzCopy commands with the appropriate source and destination parameters and schedule them to occur at the desired times.
Can I cancel a scheduled transfer? Yes, you can cancel a scheduled transfer by stopping the AzCopy process or by deleting the scheduled task in the Task Scheduler. If you are using a script to automate your transfer schedule, you can stop the script or remove the scheduled task that runs the script. It is important to cancel a scheduled transfer carefully to avoid any data loss or corruption. For example, if you stop the AzCopy process while a transfer is in progress, some files may be partially transferred or not transferred at all.
Can I schedule transfers to occur on specific days of the week? Yes, you can schedule transfers to occur on specific days of the week by specifying the appropriate days in the cron expression. For example, if you want to schedule a transfer to occur on Mondays and Fridays at 2 AM, you would use the following command: azcopy copy "C:\source" "https://destination.blob.core.windows.net/container" --schedule="0 2 * * 1,5" In this example, the cron expression 0 2 * * 1,5 specifies that the transfer should occur at 2 AM on Mondays and Fridays.
Can I schedule transfers between different Azure accounts? Yes, you can schedule transfers between different Azure accounts by specifying the appropriate source and destination parameters in the AzCopy command. For example, you may have an Azure Blob Storage account in one Azure subscription and an Azure File Storage account in another Azure subscription. You can create an AzCopy command with the appropriate source and destination parameters and schedule it to occur at the desired times.
Azure Files is Microsoft’s robust file storage solution, offering the ability to access data seamlessly from various locations using standard protocols. But in the world of IT, where data is the heartbeat of operations, its safety is paramount. That’s where Azure Files Backup comes into play.
In a digital era, where data loss can spell catastrophe, backing up your valuable files is more than a best practice; it’s a necessity. With Azure Files Backup, not only are your files secure, but they’re also retrievable when you need them, regardless of what mishap might have caused the loss. Human error, software glitches, or malicious attacks – no matter the cause, your data remains shielded.
Azure Files Backup doesn’t just preserve files; it’s part of a broader strategy for business continuity. Ever had that sinking feeling when a vital document gets deleted accidentally? Or when a system failure wipes out hours of work? Azure Files Backup is the safety net that catches these digital mishaps, turning potential disasters into minor inconveniences.
In this comprehensive guide, we’ll delve into every aspect of Azure Files Backup. From setting it up, understanding its security features, exploring pricing options, to integration with other services and optimizing costs with the help of tools like Cloud Storage Manager, it’s all here. If you’re an IT professional looking to leverage Azure Files Backup, you’re in the right place.
Ready to dive into the world of Azure Files Backup? Let’s start with the foundational steps!
Setting Up Azure Files Backup
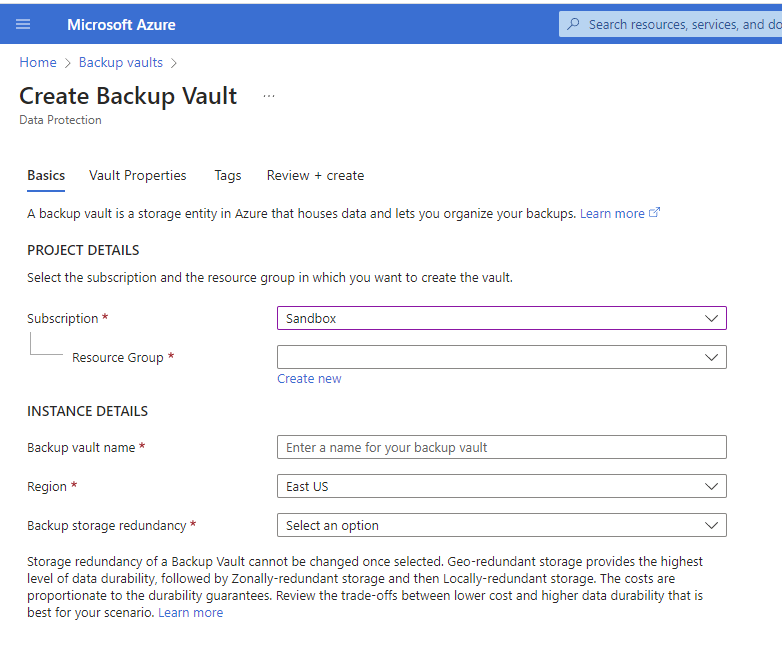
Azure Files Backup Setup
Preparing Your Environment: This isn’t just a click-and-go affair. Setting up Azure Files Backup requires a solid understanding of your existing Azure environment. Have you checked your Azure Storage account and ensured it’s in a supported region? Are your permissions properly configured? The preparation phase lays the groundwork, so take your time with this step.
Configuring Backup Settings: Head over to the Azure Recovery Services vault, where you’ll define your backup goal. What exactly are you backing up, and where would you like to store it? Under the ‘Backup’ section, select Azure Storage (Azure Files) and configure the storage settings to match your requirements. And don’t forget to choose a backup policy that aligns with your needs.
Implementing Backup Schedules: Backup isn’t a one-time event; it’s an ongoing process. Consistent, scheduled backups ensure that you’re never at risk of losing recent data. Depending on the critical nature of your files, you can set daily, weekly, or monthly backups. This isn’t just a set-and-forget task. Regular reviews of your backup schedule keep your data safety net as strong as possible.
Code Snippets and Tools: Automate, automate, automate! In the world of IT, automation is king, and backups are no exception. Whether you’re a fan of Azure CLI or PowerShell, scripts can help you streamline your backup tasks. Here’s an example using # Backup Azure Files using PowerShell $vault = Get-AzRecoveryServicesVault -Name 'MyVault' Set-AzCurrentBackupStorageOption -BackupStorageOption AzureFiles -VaultId $vault.Id
Common Challenges and Troubleshooting: Even with the best-laid plans, backups can sometimes falter. Whether it’s a permissions issue, a storage account glitch, or a misconfiguration, the Azure portal’s comprehensive logs provide all the clues you need to get back on track. A systematic approach to troubleshooting can turn a failed backup from a crisis into a learning opportunity.
Security Considerations: Your backup is only as secure as your weakest link. Azure Files Backup integrates with Azure’s robust security features, but an understanding of encryption, authentication, and access control will ensure that your backups are not just successful but also secure.
Cost Management: Backups aren’t just about data; they’re about balancing data safety with costs. Understanding pricing tiers and selecting the right options can make Azure Files Backup an economical choice without compromising safety.
Setting Up Azure Files Backup: An In-Depth Guide
Create a Storage Account
a. Open Azure Portal: Log in to your Azure Portal at portal.azure.com. If you don’t have an account, you will need to sign up and configure your subscription.
b. Select ‘Create a Resource’: On the left-hand side menu, click on ‘Create a Resource’. Navigate to the ‘Storage’ section and then select ‘Storage account’.
c. Configure Your Storage Account: You’ll need to choose the subscription you want to use, select or create a new resource group, specify a unique name for the storage account, and pick the region that suits your needs. Make sure to select the performance, account kind, and replication options as per your requirements.
d. Review and Create: Check all the details you entered, and if everything looks correct, click ‘Create’. The creation might take a few minutes.
Create a File Share
a. Select Your Storage Account: Once your storage account is ready, navigate to it from the dashboard or ‘Resource groups’.
b. Click on ‘File shares’: In the left-hand menu of your storage account, click on the ‘File shares‘ then the ‘+ File share’ button.
c. Name Your File Share: Enter a name for your file share and specify the size according to your needs, then click ‘Create’.
Configure Backup
a. Select ‘Backup’ in the Azure Portal: From the left-hand menu, find ‘Backup’. If it’s not visible, you may need to search for it in the ‘All services’ section.
b. Define Your Backup Goal: Select your subscription, the resource group where your storage account is located, and specify that you want to back up ‘Azure File Share’.
c. Create a Recovery Services Vault: If you don’t have an existing vault, you’ll need to create one. Provide the name, subscription, resource group, and region for the vault.
d. Set Backup Policy: You can choose an existing policy or create a new one, defining the frequency and retention rules for your backups.
e. Enable Backup: Once everything is configured, click the ‘Enable Backup’ button. The initial backup may take some time to complete.
b. Integrate with Azure: Connect Cloud Storage Manager with your Azure Files following the detailed integration guide provided with the software.
Monitor and Manage
a. Regularly Review Backups: Monitor the status and health of your backups through both Azure Portal and Cloud Storage Manager to understand how much Azure Files you are using.
b. Restore When Needed: If you need to restore data, navigate to the ‘Backup items’ tab in your Recovery Services Vault, select the file share you want to restore, and follow the on-screen instructions.
Cloud Storage Manager Reports Tab
Security Features of Azure Files Backup
Taking Data Protection to the Next Level
Azure Files Backup isn’t just about storing another copy of your data. It’s about ensuring that the backup is as secure as the original, if not more. Here’s how Azure prioritizes security:
Encryption: Every bit of data you backup is encrypted using the Advanced Encryption Standard (AES) with 256-bit keys, both at rest and during transit. So, whether your data is sitting tight or moving between locations, it’s wrapped in a layer of high-level security. It’s like storing your gold in a vault that’s inside another vault.
Authentication and Access Control: Access to your backups is as vital as the backup itself. Azure implements strict role-based access controls combined with multi-factor authentication. This dual layer of protection ensures that only the eyes meant to see your data get to it. Think of it as a fingerprint-protected diary where even if someone has the key, they still can’t read it without your unique fingerprint.
Integrity Checks: Azure runs regular integrity checks to ensure that backups remain uncorrupted. If your data is the DNA of your operations, think of integrity checks as the regular health check-ups, ensuring everything’s running smoothly.
Threat Detection: In the unlikely event of a breach or a threat, Azure’s advanced analytics kick in to detect and respond, ensuring that threats are neutralized before they can cause any damage. It’s like having a security guard monitoring your house who calls the police at the first sign of trouble.
Pricing, Cost Management, and Cost-Efficiency
Making the Most of Every Dollar in Azure
Azure Files Backup isn’t just about storing data securely; it’s also about doing so cost-effectively. Here’s how to navigate Azure’s pricing landscape:
Understanding Pricing Tiers: Azure offers different pricing options based on storage capacity, access frequency, and retention periods. It’s a menu, and understanding each option ensures you pick what’s just right for your appetite and budget.
Regularly Review and Clean: Redundant or outdated backups can be pruned. Regularly reviewing and cleaning your backup repository ensures that you’re not paying for what you don’t need. Think of it like cleaning out your closet – if you haven’t used it in a while, maybe it’s time to let it go.
Monitoring with Tools: Platforms like Cloud Storage Manager can provide insights into storage consumption, offering reports on usage trends. By understanding how and where you’re consuming storage, you can make informed decisions, much like studying your electricity bill to understand where you can save.
Cost-saving Resources: Azure offers a plethora of resources to help save on storage costs. From understanding blob storage sizes to minimizing Azure Blob storage costs, the tools and tips are there, waiting to be leveraged.
Integrating Azure Files Backup with Other Services
Strengthening Connections for Streamlined Operations
Azure doesn’t exist in isolation; it’s part of a vibrant ecosystem. Knowing how Azure Files Backup integrates with other services can streamline your operations:
Integration Scenarios: Be it with Azure Kubernetes Service or Azure App Service, Azure Files can seamlessly connect, allowing for efficient data movement and usage across platforms.
Automation across Services: With tools like Azure Logic Apps or Azure Automation, backup tasks can be integrated with other IT tasks, creating a cohesive, automated workflow.
Optimizing Integrations: Regularly review integration points. As services update and evolve, ensuring optimal integration ensures smooth operations. It’s akin to making sure all cogs in a machine are well-oiled and aligned.
Cloud Storage Manager Main Window
The Power of Cloud Storage Manager in Azure Files Backup
The Unsung Hero in Efficient Azure Storage Management
While Azure offers powerful tools natively, third-party platforms like Cloud Storage Manager can supercharge your Azure storage management:
Holistic View: Get a bird’s-eye view of Azure blob and file storage consumption, providing actionable insights into patterns and areas of improvement.
Reports and Trends: It’s not just about knowing where you are, but also where you’re headed. With growth trend reports, anticipate future needs and adjust strategies accordingly.
Cost-saving Insights: With tools and insights, understand how to save money on Azure storage, ensuring that your cloud strategy is both robust and economical.
Integration and Usage: The true power of any tool lies in its usage. Integrate Cloud Storage Manager into your Azure routine and harness its power to the fullest.
Cloud Storage Manager Blobs Tab
Conclusion: Azure Files Backup – Your Digital Safeguard
In an increasingly digital world, where data is the heart of any operation, the importance of securing it cannot be overstated. Azure Files Backup serves as a robust solution, providing not just backup but also an array of security features, integration capabilities, and cost-effective strategies.
From IT professionals looking to understand every nuance of the service to business owners seeking to understand the broader landscape, Azure Files Backup caters to a variety of needs. With tools like Cloud Storage Manager, you can dive even deeper, gaining insights into storage consumption and cost-saving strategies.
Azure Files Backup isn’t just a service; it’s an investment in peace of mind, knowing that no matter what happens, your data is secure and retrievable. So why wait? Dive into Azure Files Backup and explore how you can streamline your data backup process. Download and use our software “Cloud Storage Manager” today to enhance your Azure storage experience.
Frequently Asked Questions
How can I start using Azure Files Backup?
Answer: Start by preparing your Azure environment and following the step-by-step guide outlined above. Tools like PowerShell or Azure CLI can further streamline the process.
What makes Azure Files Backup secure?
Answer: With encryption, multi-factor authentication, regular integrity checks, and advanced threat detection, Azure Files Backup ensures that your data remains secure.
How can I manage costs with Azure Files Backup?
Answer: By understanding pricing tiers, regularly reviewing and cleaning backups, and utilizing tools like Cloud Storage Manager, you can effectively manage costs.
How does Cloud Storage Manager integrate with Azure Files?
Answer: Cloud Storage Manager provides insights into Azure blob and file storage consumption, offers growth trend reports, and helps with cost-saving strategies. It’s a valuable addition to any Azure Files Backup strategy.
Can I integrate Azure Files Backup with other Azure services?
Answer: Absolutely! Azure Files Backup can integrate seamlessly with services like Azure Kubernetes Service or Azure App Service, allowing for efficient data movement and automation across platforms.
In today’s data-driven world, managing information is more crucial than ever. With the constant flow of data, both individuals and organizations are increasingly concerned about privacy and security. The General Data Protection Regulation (GDPR) has emerged as a key legislative framework in the European Union to protect citizens’ personal data. But how does this relate to the tools we use to manage and transfer data, like Microsoft’s AzCopy? This blog post aims to explore AzCopy’s GDPR compliance, offering both a technical and legal perspective, tailored for readers who may be new to these topics.
Cloud Storage Manager Reports Tab
What is AzCopy?
AzCopy is a command-line utility tool designed by Microsoft to move data to and from Azure Blob and File storage, a part of Microsoft’s vast cloud services. It’s popular among developers and administrators for its efficiency and flexibility in handling large amounts of data. But what does it mean for AzCopy to be GDPR compliant, and why is it essential? To understand this, let’s first look at GDPR itself.
Understanding GDPR
The General Data Protection Regulation (GDPR) is a regulation enacted by the European Union to ensure that companies protect the personal data and privacy of individuals within the EU. Since its implementation in May 2018, GDPR has reshaped how data is handled across every sector.
Key Principles of GDPR
Lawfulness, Fairness, and Transparency: Data must be processed legally, fairly, and in a transparent manner.
Purpose Limitation: Data must be collected for specific, explicit, and legitimate purposes.
Data Minimization: Only the necessary amount of data should be collected and processed.
Accuracy: Data must be accurate and, when necessary, kept up to date.
Storage Limitation: Data must not be kept longer than necessary.
Integrity and Confidentiality: Data must be processed securely.
Cloud Storage Manager Main Window
AzCopy and GDPR Compliance: The Technical Perspective
As a tool used to transfer data, AzCopy plays a significant role in the data processing pipeline. Its compliance with GDPR is therefore vital for organizations that handle personal data of EU citizens. Let’s explore how AzCopy meets GDPR requirements:
Secure Data Transfer
AzCopy employs robust encryption mechanisms during data transfer, ensuring that the information is secure and protected against unauthorized access. This aligns with the GDPR’s principle of integrity and confidentiality.
Flexible Data Management
AzCopy’s ability to control and manage data, set permissions, and monitor activities enables organizations to fulfill GDPR’s requirements for data minimization, accuracy, and storage limitation.
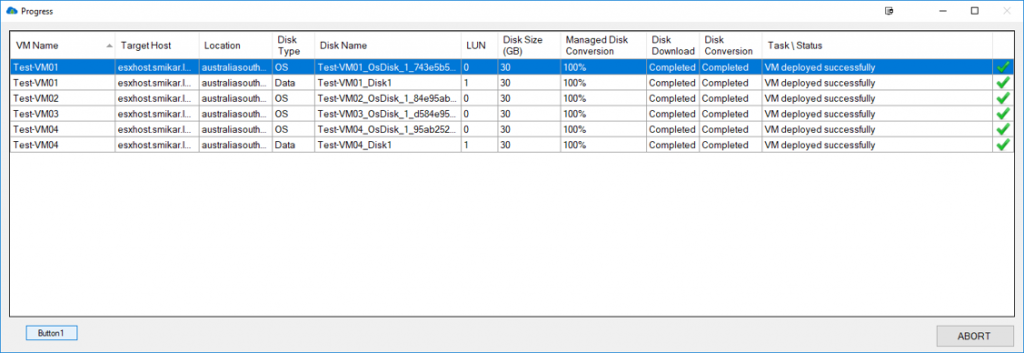
Carbon Azure Migration Progress Screen
AzCopy and GDPR Compliance: The Legal Perspective
Understanding the legal side of AzCopy’s GDPR compliance is equally vital, as it ensures organizations remain within the bounds of the law while using this tool. Here’s how AzCopy aligns with legal requirements:
Compliance with Contractual Obligations
Organizations can craft specific agreements or contracts that align with GDPR principles, with AzCopy’s functionality acting as an enabling technology. These contracts can define the roles, responsibilities, and requirements for all parties involved in data processing.
Vendor Assessment and Relationship
Since AzCopy is a product of Microsoft, a large and well-established vendor, assessing its GDPR compliance can be part of an organization’s vendor risk management. Microsoft provides extensive documentation on AzCopy’s security and privacy features, easing concerns about GDPR compliance.
Regular Monitoring and Auditing
AzCopy allows for logging and tracking of data transfers. Regular monitoring and auditing of these logs can demonstrate compliance with GDPR by showing active management and oversight of personal data.
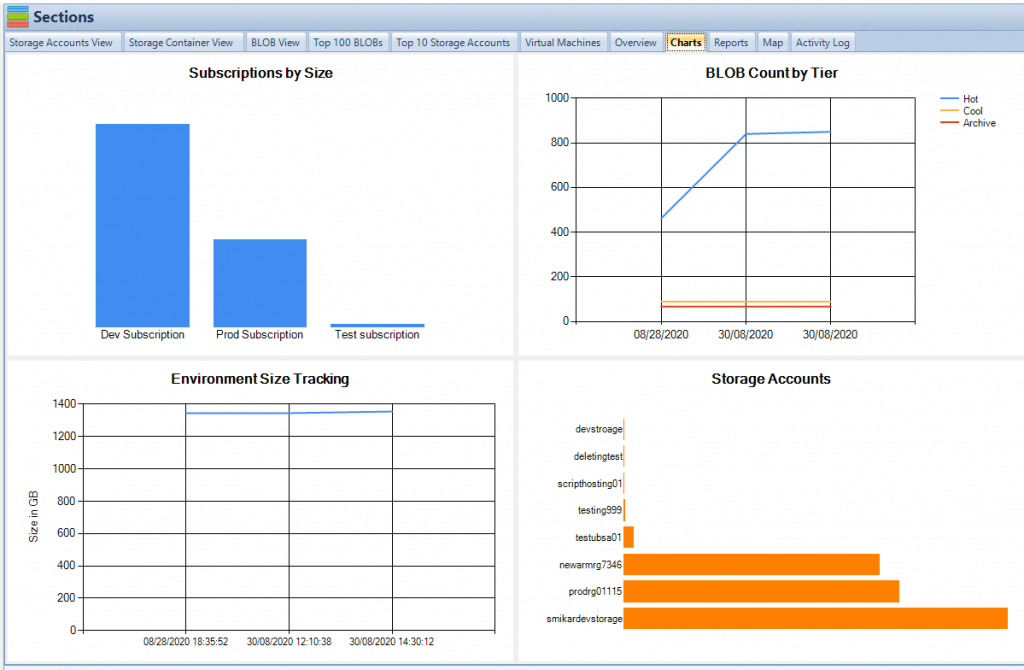
Cloud Storage Manager Charts Tab
Potential Challenges and Considerations
While AzCopy offers many features that align with GDPR principles, users must be aware of potential challenges and considerations:
Data Residency
Under GDPR, organizations may be required to store personal data within the EU or in countries with adequate privacy protections. AzCopy does not manage data residency itself, so organizations must ensure that their Azure storage locations comply with these requirements.
User Error
Like any powerful tool, AzCopy requires careful handling. Misconfiguration or incorrect usage can lead to non-compliance with GDPR. Proper training, guidelines, and internal policies can mitigate this risk.
Third-party Integrations
Using AzCopy in conjunction with other tools or third-party services may introduce additional GDPR compliance complexities. It’s essential to assess the entire data processing pipeline to ensure overall compliance.
Conclusion
AzCopy, Microsoft’s efficient data transfer utility, is a potent tool in the modern data landscape. But in the era of GDPR, its usage requires more than technical proficiency; it demands a careful understanding of legal requirements, potential challenges, and the broader context of data privacy.
By following best practices and keeping abreast of both technical and legal considerations, organizations can leverage AzCopy to its fullest while staying within the bounds of GDPR. A balanced approach, focusing on secure data transfer, contractual obligations, regular monitoring, and understanding potential challenges, will not only ensure compliance but also foster trust among customers and stakeholders.
With the continued evolution of data privacy laws, staying informed and adaptable is key. AzCopy serves as a practical example of how tools must align with legal frameworks, bridging the technical efficiency we demand with the ethical responsibility we owe to individuals whose data we handle.
In today’s digital world, where data is considered the new oil, organizations are consistently looking for efficient ways to store and manage their invaluable information assets. Microsoft’s Azure Files and Windows Server are two technologies at the forefront of this technological evolution. Azure Files offers a simple, secure, and fully-managed cloud-native file-sharing service, whereas Windows Server plays a pivotal role in many enterprise environments, hosting services, applications, and much more. Integrating Azure Files with Windows Server opens up a world of possibilities, enhancing scalability, reliability, and performance. This guide will provide a comprehensive walk-through of this integration, helping IT professionals and decision-makers leverage these tools effectively.
Cloud Storage Manager Main Window
Why Integrate Azure Files with Windows Server?
The integration of Azure Files with Windows Server is not just a technological advancement but a strategic alignment that delivers several key benefits:
Cost-Efficiency: Traditional on-premises storage solutions can be expensive and challenging to maintain. Azure Files allows for flexible pricing, meaning you only pay for what you use. By migrating file shares to the cloud, organizations can reduce costs related to hardware, maintenance, and energy consumption.
Scalability: Azure Files offers seamless scalability, enabling businesses to grow their storage solutions in tandem with their needs. Whether expanding a small file share or handling massive datasets, Azure can accommodate without the need for significant hardware investments.
Security: Azure is renowned for its robust security features, including encryption, identity management, and compliance certifications. Integrating with Windows Server ensures that the same security measures that protect your local resources are extended to your cloud-based file shares.
Performance: Through caching and optimized networking, the integration ensures fast access to files. Performance tuning tools and practices enable customization to suit specific organizational needs.
Prerequisites for Integration
Before you begin integrating Azure Files with Windows Server, it’s essential to have a few critical components in place:
Azure Subscription: An active Azure subscription is required to create and manage Azure File Shares. If you don’t have a subscription, you can create one through the Azure portal.
Windows Server Requirements: Ensure that your Windows Server meets the necessary compatibility requirements, including supported OS versions and network configurations.
Network Considerations: Azure Files requires specific networking configurations, including firewall rules and VPN connections, if necessary. Understanding and implementing these requirements is crucial for a successful integration.
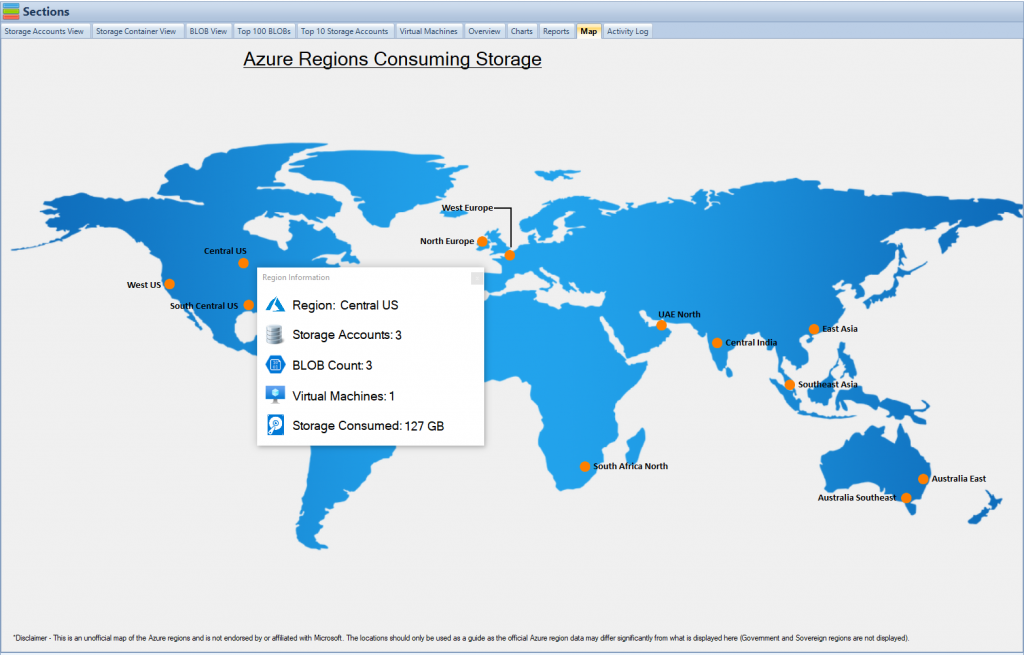
Cloud Storage Manager Map View
Step-by-Step Guide to Integrating Azure Files with Windows Server
Select compatible performance and account kind options.
Review the advanced settings to configure additional features like secure transfer.
Click “Review + create” and then “Create” to provision the storage account.
3. Create a File Share
Once the storage account is created, navigate to it and select “File shares” under “File service.”
Click “+ File share.”
Enter a name for your file share.
Specify the quota, defining the size of the file share.
Click “Create.”
Configuring Windows Server
4. Install Azure PowerShell Module (If not installed)
Open PowerShell as an administrator.
Run the following command to install the Azure PowerShell module: Install-Module -Name Az -AllowClobber -Scope CurrentUser
If prompted to install from the PSGallery, type ‘Y’ to proceed.
5. Connect to Your Azure Account
Run the following command to sign in:powershellCopy codeConnect-AzAccount
Enter your Azure credentials.
6. Mount the Azure File Share
You can mount the file share by running the following PowerShell command. Replace the placeholders with your storage account name and file share name: $connectTestResult = Test-AzStorageAccount -ResourceGroupName "ResourceGroupName" -Name "StorageAccountName" $connectTestResult.Context | New-AzStorageDrive -Name Z -Root "\\StorageAccountName.file.core.windows.net\FileShareName"
This will map the Azure File Share as the Z: drive.
7. Verify the Mapped Drive
You can check if the file share is mapped correctly by running: Get-PSDrive -PSProvider FileSystem
Look for the drive with the name ‘Z’ or the name you specified in the previous step.
8. Managing Permissions
Azure File Share permissions can be managed through the Azure portal.
Navigate to the file share and click on “Access Control (IAM).”
Here, you can add or remove role assignments to control who has access to the file share.
Performance Tuning (Optional)
You may want to adjust the caching policy or network configuration for performance optimization.
Azure File Shares supports an on-premises caching feature that can be configured to your needs.
Consider consulting Azure’s official documentation on performance tuning for specific guidelines tailored to your scenario.
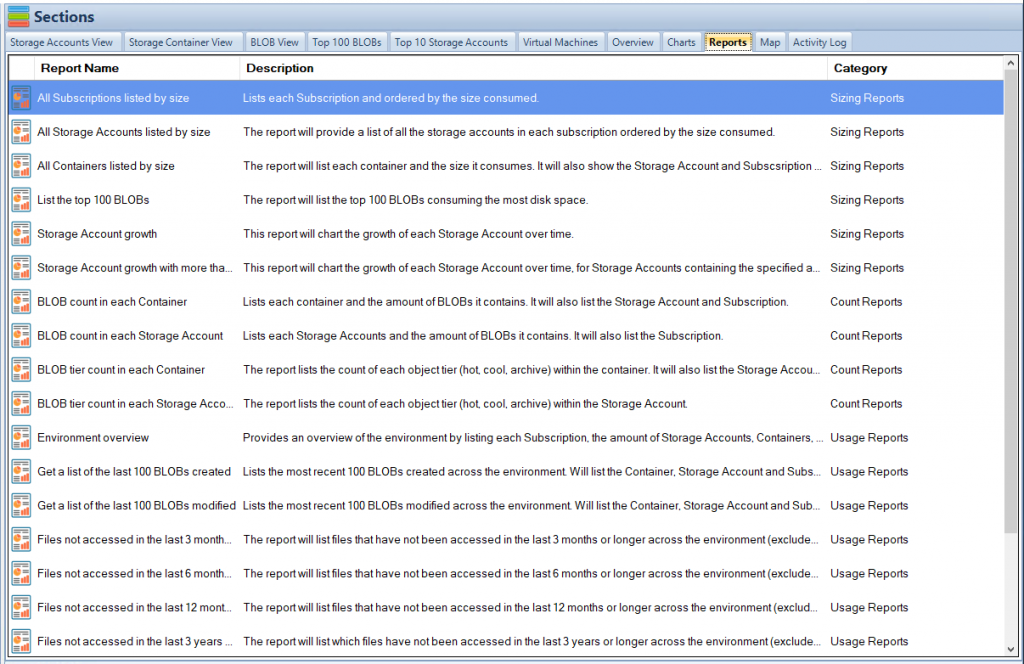
Cloud Storage Manager Reports Tab
Conclusion
Integrating Azure Files with Windows Server is a multi-faceted process that reaps significant benefits. Through this guide, we’ve explored how to create, mount, and manage Azure File Shares with Windows Server. The steps detailed are geared to foster efficiency, collaboration, and robust data management within organizations.
For those keen to delve deeper into various aspects of Azure Files, the following resources offer valuable insights:
To understand the vital feature of geographical redundancy in Azure Files, you can explore Azure Files Geo-Redundancy.
These resources extend the understanding of Azure Files, catering to different levels of expertise and unique organizational needs. Whether you’re looking for technical know-how, cost-saving strategies, or comparative insights, the integration of Azure Files with Windows Server and the linked resources provide a solid foundation for advancing your organization’s data management capabilities.
AzCopy, a command-line utility designed by Microsoft, is the bridge that links data transfer and data management within Azure. Targeting seasoned professionals, it offers a granular level of control, especially when it comes to permissions. Managing permissions is not just about controlling access; it’s about maintaining the integrity of data, ensuring compliance, and optimizing operational efficiency. The precision that AzCopy offers in handling permissions allows administrators to sculpt data accessibility according to organizational needs. This guide is for those who already have a solid foundation in AzCopy and are looking to deepen their understanding of permission management within this tool. It will cover the core concepts of permissions, detail a comprehensive step-by-step guide, uncover best practices, and reveal common mistakes to avoid, all while maintaining a technical rigor appropriate for experts.
Cloud Storage Manager Main Window
Understanding Permissions in AzCopy
The arena of permissions in AzCopy is vast and nuanced. Permissions are not merely binary gates; they are fine-grained controls that dictate the very interaction between users and resources. In AzCopy, this is articulated through specific permissions like read (R), write (W), delete (D), and list (L), all of which serve precise functions. Permissions work in concert with Azure Blob, File, and Table storage, with specific strategies to manage each. For example, Blob permissions are governed through Shared Access Signatures (SAS), creating time-bound access control. File Share Permissions echo the characteristics of NTFS permissions, while Table Permissions manifest at the table level, allowing granular control over entities within the tables. This multifaceted nature of permissions within AzCopy necessitates a comprehensive understanding of their dynamics, their interplay with different Azure storages, and the tools and techniques to manipulate them effectively.
Cloud Storage Manager Map View
Step-by-Step Guide to Managing Permissions
In the AzCopy command-line tool, switches (also known as flags or options) are used to modify the behavior of a command. Here’s a breakdown of the switches used in the provided examples:
cp: This command is used to copy data between a source and a destination. It could be from one Azure storage to another or between Azure storage and the local file system.
--recursive=true: This switch is used to specify that the copy operation should include all subdirectories recursively. If this switch is omitted or set to false, only the files in the specified directory will be copied.
SAS Token Parameters: The Shared Access Signature (SAS) token within the URLs has specific parameters that control permissions and other aspects of access:
sv: Storage Service Version, specifies the version of the storage service to use.
ss: Storage Services, can be blob (b), file (f), table (t), or queue (q) to specify the type of storage service.
srt: Signed Resource Types, specifies the resource type that the SAS token can access, such as service (s), container (c), or object (o).
sp: Signed Permissions, defines what permissions the SAS grants, such as read (r), write (w), delete (d), list (l), etc.
se: Signed Expiry, sets the expiration time for the SAS token.
st: Signed Start, sets the start time for the SAS token’s validity period.
spr: Signed Protocol, specifies the allowed protocol for the request, such as HTTPS.
sig: Signature, contains the cryptographic signature for the SAS token.
Switches in AzCopy offer granular control over the copy operations, allowing users to define permissions, choose resources, set time limits, and more. This makes AzCopy a highly versatile tool for managing data within Azure, catering to various organizational needs and security requirements.
Setting Up AzCopy
Starting with the fundamental step, the installation of AzCopy requires an accurate understanding of the system requirements and dependencies. While AzCopy is available for Windows, Linux, and macOS, this guide focuses on the Linux installation. The command
not only downloads the executable but sets the necessary permissions to run it. An essential part of setting up AzCopy is authenticating it with Azure. It can be achieved through Managed Service Identity (MSI) or by manually entering the access credentials. The latter requires careful management as improper handling can expose sensitive information. This setup process, though simple on the surface, lays the groundwork for the entire permission management operation.
Configuring Permissions
In the world of AzCopy, configuring permissions is akin to tuning an intricate piece of machinery. It’s where the expertise of an Azure administrator truly shines. Let’s take the example of Blob permissions. These permissions are typically set using Shared Access Signatures (SAS), which allow you to specify the time frame and permissions for accessing Blob data. A SAS token can be generated from the Azure portal or programmatically using Azure Storage client libraries. For example, using the command
, you can grant read access to a blob. The SAS token embedded in the URL dictates the extent and duration of the access. Configuring permissions with AzCopy goes far beyond the basics, allowing for the setup of multilayered, nested permissions that control access at various levels, from containers to individual blobs. Such granularity can be instrumental in implementing organization-wide data governance policies.
Example: Granting and Revoking Permissions
AzCopy’s strength in permission management isn’t just about setting permissions; it’s also about modifying them in a controlled manner. Let’s dive into an example that looks at both granting and revoking permissions. Granting read and write access to a blob might be done using the following command:
Here, the SAS token is crafted to grant both read and write permissions. Now, let’s say that access needs to be revoked. Unlike many other tools, AzCopy doesn’t leave you stranded. You can either modify the SAS token, rendering the previous one invalid or use Azure Portal’s sophisticated interface to control permissions. The underpinning architecture of AzCopy ensures that changes in permissions are propagated consistently, minimizing the risk of unauthorized access.
Cloud Storage Manager Reports Tab
Best Practices
Navigating the complex pathways of AzCopy’s permissions requires not only skill but also adherence to best practices. The concept of the Least Privilege Principle resonates strongly here. AzCopy enables you to grant exactly the level of access that a user needs and no more. Such granularity minimizes security risks. Time-bound access, another facet, ensures that permissions do not linger beyond their necessity. By using SAS tokens with specific expiry times, you encapsulate the access, rendering it void after the required period. Additionally, monitoring and logging play a crucial role. AzCopy, when coupled with Azure Monitor and Azure Activity Log, becomes a potent combination, enabling real-time monitoring and alerts. These best practices are not mere recommendations; they are the embodiment of efficient, secure, and responsible permission management in AzCopy.
. Copying a Blob with Read Permissions
You can copy a blob and set read permissions using a SAS token like this:
These examples demonstrate the flexibility and precision of AzCopy in managing permissions for various Azure storage services. The permissions are defined by the sp parameter in the SAS token, where you can specify different combinations like read (r), write (w), delete (d), list (l), etc.
Remember to replace the example URLs, paths, and SAS tokens with your specific details, and note that these tokens should be handled securely, as they grant access to the resources.
Common Mistakes and How to Avoid Them
The road to mastery in managing permissions with AzCopy is fraught with potential mistakes. Understanding these common pitfalls and learning how to avoid them is a hallmark of expertise.
Overly Broad Permissions
A common mistake is to assign permissions that are too broad. AzCopy allows for finely grained control, and it should be utilized. For example, providing write access when only read access is needed can lead to unintentional data modifications. The use of specific roles, along with clear understanding and planning of the required permissions, can alleviate this risk. By aligning permissions with the exact needs of each user or process, you not only minimize security risks but also align with the principle of least privilege, which is central to robust security design.
Lack of Monitoring and Not Revoking Temporary Permissions
Another common mistake in permission management with AzCopy is the lack of ongoing monitoring and failing to revoke temporary permissions. Even the most meticulously crafted permissions can become a liability if they are not regularly reviewed and adjusted as needs change. AzCopy, when integrated with monitoring tools like Azure Security Center, can provide real-time insights into how permissions are being used. Such insights enable prompt action if suspicious activity is detected. Furthermore, temporary permissions should be time-bound, and AzCopy’s support for SAS tokens with expiry dates facilitates this. It’s not just about setting permissions correctly at the outset; it’s about maintaining them accurately over time, and AzCopy provides the tools needed to do this effectively.
Carbon Azure Migration Progress Screen
Advanced Techniques and Tools
Expertise in AzCopy’s permission management is not only about understanding the basic and intermediate concepts; it also involves leveraging advanced techniques and integrating with other Azure services.
Automation with Azure Functions
AzCopy can be combined with Azure Functions to create automated data movement workflows that respond to specific triggers. Such automation can include the dynamic creation and revocation of permissions based on pre-defined rules. For example, an Azure Function could be set up to automatically grant read access to a blob when a new user is added to a specific Azure AD group and revoke that access when the user is removed. The combination of AzCopy’s robust permission management capabilities with Azure Functions’ flexible automation creates a powerful tool for dynamic, responsive data access management.
Utilizing AzCopy with Azure Policy
AzCopy can also be used in conjunction with Azure Policy to enforce organizational rules and compliance requirements. By defining custom policies that align with your organization’s specific needs, you can ensure that AzCopy is used in a manner that meets regulatory and internal governance requirements. This might include rules regarding the types of permissions that can be granted, the duration for which they can be granted, and the conditions under which they must be revoked. The ability to define and enforce such rules programmatically adds another layer of control and efficiency to AzCopy’s permission management capabilities.
Conclusion
Managing permissions with AzCopy is a complex and rewarding endeavor. This guide, crafted for those with an expert understanding, has delved into the intricacies of permissions within AzCopy, unraveling step-by-step procedures, best practices, common mistakes, and advanced techniques. Whether it’s the granular control offered by Shared Access Signatures, the dynamism of integrating with Azure Functions, or the governance provided by Azure Policy, AzCopy stands as a versatile tool in the hands of seasoned administrators. Embracing AzCopy’s capabilities is not just about efficient data management; it’s about crafting a secure, responsive, and optimized data ecosystem that aligns with the evolving needs of a modern organization.
Cloud Storage Manager Blobs Tab
AZCopy FAQs
What is AzCopy and why is it used for permission management? AzCopy is a command-line utility tool designed by Microsoft to facilitate efficient data transfer within Azure. It allows fine-grained control over permissions, making it essential for secure data access and compliance.
How do I install and authenticate AzCopy on my system? AzCopy can be installed on Windows, macOS, or Linux, and authentication can be done through Managed Service Identity (MSI) or manual access credentials. Follow the installation guide for your specific OS.
Can I set time-bound permissions with AzCopy? Yes, AzCopy allows setting time-bound permissions using Shared Access Signatures (SAS), enabling control over the duration of access to specific resources.
What are some best practices for managing permissions in AzCopy? Adhering to the principle of least privilege, using time-bound access, and regularly monitoring with tools like Azure Security Center are key best practices.
How can I avoid common mistakes in permission management with AzCopy? Avoid overly broad permissions, ensure ongoing monitoring, and revoke temporary permissions as needed to minimize risks.
Is it possible to automate permission management with AzCopy? Yes, AzCopy can be combined with Azure Functions to create automated, responsive data access management workflows.
Can I integrate AzCopy with Azure Policy for compliance? Absolutely! AzCopy can be used with Azure Policy to enforce organizational rules and align with regulatory requirements.
What are the types of permissions that can be managed with AzCopy? AzCopy allows managing various permissions like read (R), write (W), delete (D), and list (L) across Azure Blob, File, and Table storage.
How do I revoke permissions once granted through AzCopy? Permissions can be revoked by modifying the SAS token or using the Azure Portal’s interface to control access, ensuring a consistent propagation of changes.
Is there any real-time monitoring available with AzCopy? AzCopy can be coupled with Azure Monitor and Azure Activity Log for real-time monitoring, allowing for immediate alerts and insights into permission usage.