AzCopy is a command-line utility designed for copying data to and from Microsoft Azure Blob and File storage. It allows for efficient data transfer, ensuring the integrity of the files and offering a seamless process. In a world where data is considered a valuable asset, AzCopy stands out as a vital tool for data administrators, developers, and Azure users. With capabilities like copying, syncing, deleting, and managing large datasets, AzCopy has become an indispensable resource for those dealing with Azure’s data storage. This article aims to provide a comprehensive guide to AzCopy’s powerful features, explaining every essential command you need to get started or refine your existing skills.
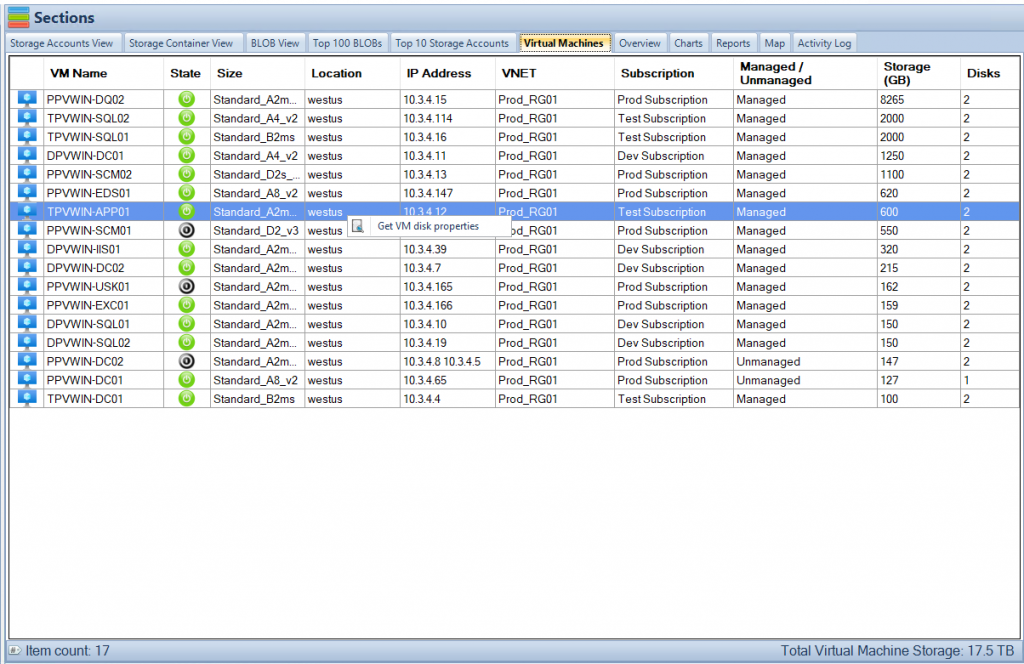
Cloud Storage Manager Virtual Machines Tab
Installation
AzCopy is a platform-independent utility, available for various operating systems. Installing AzCopy is the first step to accessing its broad array of features. The installation process is quite straightforward. By downloading the right executable file from the official Azure website, users can have AzCopy up and running on their systems within minutes. It’s essential to keep the tool updated to the latest version to benefit from improvements and new features that are regularly added by Microsoft.
Authentication
User Authentication
Authentication in AzCopy is crucial for establishing a secure connection between the user and Azure Storage. The simple command azcopy login allows users to authenticate using their Azure Active Directory (Azure AD) credentials. This authentication process ensures that only authorized individuals can access, manipulate or manage data within the Azure Storage. It adds a layer of security and compliance, making sure that data remains protected against unauthorized access.
Service Principal Authentication
In more complex scenarios, users might want to authenticate using a service principal. Service principals are non-human users that can authenticate and be granted roles and permissions. By running azcopy login --tenant-id=<tenant-id> --service-principal, users can authenticate using a specific service principal. This can be extremely useful in automating tasks and scripts without the need for manual intervention, ensuring a more streamlined and efficient workflow.
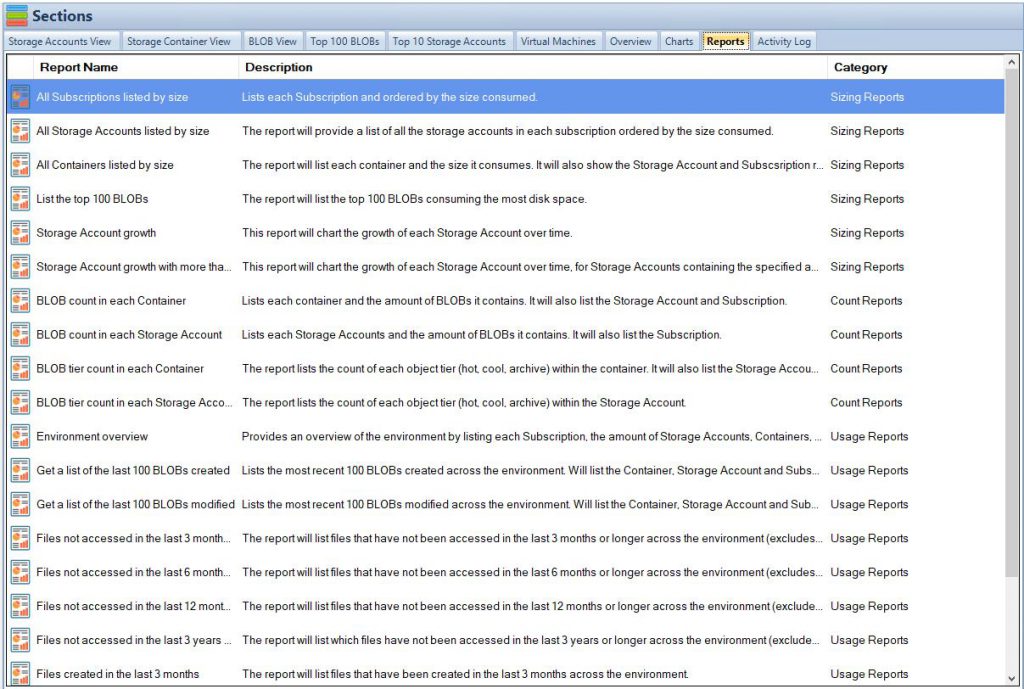
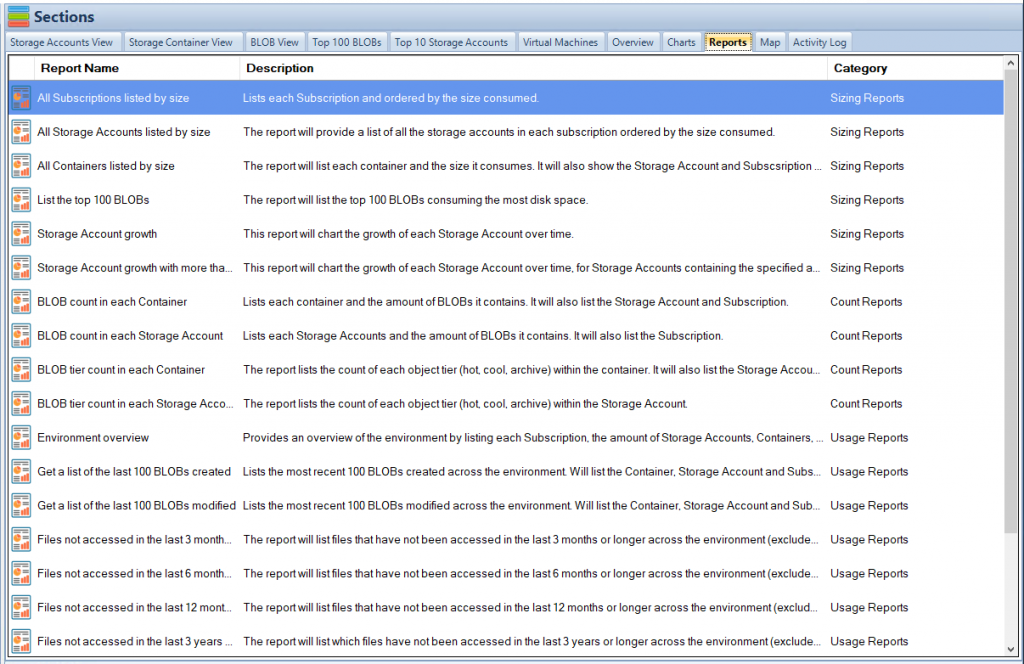
Cloud Storage Manager Reports Tab
Copying Operations
Copy a Single File or Directory
The core function of AzCopy is copying data. Whether it’s a single file or an entire directory, AzCopy offers a simple yet powerful solution. Using the azcopy copy command, users can easily transfer files from their local system to Azure Blob storage or vice versa. The option to include the --recursive flag allows the copying of entire directories, including all subdirectories. This flexibility in copying data can save time and effort, especially when dealing with large sets of data.
Copy with Patterns and Additional Options
AzCopy offers more nuanced control over copying through the use of patterns and additional flags. For instance, users can copy only files matching a particular pattern using wildcards. Options like --overwrite and --exclude-pattern allow more granular control over the copying process, providing users with the power to define exactly how the copying operation should behave. These commands not only enhance efficiency but also provide customized solutions tailored to individual needs and project requirements.
Syncing Operations
Synchronization is another key feature of AzCopy. The azcopy sync command allows users to keep directories in alignment between a local file system and Azure Blob storage. This can be incredibly useful for maintaining updated copies of files across different locations, ensuring consistency and reducing the chances of working with outdated data. Flags like --delete-destination further refine the synchronization process, enabling precise control over what gets synced and what doesn’t. This powerful synchronization capability can be pivotal in keeping data aligned across development, testing, and production environments.
Deleting Operations
AzCopy also includes the functionality to delete data, whether it’s a specific blob or multiple blobs matching a pattern. The azcopy remove command provides this functionality, allowing users to delete unwanted or redundant data from Azure Storage. This ability to effectively manage and clean up data is vital for maintaining an organized and efficient storage environment. It aids in optimizing storage costs, improving performance, and ensuring that only relevant data is kept within the storage containers.
Job Management
Job management is one of AzCopy’s features that sets it apart. It enables users to have a granular view of ongoing and past data operations. With commands like azcopy jobs list, azcopy jobs show, and azcopy jobs resume, users can list all jobs, show the details of specific jobs, and even resume failed or canceled jobs. This feature enhances transparency, control, and recoverability, ensuring that users have a complete handle on what’s happening with their data at any given time. In large-scale operations where data transfer may take a considerable amount of time, job management becomes an essential tool for monitoring and managing these data operations.
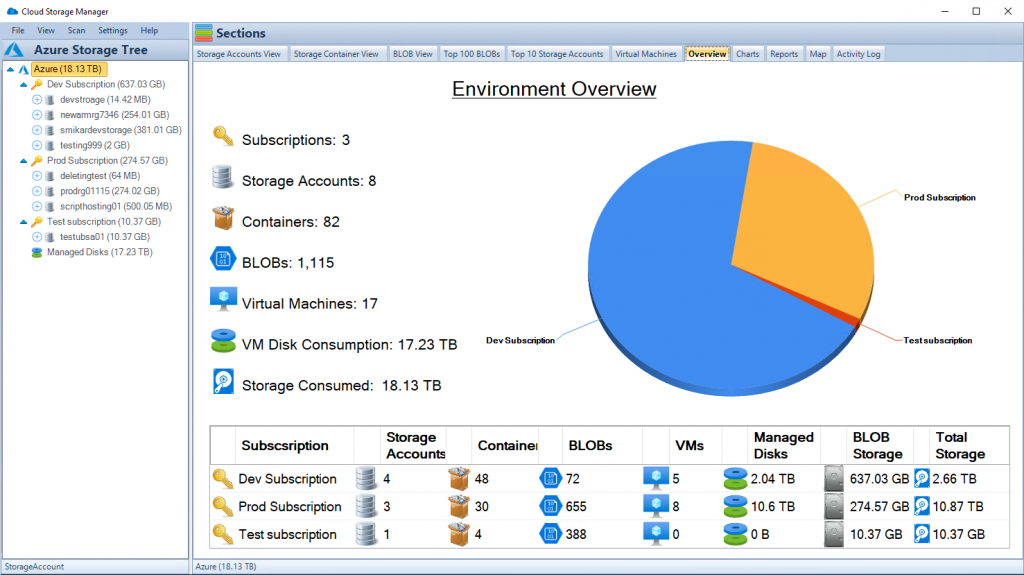
Cloud Storage Manager Main Window
Azcopy Commands List
Authentication
User Authentication
azcopy login
Logging in with user credentials is the simplest way to start using AzCopy.
AzCopy is more than just a data copying tool; it’s a comprehensive solution for managing Azure Storage. From copying and syncing to deleting and managing jobs, AzCopy offers a robust set of features that cater to a wide array of data management needs. Its command-line nature provides flexibility and control, catering to both simple and complex scenarios. Whether you are new to Azure or an experienced professional, AzCopy’s functionalities are designed to streamline your storage tasks. This guide has covered the essential commands and their applications, aiming to be a valuable resource for AzCopy users at all levels. However, with continuous updates and improvements, always refer to the official documentation for the most accurate and up-to-date information. The mastery of AzCopy commands equips you with a powerful toolset, enabling you to work more efficiently and make the most of Azure’s data storage capabilities.
AzCopy is a command-line tool provided by Microsoft to transfer data to and from Azure Storage services like Blob, File, and Table storage. It’s a vital tool for IT professionals who handle large-scale data operations, offering an efficient way to move data where it’s needed.
However, as with any robust tool, users might encounter errors or issues while working with AzCopy. In this article, we’ll explore some common AzCopy errors and provide solutions on how to fix them. Additionally, we’ll introduce the “Cloud Storage Manager,” a software that provides insights into Azure blob and file storage consumption, and helps users save money on their Azure Storage.
Overview of AzCopy
AzCopy is designed to copy data using simple commands with optimal performance. You can use it to migrate data to Azure, back up content to Azure, or keep your data synchronized across different Azure services. For a detailed guide on using AzCopy with Azure Storage, click here.
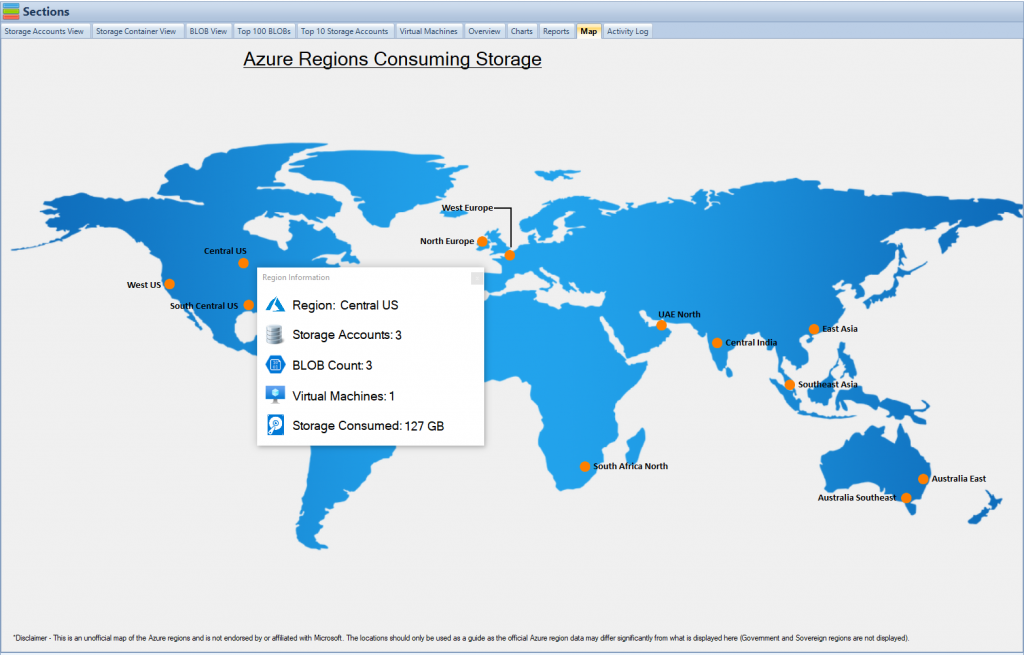
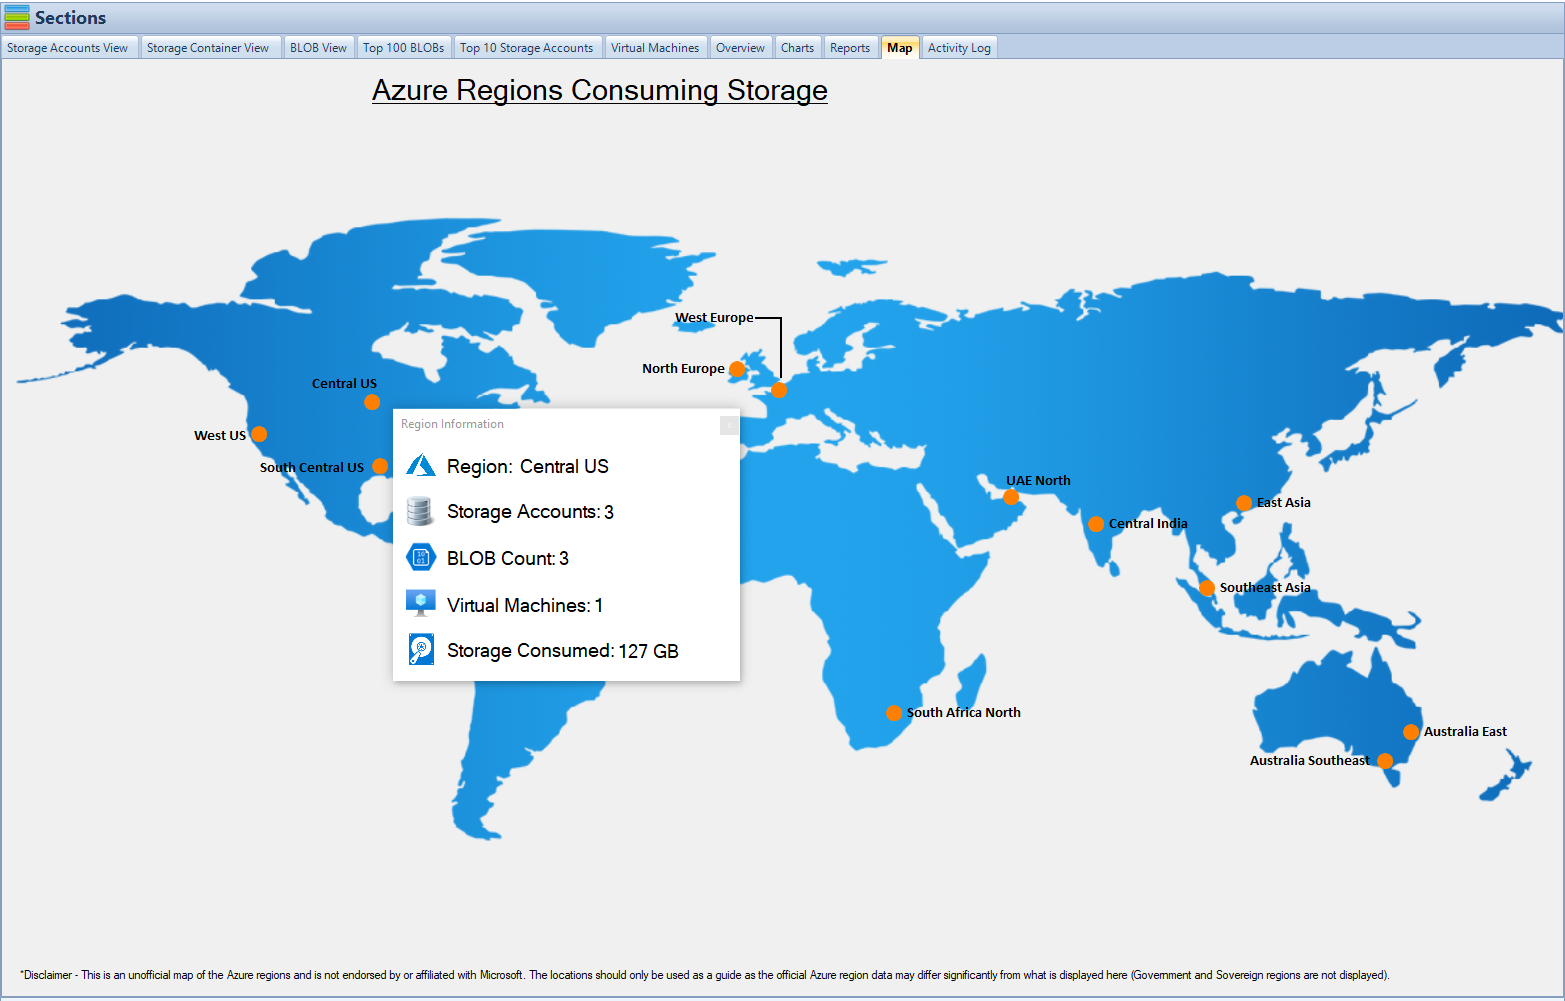
Cloud Storage Manager Map View
Common AzCopy Errors and Their Solutions
Authentication Error: Failed to authenticate with the resource. Make sure the URL is accessible.Explanation: This error often occurs when there is an issue with the credentials.Solution: Check the credentials and ensure that you are using the correct ones for the specific resource.
Syntax Error: Syntax error in 'from-to' option. Provide a valid option.Explanation: This typically means there’s a mistake in the command structure.Solution: Refer to the official syntax or use “Cloud Storage Manager” to manage your files easily. Read more about uploading files using AzCopy here.
Connectivity Issue: Cannot connect to Azure. Check your internet connection.Explanation: The error is self-explanatory and often occurs when there’s a network issue.Solution: Ensure that your internet connection is stable and that AzCopy has the necessary permissions to access the internet.
Transfer Failure Error: Failed to transfer: An unexpected error occurred.Explanation: This generic error might pop up for various reasons, such as network interruptions or file access permissions.Solution: Check the log details for more specific information. Make sure the files you’re trying to transfer are accessible and your network connection is stable.
Blob Type Mismatch Error: The transfer failed: Blob type of the blob reference doesn't match blob type of the blob.Explanation: This error occurs when you’re trying to upload a blob that doesn’t match the existing blob type.Solution: Ensure that the blob type you’re trying to upload matches the destination blob type. If necessary, delete the existing blob and re-upload.
Throttling Error: Server failed to authenticate the request. Please make sure the account name and key are valid.Explanation: This error might occur when too many requests are being sent in a short amount of time, leading to throttling.Solution: Adjust the number of concurrent operations or the number of retries in your AzCopy command. Consider using Cloud Storage Manager to gain insights into your storage and avoid these issues.
No Available Space Error: Disk is out of space or quota: Not enough space is available to complete the operation.Explanation: This error happens when the destination disk does not have enough space to accommodate the files being transferred.Solution: Free up space on the destination disk or choose a different destination with sufficient space.
File Path Too Long Error: The specified file or directory path is too long.Explanation: This error is due to the limitation on the length of file paths in the system.Solution: Shorten the file path or move the file to a directory closer to the root to reduce the overall path length.
403 Forbidden Error: This request is not authorized to perform this operation.Explanation: A 403 error often means that AzCopy doesn’t have the right permissions to perform the operation.Solution: Check the permissions associated with your Azure account and make sure they are correctly configured for the action you are trying to perform.
These are some of the more common errors that IT professionals might encounter when using AzCopy. Understanding these errors and their solutions, as well as utilizing tools like Cloud Storage Manager, can help in managing Azure Storage efficiently and effectively. Additionally, for a simplified way to transfer data to the cloud, consider reading about AzCopy installation.
By following best practices and utilizing the right tools, AzCopy becomes an even more powerful asset in your data management toolkit.
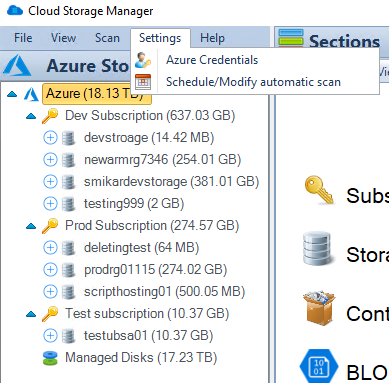
Cloud Storage Manager Settings Menu
Benefits of Using AzCopy
Understanding why AzCopy is a preferred tool can help you make the most of it. Here are some benefits:
Efficiency: AzCopy’s parallel data transfer and retry mechanisms ensure quick and reliable data movement.
Flexibility: It supports various data types and transfer scenarios, adapting to different needs.
Security: Data transfer is secured using HTTPS, maintaining the confidentiality and integrity of your data.
AzCopy Version Considerations
Different versions of AzCopy may lead to varying experiences and potential errors. Here’s what to keep in mind:
Upgrading to Latest Version: Newer versions often contain bug fixes and enhancements. Learn how to upgrade here.
Compatibility Issues: Be aware of compatibility between AzCopy and Azure Storage versions to avoid unexpected errors.
Best Practices When Using AzCopy
These guidelines will help in avoiding common pitfalls:
Proper Syntax: Always refer to the official documentation for the correct command syntax.
Monitor Logs: Regularly checking AzCopy logs helps in early error detection and troubleshooting.
Use Managed Identities: For Azure VMs, using managed identities can simplify authentication.
Cloud Storage Manager Reports Tab
How Cloud Storage Manager Can Help
Cloud Storage Manager offers a user-friendly solution that streamlines the management of Azure blob and file storage consumption. By providing insightful reports on storage usage and growth trends, it helps users make informed decisions, ultimately saving on Azure Storage costs. Here’s how Cloud Storage Manager can enhance your experience:
Insights into Storage Consumption: Cloud Storage Manager provides detailed reports that help you understand where your storage is being utilized. It allows you to optimize AzCopy usage by identifying which data is essential to transfer.
Monitoring Growth Trends: Understanding storage growth trends helps you plan future data transfers and allocate resources more efficiently when using AzCopy.
Cost Management: By giving insights into storage consumption and growth trends, Cloud Storage Manager empowers users to make informed decisions that ultimately save money on Azure Storage.
Finding and Managing Large Azure Blobs: Cloud Storage Manager helps you find the largest Azure blobs, making it easier to manage them with AzCopy. Learn how to do this here.
Comprehensive View of Azure Storage Accounts: By listing all Azure storage accounts by size, you can decide what to move with AzCopy and how to restructure your storage. Learn more here.
Cloud Storage Manager’s reporting and insights make it an invaluable tool for anyone using AzCopy. By providing a clear picture of storage consumption and trends, it helps to make more informed decisions regarding what to transfer and when, thereby aligning with AzCopy’s goal of efficient and effective data transfer.
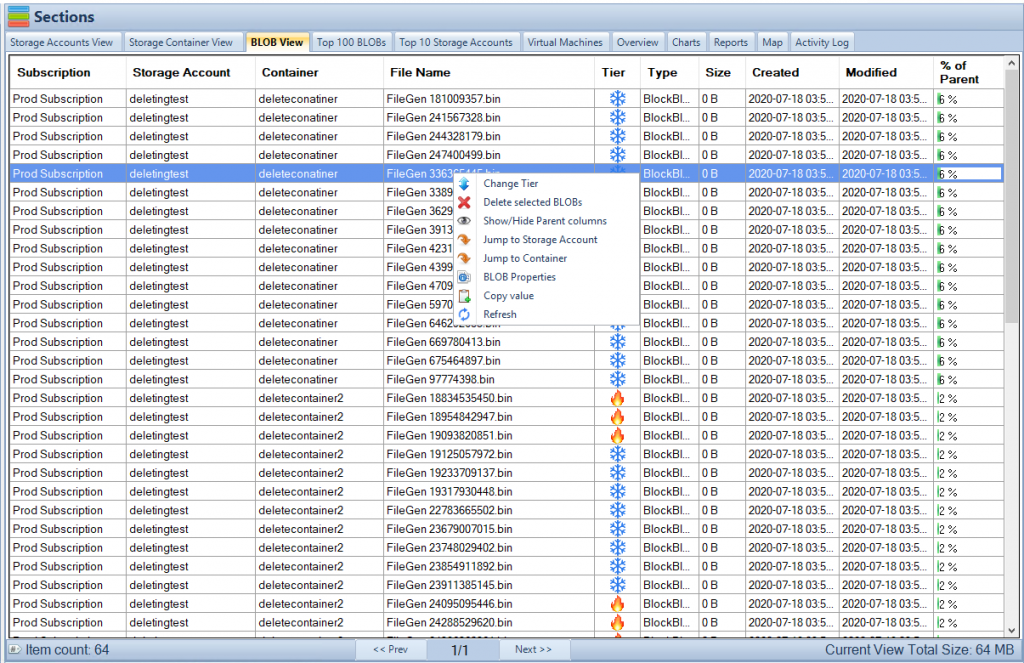
Cloud Storage Manager Blobs Tab
Conclusion
AzCopy and Azure Storage, while powerful, can present challenges. However, understanding common errors and their solutions, along with utilizing tools like Cloud Storage Manager, can turn these challenges into manageable tasks.
By staying informed about the best practices and being equipped with tools that provide clear insights into storage usage, IT professionals can harness the full potential of Azure Storage and AzCopy. They not only streamline their data management but also achieve cost efficiency.
For further reading, you may refer to the following links:
In the dynamic world of cloud storage, staying agile and informed is the key to success. Utilize these tools and insights to ensure a smooth, efficient, and cost-effective experience with Azure Storage.
Data has become a critical asset in today’s digital era, making its storage, management, and accessibility crucial to many organizations’ operations. Microsoft’s Azure provides a suite of cloud storage solutions designed to address these needs. Among the tools provided by Azure is AzCopy, a command-line utility designed to simplify data transfer to and from Azure Blob, File, and Table storage.
In this article, we’ll delve into the details of how you can effectively upload files using AzCopy. This guide will be comprehensive, covering everything from the basics of Azure Blob Storage and AzCopy to advanced functionalities and best practices.
Cloud Storage Manager Charts Tab
Understanding Azure Blob Storage
Before we dive into the intricacies of AzCopy, it’s essential to grasp the concept of Azure Blob Storage. Azure Blob Storage is a scalable, object storage solution designed to store large amounts of unstructured data like images, documents, streaming video and audio, and log files. This data is stored in ‘blobs’ or Binary Large Objects.
Azure Blob Storage consists of three types of blobs – Block blobs, Append blobs, and Page blobs, each designed to handle different types of data. Understanding the type of data you’re dealing with will guide you to choose the right blob type.
Furthermore, Azure Blob Storage provides multiple access tiers – Hot, Cool, and Archive. The tiers differ in pricing and accessibility, with the Hot tier being the most accessible but expensive, and the Archive tier being the least accessible but most cost-effective. Again, understanding your data’s usage patterns will help you choose the most cost-effective tier.
Cloud Storage Manager Main Window
AzCopy: An Overview
AzCopy is a data transfer utility offered by Microsoft. This command-line tool is built for optimal performance when moving data to and from Azure storage services. You can use AzCopy to upload, download, and copy blobs or files, among other operations.
AzCopy has several advantages that make it preferable for large data transfers. It supports parallelism and restartable transfers, which drastically improves the speed of data migration, particularly for large files or numerous small files.
Installing AzCopy
Before you can use AzCopy, you need to install it on your system. The installation process is straightforward and differs slightly based on the operating system (Windows, MacOS, Linux) you are using. The official Microsoft documentation provides a step-by-step guide for installing AzCopy on each of these operating systems.
Cloud Storage Manager Reports Tab
Uploading Files to Azure Blob Storage Using AzCopy
Once you have AzCopy installed, you can begin uploading files. The first step is to authenticate your Azure account. AzCopy supports Azure Active Directory (Azure AD) and Shared Access Signature (SAS) token authentication. Azure AD authentication is recommended for most cases as it provides robust security features.
To upload a file, you use the azcopy copy command followed by the file path and the destination URL in Azure Blob Storage. If you’re uploading a local file to a block blob, your command might look like this:
In this command, [account] is your Azure storage account name, [container] is the blob container where you’re uploading the file, and [path/to/blob] is the path where your file will reside within the blob container.
If the upload is successful, AzCopy will display a confirmation message. You can also use the azcopy jobs show command to check the status of your upload.
Advanced Uploading With AzCopy
While the basic azcopy copy command will work for simple uploads, AzCopy offers several additional options for more complex operations. For instance, you can specify patterns to copy multiple files, use the --include and --exclude parameters to filter files, and control the number of parallel operations for an upload job.
When uploading large files, you can split them into blocks to take advantage of AzCopy’s parallel uploading feature. This feature is enabled by default and can significantly speed up the transfer of large files.
Data Security and Compliance
When uploading data to Azure Blob Storage, it’s crucial to consider data security and compliance. Azure Blob Storage offers several security features, including encryption at rest and in transit, network and access policies, and advanced threat protection.
By default, Azure Blob Storage encrypts all data at rest. You can choose to manage your encryption keys or allow Microsoft to manage them. Azure Blob Storage also supports integration with Azure Private Link, which allows you to access your blobs over a private network connection.
Additionally, you can set up access policies for your blob containers and blobs to control who can access your data and what they can do with it. This is particularly important when dealing with sensitive data.
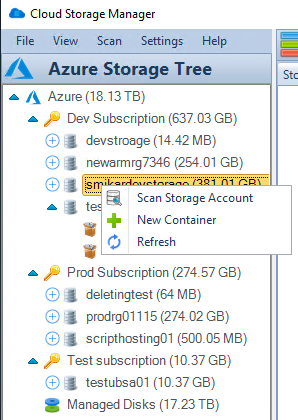
Cloud Storage Manager Azure Storage Tree
Monitoring and Troubleshooting
Monitoring is an essential aspect of managing your Azure Blob Storage and AzCopy operations. Azure provides built-in monitoring and diagnostics tools, including Azure Monitor, Azure Storage Analytics, and the AzCopy log file.
Azure Monitor can be used to track the performance, availability, and user behavior of your applications and services. You can set up alerts based on specific conditions and automate actions in response to these alerts.
Azure Storage Analytics provides detailed log data for your storage account. This data can help you track storage usage, analyze usage trends, and diagnose issues with your storage account.
The AzCopy log file contains detailed information about each AzCopy operation. If an operation fails, you can use the log file to identify the cause of the failure and take corrective action.
In addition to these tools, Microsoft provides comprehensive documentation for AzCopy and Azure Blob Storage. These resources can be invaluable when troubleshooting issues or seeking to understand specific features or behaviors.
In conclusion, AzCopy is a powerful tool for managing data transfers to and from Azure Blob Storage. By understanding the capabilities and features of AzCopy and Azure Blob Storage, you can effectively manage your data, optimize your storage costs, and ensure your data’s security and compliance. As with any tool, the key to mastering AzCopy is practice and continued learning. So, don’t hesitate to dive in and start exploring what AzCopy can do for you.
Microsoft’s Azure Data Lake Storage (ADLS) has been a vital component for organizations aiming to build scalable and secure data lakes. As technology evolves, transitioning from Azure Data Lake Storage Gen1 to Gen2 has become increasingly important. This article aims to guide readers through the essential considerations, detailed processes, and best practices involved in making this shift.
Brief Overview of Azure Data Lake Storage
Azure Data Lake Storage provides highly scalable and secure data lake functionality, allowing organizations to run big data analytics and provides massively parallel processing support. Gen1 offered an essential foundation, but with the advent of Gen2, users have more capabilities and enhancements at their fingertips.
Importance of Transitioning from Gen1 to Gen2
Transitioning from Gen1 to Gen2 is not merely an upgrade; it is a strategic move towards better performance, security, and cost-efficiency. Gen2 combines the best aspects of Azure Blob Storage and Azure Data Lake Storage Gen1, creating a more powerful platform.
Purpose and Scope of the Article
This comprehensive guide will delve into the nuances of both generations, compare them, and provide a step-by-step guide to transitioning smoothly and efficiently. Whether you are a technical expert or an executive considering the shift, this article offers valuable insights.
Cloud Storage Manager Reports Tab
Understanding Azure Data Lake Storage Gen1 and Gen2
Features and Benefits of Gen1
Gen1 has been a robust solution, offering features such as:
Scalability: Capable of handling large-scale data.
Security: Integrated with Azure Active Directory for authentication and access control.
Performance: Suitable for big data analytics.
However, limitations exist, including a lack of native integration with Azure Blob Storage and increased complexity in managing large volumes of small files.
Features and Benefits of Gen2
Gen2 enhances and extends Gen1’s capabilities:
Improved Performance: Gen2’s architecture optimizes performance for big data analytics.
Enhanced Security: Additional security layers and Azure Private Link support.
Cost-Efficiency: Ability to leverage different storage tiers to minimize costs.
Integration: Seamless integration with other Azure services.
Comparative Analysis
Comparing Gen1 and Gen2 reveals significant improvements in Gen2:
Performance: Gen2’s hierarchical file system delivers better performance.
Security: Gen2 offers more robust security features.
Transitioning to Gen2 ensures that organizations take full advantage of Azure’s enhanced capabilities. Better performance, integration, and cost-effectiveness make Gen2 a compelling choice.
Cloud Storage Manager Map View
Preparing for the Transition
Transitioning from Gen1 to Gen2 is a crucial process that requires careful planning and execution.
Evaluating Current Gen1 Usage
Understanding the current usage, data structure, and requirements is the first step. Analyzing dependencies, workflows, and tools that interact with Gen1 will aid in creating a seamless migration plan.
Understanding Gen2 Pricing and Cost Minimization
Gen2 offers flexible pricing, and understanding these options can help in selecting the most cost-effective plan. Leveraging insights from this guide on minimizing Azure Blob Storage costs can be beneficial.
Compatibility Checks
Ensuring compatibility between existing applications and Gen2 is essential. This might require adjustments or updates to certain applications and services.
Backup and Safety Measures
Prior to migration, it is crucial to take appropriate backup and create rollback strategies to ensure data integrity.
Transitioning from Gen1 to Gen2: A Step-by-Step Guide
Migrating from Azure Data Lake Storage Gen1 to Gen2 is a significant undertaking that requires methodical planning and execution. Below, you’ll find a step-by-step guide to ensure a smooth transition.
Step 1: Detailed Assessment and Planning
Understand Data and Dependencies: Analyze existing data, dependencies, and workflows that interact with Gen1.
Choose Migration Tools: Azure provides tools like Azure Data Factory to facilitate migration. Select the ones that best fit your needs.
Develop a Migration Plan: Create a plan that includes timelines, resource allocation, risk assessment, and rollback strategies.
Step 2: Setting Up Azure Data Lake Storage Gen2
Create a Gen2 Account: Follow Azure’s guidelines to create a Gen2 storage account.
Configure Security: Set up authentication and authorization using Azure Active Directory.
Implement Monitoring and Maintenance: Set up monitoring for the new environment and plan regular maintenance.
Documentation: Document the entire process, including changes made, for future reference.
Cloud Storage Manager Main Window
Post-Transition Considerations
Monitoring and Performance Tuning
Constant monitoring of the Gen2 environment is essential for recognizing and reacting to performance bottlenecks.
Regular Security Audits
Conducting regular security audits will ensure that the new environment adheres to compliance requirements and maintains data integrity.
Engaging with the Community and Support
Azure’s community and support forums are valuable resources for addressing challenges and staying up to date with new features and updates.
Conclusion
Transitioning from Azure Data Lake Storage Gen1 to Gen2 is more than an upgrade; it’s a strategic move to a more robust, secure, and cost-effective data storage solution. By following the steps outlined above, organizations can make the transition smoothly and efficiently.
Whether the goal is to leverage better performance, secure sensitive data, or reduce costs, Gen2 offers significant improvements over Gen1. With careful planning, the right tools, and adherence to best practices, this transition can become a significant milestone in an organization’s data management journey.
For more in-depth insights on Azure’s storage capabilities, these resources can be valuable:
On September 1, 2023, Microsoft’s Defender for Azure Blob Storage is set to introduce a groundbreaking feature: Malware Scanning. This highly-anticipated addition to the Defender suite brings real-time protection against malicious content, making it a vital component in fortifying your data security and safeguarding against the ever-evolving threat landscape. In this article, we’ll delve into the power of Malware Scanning and its multifaceted benefits, revealing how it can help you stay ahead in the battle against malware.
Detect and Prevent Malware Distribution
Malware poses a significant risk to cloud storage resources, including Azure Blob Storage. To counter this threat, Malware Scanning in Defender uses state-of-the-art scanning engines to swiftly and effectively detect and prevent the distribution of malicious content. By continuously monitoring file uploads and exfiltration attempts, the scanning engine provides real-time protection, giving you peace of mind that your data remains secure at all times.
Simplified and Automated Process
Emphasizing ease of use, the process of enabling Malware Scanning is streamlined and automated. Implementing this robust security measure is hassle-free and can be accomplished with minimal effort. The Defender for Azure Blob Storage automatically scans incoming content, mitigating the need for manual intervention and freeing up valuable resources within your organization.
Scalability at Its Core
Whether you’re a small startup or a large enterprise, Defender’s Malware Scanning is designed with scalability in mind. The solution seamlessly adapts to your data storage needs, ensuring consistent protection as your storage requirements grow. From the smallest text files to massive multimedia assets, Malware Scanning effortlessly scales to accommodate your data volume without compromising on performance.
Data Privacy as a Priority
Data privacy is of utmost importance in the modern digital landscape. To maintain a high standard of privacy, the Malware Scanning engine operates without retaining any file content. This approach guarantees that your sensitive data remains confidential and inaccessible to any unauthorized parties, fostering trust and compliance within your organization and with external regulations.
Cost Control with Data Volume Limits
Managing costs is a crucial aspect of any cloud-based solution. To enable effective cost control, Malware Scanning allows you to set data volume limits for the scanning process. By fine-tuning these limits to suit your specific needs, you can optimize resource allocation, thereby maximizing your return on investment without compromising on security.
Diverse Use Cases
Malware Scanning proves invaluable across a range of scenarios. Web applications benefit from an added layer of protection, preventing the distribution of malware-laden files to users. For businesses dealing with sensitive content, this feature safeguards valuable intellectual property and customer data. Additionally, adhering to compliance regulations becomes easier with the implementation of robust malware protection. Moreover, for organizations utilizing machine learning, ensuring the integrity of training data is critical, and Malware Scanning effectively supports this aspect as well.
Seamless Deployment Options
Deploying Malware Scanning in Defender for Azure Blob Storage is a flexible process. You can choose from a variety of deployment options to suit your preferences and requirements. These options include:
Azure Policy: Incorporate Malware Scanning into your organization’s security policies, ensuring comprehensive coverage across your entire Azure ecosystem.
Infrastructure as Code (IaC) Templates: Leverage IaC templates for automated and repeatable deployment, reducing manual configuration efforts.
REST API: For developers seeking programmatic control, the REST API enables seamless integration of Malware Scanning capabilities into custom applications and workflows.
Azure Portal UI: Utilize the intuitive Azure Portal user interface for a straightforward setup process, empowering users of all levels to enable this robust security feature effortlessly.
Strengthening Data Protection
Data stored in Azure Blob Storage is often valuable, ranging from sensitive business documents to customer data and intellectual property. With Malware Scanning, organizations can reinforce their data protection measures significantly. The real-time detection and prevention of malware distribution ensure that malicious files cannot infiltrate the storage environment, safeguarding the integrity and confidentiality of critical information.
Furthermore, Malware Scanning plays a crucial role in preventing data breaches. By identifying and blocking potentially harmful files at the point of upload, organizations can avoid scenarios where malware-infected files may later compromise system integrity or lead to data leaks. This proactive approach reduces the chances of costly data breaches and minimizes the associated reputational risks.
Meeting Compliance Requirements
Compliance with industry regulations and data protection laws is a top priority for businesses operating in the digital landscape. Many sectors, including healthcare, finance, and government, are subject to stringent data security standards. Failure to comply with these requirements can result in severe penalties and legal consequences.
By integrating Malware Scanning in Defender for Azure Blob Storage, organizations can demonstrate their commitment to data security and regulatory compliance. The ability to prevent malware distribution aligns with various compliance frameworks, reinforcing data protection efforts and ensuring adherence to relevant industry standards.
Safeguarding Machine Learning (ML) Training Data
Machine learning models depend on high-quality training data to deliver accurate and reliable results. Ensuring the integrity and cleanliness of training datasets is paramount for successful ML initiatives. Malware-infected data can compromise the training process, leading to biased or erroneous model outputs.
Malware Scanning in Defender for Azure Blob Storage addresses this concern by preventing the ingestion of contaminated data into the ML training pipeline. By leveraging Malware Scanning, organizations can safeguard the accuracy and reliability of their ML models, thus maximizing the return on investment in AI and ML initiatives.
Enhancing Web Application Security
Web applications often rely on cloud storage resources to serve content to users. Malware distribution through web applications can lead to compromised user experiences, reputational damage, and even legal liabilities. Malware Scanning acts as a powerful line of defense, protecting web applications from delivering malicious content to unsuspecting users.
As web application threats continue to evolve, a robust malware protection mechanism becomes essential. Defender’s Malware Scanning enables organizations to fortify their web applications against emerging threats, bolstering their overall cybersecurity posture and instilling confidence in users who rely on their services.
A Unified Solution for Cloud Security
Defender for Azure Blob Storage’s Malware Scanning seamlessly integrates with other components of the Microsoft Defender suite. This unified approach to cloud security empowers organizations with a comprehensive, end-to-end solution for protecting their cloud-based resources.
With Malware Scanning working in tandem with other security features, such as threat detection, identity protection, and access controls, organizations can establish a multi-layered defense strategy against diverse cyber threats. This holistic approach ensures that potential vulnerabilities are detected and addressed from various angles, creating a robust security posture that leaves no room for compromise.
Azure Defender for Storage Flowchart
User Uploads File: The process begins when a user (A) uploads a file to the Azure Blob Storage (B). This could be any type of file, ranging from documents and images to videos and application files. The seamless integration of Azure Blob Storage into various applications and systems makes it an ideal choice for storing a wide range of data.
Triggering Malware Scanning: As the file reaches the Azure Blob Storage, the Malware Scanning Engine (C) is automatically triggered. This engine is equipped with advanced scanning algorithms and up-to-date threat intelligence, enabling it to swiftly analyze the uploaded content for any signs of malicious activity.
Detecting Malicious Content: The Malware Scanning Engine (C) diligently inspects the content of the uploaded file. Leveraging signature-based scanning, behavior analysis, and machine learning techniques, it identifies known malware signatures, suspicious patterns, and potential zero-day threats. If any malicious content is detected within the file, the system proceeds to take immediate action.
Blocking Upload for Security: When the Malware Scanning Engine (C) identifies malicious content, it promptly blocks the file upload (D). This rapid response prevents the harmful file from being stored in the Azure Blob Storage, mitigating the risk of it spreading further across the system or affecting other users.
Sending Alerts to the Security Team: Simultaneously, upon the detection of malicious content and blocking of the upload, the system triggers an alert (D). This alert is sent to the designated Security Team (F), providing them with real-time information about the attempted security breach. The security team can then initiate immediate investigation and implement appropriate measures to address the threat.
Allowing Safe Upload: On the other hand, if the Malware Scanning Engine (C) does not find any malicious content within the uploaded file, it allows the file to be stored in the Azure Blob Storage without any interruptions (E). This seamless process ensures that legitimate content can be efficiently stored and accessed without unnecessary delays or obstacles.
The Mermaid diagram and its accompanying explanation demonstrate the proactive and robust nature of Malware Scanning in Defender for Azure Blob Storage. This real-time protection mechanism ensures that your cloud storage remains secure and free from potential threats, safeguarding your valuable data and bolstering your overall cybersecurity posture.
By combining advanced scanning capabilities, automated processes, and a vigilant security team, organizations can confidently rely on Defender for Azure Blob Storage to protect their critical data and applications. This comprehensive approach to malware detection and prevention empowers businesses to stay ahead of emerging cyber threats, maintain regulatory compliance, and foster trust with customers and partners.
Abundant Resources and Documentation
Microsoft’s commitment to empowering its users is reflected in the abundance of resources and documentation available. Detailed guides, best practices, and use case examples ensure that users understand the full potential of Malware Scanning in Defender for Azure Blob Storage. Additionally, a responsive support network stands ready to assist in any deployment or operational queries, further enhancing the value of this cutting-edge security solution.
In summary, Malware Scanning in Defender for Azure Blob Storage presents an unprecedented level of security and protection for your cloud storage resources. Its real-time detection capabilities, automated processes, scalability, and commitment to data privacy make it an essential addition to any organization’s cybersecurity strategy. By leveraging this robust solution, you can confidently outperform potential threats, elevate your data protection standards, and establish a strong foothold in today’s dynamic digital landscape.